


本文来自 http://blog.csdn.net/hellogv/ ,引用必须注明出处!
SurfaceView由于可以直接从内存或者DMA等硬件接口取得图像数据,因此是个非常重要的绘图容器,这次 我就用两篇文章来介绍SurfaceView的用法。网上介绍SurfaceView的用法有很多,写法也层出不同,例如继承SurfaceView类, 或者继承SurfaceHolder.Callback类等,这个可以根据功能实际需要自己选择,我这里就直接在普通的用户界面调用 SurfaceHolder的lockCanvas和unlockCanvasAndPost。
先来看看程序运行的截图:
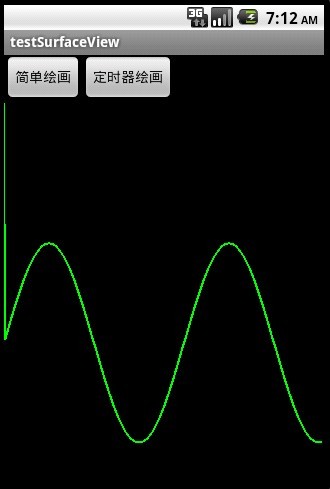
截图1主要演示了直接把正弦波绘画在SurfaceView上
对比上面的左右两图,右图用.lockCanvas(null),而左图用.lockCanvas(new Rect(oldX, 0, oldX + length,
getWindowManager().getDefaultDisplay().getHeight())), 对比一下两个效果,由于左图是按指定Rect绘画,所以效率会比右图的全控件绘画高些,并且在清屏之后 (canvas.drawColor(Color.BLACK))不会留有上次绘画的残留。
接下来贴出main.xml的源码:
- <? xml version = "1.0" encoding = "utf-8" ?>
- < LinearLayout xmlns:android = "http://schemas.android.com/apk/res/android"
- android:layout_width = "fill_parent" android:layout_height = "fill_parent"
- android:orientation = "vertical" >
- < LinearLayout android:id = "@+id/LinearLayout01"
- android:layout_width = "wrap_content" android:layout_height = "wrap_content" >
- < Button android:id = "@+id/Button01" android:layout_width = "wrap_content"
- android:layout_height = "wrap_content" android:text = "简单绘画" > </ Button >
- < Button android:id = "@+id/Button02" android:layout_width = "wrap_content"
- android:layout_height = "wrap_content" android:text = "定时器绘画" > </ Button >
- </ LinearLayout >
- < SurfaceView android:id = "@+id/SurfaceView01"
- android:layout_width = "fill_parent" android:layout_height = "fill_parent" > </ SurfaceView >
- </ LinearLayout >
接下来贴出程序源码:
- package com.testSurfaceView;
- import java.util.Timer;
- import java.util.TimerTask;
- import android.app.Activity;
- import android.graphics.Canvas;
- import android.graphics.Color;
- import android.graphics.Paint;
- import android.graphics.Rect;
- import android.os.Bundle;
- import android.util.Log;
- import android.view.SurfaceHolder;
- import android.view.SurfaceView;
- import android.view.View;
- import android.widget.Button;
- public class testSurfaceView extends Activity {
- /** Called when the activity is first created. */
- Button btnSimpleDraw, btnTimerDraw;
- SurfaceView sfv;
- SurfaceHolder sfh;
- private Timer mTimer;
- private MyTimerTask mTimerTask;
- int Y_axis[], //保存正弦波的Y轴上的点
- centerY,//中心线
- oldX,oldY,//上一个XY点
- currentX;//当前绘制到的X轴上的点
- @Override
- public void onCreate(Bundle savedInstanceState) {
- super .onCreate(savedInstanceState);
- setContentView(R.layout.main);
- btnSimpleDraw = (Button) this .findViewById(R.id.Button01);
- btnTimerDraw = (Button) this .findViewById(R.id.Button02);
- btnSimpleDraw.setOnClickListener(new ClickEvent());
- btnTimerDraw.setOnClickListener(new ClickEvent());
- sfv = (SurfaceView) this .findViewById(R.id.SurfaceView01);
- sfh = sfv.getHolder();
- //动态绘制正弦波的定时器
- mTimer = new Timer();
- mTimerTask = new MyTimerTask();
- // 初始化y轴数据
- centerY = (getWindowManager().getDefaultDisplay().getHeight() - sfv
- .getTop()) / 2 ;
- Y_axis = new int [getWindowManager().getDefaultDisplay().getWidth()];
- for ( int i = 1 ; i < Y_axis.length; i++) { // 计算正弦波
- Y_axis[i - 1 ] = centerY
- - (int ) ( 100 * Math.sin(i * 2 * Math.PI / 180 ));
- }
- }
- class ClickEvent implements View.OnClickListener {
- @Override
- public void onClick(View v) {
- if (v == btnSimpleDraw) {
- SimpleDraw(Y_axis.length-1 ); //直接绘制正弦波
- } else if (v == btnTimerDraw) {
- oldY = centerY;
- mTimer.schedule(mTimerTask, 0 , 5 ); //动态绘制正弦波
- }
- }
- }
- class MyTimerTask extends TimerTask {
- @Override
- public void run() {
- SimpleDraw(currentX);
- currentX++;//往前进
- if (currentX == Y_axis.length - 1 ) { //如果到了终点,则清屏重来
- ClearDraw();
- currentX = 0 ;
- oldY = centerY;
- }
- }
- }
- /*
- * 绘制指定区域
- */
- void SimpleDraw( int length) {
- if (length == 0 )
- oldX = 0 ;
- Canvas canvas = sfh.lockCanvas(new Rect(oldX, 0 , oldX + length,
- getWindowManager().getDefaultDisplay().getHeight()));// 关键:获取画布
- Log.i("Canvas:" ,
- String.valueOf(oldX) + "," + String.valueOf(oldX + length));
- Paint mPaint = new Paint();
- mPaint.setColor(Color.GREEN);// 画笔为绿色
- mPaint.setStrokeWidth(2 ); // 设置画笔粗细
- int y;
- for ( int i = oldX + 1 ; i < length; i++) { // 绘画正弦波
- y = Y_axis[i - 1 ];
- canvas.drawLine(oldX, oldY, i, y, mPaint);
- oldX = i;
- oldY = y;
- }
- sfh.unlockCanvasAndPost(canvas);// 解锁画布,提交画好的图像
- }
- void ClearDraw() {
- Canvas canvas = sfh.lockCanvas(null );
- canvas.drawColor(Color.BLACK);// 清除画布
- sfh.unlockCanvasAndPost(canvas);
- }
- }
注意一下 for (int i = oldX + 1; i < length; i++) {// 绘画正弦波 这句,在.lockCanvas()指定Rect内减少循环画线的次数,可以提高绘图效率。
上一篇 简 单介绍了SurfaceView的基本使用,这次就介绍SurfaceView与多线程的混搭。SurfaceView与多线程混搭,是为了防止动画闪烁 而实现的一种多线程应用。android的多线程用法与JAVA的多线程用法完全一样,本文不做多线程方面的介绍了。直接讲解SurfaceView与多 线程的混合使用,即开一条线程专门读取图片,另外一条线程专门绘图。
本文程序运行截图如下,左边是开单个线程读取并绘图,右边是开两个线程,一个专门读取图片,一个专门绘图:
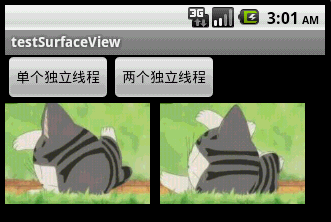
对 比一下,右边动画的帧速明显比左边的快,左右两者都没使用Thread.sleep()。为什么要开两个线程一个读一个画,而不去开两个线程像左边那样都 “边读边画”呢?因为SurfaceView每次绘图都会锁定Canvas,也就是说同一片区域这次没画完下次就不能画,因此要提高动画播放的效率,就得开一条线程专门画图,开另外一条线程做预处理的工作。
main.xml的源码:
- <? xml version = "1.0" encoding = "utf-8" ?>
- < LinearLayout xmlns:android = "http://schemas.android.com/apk/res/android"
- android:layout_width = "fill_parent" android:layout_height = "fill_parent"
- android:orientation = "vertical" >
- < LinearLayout android:id = "@+id/LinearLayout01"
- android:layout_width = "wrap_content" android:layout_height = "wrap_content" >
- < Button android:id = "@+id/Button01" android:layout_width = "wrap_content"
- android:layout_height = "wrap_content" android:text = "单个独立线程" > </ Button >
- < Button android:id = "@+id/Button02" android:layout_width = "wrap_content"
- android:layout_height = "wrap_content" android:text = "两个独立线程" > </ Button >
- </ LinearLayout >
- < SurfaceView android:id = "@+id/SurfaceView01"
- android:layout_width = "fill_parent" android:layout_height = "fill_parent" > </ SurfaceView >
- </ LinearLayout >
本文程序的源码:
- package com.testSurfaceView;
- import java.lang.reflect.Field;
- import java.util.ArrayList;
- import android.app.Activity;
- import android.graphics.Bitmap;
- import android.graphics.BitmapFactory;
- import android.graphics.Canvas;
- import android.graphics.Paint;
- import android.graphics.Rect;
- import android.os.Bundle;
- import android.util.Log;
- import android.view.SurfaceHolder;
- import android.view.SurfaceView;
- import android.view.View;
- import android.widget.Button;
- public class testSurfaceView extends Activity {
- /** Called when the activity is first created. */
- Button btnSingleThread, btnDoubleThread;
- SurfaceView sfv;
- SurfaceHolder sfh;
- ArrayList<Integer> imgList = new ArrayList<Integer>();
- int imgWidth, imgHeight;
- Bitmap bitmap;//独立线程读取,独立线程绘图
- @Override
- public void onCreate(Bundle savedInstanceState) {
- super .onCreate(savedInstanceState);
- setContentView(R.layout.main);
- btnSingleThread = (Button) this .findViewById(R.id.Button01);
- btnDoubleThread = (Button) this .findViewById(R.id.Button02);
- btnSingleThread.setOnClickListener(new ClickEvent());
- btnDoubleThread.setOnClickListener(new ClickEvent());
- sfv = (SurfaceView) this .findViewById(R.id.SurfaceView01);
- sfh = sfv.getHolder();
- sfh.addCallback(new MyCallBack()); // 自动运行surfaceCreated以及surfaceChanged
- }
- class ClickEvent implements View.OnClickListener {
- @Override
- public void onClick(View v) {
- if (v == btnSingleThread) {
- new Load_DrawImage( 0 , 0 ).start(); //开一条线程读取并绘图
- } else if (v == btnDoubleThread) {
- new LoadImage().start(); //开一条线程读取
- new DrawImage(imgWidth + 10 , 0 ).start(); //开一条线程绘图
- }
- }
- }
- class MyCallBack implements SurfaceHolder.Callback {
- @Override
- public void surfaceChanged(SurfaceHolder holder, int format, int width,
- int height) {
- Log.i("Surface:" , "Change" );
- }
- @Override
- public void surfaceCreated(SurfaceHolder holder) {
- Log.i("Surface:" , "Create" );
- // 用反射机制来获取资源中的图片ID和尺寸
- Field[] fields = R.drawable.class .getDeclaredFields();
- for (Field field : fields) {
- if (! "icon" .equals(field.getName())) // 除了icon之外的图片
- {
- int index = 0 ;
- try {
- index = field.getInt(R.drawable.class );
- } catch (IllegalArgumentException e) {
- // TODO Auto-generated catch block
- e.printStackTrace();
- } catch (IllegalAccessException e) {
- // TODO Auto-generated catch block
- e.printStackTrace();
- }
- // 保存图片ID
- imgList.add(index);
- }
- }
- // 取得图像大小
- Bitmap bmImg = BitmapFactory.decodeResource(getResources(),
- imgList.get(0 ));
- imgWidth = bmImg.getWidth();
- imgHeight = bmImg.getHeight();
- }
- @Override
- public void surfaceDestroyed(SurfaceHolder holder) {
- Log.i("Surface:" , "Destroy" );
- }
- }
- /*
- * 读取并显示图片的线程
- */
- class Load_DrawImage extends Thread {
- int x, y;
- int imgIndex = 0 ;
- public Load_DrawImage( int x, int y) {
- this .x = x;
- this .y = y;
- }
- public void run() {
- while ( true ) {
- Canvas c = sfh.lockCanvas(new Rect( this .x, this .y, this .x
- + imgWidth, this .y + imgHeight));
- Bitmap bmImg = BitmapFactory.decodeResource(getResources(),
- imgList.get(imgIndex));
- c.drawBitmap(bmImg, this .x, this .y, new Paint());
- imgIndex++;
- if (imgIndex == imgList.size())
- imgIndex = 0 ;
- sfh.unlockCanvasAndPost(c);// 更新屏幕显示内容
- }
- }
- };
- /*
- * 只负责绘图的线程
- */
- class DrawImage extends Thread {
- int x, y;
- public DrawImage( int x, int y) {
- this .x = x;
- this .y = y;
- }
- public void run() {
- while ( true ) {
- if (bitmap != null ) { //如果图像有效
- Canvas c = sfh.lockCanvas(new Rect( this .x, this .y, this .x
- + imgWidth, this .y + imgHeight));
- c.drawBitmap(bitmap, this .x, this .y, new Paint());
- sfh.unlockCanvasAndPost(c);// 更新屏幕显示内容
- }
- }
- }
- };
- /*
- * 只负责读取图片的线程
- */
- class LoadImage extends Thread {
- int imgIndex = 0 ;
- public void run() {
- while ( true ) {
- bitmap = BitmapFactory.decodeResource(getResources(),
- imgList.get(imgIndex));
- imgIndex++;
- if (imgIndex == imgList.size()) //如果到尽头则重新读取
- imgIndex = 0 ;
- }
- }
- };
- }
要创建一个新的SurfaceView,需要创建一个新的扩展了SurfaceView的类,并实现SurfaceHolder.Callback。
SurfaceHolder回调可以在底层的Surface被创建和销毁的时候通知View,并传递给它对SurfaceHolder对象的引用,其中包含了当前有效的Surface。
一个典型的Surface View设计模型包括一个由Thread所派生的类,它可以接收对当前的SurfaceHolder的引用,并独立地更新它。
下面的框架代码展示了使用Canvas所绘制的Surface View的实现。在Surface View控件中创建了一个新的由Thread派生的类,并且所有的UI更新都是在这个新类中处理的。
- import android.content.Context;
- import android.graphics.Canvas;
- import android.view.SurfaceHolder;
- import android.view.SurfaceView;
- public class MySurfaceView extends SurfaceView implements SurfaceHolder. Callback {
- private SurfaceHolder holder;
- private MySurfaceViewThread mySurfaceViewThread;
- private boolean hasSurface;
- MySurfaceView(Context context) {
- super(context);
- init();
- }
- private void init() {
- //创建一个新的SurfaceHolder, 并分配这个类作为它的回调(callback)
- holder = getHolder ();
- holder.addCallback(this);
- hasSurface = false ;
- }
- public void resume() {
- //创建和启动图像更新线程
- if ( mySurfaceViewThread == null) {
- mySurfaceViewThread = new MySurfaceViewThread();
- if ( hasSurface == true)
- mySurfaceViewThread.start();
- }
- }
- public void pause() {
- // 杀死图像更新线程
- if (mySurfaceViewThread != null) {
- mySurfaceViewThread.requestExitAndWait();
- mySurfaceViewThread = null ;
- }
- }
- public void surfaceCreated(SurfaceHolder holder) {
- hasSurface = true ;
- if (mySurfaceViewThread != null)
- mySurfaceViewThread.start();
- }
- public void surfaceDestroyed(SurfaceHolder holder) {
- hasSurface = false ;
- pause();
- }
- public void surfaceChanged(SurfaceHolder holder,int format,int w,int h) {
- if (mySurfaceViewThread != null)
- mySurfaceViewThread.onWindowResize(w, h);
- }
- class MySurfaceViewThread extends Thread {
- private boolean done;
- MySurfaceViewThread() {
- super();
- done = false ;
- }
- @Override
- public void run() {
- SurfaceHolder surfaceHolder = holder ;
- // 重复绘图循环,直到线程停止
- while (!done) {
- // 锁定surface,并返回到要绘图的Canvas
- Canvas canvas = surfaceHolder .lockCanvas();
- // 待实现:在Canvas上绘图
- // 解锁Canvas,并渲染当前图像
- surfaceHolder.unlockCanvasAndPost(canvas);
- }
- }
- public void requestExitAndWait() {
- // 把这个线程标记为完成,并合并到主程序线程
- done = true ;
- try {
- join();
- } catch (InterruptedException ex) { }
- }
- public void onWindowResize(int w, int h) {
- // 处理可用的屏幕尺寸的改变
- }
- }
- }


 2万+
2万+


 被折叠的 条评论
为什么被折叠?
被折叠的 条评论
为什么被折叠?
 到【灌水乐园】发言


