


 本文详细介绍了在Linux环境下如何检查、激活并使用蓝牙设备,包括通过命令行进行蓝牙设备的搜索、配置及文件传输等操作。
http://blog.csdn.net/luojianbing1/article/details/6776318
蓝牙测试
1.检查是否有蓝牙设备
在插入蓝牙到到USB口前后,用lsusb命令可以发现输出内容不一样。即插入蓝牙设备后lsusb输出多了一行。然后,运行hciconfig可以看到:
#hciconfig
hci0:
上面的信息说明检测到了蓝牙设备hci0。
2.激活蓝牙设备
#hciconfig hci0 up
可以激活借口(这一步不做,hcitool scan无法运行) 。这时候如果再次执行hciconfg命令,可以发现蓝牙以及激活(UP RUNNING):
hci0:
3.扫描设备
#hcitool scan
可以得到:
Scanning ...
4.修改配置文件:
修改/etc/bluetooth/rfcomm.conf
将里面的:device 11:22:33:44:55:66;
修改成hcitool scan的结果,也就是:
device 00:23:7A:F3:66:8D
保存退出。
rfcomm_create_dev。
5.创建蓝牙设备
运行:
#rfcomm_create_dev。
3,配置bluez
默认的配置文件放在/etc/bluetooth目录
hcid.conf和pin不需要修改,安全方式已经被设置成auto,这是为了方便连接,用户可以自己修改,推荐不做修改,以防止有些设备连接不上。
4,重启bluetooth服务。
7,创建设备:
#rfcomm
cat /dev/rfcomm0
8,添加通道:
#sdptool add --channel=1 DID SP DUN LAN FAX OPUSH FTP HS HF SAP NAP GN PANU HID CIP CTP A2SRC A2SNK SYNCML NOKID PCSUITE SR1
后面的参数不一定被支持,但是以防有些服务没有被打开,所以,干脆全部打开了。
rfcomm bind /dev/rfcomm0 电话的地址通道(在rfcomm.conf中配置)
这里的命令应该写成:
#rfcomm bind /dev/rfcomm0 00:23:7A:F3:66:8D 1
9,连接手机:
也就是
这时候,可以看到手机上的蓝牙连接呈联通状态。
10,从计算机发送文件:
操作系统会弹出提示框,让你选择要发送的目标。
同时可以看到手机会弹出提示框,询问是否接受文件。
11,手机的配置:
需要在手机上进行一下配置:
连接->蓝牙->匹配装置->添加装置。
会自动扫描到PC上的适配器。
如果需要填入识别码就填写123。上面已经设置了。
这时候,可以看到手机已经成功的添加蓝牙装置。
12,从手机发送文件。
在PC机上启动obex-server,会看到系统托盘出现一个小图标。
完成上面的工作后,可以进入手机的:
多媒体->我的影集
选择一张图片。
然后,“发送”->“通过蓝牙”
看到有刚才扫描到的蓝牙适配器。
然后,就可以发送文件了。
13,使用软件管理手机信息。
参考gnokii软件的文档
二、蓝牙耳机。
1,同时按住jabra 250上面的“电话键”和“音量增大键”,大约8秒,看到蓝灯常亮
2,扫描耳机,得到bdaddress
3,配置工作:
4,建立联接后,设备被映射成/dev/dsp1。
以beep为例,
插件->输出,选择使用alsa驱动,点开“首选项”,音频设置部分就可以看到btsco:hw0,1之类的信息,选择这个即可。
然后播放一首歌,尝试一下无线的快乐吧。
然后适当的配置你所要使用的播放器之类的就可以了
一、Bluez编译配置支持
在BoardConfig.mk中添加:
BOARD_HAVE_BLUETOOTH := true。
二、启动hciattach
修改init.rc来启动hciattach:
user bluetooth
group bluetooth net_bt_admin
disabled
同时也要启动dbus daemon,因为bluez需要dbus与其它进程通讯的。
applicaton层调用bluetoothdevice, 接着就是bluetoothservice的调用,
bluetoothservice调用native方法,到此全部的java程序结束了。
下面的调用都是JNI, cpp实现的。android_server_bluetoothservice.cpp里面实现了native
2. 启动service hciattch -n -s 115200 /dev/ttyS2 bcm2035 115200;
3. 检测HCI是否成功(接受HCIDEVUP socket来判断或hciconfig hci0 up);
4. hcid deamon start up。
首先,要操作蓝牙,先要在AndroidManifest.xml里加入权限<uses-permissionandroid:name="android.permission.BLUETOOTH_ADMIN" />
<uses-permissionandroid:name="android.permission.BLUETOOTH" />
然后,看下api,Android所有关于蓝牙开发的类都在android.bluetooth包下,如下图,只有8个类

而我们需要用到了就只有几个而已:
1.BluetoothAdapter 顾名思义,蓝牙适配器,直到我们建立bluetoothSocket连接之前,都要不断操作它
BluetoothAdapter里的方法很多,常用的有以下几个:
cancelDiscovery() 根据字面意思,是取消发现,也就是说当我们正在搜索设备的时候调用这个方法将不再继续搜索
disable()关闭蓝牙
enable()打开蓝牙,这个方法打开蓝牙不会弹出提示,更多的时候我们需要问下用户是否打开,一下这两行代码同样是打开蓝牙,不过会提示用户:
Intent enabler=new Intent(BluetoothAdapter.ACTION_REQUEST_ENABLE);
startActivityForResult(enabler,reCode);//同startActivity(enabler);
getAddress()获取本地蓝牙地址
getDefaultAdapter()获取默认BluetoothAdapter,实际上,也只有这一种方法获取BluetoothAdapter
getName()获取本地蓝牙名称
getRemoteDevice(String address)根据蓝牙地址获取远程蓝牙设备
getState()获取本地蓝牙适配器当前状态(感觉可能调试的时候更需要)
isDiscovering()判断当前是否正在查找设备,是返回true
isEnabled()判断蓝牙是否打开,已打开返回true,否则,返回false
listenUsingRfcommWithServiceRecord(String name,UUID uuid)根据名称,UUID创建并返回BluetoothServerSocket,这是创建BluetoothSocket服务器端的第一步
startDiscovery()开始搜索,这是搜索的第一步
2.BluetoothDevice看名字就知道,这个类描述了一个蓝牙设备
createRfcommSocketToServiceRecord(UUIDuuid)根据UUID创建并返回一个BluetoothSocket
这个方法也是我们获取BluetoothDevice的目的——创建BluetoothSocket
这个类其他的方法,如getAddress(),getName(),同BluetoothAdapter
3.BluetoothServerSocket如果去除了Bluetooth相信大家一定再熟悉不过了,既然是Socket,方法就应该都差不多,
这个类一种只有三个方法
两个重载的accept(),accept(int timeout)两者的区别在于后面的方法指定了过时时间,需要注意的是,执行这两个方法的时候,直到接收到了客户端的请求(或是过期之后),都会阻塞线程,应该放在新线程里运行!
还有一点需要注意的是,这两个方法都返回一个BluetoothSocket,最后的连接也是服务器端与客户端的两个BluetoothSocket的连接
close()这个就不用说了吧,翻译一下——关闭!
4.BluetoothSocket,跟BluetoothServerSocket相对,是客户端
一共5个方法,不出意外,都会用到
close(),关闭
connect()连接
getInptuStream()获取输入流
getOutputStream()获取输出流
getRemoteDevice()获取远程设备,这里指的是获取bluetoothSocket指定连接的那个远程蓝牙设备。
1、获取本地蓝牙适配器
BluetoothAdapter
mAdapter= BluetoothAdapter.getDefaultAdapter();
2、打开蓝牙
if(!mAdapter.isEnabled()){
//弹出对话框提示用户是后打开
Intent enabler = new Intent(BluetoothAdapter.ACTION_REQUEST_ENABLE);
startActivityForResult(enabler, REQUEST_ENABLE);
//不做提示,强行打开
// mAdapter.enable();
}
3、搜索设备
1)刚才说过了mAdapter.startDiscovery()
是第一步,可以你会发现没有返回的蓝牙设备,怎么知道查找到了呢?向下看,不要急
2)定义BroadcastReceiver,关于BroadcastReceiver不多讲了,不是今天的讨论内容,代码如下
BroadcastReceiver mReceiver = new BroadcastReceiver() {
public void onReceive(Context context, Intent intent) {
String action = intent.getAction();
//找到设备
if (BluetoothDevice.ACTION_FOUND.equals(action)) {
BluetoothDevice device = intent
.getParcelableExtra(BluetoothDevice.EXTRA_DEVICE);
if (device.getBondState() != BluetoothDevice.BOND_BONDED) {
Log.v(TAG, "find device:" + device.getName()
+ device.getAddress());
}
}
//搜索完成
else if (BluetoothAdapter.ACTION_DISCOVERY_FINISHED
.equals(action)) {
setTitle("搜索完成");
if (mNewDevicesAdapter.getCount() == 0) {
Log.v(TAG,"find over");
}
}
//执行更新列表的代码
}
};
这样,没当查找到新设备或是搜索完成,相应的操作都在上段代码的两个if里执行了,不过前提是你要先注册
BroadcastReceiver,具体代码如下
IntentFilter filter = new IntentFilter(BluetoothDevice.ACTION_FOUND);
registerReceiver(mReceiver, filter);
filter = new IntentFilter(BluetoothAdapter.ACTION_DISCOVERY_FINISHED);
registerReceiver(mReceiver, filter);
(这段代码,一般写在onCreate()里..)
3建立连接,首先Android sdk(2.0以上版本)支持的蓝牙连接是通过BluetoothSocket建立连接(说的不对请高人指正),服务器端(BluetoothServerSocket)和客户端(BluetoothSocket)需指定同样的UUID,才能建立连接,因为建立连接的方法会阻塞线程,所以服务器端和客户端都应启动新线程连接
1)服务器端:
//UUID格式一般是"xxxxxxxx-xxxx-xxxx-xxxx-xxxxxxxxxxxx"可到
//http://www.uuidgenerator.com 申请
BluetoothServerSocket serverSocket = mAdapter. listenUsingRfcommWithServiceRecord(serverSocketName,UUID);
serverSocket.accept();
2)客户端:
//还记得我们刚才在BroadcastReceiver获取了BLuetoothDevice么?
BluetoothSocket clienSocket=dcvice. createRfcommSocketToServiceRecord(UUID);
clienSocket.connect();
4、数据传递,通过以上操作,就已经建立的BluetoothSocket连接了,数据传递无非是通过流的形式
1)获取流
inputStream = socket.getInputStream();
outputStream = socket.getOutputStream();
2)写出、读入
略
android.bluetooth下有8个类,还有4个类没有用到,那4个类里定义的都是常量
Android SDK2.0版本才支持蓝牙Bluetooth接口的, SDK API接口支持蓝牙技术所有特征,而且和手机制造商无关,这给Android开发者带来了很大的方便,也使得Android更为完美了。
Android蓝牙API接口支持下面特征:
- 开启/关闭蓝牙;
- 开启/关闭设备;
- 发现蓝牙设备;
- 发现蓝牙设备;
- 传输数据;
Android SDK中对蓝牙的操作做了很高级的封转,类BluetoothAdapter就能完成蓝牙的基本操作,在开发中使用蓝牙变得很简单。下面介绍一个应用过程。
1、确保Android工程使用的是Android SDK2.0版本或者更高的。
2、在AndroidManifest.xml中增加使用蓝牙的权限:
<uses-permission android:name="android.permission.BLUETOOTH" />
3、开启蓝牙,代码如下:
import android.bluetooth.BluetoothAdapter;
...
public static void StartBluetooth(){
BluetoothAdapter btAdapter = BluetoothAdapter.getDefaultAdapter();
btAdapter.enable();
}
类BluetoothAdapter就是代表蓝牙设备,调用enable()方法即可启动设备中的蓝牙;
4、关闭蓝牙,代码也是相当简单:
public static void StopBluetooth(){
BluetoothAdapter btAdapter = BluetoothAdapter.getDefaultAdapter();
btAdapter.disable();
}
BluetoothAdapter的disable()方法即可关闭蓝牙;
5、判断蓝牙的状态:
public static boolean isBluetoothEnabled(){
BluetoothAdapter btAdapter = BluetoothAdapter.getDefaultAdapter();
return btAdapter.isEnabled();
}
要进行蓝牙通信需要完成下面四个步骤:
- 设置蓝牙;
- 发现已经配对或者可用的附近的蓝牙设备;
- 连接设备;
- 在不同设备之间传输数据;
本文主要介绍如何使用Bluetooth APIs来完成上述四个步骤。
所有可用的Bluetooth APIs都包含在android.bluetooth包里。下面是创建蓝牙连接的类的总览:
BluetoothAdapter
- 代表本地的蓝牙适配器( local Bluetooth adapter) (Bluetooth radio). BluetoothAdapter是所有蓝牙通信的入口点。使用BluetoothAdapter,你能够探测其他蓝牙设备,获得一个bonded(已配对)的设备列表,使用一个知名的(know)MAC地址实例化一个BluetoothDevice,并创建一个BluetoothServerSocket来监听其他设备的通信。
- 代表一个远程蓝牙设备,使用BluetoothSocket对另一个远程设备发出连接请求,或者查询该远程设备的名字、地址、类和连接状态。
- 代表一个蓝牙socket的接口(类似于TCP socket)。这是应用程序通过InputStream或者OutputStream与其他蓝牙设备交换数据的连接点。
- 表示一个开放的服务器socket,监听进入的连接请求(类似于TCP的ServerSocket)。为了连接两个Android设备,其中一个必须打开一个server socket。当一个远程蓝牙设备发出一个连接请求并被接受时,BluetoothServerSocket将返回一个已连接的BluetoothSocket。
- 描述了一个蓝牙设备的普通特性和能力,它提供了一系列描述一个设备的主要和次要设备类别和服务的只读属性。尽管这个类并不总是可靠地描述一个设备所有的蓝牙profile(配置)和所支持的服务,但它作为设备类型的一个提示是不错的
BluetoothDevice
BluetoothSocket
BluetoothServerSocket
BluetoothClass
为了在应用程序中使用蓝牙功能,我们至少需要声明两方面的权限:BLUETOOTH和BLUETOOTH_ADMIN。
你必须请求BLUETOOTH权限才能够实现蓝牙通信,例如请求一个连接、接受一个连接和传输数据。
你必须请求BLUETOOTH_ADMIN权限,才能够初始化device discovery或者管理蓝牙设置(Bluetooth settings)。大多数应用程序必须具有这个权限才能够发现本地蓝牙设备,这个权限保护的其他能力(除了发现本地设备)不应该被使用,除非你的应用程序是在用户请求的时候能够修改蓝牙设置的管理者。
注意:如果你想要使用BLUETOOTH_ADMIN权限,那么你首先必须有BLUETOOTH权限。
你需要在应用程序的manifest文件中声明程序的蓝牙权限。例如:
- <manifest ... >
- <uses-permission android:name="android.permission.BLUETOOTH" />
- ...
- </manifest>
- <manifest ... >
- <uses-permission android:name="android.permission.BLUETOOTH" />
- ...
- </manifest>
关于声明应用程序权限的信息,请看<uses-permission>参考。
- 获得BluetoothAdapter类
任何蓝牙activity都需要BluetoothAdapter类。使用静态方法getDefaultAdapter()获得一个BluetoothAdapter的实例,这代表了设备本身的蓝牙适配器(the Bluetooth radio)。整个系统只有一个蓝牙适配器,你的程序可以通过获取到BluetoothAdapter实例与之交互。如果getDefaultAdapter()方法返回null则说明你的设备不支持蓝牙。
- BluetoothAdapter mBluetoothAdapter = BluetoothAdapter.getDefaultAdapter();if (mBluetoothAdapter == null) { // Device does not support Bluetooth}
- BluetoothAdapter mBluetoothAdapter = BluetoothAdapter.getDefaultAdapter();if (mBluetoothAdapter == null) { // Device does not support Bluetooth}
- if (!mBluetoothAdapter.isEnabled()) { Intent enableBtIntent = new Intent(BluetoothAdapter.ACTION_REQUEST_ENABLE); startActivityForResult(enableBtIntent, REQUEST_ENABLE_BT);}
- if (!mBluetoothAdapter.isEnabled()) { Intent enableBtIntent = new Intent(BluetoothAdapter.ACTION_REQUEST_ENABLE); startActivityForResult(enableBtIntent, REQUEST_ENABLE_BT);}
- Set<BluetoothDevice> pairedDevices = mBluetoothAdapter.getBondedDevices();
- // If there are paired devices
- if (pairedDevices.size() > 0) {
- // Loop through paired devices
- for (BluetoothDevice device : pairedDevices) {
- // Add the name and address to an array adapter to show in a ListView
- mArrayAdapter.add(device.getName() + "/n" + device.getAddress()); }}
- // Create a BroadcastReceiver for ACTION_FOUND
- private final BroadcastReceiver mReceiver = new BroadcastReceiver() { public void onReceive(Context context, Intent intent)
- {
- String action = intent.getAction();
- // When discovery finds a device
- if (BluetoothDevice.ACTION_FOUND.equals(action)) {
- // Get the BluetoothDevice object from the Intent
- BluetoothDevice device = intent.getParcelableExtra( BluetoothDevice.EXTRA_DEVICE);
- // Add the name and address to an array adapter to show in a ListView mArrayAdapter.add(device.getName() + "/n" + device.getAddress());
- }
- }};
- // Register the BroadcastReceiverIntentFilter
- filter = new IntentFilter(BluetoothDevice.ACTION_FOUND);
- registerReceiver(mReceiver, filter);
- // Don't forget to unregister during onDestroy
- Intent discoverableIntent = newIntent(BluetoothAdapter.ACTION_REQUEST_DISCOVERABLE);
- discoverableIntent.putExtra(BluetoothAdapter.EXTRA_DISCOVERABLE_DURATION, 300);
- startActivity(discoverableIntent);
- Intent discoverableIntent = newIntent(BluetoothAdapter.ACTION_REQUEST_DISCOVERABLE);
- discoverableIntent.putExtra(BluetoothAdapter.EXTRA_DISCOVERABLE_DURATION, 300);
- startActivity(discoverableIntent);

在你的应用程序使用蓝牙进行通信之前,你需要确认你的设备支持蓝牙,如果支持,那么确认它已被启动。
如果你的设备不支持蓝牙,那么你应该关闭任何蓝牙特性。如果蓝牙被支持,那么你可以在你的程序中要求用户启动蓝牙。这需要两个步骤,并且要使用BluetoothAdapter这个类。
如果你的设备不支持蓝牙,那么要关闭任何蓝牙功能。如果支持蓝牙但没有启动,则你可以在程序中要求用户启动蓝牙。启动蓝牙需要两个步骤,并且需要BluetoothAdapter类。
示例代码如下:
2.启动蓝牙
接下来,你必须确保用户启动了蓝牙。调用isEnabled()方法来检查当前蓝牙是否启动。如果该方法返回false,那么说明蓝牙没有启动。这时需要使用“ACTION_REQUEST_ENABLE”action Intent作为参数,调用startActivityForResult()方法来请求启动蓝牙。这将通过系统设备来发出启动蓝牙的请求(不会停止你的程序)。例如:
执行如上的代码将会弹出一个对话框,请求启动蓝牙的用户权限,如Figure 1所示。如果用户点击“Yes”按钮,那么系统将开始启动蓝牙,启动蓝牙(有可能失败)之后你的程序将重新获得焦点。
如果启动蓝牙成功,你的Activity将在onActivityResult()回调函数中接收到一个RESULT_OK结果码。如果蓝牙启动失败或者用户不允许启动蓝牙,则会收到RESULT_CANCELED。
可选的,你的程序能够监听ACTION_STATE_CHANGED broadcast Intent,这个广播Intent是系统探测到蓝牙状态改变时发出的。这个广播Intent包含了EXTRA_STATE和EXTRA_PREVIOUS_STATE两个域,包含了蓝牙旧的和新的状态。这两个域的值可能是STATE_TURNING_ON,STATE_ON,STATE_TURNING_OFF和STATE_OFF。
Tip: Enabling discoverability will automatically enable Bluetooth. If you plan to consistently enable device discoverability before performing Bluetooth activity, you can skip step 2 above. Read about enabling discoverability, below.
使用BluetoothAdapter,你能够通过设备发现(device discovery)或者通过查询配对设备的列表来发现远程蓝牙设备。
设备发现(Device discovery)是搜查本地启动蓝牙的设备,然后请求该设备一些信息的一个扫描过程(有时,这被称为“discovering”,“inquiring”或者“scannig”)。但是,本地蓝牙设备只有在启动蓝牙的时候才会对发现请求作出响应。如果一个设备被发现,它将通过共享一些信息,如设备名称、类别和唯一的MAC地址,来对发现请求作出响应。使用这些信息,执行设备发现请求动作的设备就能够初始化一个连接,对被发现的设备发出连接请求。
如果一个远程设备第一次请求连接,那么接收到连接请求的设备会自动发送一个配对请求。如果一个设备已经被配对,那么关于该设备的基本信息(设备名称、类别和MAC地址)将会被保存,并且能用Bluetooth APIs读取。知道了一个远程设备的MAC地址之后,就可以使用该MAC地址在任何时间初始化一个连接,无需再执行device discovery(假设该设备在距离范围之内)。
在被配对和被连接之间是有区别的。被配对意味着两个设备彼此知道对方的存在,有一个连接key被用于认证,能够建立一条加密的连接。被连接意味着设备当前共享一个RFCOMM渠道并且能够传输数据给对方。Android Bluetooth APIs要求设备在建立RFCOMM连接之前要先配对。配对是在你使用Bluetooth APIs建立一个加密连接的时候自动执行的。
下面的章节将描述发现已经配对的设备,或者,使用device discovery发现新的设备。
Note: Android-powered devices are not discoverable by default. A user can make the device discoverable for a limited time through the system settings, or an application can request that the user enable discoverability without leaving the application. How to enable discoverability is discussed below.
查询配对设备
在执行device discovery之前,最好在已配对的设备列表中查看所要发现的设备是否已经存在。通过调用getBondedDevices()函数可以获得代表已经配对的设备的BluetoothDevice集合。 例如,你可以查询所有已经配对的设备,然后通过一个ArrayAdapter添加和显示每个设备的名字给用户:
为了建立一个连接,需要才能够BluetoothDevice对象中获取的是MAC地址。在这个例子中,MAC地址作为显示给用户的ArrayAdapter的一部分存储。只要有需要,可以把MAC地址提取出来。
发现设备
调用startDiscovery()开始设备发现的过程,这个过程是异步的,startDiscovery()方法会立即返回一个boolean的值表示启动是否成功。这个发现过程通常包括大约12秒的查询扫描,之后是在发现的设备中查询其蓝牙名称。
你的应用程序中必须注册一个ACTION_FOUND Intent的BroadcastReceiver,用于接收发现一个蓝牙设备时发出的信息。对于每一个设备,系统将广播ACTION_FOUND的Intent。这个Intent包含了一些附加数据域——EXTRA_DEVICE和EXTRA_CLASS,分别包含BluetoothDevice类和BluetoothClass类的实例。
下面代码展示了如何注册设备发现时的广播处理函数:
为了初始化一个连接,我们需要从BluetoothDevice对象中获取MAC地址。
注意: 执行设备发现这个过程,需要花费蓝牙适配器大量资源,是一个重量级过程。如果你发现一个设备并要连接它,最好先调用cancelDiscovery()方法来停止设备发现过程。如果你已经有一个连接,那么执行设备发现过程或导致连接的带宽大幅度减少,所以当你已经有连接的时候最好就不要执行设备发现过程了。
启动发现功能
如果你想要你的设备能被其他设备发现,调用startActivityForResult(Intent,int),传递一个ACTION_REQUEST_DISCOVERABLE action Intent给它。这将发送一个请求给系统设置以启动可被发现模式。可被发现模式一般默认持续120秒,你可以通过给Intent添加一个EXTRA_DISCOVERABLE_DURATION Intent extra来更改可被发现模式的持续时间,这个时间最大是300秒。
请看代码示例:
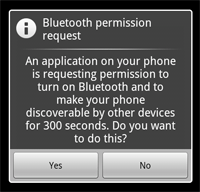
Figure 2: The enabling discoverability dialog.
一个对话框将会出现,请求用户权限来启动设备的可被发现模式,如Figure 2所示。如果用户点击“Yes”,那么设备在设定的时间内将是可被发现的。你的Activity将调用onActivityResult()回调函数。如果用户点击“No”,那么将产生一个错误,结果码将是Activity.RESULT_CANCELLED。
Note: If Bluetooth has not been enabled on the device, then enabling device discoverability will automatically enable Bluetooth.
The device will silently remain in discoverable mode for the allotted time. If you would like to be notified when the discoverable mode has changed, you can register a BroadcastReceiver for theACTION_SCAN_MODE_CHANGED Intent. This will contain the extra fields EXTRA_SCAN_MODE andEXTRA_PREVIOUS_SCAN_MODE, which tell you the new and old scan mode, respectively. Possible values for each are SCAN_MODE_CONNECTABLE_DISCOVERABLE, SCAN_MODE_CONNECTABLE, or SCAN_MODE_NONE, which indicate that the device is either in discoverable mode, not in discoverable mode but still able to receive connections, or not in discoverable mode and unable to receive connections, respectively.
You do not need to enable device discoverability if you will be initiating the connection to a remote device. Enabling discoverability is only necessary when you want your application to host a server socket that will accept incoming connections, because the remote devices must be able to discover the device before it can initiate the connection.
为了在两台设备上创建一个连接,你必须在软件上实现服务器端和客户端的机制,因为一个设备必须必须打开一个server socket,而另一个必须初始化这个连接(使用服务器端设备的MAC地址进行初始化)。
当服务器端和客户端在同一个RFCOMM信道上都有一个BluetoothSocket时,就可以认为它们之间建立了一个连接。在这个时刻,每个设备能获得一个输出流和一个输入流,也能够开始数据传输。本节介绍如何在两个设备之间初始化一个连接。
服务器端和客户端获得BluetoothSocket的方法是不同的,服务器端是当一个进入的连接被接受时才产生一个BluetoothSocket,客户端是在打开一个到服务器端的RFCOMM信道时获得BluetoothSocket的。

一种实现技术是,每一个设备都自动作为一个服务器,所以每个设备都有一个server socket并监听连接。然后每个设备都能作为客户端建立一个到另一台设备的连接。另外一种代替方法是,一个设备按需打开一个server socket,另外一个设备仅初始化一个到这个设备的连接。
Note: 如果两个设备在建立连接之前并没有配对,那么在建立连接的过程中,Android框架将自动显示一个配对请求的notification或者一个对话框,如Figure 3所示。所以,在尝试连接设备时,你的应用程序无需确保设备之间已经进行了配对。你的RFCOMM连接将会在用户确认配对之后继续进行,或者用户拒绝或者超时之后失败。
作为一个服务器进行连接
当你想要连接两个设备时,其中一个必须保持一个打开的BluetoothServerSocket,作为服务器。服务器socket将监听进入的连接请求,一旦连接被接受,将产生一个BluetoothSocket。
- 调用
listenUsingRfcommWithServiceRecord(String, UUID)获得一个BluetoothServerSocket。字符串参数是你的服务的标识名,系统将自动将这个标识名写到设备上一个新的Service Discovery Protocol(SDP)数据库条目中(这个标识名可以简单地作为你的程序的名字,也就是说可以把你的程序的名字作为命名)。UUID也会被包含在这个新的SDP条目中,并作为与客户端设备建立连接的基础。 That is, when the client attempts to connect with this device, it will carry a UUID that uniquely identifies the service with which it wants to connect. These UUIDs must match in order for the connection to be accepted (in the next step).
- 调用
accept()开始监听连接请求这是一个阻塞调用。当一个连接被接受或者发生异常时将返回。一个连接,仅当一个远程设备发出的请求包含UUID匹配正在监听的server socket所注册的UUID时被接受。成功的时候,accept()将返回一个连接的BluetoothSocket。
- 除非你要接受另外一个连接,否则调用close,关闭server socket。
这将释放server socket和它占用的所有资源,但不要用来关闭accept返回的已连接的BluetoothSocket。不像TCP/IP,RFCOMM仅允许一个信道在某一时刻有一个连接的客户端。所以,创建了一个连接的socket之后立即调用close()来关闭BluetoothServerSocket。
accept()方法不应该在主Activity UI线程中执行,因为它是一个阻塞调用,如果在主Activity UI线程中条也能够将会阻止与用户的交互。一般使用BluetoothServerSocket或者BluetoothSocket进行相关工作时都是在一个新的线程中。为了避免调用诸如accept()这样的阻塞调用,针对来自其他线程的BluetoothServerSocket或者BluetoothSocket调用close()将会使阻塞调用立即返回。注意,针对BluetoothServerSocket或者BluetoothSocket调用的方法都是线程安全的,也就是说可以在多个线程中使用。
示例
- private class AcceptThread extends Thread {
- private final BluetoothServerSocket mmServerSocket;
- public AcceptThread() {
- // Use a temporary object that is later assigned to mmServerSocket,
- // because mmServerSocket is final
- BluetoothServerSocket tmp = null;
- try {
- // MY_UUID is the app's UUID string, also used by the client code
- tmp = mAdapter.listenUsingRfcommWithServiceRecord(NAME, MY_UUID);
- } catch (IOException e) { }
- mmServerSocket = tmp;
- }
- public void run() {
- BluetoothSocket socket = null;
- // Keep listening until exception occurs or a socket is returned
- while (true) {
- try {
- socket = mmServerSocket.accept();
- } catch (IOException e) {
- break;
- }
- // If a connection was accepted
- if (socket != null) {
- // Do work to manage the connection (in a separate thread)
- manageConnectedSocket(socket);
- mmServerSocket.close();
- break;
- }
- }
- }
- /** Will cancel the listening socket, and cause the thread to finish */
- public void cancel() {
- try {
- mmServerSocket.close();
- } catch (IOException e) { }
- }
- }
manageConnectedSocket() 这个方法能初始化用于传输数据的线程。
感觉这些英语基本上都能看懂,就不翻译了...
Connecting as a client
In order to initiate a connection with a remote device (a device holding an open server socket), you must first obtain a BluetoothDevice object that represents the remote device. (Getting a BluetoothDevice is covered in the above section about Finding Devices.) You must then use the BluetoothDevice to acquire aBluetoothSocket and initiate the connection.
Here's the basic procedure:
- Using the
BluetoothDevice, get aBluetoothSocketby callingcreateRfcommSocketToServiceRecord(UUID).This initializes a
BluetoothSocketthat will connect to theBluetoothDevice. The UUID passed here must match the UUID used by the server device when it opened itsBluetoothServerSocket(withlistenUsingRfcommWithServiceRecord(String, UUID)). Using the same UUID is simply a matter of hard-coding the UUID string into your application and then referencing it from both the server and client code. - Initiate the connection by calling
connect().Upon this call, the system will perform an SDP lookup on the remote device in order to match the UUID. If the lookup is successful and the remote device accepts the connection, it will share the RFCOMM channel to use during the connection and
connect()will return. This method is a blocking call. If, for any reason, the connection fails or theconnect()method times out (after about 12 seconds), then it will throw an exception.Because
connect()is a blocking call, this connection procedure should always be performed in a thread separate from the main Activity thread.Note: You should always ensure that the device is not performing device discovery when you call
connect(). If discovery is in progress, then the connection attempt will be significantly slowed and is more likely to fail.
Example
Here is a basic example of a thread that initiates a Bluetooth connection:
private class ConnectThread extends Thread {
    private final BluetoothSocket mmSocket;
    private final BluetoothDevice mmDevice;

    public ConnectThread(BluetoothDevice device) {
        // Use a temporary object that is later assigned to mmSocket,
        // because mmSocket is final
        BluetoothSocket tmp = null;
        mmDevice = device;

        // Get a BluetoothSocket to connect with the given BluetoothDevice
        try {
            // MY_UUID is the app's UUID string, also used by the server code
            tmp = device.createRfcommSocketToServiceRecord(MY_UUID);
        } catch (IOException e) { }
        mmSocket = tmp;
    }

    public void run() {
        // Cancel discovery because it will slow down the connection
        mAdapter.cancelDiscovery();

        try {
            // Connect the device through the socket. This will block
            // until it succeeds or throws an exception
            mmSocket.connect();
        } catch (IOException connectException) {
            // Unable to connect; close the socket and get out
            try {
                mmSocket.close();
            } catch (IOException closeException) { }
            return;
        }

        // Do work to manage the connection (in a separate thread)
        manageConnectedSocket(mmSocket);
    }

    /** Will cancel an in-progress connection, and close the socket */
    public void cancel() {
        try {
            mmSocket.close();
        } catch (IOException e) { }
    }
}
Notice that cancelDiscovery() is called before the connection is made. You should always do this before connecting and it is safe to call without actually checking whether it is running or not (but if you do want to check, call isDiscovering()).
manageConnectedSocket() is a fictional method in the application that will initiate the thread for transferring data, which is discussed in the section about Managing a Connection.
When you're done with your BluetoothSocket, always call close() to clean up. Doing so will immediately close the connected socket and clean up all internal resources.
当你成功地连接了两台(或多台)设备时,每个设备都有一个已连接的BluetoothSocket。这时你可以在设备之间共享数据,乐趣才刚开始。 使用BluetoothSocket,传输二进制数据的过程是简单的:
- 分别通过getInputStream()和getOutputStream()获得管理数据传输的InputStream和OutputStream。
- 通过read(byte[])和write(byte[])从流中读取或写入数据。
首先,你必须使用一个线程专门用于数据的读或写。这是非常重要的,因为read(byte[])和write(byte[])方法都是阻塞调用。read(byte[])将会阻塞到流中有数据可读。write(byte[])一般不会阻塞,但当远程设备的中间缓冲区已满而对方没有及时地调用read(byte[])时将会一直阻塞。所以,你的线程中的主循环将一直用于从InputStream中读取数据。 A separate public method in the thread can be used to initiate writes to the OutputStream.
Example
- private class ConnectedThread extends Thread {
- private final BluetoothSocket mmSocket;
- private final InputStream mmInStream;
- private final OutputStream mmOutStream;
- public ConnectedThread(BluetoothSocket socket) {
- mmSocket = socket;
- InputStream tmpIn = null;
- OutputStream tmpOut = null;
- // Get the input and output streams, using temp objects because
- // member streams are final
- try {
- tmpIn = socket.getInputStream();
- tmpOut = socket.getOutputStream();
- } catch (IOException e) { }
- mmInStream = tmpIn;
- mmOutStream = tmpOut;
- }
- public void run() {
- byte[] buffer = new byte[1024]; // buffer store for the stream
- int bytes; // bytes returned from read()
- // Keep listening to the InputStream until an exception occurs
- while (true) {
- try {
- // Read from the InputStream
- bytes = mmInStream.read(buffer);
- // Send the obtained bytes to the UI Activity
- mHandler.obtainMessage(MESSAGE_READ, bytes, -1, buffer).sendToTarget();
- } catch (IOException e) {
- break;
- }
- }
- }
- /* Call this from the main Activity to send data to the remote device */
- public void write(byte[] bytes) {
- try {
- mmOutStream.write(bytes);
- } catch (IOException e) { }
- }
- /* Call this from the main Activity to shutdown the connection */
- public void cancel() {
- try {
- mmSocket.close();
- } catch (IOException e) { }
- }}
BT Turn on Turn off
蓝牙的打开关闭由类BluetoothEnabler控制。触发点击使调用LocalBluetoothManager.setBluetoothEnabled(enable)。再调用到BluetoothAdapter的enable() 。蓝牙的打开关闭属于异步操作,操作成功后会有一个异步事件ACTION_STATE_CHANGED返回,异步事件由类BluetoothEventRedirector控制。
在收到ACTION_STATE_CHANGED次异步事件后,还需要做update本地设备profile的事情,以及读取上次关闭前搜索到的蓝牙设备。具体参考代码
涉及到的类:LocalBluetoothManager(本机蓝牙设备管理,开启关闭,搜索等等)
BluetoothEnabler(界面的点击和状态文字的显示)
BluetoothAdapter(framework封装的类,提供本地蓝牙设备的配置,包括开启蓝牙,搜索周围蓝牙设备,设置本地蓝牙可见性)
Discoverable
蓝牙的discoverable mode由类BluetoothDiscoverableEnabler控制。触发点击使调用setEnabled(true)。再调用到BluetoothAdapter的setScanMode () 方法。具体参考代码
蓝牙模式有两种模式SCAN_MODE_CONNECTABLE_DISCOVERABLE(可连接可发现)和SCAN_MODE_CONNECTABLE(可连接但不可发现)
LocalBluetoothManager(本机蓝牙设备管理,开启关闭,搜索等等)
BluetoothDiscoverableEnabler (界面的点击和状态文字的显示)
BluetoothAdapter(framework封装的类,提供本地蓝牙设备的配置,包括开启蓝牙,搜索周围蓝牙设备,设置本地蓝牙可见性)
蓝牙本地名称设置由类BluetoothNamePreference控制。会调用到BluetoothAdapter的setName () 。
涉及到的类:
BluetoothNamePreference (界面的点击和状态文字的显示)
BluetoothAdapter(framework封装的类,提供本地蓝牙设备的配置,包括开启蓝牙,搜索周围蓝牙设备,设置本地蓝牙可见性)
Scan BT Device
蓝牙的搜索由类BluetoothFindNearby控制。触发点击使调用LocalBluetoothManager. startScanning(true)。
startDiscovery()是个异步函数,会立即返回,通过注册ACTION_DISCOVERY_STARTED、ACTION_DISCOVERY_FINISHED、ACTION_FOUND,来确定当前的状态。当收到ACTION_FOUND这个异步事件后,就可以确认搜索到的蓝牙设备的rssi, btClass, name。然后再把这些设备用CachedBluetoothDeviceManager这个类管理。
Connection & Pair
在setting界面点击连接,会调到CachedBluetoothDevice(搜索到的设备)类的connect方法,在connectInt里,根据不同的profile来获得profilemanger,然后调用 profilemanger.connect()函数。此处的链接会涉及到的profile有A2DP AVRCP DUN HSP HFP 等。
同理如果配对或者解除配对,也会调到CachedBluetoothDevice类的pair()方法和unpair()。
说明: CachedBluetoothDevice 描述的搜索到的设备
首先,要操作蓝牙,先要在AndroidManifest.xml里加入权限<uses- permissionandroid:name="android.permission.BLUETOOTH_ADMIN" /><uses-permissionandroid:name="android.permission.BLUETOOTH" />
然后,看下api,Android所有关于蓝牙开发的类都在android.bluetooth包下,,只有8个类
而我们需要用到了就只有几个而已:
1.BluetoothAdapter 顾名思义,蓝牙适配器,直到我们建立bluetoothSocket连接之前,都要不断操作它 BluetoothAdapter里的方法很多,常用的有以下几个: cancelDiscovery() 根据字面意思,是取消发现,也就是说当我们正在搜索设备的时候调用这个方法将不再继续搜索 disable()关闭蓝牙 enable()打开蓝牙,这个方法打开蓝牙不会弹出提示,更多的时候我们需要问下用户是否打开,一下这两行代码同样是打开蓝牙,不过会提示用户:Intemtenabler=newIntent(BluetoothAdapter.ACTION_REQUEST_ENABLE); startActivityForResult(enabler,reCode);//同 startActivity(enabler); getAddress()获取本地蓝牙地址 getDefaultAdapter()获取默认BluetoothAdapter,实际上,也只有这一种方法获取 BluetoothAdapter getName()获取本地蓝牙名称 getRemoteDevice(String address)根据蓝牙地址获取远程蓝牙设备 getState()获取本地蓝牙适配器当前状态(感觉可能调试的时候更需要) isDiscovering()判断当前是否正在查找设备,是返回 true isEnabled()判断蓝牙是否打开,已打开返回true,否则,返回 false listenUsingRfcommWithServiceRecord(String name,UUID uuid)根据名称,UUID创建并返回BluetoothServerSocket,这是创建BluetoothSocket服务器端的第一步 startDiscovery()开始搜索,这是搜索的第一步 2.BluetoothDevice看名字就知道,这个类描述了一个蓝牙设备 createRfcommSocketToServiceRecord(UUIDuuid)根据UUID创建并返回一个BluetoothSocket
这个方法也是我们获取BluetoothDevice的目的——创建BluetoothSocket
这个类其他的方法,如getAddress(),getName(),同 BluetoothAdapter 3.BluetoothServerSocket如果去除了Bluetooth相信大家一定再熟悉不过了,既然是Socket,方法就应该都差不多,
这个类一种只有三个方法
两个重载的accept(),accept(inttimeout)两者的区别在于后面的方法指定了过时时间,需要注意的是,执行这两个方法的时候,直到接收到了客户端的请求(或是过期之后),都会阻塞线程,应该放在新线程里运行!
还有一点需要注意的是,这两个方法都返回一个BluetoothSocket,最后的连接也是服务器端与客户端的两个BluetoothSocket的连接
close()这个就不用说了吧,翻译一下——关闭!
4.BluetoothSocket,跟BluetoothServerSocket相对,是客户端
一共5个方法,不出意外,都会用到
close(),关闭
connect()连接
getInptuStream()获取输入流
getOutputStream()获取输出流
getRemoteDevice()获取远程设备,这里指的是获取
bluetoothSocket指定连接的那个远程蓝牙设备
1、获取本地蓝牙适配器
BluetoothAdapter
mAdapter= BluetoothAdapter.getDefaultAdapter();
2、打开蓝牙
if(!mAdapter.isEnabled()){
//弹出对话框提示用户是后打开
Intent enabler = new Intent(BluetoothAdapter.ACTION_REQUEST_ENABLE);
startActivityForResult(enabler, REQUEST_ENABLE);
//不做提示,强行打开
// mAdapter.enable();
}
3、搜索设备
1)刚才说过了mAdapter.startDiscovery()
是第一步,可以你会发现没有返回的蓝牙设备,怎么知道查找到了呢?向下看,不要急
2)定义BroadcastReceiver,关于BroadcastReceiver不多讲了,不是今天的讨论内容,代码如下
BroadcastReceiver mReceiver = new BroadcastReceiver() {
public void onReceive(Context context, Intent intent) {
String action = intent.getAction();
//找到设备
if (BluetoothDevice.ACTION_FOUND.equals(action)) {
BluetoothDevice device = intent
.getParcelableExtra(BluetoothDevice.EXTRA_DEVICE);
if (device.getBondState() != BluetoothDevice.BOND_BONDED) {
Log.v(TAG, "find device:" + device.getName()
+ device.getAddress());
}
}
//搜索完成
else if (BluetoothAdapter.ACTION_DISCOVERY_FINISHED
.equals(action)) {
setTitle("搜索完成");
if (mNewDevicesAdapter.getCount() == 0) {
Log.v(TAG,"find over");
}
}
//执行更新列表的代码
}
};
这样,没当查找到新设备或是搜索完成,相应的操作都在上段代码的两个if里执行了,不过前提是你要先注册
BroadcastReceiver,具体代码如下
IntentFilter filter = new IntentFilter(BluetoothDevice.ACTION_FOUND);
registerReceiver(mReceiver, filter);
filter = new IntentFilter(BluetoothAdapter.ACTION_DISCOVERY_FINISHED);
registerReceiver(mReceiver, filter);
(这段代码,一般写在onCreate()里..)
3建立连接,首先Android sdk(2.0以上版本)支持的蓝牙连接是通过 BluetoothSocket建立连接(说的不对请高人指正),服务器端(BluetoothServerSocket)和客户端(BluetoothSocket)需指定同样的UUID,才能建立连接,因为建立连接的方法会阻塞线程,所以服务器端和客户端都应启动新线程连接
1)服务器端:
//UUID格式一般是"xxxxxxxx-xxxx-xxxx-xxxx-xxxxxxxxxxxx"可到
//http://www.uuidgenerator.com 申请
BluetoothServerSocket serverSocket = mAdapter. listenUsingRfcommWithServiceRecord(serverSocketName,UUID);
serverSocket.accept();
2)客户端:
//还记得我们刚才在BroadcastReceiver获取了BLuetoothDevice么?
BluetoothSocket clienSocket=dcvice. createRfcommSocketToServiceRecord(UUID);
clienSocket.connect();
4、数据传递,通过以上操作,就已经建立的BluetoothSocket连接了,数据传递无非是通过流的形式
1)获取流
inputStream = socket.getInputStream();
outputStream = socket.getOutputStream();
2)写出、读入
这是基础的东西,在这就不多赘述了
终于写完了,这是我这两天的学习经验,希望对有蓝牙需求的朋友有所帮助!另外,之前我们提过
android.bluetooth下有8个类,还有4个类没有用到,那4个类里定义的都是常量,我也没用到它们.
BluetoothService里定义的Native方法都在android_server_BluetoothServer.cpp里建立jni调用
开启
由BluetoothEnabler控制,在构造里会先调用 LocalBluetoothManager.getInstance(context),在getInstance里会调用init()函数,BluetoothAdapter.getDefaultAdapter()获得蓝牙设备的句柄,如果当前没有蓝牙设备则返回null。
初始化完毕会监听checkbox的状态,当点击checkbox会调用 LocalBluetoothManager.setBluetoothEnabled(enable)函数。调用mAdapter.enable()到 BluetoothService.enable()开启EnableThread线程,进行打开操作,同时调到 CachedBluetoothDeviceManager.onBluetoothStateChanged来读取上次关闭之前搜索到device.
涉及到的类:
BluetoothService(最主要的类,开启具体命令的线程进行enadble,disable等操作)
LocalBluetoothManager(初始化BluetoothAdapter)
BluetoothEnabler(界面的点击和状态文字的显示)
BluetoothAdapter(建立LocalBluetoothManager和BluetoothService的映射关系,主要是通过它调用BluetoothService的函数)
扫描
在BluetoothSetting里触发点击,调用LocalBluetoothManager.startScanning(true)函数,通过BluetoothAdapter的startDiscovery调用到BluetoothService里的startDiscovery来调用Native函数 startDiscoveryNative()。
startDiscovery()是个异步函数,会立即返回,通过注册 ACTION_DISCOVERY_STARTED、ACTION_DISCOVERY_FINISHED、ACTION_FOUND,来确定当前的状态。
当蓝牙由disable变成enable时会调用扫描,当距离上次扫描超过5分钟的前提下,退出页面,再进到页面的时候也会启动扫描。
在启动scan的时候,还会判断当前是否在播放音乐,如果在播放音乐,则不启动扫描。
点击查找设备后,会把设备列表里没有配对的设备清除掉,保留配对状态的设备。
扫描的过程是一个很耗费资源的过程,在扫描过程,不会去尝试进行新的连接,扫描时间默认是12秒,它是以一个系统服务的形式存在的,可以调用cancelDiscovery()来取消扫描。
连接
在setting界面点击连接,会调到CachedBluetoothDevice类的connect方法,调用 updateProfiles(),根据搜索到的device的uuid来向ProfilesList里添加profile,然后遍历 ProfileList,根据不同的profile来获得profileManager。
然后判断当前的device的Priority,如果Priority=100,则去调用queueCommand(new BluetoothJob(BluetoothCommand.CONNECT, this, profile)),去发送连接的命令。如果Priority=1,则不去自动连接。Priority=-1,代表当前的device没有配对。
在queueCommand()函数里,有一个消息队列来处理命令,在这里生成了一个BluetoothJob的实例,来代表要执行的命令。
最终调到processCommand(BluetoothJob job)函数,由它来通过job.command来调用CONNECT: DISCONNECT:REMOVE_BOND:
以A2DP为例,在connectInt里,根据不同的profile来获得profilemanger,然后调用 profilemanger.connect()函数,在这个函数里调用了BluetoothA2dpService的connectSink()函数,最后调到Native方法connectSinkNative()去建立连接。
涉及到的一些类:
CachedBluetoothDevice(搜索到的设备)
BluetoothDevice(设备类)
LocalBluetoothProfileManager(各种ProfileManger,实例化各种Profile的service)
SettingsBtStatus(蓝牙的状态类)
BluetoothA2dp(为LocalBluetoothProfileManager和BluetoothA2dpService建立映射关系)
BluetoothA2dpService(最终的服务类,由它调用连接、断开等Native函数,和底层通信)


 2391
2391

 被折叠的 条评论
为什么被折叠?
被折叠的 条评论
为什么被折叠?
 到【灌水乐园】发言


