


原文教程:tensorflow官方教程
记录关键内容与学习感受。未完待续。。
TensorFlow Linear Model Tutorial
——在本教程中,我们将使用tensorflow中tf.learnAPI来解决一个二元分类的问题:对于给定的人口普查数据,例如一个人的年龄、性别、教育、职业(特征),我们要试图预测出一个人一年是否能赚超过50000美元(目标标签),我们将训练一个逻辑回归模型,并且给模型一个人的信息后,模型将输出数字0或1,这可以理解为一个人年薪超过50000美元的可能性。
1、安装
——运行本教程的代码:
- 安装tensorflow
- 下载教程代码
安装pandas数据分析库,tf.learn不需要pandas,但支持它,本教程使用pandas。安装pandas:
– get pip# ubuntu/linux 64-bit $ sudo apt-get install python-pip python-dev # mac ox x $ sudo easy_install pip $ sudo easy_install --upgrade six–使用pip安装pandas
$ sudo pip install pandas- 如果你安装pandas有问题,请查看指导。
- 用下面命令行执行代码训练教程中描述的线性模型。
$ python wide_n_deep_tutorial.py --model_type=wide- 阅读并发现这份代码如何建立线性模型的。
——实际安装pandas时,用pip一直有问题,于是选择直接安装,命令如下:
$ sudo apt-get install python-pandas——安装结果截图:
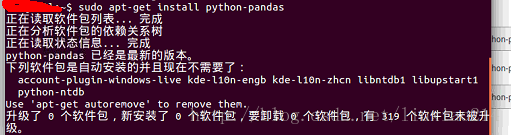
——此处不建议用apt-get安装,因为这很容易安装为旧版本,导致后面用到pandas.read_csv时出现段错误,所以最好还是用pip安装。
——实际运行结果截图:


2、读取人口普查数据
——我们使用的数据集是Census Income Dataset。你可以手动下载训练数据和测试数据,或者使用下面的代码:
import tempfile
import urllib
train_file = tempfile.NamedTemporaryFile()
test_file = tempfile.NamedTemporaryFile()
urllib.urlretrieve("https://archive.ics.uci.edu/ml/machine-learning-databases/adult/adult.data", train_file.name)
urllib.urlretrieve("https://archive.ics.uci.deu/ml/machine-learning-databases/adult/adult.test", test_file.name)——一旦CSV文件下载后,将它们读入pandas数据框架中。
import pandas as pd
COLUMNS = [
    "age", "workclass", "fnlwgt", "education",
    "education_num", "marital_status", "occupation",
    "relationship", "race", "gender", "capital_gain","capital_loss"
    "hours_per_week", "native_country", "income_bracket"
]
df_train = pd.read_csv(train_file,names=COLUMNS, skipinitialspace=True)
df_test = pd.read_csv(test_file, names=COLUMNS, skipinitialspace=True, skiprows=1)
——因为目标是二元分类,我们创建一个名为label的标签列,其中的值如果年薪超过50k,就是1,否则为0。
——现在看一下数据框架中,哪个列我们可以使用来预测目标标签。这个列可以被分组为两种类型—-类别列和连序列。
- 如果一个列称为类别列,它的值在一个有限集中只能是其中一个种类。例如,一个人的国籍(例如印度、日本等)和受教育水平(高中、大学等)都是类别列。
- 如果一个列称为连续列,它的值在一个连续范围中,可以是任意一个数字,一个人的资本收益(例如14084美元)是一个连序列。
CATEGORICAL_COLUMNS = [
    "workclass", "education", "marital_status",
    "occupation", "relationship", "race",
    "gender", "native_country"
]
CONTINUOUS_COLUMNS = [
    "age", "education_num", "capital_gain",
    "capital_los", "hours_per_week"
]
——这里是在人口普查收入数据集中可使用的列。
| Column Name | Type | Description |
|---|---|---|
| age | Continuous | 一个人的年龄 |
| workclass | Categorical | 个人所属企业类型(政府, 军事, 私营, 等) |
| fnlwgt | Continuous | The number of people the census takers believe that observation represents (sample weight). This variable will not be used. |
| education | Categorical | 个人最高教育水平. |
| education_num | Continuous | 数字形式的最高教育水平. |
| marital_status | Categorical | 个人的婚姻状态. |
| occupation | Categorical | 个人职业. |
| relationship | Categorical | 家庭关系:Wife, Own-child, Husband, Not-in-family, Other-relative, Unmarried. |
| race | Categorical | 种族:White, Asian-Pac-Islander, Amer-Indian-Eskimo, Other, Black. |
| gender | Categorical | 性别:Female, Male. |
| capital_gain | Continuous | Capital gains recorded. |
| capital_loss | Continuous | Capital Losses recorded. |
| hours_per_week | Continuous | Hours worked per week. |
| native_country | Categorical | Country of origin of the individual. |
| income | Categorical | “>50K” or “<=50K”, meaning whether the person makes more than $50,000 annually. |
3、将数据转换为tensors
——当建立一个TF.Learn模型时,输入数据用输入建立函数来指定。这个建立函数不会调用直到后面传给tf.learn方法,如fit和evaluate。这个函数的目的是构建输入数据,用Tensors或者SparseTensors的形式表示。更多细节,输入建立函数将返回如下信息对:
- feature_cols:一个从特征列名字到Tensors或者SparseTensors的字典。
- label:一个Tensors包含的标签列。
——feature_cols中的键将会被用来在下一节中构建列。因为我们想用不同的数据调用fit和evaluate方法,我们定义了两个不同的输入建立函数,train_input_fn和test_input_fn,除了他们将不同的数据送入到input_fn函数中,其他都是相同的。要注意,input_fn函数是在构建tensorflow graph中被调用,而不是运行graph的时候。返回的是一个Tensors,它将输入数据表示为tensorflow计算的基本单元。
——我们的模型将输入数据表示为一个不变的tensor,这意味着tensor表示一个常量,在这种情况下,这个值为df_train或者df_test中特定的列。这是最简单的方法将数据传到tensorflow中。另一种更先进的来表示输入数据的方法是,构建Input Reader,它代表一个文件或数据源,通过tensorflow运行图来迭代文件。对于类别数据,我们必须将其表示为SparseTensor,这种数据形式对于表示稀疏数据是很好的。
def input_fn(df):
    # creates a dictionary mapping from each continuous features
    # column name(k) to the values of that column stored in
    # a constant tensor
    continuous_cols = {
        k:tf.constant(df[k].values)
        for k in CONTINUOUS_COLUMNS
    }
    # creates a dictionary mapping from each categorical
    # feature column mane(k) to the values of that column
    # stored in a tf.SparseTensor
    categorical_cols = {
        k:tf.SparseTensor(
            indices = [[i,0] for i in range(df[k].size)],
            values = df[k].values,
            shape = [df[k].size, 1]
        )
        for k in CATEGORICAL_COLUMNS
    }
    # merges the two dictionaries into one
    feature_cols = dict(continuous_cols.items() + categorical_cols.items())
    # converts the label column into a constant tensor
    label = tf.constant(df[LABEL_COLUMN].values)
    # returns the feature columns and the label
    return feature_cols,label
def train_input_fn():
    return input_fn(df_train)
def eval_input_fn():
    return input_fn(df_test)
4、选择和设计模型
——选择和制作正确的特征列集合是学习到一个有效率模型的关键。一个feature column可以是原始数据框架中未加工的某一列,也可以是基于一个或多个基列转变而来的新的列(称之为衍生特征列)。基本上说,feature column是一个关于任何未加工的或者衍生的变量的抽象概念,可以被用来预测目标标签。
4.1 Base Categorical Feature Columns
——为了定义一个关于类别特征的特征列,我们使用tf.learnAPI创建了一个SparseColumn。如果你知道对于一个列,所有可能的特征值的集合,并且有一些集合,你可以使用sparse_column_with_keys。列表中的每一个key,将被分派一个从0开始自动增加的ID。例如,对于性别这一列,我们可以分配特征字符串Female给ID为0的,Male给ID为1的,如下:
gender = tf.contrib.layers.sparse_column_with_keys(
    column_name = "gender",
    keys = ["Female", "Male"]
)
——如果我们无法知道这个集合所有的可能值呢?我们可以使用sparse_column_with_hash_bucket:
ducation = tf.contrib.layers.sparse_column_with_hash_bucket("education",hash_bucket_size=1000)——在特征列education中每一个可能的值将会被散列的分配给整数ID,作为我们在训练时寻找的方法,可以见下面的例子:
| ID | Feature |
|---|---|
| … | |
| 9 | “Bachelors” |
| … | |
| 103 | “Doctorate” |
| … | |
| 375 | “Masters” |
| … |
.
——无论我们选择哪种方式来定义SparseColumn,每一个特征字符串都会通过固定映射或者哈希映射,映射到一个整数ID上。注意,哈希冲突是可能的,但对模型的质量不会造成显著影响。在覆盖下,LinearModel 负责对每一个特征ID,管理映射和创建tf.learn来存储模型参数(也就是模型权重)。模型的参数将会模型训练过程被学习到。
——我们可以使用同样的技巧来定义其他类比特征:
relationship = tf.contrib.layers.sparse_column_with_hash_bucket("relationship",hash_bucket_size=100)
workclass = tf.contrib.layers.sparse_column_with_hash_bucket("workclass",hash_bucket_size=100)
occupation = tf.contrib.layers.sparse_column_with_hash_bucket("occupation",hash_bucket_size=1000)
native_country = tf.contrib.layers.sparse_column_with_hash_bucket("native_country",hash_bucket_size=1000)
marital_status = tf.contrib.layers.sparse_column_with_hash_bucket("marital_status",hash_bucket_size=1000)
race = tf.contrib.layers.sparse_column_with_hash_bucket("race",hash_bucket_size=1000)
4.2 Base Continuous Feature Columns
——类似的,我们对想在模型是使用的连续特征列定义一个RealValuedColumn:
age = tf.contrib.layers.real_valued_column("age")
education_num = tf.contrib.layers.real_valued_column("education_num")
capital_gain = tf.contrib.layers.real_valued_column("capital_gain")
capital_loss = tf.contrib.layers.real_valued_column("captial_loss")
hours_per_week = tf.contrib.layers.real_valued_column("hours_per_week")
4.3 通过Bucketization将连续特征绝对化
——有时,连续特征和标签之间的关系并不是线性的。作为一个假设例子,在一个人事业的早期,他的收入可能会随着年龄的增长而增长,接着在某一个点的时候增长的很慢,最后在退休后收入开始下降。在这种设想中,使用未加工的年龄作为real-valued feature column可能不是个好的选择,这是因为模型可能仅仅学到了1/3的情形:
- 随着年龄的增长,收入一直以某种速率增长(正相关)
- 随着年龄的增长,收入一直以某种速率减少(负相关)
- 无论年龄如何变化,收入一直不变(无关)
——如果我们想要学到收入和分开的年龄组之间的细微的关系,我们可以利用bucketization。bucketization是一个将连续特征的整个值域分开到一个连贯的bins/buckets的集合的过程,接着根据哪个bucket会落入值,将原始数字特征转变为bucket的ID(作为类别特征)。因此,我们定义关于age的bucketized_column:
age_buckets = tf.contrib.layers.bucketized_column(age,boundaries=[18,25,30,35,40,45,50,55,60,65])——其中,boundaries是一个bucket边界的列表。在这种情况下,这里有10个边界,就产生了11个年龄组bucket(17岁及以下,18-24,25-29,…,65及以上)。
4.4 使用CrossedColumn的多交叉列
——分别使用每一个基特征列可能不足以解释数据。例如,教育和标签(赚取超过50000美元)之间的联系可能会因为不同的职业而有所不同。因此,如果我们只是学习了一个单一模型权重,如education=”Bachelors”和education=”Masters”,我们将无法获得每一个单一的教育与职业的结合(例如区分education=”Bachelors”且occupation=”Exec-managerial”和education=”Bachelors”且occupation=”Craft-repair”)。为了学习这些不同特征结合之间的差异,我们可以将crossed feature columns添加到模型中。
education_x_occupation = tf.contrib.layers.crossed_column([education,occupation],hash_bucket_size=int(1e4))
——我们也可以创建一个CrossedColumn,多余两个列的组合。每一个成分列都可以是一个类别的(SparseColumn)基特征列,可以是一个bucketized真值特征列(BucketizedColumn),甚至可以是另一个CrossColumn,如下:
age_buckets_x_education_x_occupation=tf.contrib.layers.crossed_column(
   [age_buckets,education,occupation],hash_bucket_size=int(1e6)
)
5、定义逻辑回归模型
——在处理了输入数据和定义了所有的特征列之后,我们可以准备将他们放在一起并且建立一个逻辑回归模型。在前面的介绍中,我们看到几种不同类别的基和衍生特征列,包括:
- SparseColumn
- RealValuedColumn
- BucketizedColumn
- CrossedColumn
——所有这些都是抽象FeatureColumn类的子类,可以被添加到一个模型的feature_columns中。
model_dir = tempfile.mkdtemp()
m = tf.contrib.learn.LinearClassifier(
    feature_columns = [
        gender, native_country, education, occupation, workclass,
        marital_status, race, age_buckets, education_x_occupation,
        age_buckets_x_education_x_occupation
    ],
    model_dir = model_dir
)
——-这个模型也可以自动学习一个偏置,它控制了不需要观察任何特征的预测(可以在“逻辑回归如何工作”部分查看更多信息)。这个学习到的模型文件将被存储在model_dir中。
6、训练和验证模型
——在模型中添加完所有的特征之后,现在开始学习如何真正的训练模型。训练模型使用tf.learnAPI,只需要一行代码。
m.fit(input_fn=train_input_fn,steps=200)——在模型训练完后,我们可以验证模型在输入数据的预测标签的好坏。
results = m.evaluate(input_fn=eval_input_fn,steps=1)
for key in sorted(results):
    print "%s: %s" % (key,results[key])
——-第一行的输出应该是accuracy: 0.83557522,这意味着正确率是83.6%。使用更多的特征和转变看看是否可以做更好。
——如果你想看一个工作中的端对端的例子,你可以下载example code,并且设置model_type为wide。
7、添加正则化以防止过拟合
——正则化是一种技术用来避免过拟合。过拟合一般发生在当你的模型在训练数据上做的很好,但是在模型从未见过的测试数据上做的很差,例如真实交通。出现过拟合通常是你的模型过于复杂,例如有太多参数与观察到的训练数据的数量有关。正则化允许你控制模型的复杂度,并且使得模型对未见过的数据有泛化能力。
——在一个线性模型库中,你可以添加L1和L2正则化到模型中:
m = tf.contrib.learn.LinearClassifier(
    feature_columns=[
        gender, native_country, education, occupation, workclass,
        marital_status, race, age_buckets, education_x_occupation,
        age_buckets_x_education_x_occupation
    ],
    optimizer=tf.train.FtrlOptimizer(
        learning_rate=0.1,
        l1_regularization_strength=1.0,
        l2_regularization_strength=1.0
    ),
    model_dir=model_dir
)
——L1和L2正则化之间一个重要的差别就是L1正则化倾向于使得模型权重保留为0,创建一个相对稀疏的模型,L2正则化则试图使得模型权重接近于0但不一定非要是0。因此,如果你提高L1正则化的强度,你将会获得一个相对较小的模型,因为很多的模型权重都会是0。当特征空间很大并且很稀疏的时候,这通常是令人满意的,但是当有很多资源约束的时候,这会阻止你服务于一个很大的模型。
——在实践中,你应该尝试不同的L1,L2正则化强度的结合,并且找到最好的参数,可以最好的控制过拟合,并且给你一个比较满意的模型大小。
8、逻辑回顾怎样工作
——最后,让我们花费一点时间来讨论下这里的你先前不太熟悉的逻辑回归模型。我们用Y来表示标签,观察到的特征集合作为特征向量
——其中

线性模型:首先,我们可以看到
是一个线性模型,其中输出是输入特征x的线性函数,偏置b是无关任何特征的预测。模型权重wi反映了特征xi与正值标签的联系。如果xi与正值标签正相关,则权值wi增加,可能性P(Y=1|X)越接近于1。另一方面,如果xi与正值标签负相关,则权值wi减小,可能性P(Y=1|X)越接近于0。
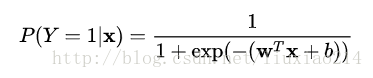
逻辑函数:第二,我们看到,逻辑函数(也称为sigmoid函数)
,应用到线性模型中。逻辑函数被用来转换线性模型
的输出,将任意一个真值转换为[0, 1]之间的数,这可以理解为概率。
——模型训练是一个最优化的问题:目标是找到一组模型权重(模型参数)的集合,使得给定训练数据的loss function最小化,例如逻辑损失和逻辑回归模型。损失函数测量真实标签和模型预测之间的差异。如果模型预测非常接近于真实标签,则损失值将非常低;如果预测与真实标签相差甚远,则损失值将非常高。
9、深一步学习
——如果你有兴趣学习更多,请点击Wide & Deep Learning
Tutorial,我们将向您展示如何结合线性模型和深度神经网络的强度,共同使用tf.learnAPI来训练。
10、实际运行结果
——刚开始运行的时候各种错误,查了好多资料,后来才发现,代码用法上没有错,错的是有些拼写与标点符号,Python太难看出哪里有错误了,这次要引以为戒,刚开始写的时候就要认真。
——修改几次代码后,以为终于可以跑起来了,结果又出现连接超时,这让人很无奈。只能多试几次。
——但是仍然出现问题“TypeError: init() got an unexpected keyword argument ‘shape’”,如图:
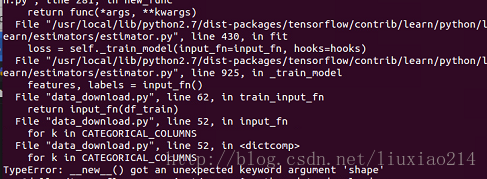
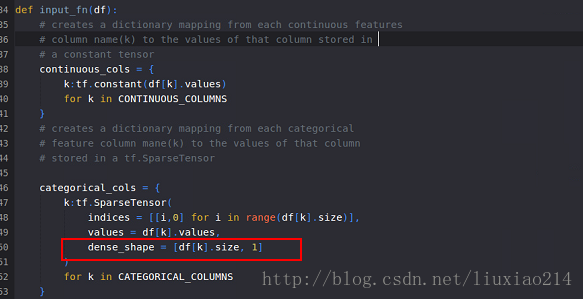
——这里是由于函数tf.SparseTensor中没有参数shape,其参数是dense_shape,修改代码如下:
——但是,又又又有问题,由于LABEL_COLUMNS没有定义,而在教程中也没有给出,所以这里参考wide模式的方式,自己定义。如下:


——最后,整理代码如下,运行结果如下:
import tensorflow as tf
import tempfile
import urllib
train_file = tempfile.NamedTemporaryFile()
test_file = tempfile.NamedTemporaryFile()

urllib.urlretrieve("https://archive.ics.uci.edu/ml/machine-learning-databases/adult/adult.data", train_file.name)
urllib.urlretrieve("https://archive.ics.uci.edu/ml/machine-learning-databases/adult/adult.test", test_file.name)


import pandas as pd
COLUMNS = [
    "age", "workclass", "fnlwgt", "education",
    "education_num", "marital_status", "occupation",
    "relationship", "race", "gender", "capital_gain","capital_loss",
    "hours_per_week", "native_country", "income_bracket"
]

df_train = pd.read_csv(train_file,names=COLUMNS, skipinitialspace=True)

df_test = pd.read_csv(test_file, names=COLUMNS, skipinitialspace=True, skiprows=1)


CATEGORICAL_COLUMNS = [
    "workclass", "education", "marital_status",
    "occupation", "relationship", "race",
    "gender", "native_country"
]
CONTINUOUS_COLUMNS = [
    "age", "education_num", "capital_gain",
    "capital_loss", "hours_per_week"
]
LABEL_COLUMN = "label"

def input_fn(df):
    # creates a dictionary mapping from each continuous features
    # column name(k) to the values of that column stored in
    # a constant tensor
    continuous_cols = {
        k:tf.constant(df[k].values)
        for k in CONTINUOUS_COLUMNS
    }
    # creates a dictionary mapping from each categorical
    # feature column mane(k) to the values of that column
    # stored in a tf.SparseTensor

    categorical_cols = {
        k:tf.SparseTensor(
            indices = [[i,0] for i in range(df[k].size)],
            values = df[k].values,
            dense_shape = [df[k].size, 1]
        )
        for k in CATEGORICAL_COLUMNS
    }
    # merges the two dictionaries into one
    feature_cols = dict(continuous_cols.items() + categorical_cols.items())
    # converts the label column into a constant tensor
    label = tf.constant(df[LABEL_COLUMN].values)
    # returns the feature columns and the label
    return feature_cols,label

def train_input_fn():
    return input_fn(df_train)
def eval_input_fn():
    return input_fn(df_test)

gender = tf.contrib.layers.sparse_column_with_keys(
    column_name = "gender",
    keys = ["Female", "Male"]
)
education = tf.contrib.layers.sparse_column_with_hash_bucket("education",hash_bucket_size=1000)

relationship = tf.contrib.layers.sparse_column_with_hash_bucket("relationship",hash_bucket_size=100)
workclass = tf.contrib.layers.sparse_column_with_hash_bucket("workclass",hash_bucket_size=100)
occupation = tf.contrib.layers.sparse_column_with_hash_bucket("occupation",hash_bucket_size=1000)
native_country = tf.contrib.layers.sparse_column_with_hash_bucket("native_country",hash_bucket_size=1000)
marital_status = tf.contrib.layers.sparse_column_with_hash_bucket("marital_status",hash_bucket_size=1000)
race = tf.contrib.layers.sparse_column_with_hash_bucket("race",hash_bucket_size=1000)

age = tf.contrib.layers.real_valued_column("age")
education_num = tf.contrib.layers.real_valued_column("education_num")
capital_gain = tf.contrib.layers.real_valued_column("capital_gain")
capital_loss = tf.contrib.layers.real_valued_column("captial_loss")
hours_per_week = tf.contrib.layers.real_valued_column("hours_per_week")

age_buckets = tf.contrib.layers.bucketized_column(age,boundaries=[18,25,30,35,40,45,50,55,60,65])

education_x_occupation = tf.contrib.layers.crossed_column([education,occupation],hash_bucket_size=int(1e4))

age_buckets_x_education_x_occupation=tf.contrib.layers.crossed_column(
    [age_buckets,education,occupation],hash_bucket_size=int(1e6)
)

df_train[LABEL_COLUMN] = (
      df_train["income_bracket"].apply(lambda x: ">50K" in x)).astype(int)
df_test[LABEL_COLUMN] = (
      df_test["income_bracket"].apply(lambda x: ">50K" in x)).astype(int)


model_dir = tempfile.mkdtemp()
m = tf.contrib.learn.LinearClassifier(
    feature_columns = [
        gender, native_country, education, occupation, workclass,
        marital_status, race, age_buckets, education_x_occupation,
        age_buckets_x_education_x_occupation
    ],
    model_dir = model_dir
)

m.fit(input_fn=train_input_fn,steps=200)
results = m.evaluate(input_fn=eval_input_fn,steps=1)
for key in sorted(results):
    print "%s: %s" % (key,results[key])

m = tf.contrib.learn.LinearClassifier(
    feature_columns=[
        gender, native_country, education, occupation, workclass,
        marital_status, race, age_buckets, education_x_occupation,
        age_buckets_x_education_x_occupation
    ],
    optimizer=tf.train.FtrlOptimizer(
        learning_rate=0.1,
        l1_regularization_strength=1.0,
        l2_regularization_strength=1.0
    ),
    model_dir=model_dir
)
print "after regularization!!!!!!!!"
m1.fit(input_fn=train_input_fn,steps=200)
results1 = m1.evaluate(input_fn=eval_input_fn,steps=1)
for key in sorted(results):
    print "%s: %s" % (key,results1[key])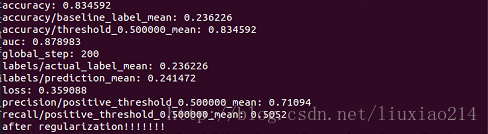
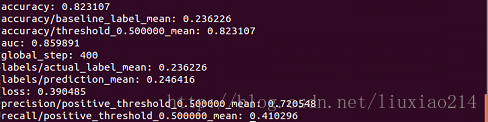
——至此,终于跑成功了,以上。


 635
635


 被折叠的 条评论
为什么被折叠?
被折叠的 条评论
为什么被折叠?
 到【灌水乐园】发言


