


在http://blog.csdn.net/piaoxuezhong/article/details/78213672中介绍了匹配滤波算法用于血管分割,本篇继续介绍血管分割的另一种方法:Gabor滤波算法,具体可以参见论文《Retinal Vessel Segmentation Using the 2-D GaborWavelet and Supervised Classification》。
Gabor滤波算法
维基里给出的解释,“In image processing, aGabor filter is a linear filter used fortextureanalysis, which means that it basically analyses whether there are any specific frequency content in the image in specific directions in a localized region around the point or region of analysis. Frequency and orientation representations of Gabor filters are similar to those of thehuman visual system, and they have been found to be particularly appropriate for texture representation and discrimination. In the spatial domain, a 2D Gabor filter is aGaussiankernel function modulated by asinusoidal plane wave.”
我这里大概翻译一下:Gaoor滤波是用于纹理分析的线性滤波器,它可以用来分析图像中某点或某区域周围在特定方向上是否存在特定的频率。Gaoor滤波器的频率和方向特性与人的视觉系统相似,尤其适合用于纹理表述方面。在空间域中,Gaoor滤波器是一种由正弦波调制而成的高斯核函数。扒下公式,毕竟数学是少不了的:
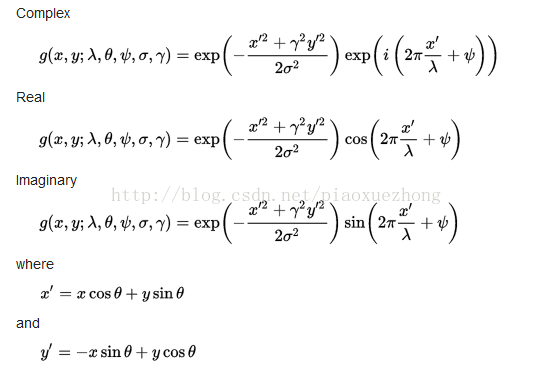
公式里的参数就不再说了,熟悉高斯函数的筒子自然就清楚了,这里说一下Gabor滤波与傅里叶变换的关系。
Gabor变换与傅里叶变换的关系

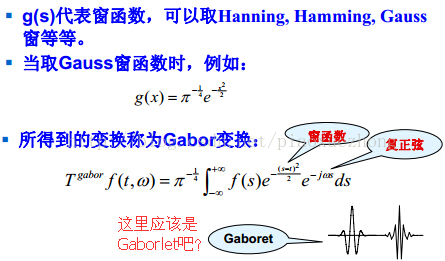
经典Fourier变换反映的是信号的整体特性(时域,频域),而对于傅里叶频谱中的某一频率,我们无法得知这个频率是什么时候产生的。傅里叶变换是信号在整个时域内的积分,反映的是信号频率的整体统计特性,所以不具备局部信号分析的功能。Gabor滤波正是针对Fourier变换的这点不足设计的,为了从Fourier变换中提取局部信息,引入了时间局部化的窗函数,变为窗口Fourier变换。由于窗口Fourier变换只依赖于部分时间的信号,窗口Fourier变换又称为短时Fourier变换,又称Gabor变换。(这样就清楚多了...)
信号x(t)的Gabor变换可以表示为:

高斯函数分布如下图所示:
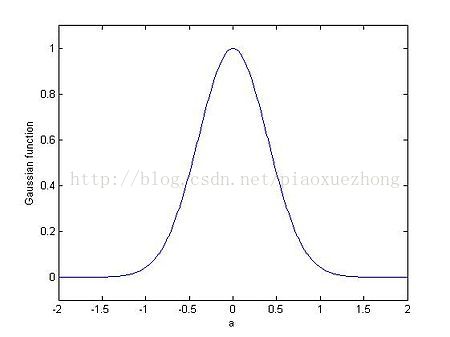
高斯分布虽然是无穷范围,但可以选取部分区域,例如设置阈值0.00001,下式成立:

Gabor变换可以近似为如下形式,即忽略掉了阈值外的区域:

二维Gabor滤波器--图像处理领域中的应用
二维Gabor滤波器能够很好地描述空间频率、空间位置和方向选择等局部信息,而且对光照不敏感。同时Gabor滤波器的响应和脊椎动物大脑视觉皮层简单细胞的响应非常相似。Gabor滤波在光学字符识别、虹膜识别和指纹识别等图像处理应用中非常有用。
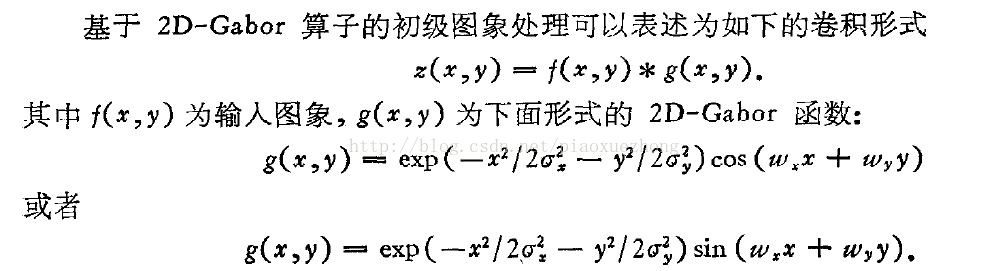
(这个考验数学功底了)从g(x,y)的形式来看,二维Gabor滤波函数可以看成经过正弦函数调制的广义高斯函数,当然也可以根据正弦函数的分解对g(x,y)进行进一步的分解。至于进一步的解析可以查阅论文《二维Gabor滤波器的快速实现》。
Gabor滤波算法实现
(1)使用opencv实现Gabor
Mat mkKernel(int ks, double sig, double th, double lm, double ps)
{
	int halfks = (ks - 1) / 2;
	double theta = th*CV_PI / 180;
	double psi = ps*CV_PI / 180;
	double delta = 2.0 / (ks - 1);
	double lmbd = lm;
	double sigma = sig / ks;
	double x_theta;
	double y_theta;
	Mat GaborKernel(ks, ks, CV_32F);
	for (int y = -halfks; y <= halfks; y++)
	{
		for (int x = -halfks; x <= halfks; x++)
		{
			x_theta = x*delta*cos(theta) + y*delta*sin(theta);
			y_theta = -x*delta*sin(theta) + y*delta*cos(theta);
			GaborKernel.at<float>(halfks + y, halfks + x) = (float)exp(-0.5*(pow(x_theta, 2) + pow(y_theta, 2)) / pow(sigma, 2))* cos(2 * CV_PI*x_theta / lmbd + psi);
		}
	}
	return GaborKernel;
}在网上流传比较广的是ZhouMian写的opencv实现,感兴趣的可以查看:http://download.csdn.net/download/piaoxuezhong/10033028.
(2)使用matlab实现Gabor
function [OutImg, GaborFilter] = gabor(I, gamma, lambda, b, theta, phi, shape)
if nargin < 7, shape = 'same'; end;
if isa(I, 'double') ~= 1, I = double(I); end
sigma = (1 / pi) * sqrt(log(2)/2) * (2^b+1) / (2^b-1) * lambda;
Sy = sigma * gamma;
for x = -fix(sigma):fix(sigma)
    for y = -fix(Sy):fix(Sy)
        xp = x * cos(theta) + y * sin(theta);
        yp = y * cos(theta) - x * sin(theta);
        % GF is Gabor Filter
        GaborFilter(fix(Sy)+y+1,fix(sigma)+x+1) = ...
            exp(-.5*(xp^2+gamma^2*yp^2)/sigma^2) * cos(2*pi*xp/lambda+phi);
    end
end

OutImg = conv2(I, double(GaborFilter), shape);

end
另外,参照opencv的实现,matlab附带案例测试文件的链接如下:http://download.csdn.net/download/piaoxuezhong/10033075
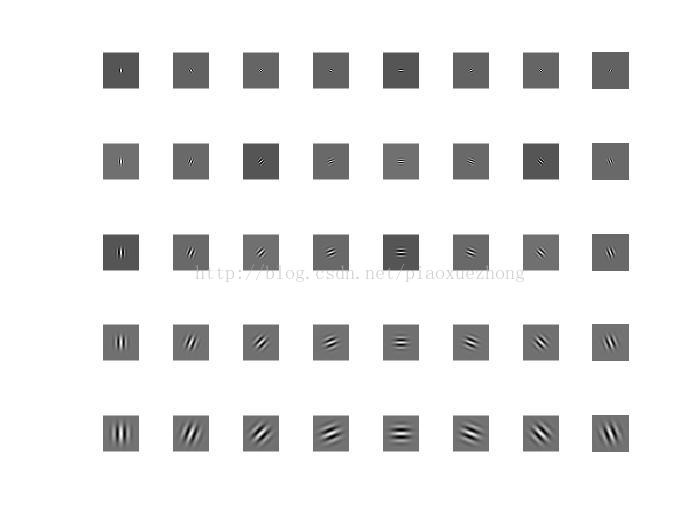
这里,我只贴下效果图:
参考:
- https://en.wikipedia.org/wiki/Gabor_filter
- http://www.cppblog.com/polly-yang/archive/2012/07/14/183327.aspx
- http://blog.csdn.net/watkinsong/article/details/7872764
- http://blog.csdn.net/chenbang110/article/details/7561846
- https://blog.csdn.net/dxinbin/article/details/73250571 ---matlab---
- http://blog.csdn.net/watkinsong/article/details/7876361 ---matlab---
- http://blog.csdn.net/u013288466/article/details/72636485
- http://blog.csdn.net/jinshengtao/article/details/17797641 ---opencv---
- http://blog.csdn.net/lichengyu/article/details/24534245
- http://blog.csdn.net/lichengyu/article/details/20743877 ---opencv---
- https://code.google.com/p/gaborboosting/source/checkout
- http://blog.csdn.net/jbb0523/article/details/42028587
- 《利用2D-Gabor滤波器提取纹理方向特征的虹膜识别方法》[J].计算机应用研究
- 《二维Gabor滤波器的快速实现》[J]自动化学报
- 《Gabor-Boosting Face Recognition》
附录几篇视网膜血管分割的文章:
- https://wenku.baidu.com/view/f42a5018763231126edb11f1.html
- http://xueshu.baidu.com/s?wd=paperuri%3A%28746181cea26c0e0ae8243ebc001c6396%29&filter=sc_long_sign&tn=SE_xueshusource_2kduw22v&sc_vurl=http%3A%2F%2Fwww.doc88.com%2Fp-1428507894322.html&ie=utf-8&sc_us=12351080291907237713


 3140
3140


 被折叠的 条评论
为什么被折叠?
被折叠的 条评论
为什么被折叠?
 到【灌水乐园】发言


