


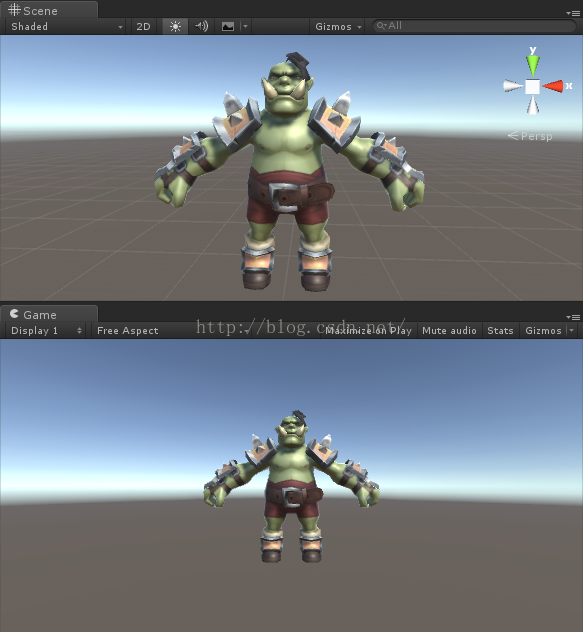
这里总结了几种在unity实现描边效果的方法,首先准备一个模型导入在unity中,使用默认shader,上传一张原始图,以便后面实现功能效果的对比
一、边缘光,这里参照官方的一个SurfaceShader Example,Rim Lighting
1.在unity创建一个SurfaceShader,命名RimLighting
Shader "Custom/RimLighting" {
	Properties {
		_Color ("Color", Color) = (1,1,1,1)
		_MainTex ("Albedo (RGB)", 2D) = "white" {}
		//边缘光颜色
		_RimColor("Rim Color",Color) =(1,1,1,1)
		//边缘光强度
		_RimPower("Rim Power", Range(0.5,8.0)) = 3.0
	}
	SubShader {
		Tags { "RenderType"="Opaque" }
		LOD 200

		CGPROGRAM
		// Physically based Standard lighting model, and enable shadows on all light types
		#pragma surface surf Standard fullforwardshadows

		// Use shader model 3.0 target, to get nicer looking lighting
		#pragma target 3.0

		sampler2D _MainTex;

		struct Input {
			float2 uv_MainTex;
			//法线
			float3 worldNormal;
			//视角方向
			float3 viewDir;
		};

		fixed4 _Color;
		fixed4 _RimColor;
		half _RimPower;

		void surf (Input IN, inout SurfaceOutputStandard o) {
			// Albedo comes from a texture tinted by color
			fixed4 c = tex2D (_MainTex, IN.uv_MainTex) * _Color;
			o.Albedo = c.rgb;
			o.Alpha = c.a;

			half rim = 1.0 - saturate(dot(normalize(IN.viewDir), IN.worldNormal));
			o.Emission = _RimColor.rgb * pow(rim, _RimPower);
		}
		ENDCG
	}
	FallBack "Diffuse"
}
2.将模型材质的shader改为刚才所写的shader,Custom/RimLighting

3.更改后,具体效果如下
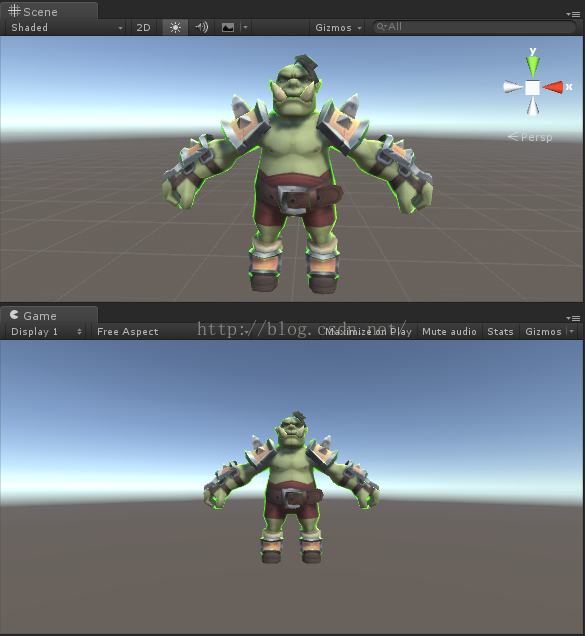
二、法线外拓,用一个Pass渲染边框,一个Pass渲染实物
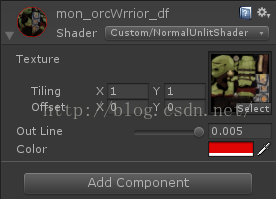
创建一个UnlitShader,命名为NormalUnlitShader
Shader "Custom/NormalUnlitShader"
{
	Properties
	{
		_MainTex ("Texture", 2D) = "white" {}
		_Outline("Out Line",Range(0.001,0.005))=0.002
		_Color("Color",Color)=(1,1,1,1)
	}

	CGINCLUDE
	#include "UnityCG.cginc"
	struct v2f
	{
		float4 pos:POSITION;
		float4 color:COLOR;
	};

	sampler2D _MainTex;
	float _Outline;
	fixed4 _Color;

	v2f vert(appdata_base v)
	{
		v2f o;
		o.pos = mul(UNITY_MATRIX_MVP, v.vertex);
		float3 norm = mul((float3x3)UNITY_MATRIX_IT_MV, v.normal);
		float2 offset = TransformViewToProjection(norm.xy);
		o.pos.xy += offset * o.pos.z * _Outline;
		o.color = _Color;
		return o;
	}
	ENDCG

	SubShader
	{
		Cull Front
		Pass
		{
			CGPROGRAM
			#pragma vertex vert
			#pragma fragment frag
			fixed4 frag (v2f i) : COLOR
			{
				return i.color;
			}
			ENDCG
		}

		CGPROGRAM
		#pragma surface surf Lambert
		struct Input {
			float2 uv_MainTex;
		};
		void surf(Input IN, inout SurfaceOutput o) {
			fixed4 c = tex2D(_MainTex, IN.uv_MainTex);
			o.Albedo = c.rgb;
			o.Alpha = c.a;
		}
		ENDCG
	}
}
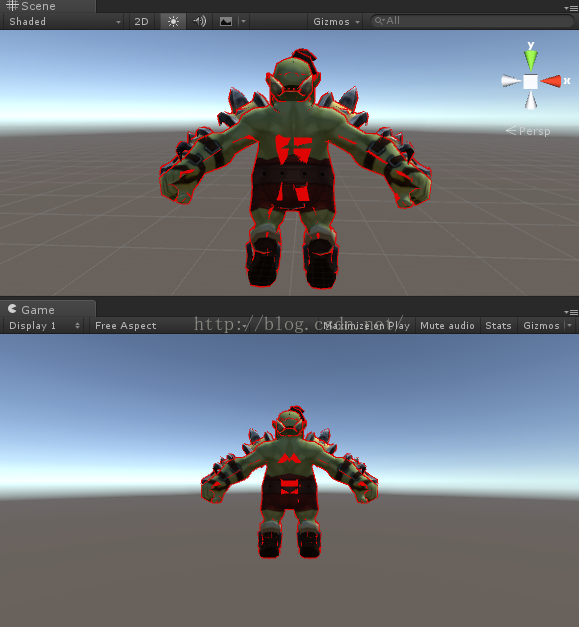
2.这里再换成新建的NormalUnlitShader,就会发现一些问题,他会在一些我们并不像描边的地方也改变了颜色,这就是因为这根据模型法线并不是全部都均匀的向外扩展,才导致这样的情况
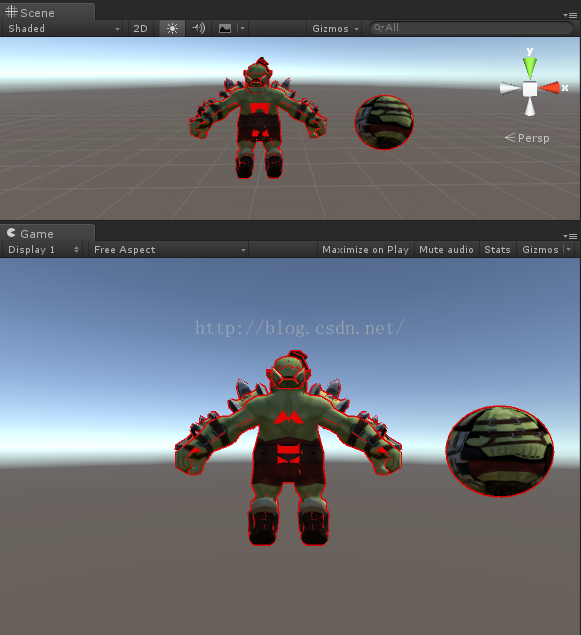
3.再换一个Sphere模型应用与怪物同一个材质球,就会发现Sphere模型,是能达到我们的需求的,也能很明显的看出两者的差别,因为球的法线都是均匀的往外扩展的,这个方法的使用就需要以后根据实际的要求来使用
三、屏幕特效,描边效果
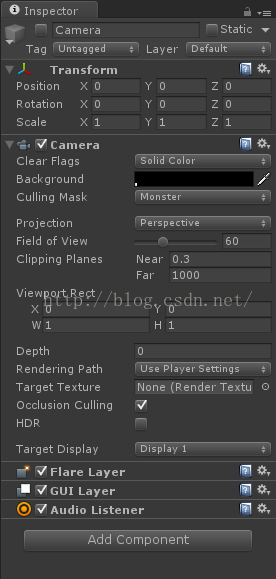
新建一个辅助摄像机,设置参数如下,并将模型的Layer设置为Monster,这样辅助摄像机就能单独看见这个怪物模型
2.写一个纯色shader,辅助摄像机用RenderWithShader,纯色渲染一张纹理处理
Shader "Custom/UnlitSolidColor"
{
	SubShader
	{
		Pass
		{
			//返回蓝色
			Color(0,0,1,1)
		}
	}
}
3.将纯色纹理,可以模糊放大几次,次数越多,边框就越宽,这里需要使用到一个像素偏移函数,Graphics.BlitMultiTap和一个Blur效果shader
Shader "Custom/OutterLineBlur" {

Properties {
	_MainTex ("", 2D) = "white" {}
}

Category {
	ZTest Always Cull Off ZWrite Off Fog { Mode Off }

	Subshader {
		Pass {
			CGPROGRAM
				#pragma vertex vert
				#pragma fragment frag
				#pragma fragmentoption ARB_precision_hint_fastest

				#include "UnityCG.cginc"

				struct v2f {
					float4 pos : POSITION;
					half4 uv[2] : TEXCOORD0;
				};

				float4 _MainTex_TexelSize;
				float4 _BlurOffsets;

				v2f vert (appdata_img v)
				{
					v2f o;
					float offX = _MainTex_TexelSize.x * _BlurOffsets.x;
					float offY = _MainTex_TexelSize.y * _BlurOffsets.y;

					o.pos = mul (UNITY_MATRIX_MVP, v.vertex);
					float2 uv = MultiplyUV (UNITY_MATRIX_TEXTURE0, v.texcoord.xy-float2(offX, offY));

					o.uv[0].xy = uv + float2( offX, offY);
					o.uv[0].zw = uv + float2(-offX, offY);
					o.uv[1].xy = uv + float2( offX,-offY);
					o.uv[1].zw = uv + float2(-offX,-offY);
					return o;
				}

				sampler2D _MainTex;
				fixed4 _Color;

				fixed4 frag( v2f i ) : COLOR
				{
					fixed4 c;
					c  = tex2D( _MainTex, i.uv[0].xy );
					c += tex2D( _MainTex, i.uv[0].zw );
					c += tex2D( _MainTex, i.uv[1].xy );
					c += tex2D( _MainTex, i.uv[1].zw );
					return c /2 ;
				}
				ENDCG
			}
		}
	}
	Fallback off
}
4.将扩大后的纹理与原来的纹理,做一个对比,并依据原来纹理剔除掉中间部分,就只剩下一个边框纹理,这里需要使用一个剔除shader
Shader "Custom/OutterLineCutoff" {
	Properties {
		_MainTex ("", 2D) = "white" {}
	}
	Category {
	BlendOp RevSub
	Blend One One
	ZTest Always Cull Off ZWrite Off Fog { Mode Off }

	Subshader {
		Pass {
			CGPROGRAM
			#pragma vertex vert
			#pragma fragment frag
			#pragma fragmentoption ARB_precision_hint_fastest

			sampler2D _MainTex;
			sampler2D _MainTex1;
			struct appdata
			{
				float4 vertex : POSITION;
				float4 texcoord : TEXCOORD0;
			};
			struct v2f
			{
				float4 pos : SV_POSITION;
				float2 uv : TEXCOORD0;
			};
			v2f vert (appdata v)
			{
				v2f o;
				o.pos = mul(UNITY_MATRIX_MVP, v.vertex);
				o.uv = v.texcoord.xy;
				return o;
			}
			half4 frag(v2f i) : COLOR
			{
				fixed4 c =  tex2D(_MainTex, i.uv);
				return c;
			}
			ENDCG
		}
		}
	}
	FallBack "Diffuse"
}
5.在主摄像机上,使用OnRenderImage函数,将得到的轮廓纯色纹理与摄像机的图像使用混合shader进行混合
Shader "Custom/OutterLineComposer" {

Properties {
	_MainTex ("", 2D) = "white" {}
}

Category {
	ZTest Always Cull Off ZWrite Off Fog { Mode Off }
	Blend SrcAlpha OneMinusSrcAlpha

	Subshader {
		Pass {
			CGPROGRAM
				#pragma vertex vert
				#pragma fragment frag
				#pragma fragmentoption ARB_precision_hint_fastest

				#include "UnityCG.cginc"

				struct v2f {
					float4 pos : POSITION;
					half2 uv : TEXCOORD0;
				};

				v2f vert (appdata_img v)
				{
					v2f o;
					o.pos = mul (UNITY_MATRIX_MVP, v.vertex);
					o.uv = v.texcoord.xy;
					return o;
				}

				sampler2D _MainTex;

				fixed4 frag( v2f i ) : COLOR
				{
					return tex2D( _MainTex, i.uv );
				}
				ENDCG
			}
		}
	}
	Fallback off
}
6.绑定在主摄像机的脚本
using UnityEngine;
using System.Collections;

[ExecuteInEditMode]
public class outline : MonoBehaviour {
    /// <summary>
    /// 辅助摄像机
    /// </summary>
    public Camera outlineCamera;

    #region 纯红色材质 solidColorMaterail
    public Shader solidColorShader;
    private Material m_solid=null;
    private Material solidMaterail
    {
        get
        {
            if (m_solid == null)
            {
                m_solid = new Material(solidColorShader);
            }
            return m_solid;
        }
    }
    #endregion

    #region 合并材质 compositeMaterial
    public Shader compositeShader;
    private Material m_composite=null;
    private Material compositeMaterial
    {
        get
        {
            if (m_composite == null)
                m_composite = new Material(compositeShader);
            return m_composite;
        }
    }
    #endregion

    #region 模糊材质 blurMaterial
    public Shader blurShader;
    private Material m_blur=null;
    private Material blurMaterial
    {
        get
        {
            if (m_blur == null)
                m_blur = new Material(blurShader);
            return m_blur;
        }
    }
    #endregion

    #region 剔除材质 cutoffShader
    public Shader cutoffShader;
    private Material m_cutoff=null;
    private Material cutoffMaterial
    {
        get
        {
            if (m_cutoff == null)
                m_cutoff = new Material(cutoffShader);
            return m_cutoff;
        }
    }
    #endregion
    /// <summary>
    /// 辅助摄像机渲染的RenderTexture
    /// </summary>
    private RenderTexture outlineRenderTex;
    /// <summary>
    /// 模糊扩大次数
    /// </summary>
    public int Iterations = 2;
    // Use this for initialization
    void Start () {
        outlineRenderTex = new RenderTexture((int)outlineCamera.pixelWidth, (int)outlineCamera.pixelHeight, 16);
    }

	// Update is called once per frame
	void Update () {
	}

    void OnPreRender()
    {
        outlineCamera.targetTexture = outlineRenderTex;
        outlineCamera.RenderWithShader(solidMaterail.shader, "");
    }

    void OnRenderImage(RenderTexture source, RenderTexture desture)
    {
        RenderTexture _renderTexture = RenderTexture.GetTemporary(outlineRenderTex.width, outlineRenderTex.height, 0);

        MixRender(outlineRenderTex,ref _renderTexture);

        Graphics.Blit(_renderTexture, desture, compositeMaterial);
        RenderTexture.ReleaseTemporary(_renderTexture);
    }


    void MixRender(RenderTexture in_outerTexture, ref RenderTexture _renderTexture)
    {
        RenderTexture buffer = RenderTexture.GetTemporary(in_outerTexture.width, in_outerTexture.height, 0);
        RenderTexture buffer2 = RenderTexture.GetTemporary(in_outerTexture.width, in_outerTexture.height, 0);

        Graphics.Blit(in_outerTexture, buffer);

        //多次模糊放大
        for (int i = 0; i < Iterations; i++)
        {
            FourTapCone(buffer, buffer2, i);
            Graphics.Blit(buffer2, buffer);
        }
        Graphics.Blit(in_outerTexture, buffer, cutoffMaterial);
        Graphics.Blit(buffer, _renderTexture);

        RenderTexture.ReleaseTemporary(buffer);
        RenderTexture.ReleaseTemporary(buffer2);
    }

    float Spread = 0.8f;
    public void FourTapCone(RenderTexture source, RenderTexture dest, int iteration)
    {
        float off = 0.5f + iteration * Spread;
        Graphics.BlitMultiTap(source, dest, blurMaterial,
                               new Vector2(off, off),
                               new Vector2(-off, off),
                               new Vector2(off, -off),
                               new Vector2(-off, -off)
                               );
    }

}
7.具体效果如下,因为这里是在主摄像机设置的屏幕特效,他可以忽略掉所有的遮挡,这是优点也是弊端


 2254
2254

 被折叠的 条评论
为什么被折叠?
被折叠的 条评论
为什么被折叠?
 到【灌水乐园】发言


