


理论
阈值?
- 最简单的分割方法
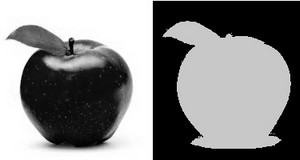
- 应用例子:从图像中分割出我们想要研究的对象。 这样的分割依赖于对象像素与背景像素的对比度差异。
- 为了区分出我们感兴趣的像素,我们可以将像素值与阈值进行比较。
- 一旦我们区分开了重要的像素,那么我们可以为它设置一个值来区分它。
阈值操作的类型
- OpenCV 提供了cv::threshold来执行阈值操作
- 这个函数中可以使用5中类型的阈值操作,后面部分我们会介绍。
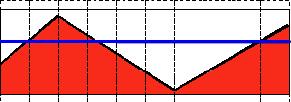
- 为了描述我们的阈值操作,假设我们原图像文件
src(x,y)
,水平的蓝线代表阈值线。
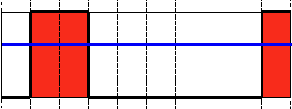
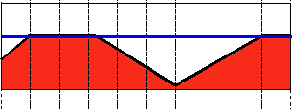
二分阈值
- 这一阈值操作可以表示为:
dst(x,y)={maxVal, 0,src(x,y)>threshotherwise
- 如果
src(x,y)
大于
thresh
值,新的像素值就是
MaxVal
。否则的话像素值为0。
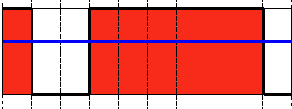
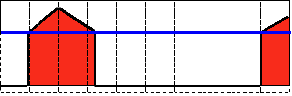
二分阈值,反向操作
- 操作可以描述为
dst(x,y)={0, maxVal,src(x,y)>threshotherwise
- 如果
src(x,y)
大于
thresh
值,新的像素值就是0。否则的话像素值为
MaxVal
。
截取操作
截取操作可以描述为:
dst(x,y)={threshold, src(x,y),src(x,y)>threshotherwisethresh是阈值操作之后的最大值,如果src(x,y)值过大会被截取。
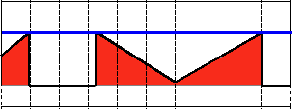
零阈值操作
操作可以描述为:
dst(x,y)={src(x,y), 0,src(x,y)>threshotherwise- 如果 src(x,y)小于thresh,则操作之后为0。
- 如果 src(x,y)小于thresh,则操作之后为0。
反向零阈值操作
操作可以描述为:
dst(x,y)={0, src(x,y),src(x,y)>threshotherwise- 如果 src(x,y)大于thresh,则操作之后为0。
- 如果 src(x,y)大于thresh,则操作之后为0。
示例代码
示例代码如下,可以从此处下载
#include "opencv2/imgproc.hpp"
#include "opencv2/imgcodecs.hpp"
#include "opencv2/highgui.hpp"
using namespace cv;
int threshold_value = 0;
int threshold_type = 3;
int const max_value = 255;
int const max_type = 4;
int const max_BINARY_value = 255;
Mat src, src_gray, dst;
const char* window_name = "Threshold Demo";
const char* trackbar_type = "Type: \n 0: Binary \n 1: Binary Inverted \n 2: Truncate \n 3: To Zero \n 4: To Zero Inverted";
const char* trackbar_value = "Value";
void Threshold_Demo( int, void* );
int main( int, char** argv )
{
  src = imread( argv[1], IMREAD_COLOR ); // Load an image
  if( src.empty() )
    { return -1; }
  cvtColor( src, src_gray, COLOR_BGR2GRAY ); // Convert the image to Gray
  namedWindow( window_name, WINDOW_AUTOSIZE ); // Create a window to display results
  createTrackbar( trackbar_type,
                  window_name, &threshold_type,
                  max_type, Threshold_Demo ); // Create Trackbar to choose type of Threshold
  createTrackbar( trackbar_value,
                  window_name, &threshold_value,
                  max_value, Threshold_Demo ); // Create Trackbar to choose Threshold value
  Threshold_Demo( 0, 0 ); // Call the function to initialize
  for(;;)
    {
      char c = (char)waitKey( 20 );
      if( c == 27 )
    { break; }
    }
}
void Threshold_Demo( int, void* )
{
  /* 0: Binary
     1: Binary Inverted
     2: Threshold Truncated
     3: Threshold to Zero
     4: Threshold to Zero Inverted
   */
  threshold( src_gray, dst, threshold_value, max_BINARY_value,threshold_type );
  imshow( window_name, dst );
}
说明
我们来看一看程序的结构:
- 加载图像,如果是BGR ,需要转换为Grayscale,我们可以使用cv::cvtColor 函数完成:
  src = imread( argv[1], IMREAD_COLOR ); // Load an image
  if( src.empty() )
    { return -1; }
cvtColor( src, src_gray, COLOR_BGR2GRAY ); // Convert the image to Gray- 创建窗口显示结果
namedWindow( window_name, WINDOW_AUTOSIZE ); // Create a window to display results- 创建两个跟踪按钮进行用户输入:
- 阈值操作的类型
- 阈值
  createTrackbar( trackbar_type,
                  window_name, &threshold_type,
                  max_type, Threshold_Demo ); // Create Trackbar to choose type of Threshold
  createTrackbar( trackbar_value,
                  window_name, &threshold_value,
                  max_value, Threshold_Demo ); // Create Trackbar to choose Threshold value
等待用户输入阈值和阈值操作类型
当用户改变跟踪条输入时,函数Threshold_Demo被调用:
void Threshold_Demo( int, void* )
{
  /* 0: Binary
     1: Binary Inverted
     2: Threshold Truncated
     3: Threshold to Zero
     4: Threshold to Zero Inverted
   */
  threshold( src_gray, dst, threshold_value, max_BINARY_value,threshold_type );
  imshow( window_name, dst );
}
cv::threshold调用的时候,给了5个参数:
- src_gray:我们的输入图像
- dst:输出图像
- threshold_value:阈值操作的阈值
- max_BINARY_value:二值阈值操作中的阈值
- threshold_type:阈值操作的类型


 25万+
25万+


 被折叠的 条评论
为什么被折叠?
被折叠的 条评论
为什么被折叠?
 到【灌水乐园】发言


