


 本文详细讲解了Android Paint中的setXfermode方法,重点探讨了PorterDuffXfermode的用法,包括AvoidXfermode和PixelXorXfermode的简单介绍,以及PorterDuffXfermode的16种混合模式的原理和应用场景。通过实例展示了如何利用PorterDuffXfermode实现图标颜色变换和创建流行的loading效果,帮助开发者更好地理解和应用Android图像混合模式。
尊重原创,欢迎转载,转载请注明: FROM GA_studio http://blog.csdn.net/tianjian4592
前面关于paint的方法讲解里,讲到 setXfermode 就截止了,原因有两个:
1. 那篇文章已经太长了,我自己都看不下去了;
2. setXfermode 在paint 里占有至关重要的地位;
基于以上两个原因,我们一起来看看这个方法有何妙用。
首先我们还是来看看关于这个方法的说明:
    /**
     * Set or clear the xfermode object. - 设置或清除xfermode对象;
     * Pass null to clear any previous xfermode. - 传递null以清除任何以前的xfermode。
     * As a convenience, the parameter passed is also returned. - 为方便起见,也返回传递的参数。
     *
     * @return         xfermode
     */
    public Xfermode setXfermode(Xfermode xfermode) {
        int xfermodeNative = 0;
        if (xfermode != null)
            xfermodeNative = xfermode.native_instance;
        native_setXfermode(mNativePaint, xfermodeNative);
        mXfermode = xfermode;
        return xfermode;
    }
这个方法传进一个 Xfermode 对象,而打开 Xfermode 发现里面没有提供任何可用的构造函数或方法,ctrl +T 看到它有三个子类:

前两个子类 AvoidXfermode 和 PixelXorXfermode 大家可以看到都已经被划上了斜线,下面就简单提及一下,咱们的重点在 PorterDuffXfermode :
1. AvoidXfermode:
    /** This xfermode draws, or doesn't draw, based on the destination's
     * distance from an op-color.
     *
     * There are two modes, and each mode interprets a tolerance value.
     *
     * Avoid: In this mode, drawing is allowed only on destination pixels that
     * are different from the op-color.
     * Tolerance near 0: avoid any colors even remotely similar to the op-color
     * Tolerance near 255: avoid only colors nearly identical to the op-color
     * Tolerance near 0: draw only on colors that are nearly identical to the op-color
     * Tolerance near 255: draw on any colors even remotely similar to the op-color
     */
    public AvoidXfermode(int opColor, int tolerance, Mode mode) {
        if (tolerance < 0 || tolerance > 255) {
            throw new IllegalArgumentException("tolerance must be 0..255");
        }
        native_instance = nativeCreate(opColor, tolerance, mode.nativeInt);
    }
咱们把它上面的说明看下就很清楚了:
xfermode 是否绘制,基于目标色和参数 op-color 的差距;
其中有两种模式,分别为 Avoid 和 TARGET:
Avoid模式:只会在目标像素值和 op-color "不一样" 的地方进行绘制;
Target模式:只会在目标像素值和 op-color "一样" 的地方进行绘制;
上面的"一样" 和 "不一样" 我都打上了引号,并不是指严格意义上的一样,而是只要在可容忍范围内就代表一样,这个可容忍范围,就是容差值(tolerance),0 代表最小容差,即得和 op-color 真正意义上一样才 ok ,255 则代表最大容差,只要有一点相近,则ok;
咱们一起来看个小例子:
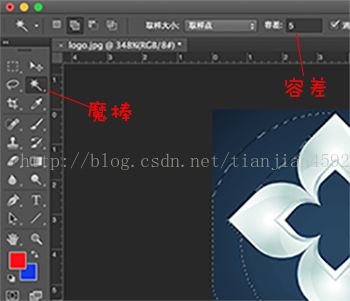
先在网上找个图案,用PS去掉周围部分,主体改为纯色;


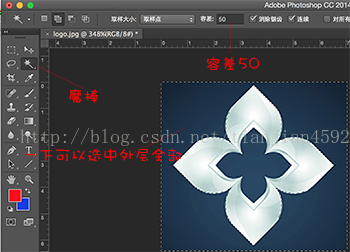
当我们使用PS里的魔棒创立选区的时候,发现一次只选取了其中最相近的一部分,这时候可以看到容差为5,但我们的目的是想把图形周围近似的蓝灰色都选中该怎么办呢?容差这时候就起作用了,改大容差,就相当于调大近似度,这个概念和我们里面的容差值是一样的,希望这样说便于理解,我们看下对比图,调到50 一下就可以选中外层所有蓝灰色:
好,我们现在有了一个纯色的图标,假定我们现在有一个需求,需要在某种操作下将图标变色,类似微信底部的tab图标,未选中时时白色,选中时是绿色,这个时候我们就可以用
AvoidXfermode 进行实现,我们一起看看要怎么做:
1. 给paint 设置要变换的颜色和图层混合模式为 AvoidXfermode;
2. 绘制图标;
3. 再绘制对应色块;
由于是对对应颜色进行替换,所以也就形成了图标变色的效果,一起来看看代码:
public class AvoidXfermodeView extends View {

    private Paint mBitmapPaint, mAvoidPaint;

    private int mTotalWidth, mTotalHeight;

    private Bitmap mBitmap;
    private int mBitWidth, mBitHeight;
    private Rect mOriginSrcRect, mOriginDestRect;
    private Rect mAvoidSrcRect, mAvoidDestRect;

    private AvoidXfermode mAvoidXfermode;

    public AvoidXfermodeView(Context context) {
        super(context);
        initPaint();
        initBitmap();
        // 对蓝色相近的颜色进行替换
        mAvoidXfermode = new AvoidXfermode(Color.BLUE, 150, Mode.TARGET);
    }

    private void initBitmap() {
        mBitmap = ((BitmapDrawable) getResources().getDrawable(R.drawable.bluelogo)).getBitmap();
        mBitWidth = mBitmap.getWidth();
        mBitHeight = mBitmap.getHeight();
    }

    private void initPaint() {
        mBitmapPaint = new Paint();
        // 去锯齿
        mBitmapPaint.setAntiAlias(true);
        // 防抖动
        mBitmapPaint.setDither(true);
        // 图像过滤
        mBitmapPaint.setFilterBitmap(true);

        // 使用上面属性创建一个新paint
        mAvoidPaint = new Paint(mBitmapPaint);
        // 颜色设置为红色
        mAvoidPaint.setColor(Color.RED);
    }

    @Override
    protected void onDraw(Canvas canvas) {
        super.onDraw(canvas);
        // 绘制原图
        canvas.drawBitmap(mBitmap, mOriginSrcRect, mOriginDestRect, mBitmapPaint);

        // 绘制用于变色图
        canvas.drawBitmap(mBitmap, mAvoidSrcRect, mAvoidDestRect, mAvoidPaint);
        // 设置图层混合模式
        mAvoidPaint.setXfermode(mAvoidXfermode);
        // 绘制色块进行混合,得到最终效果
        canvas.drawRect(mAvoidDestRect, mAvoidPaint);
    }

    @Override
    protected void onMeasure(int widthMeasureSpec, int heightMeasureSpec) {
        super.onMeasure(widthMeasureSpec, heightMeasureSpec);
    }

    @Override
    protected void onSizeChanged(int w, int h, int oldw, int oldh) {
        super.onSizeChanged(w, h, oldw, oldh);
        mTotalWidth = w;
        mTotalHeight = h;

        mOriginSrcRect = new Rect(0, 0, mBitWidth, mBitHeight);
        // 为了让图水平居中
        int left = (mTotalWidth - mBitWidth) / 2;
        mOriginDestRect = new Rect(left, 0, left + mBitWidth, mBitHeight);

        mAvoidSrc
最低0.47元/天 解锁文章


 2997
2997

 被折叠的 条评论
为什么被折叠?
被折叠的 条评论
为什么被折叠?
 到【灌水乐园】发言


