


Focus on technology, enjoy life!—— 杨焕州 QQ:804212028
原文链接:http://blog.csdn.net/y18334702058/article/details/44624305
本文可能存在参考或借助部分外界资源,如有任何侵权行为,请与我联系!
- 主题:标题栏布局设置
-Android开发中,标题栏是至关重要的存在,它的美观程度很大程度上决定了一个app是否足够优秀。
我们直接来看title_ui.xml布局
<LinearLayout xmlns:android="http://schemas.android.com/apk/res/android"
    android:orientation="vertical"
    android:layout_width="fill_parent"
    android:layout_height="fill_parent"
    >
    <RelativeLayout
        android:layout_width="match_parent"
        android:layout_height="40dip"
        android:background="#003366"
        android:orientation="vertical">

        <Button
        android:id="@+id/back"
        android:layout_width="60dip"
        android:layout_height="40dip"
        android:text="《返回"
        android:textColor="#ffffff"
        android:background="@drawable/txtback_txtok" />

        <TextView
            android:layout_width="wrap_content"
            android:layout_height="wrap_content"
            android:layout_centerInParent="true"
            android:textStyle="bold"
            android:text="添加收入"
            android:textColor="#ffffff" />

        <Button
            android:id="@+id/ok"
            android:layout_width="60dip"
            android:layout_height="40dip"
            android:layout_alignParentRight="true"
            android:text="确认"
            android:textColor="#ffffff"
            android:background="@drawable/txtback_txtok"
            android:gravity="center"/>
    </RelativeLayout>
</LinearLayout>
创建一个drawable文件,再在里面创建txtback_txtok.xml文件,这个文件用于定义back和ok按钮的按下去的效果。
<?xml version="1.0" encoding="utf-8"?>
<selector xmlns:android="http://schemas.android.com/apk/res/android" >
    <item android:state_pressed="true">
        <color android:color="#333366"/>
    </item>
</selector>
最后我们来看DemoActivity :
public class DemoActivity extends Activity {

    Button backButton,okButton;
    @Override
    protected void onCreate(Bundle savedInstanceState) {
        // TODO Auto-generated method stub
        super.onCreate(savedInstanceState);
        setContentView(R.layout.title_ui);
        backButton = (Button) findViewById(R.id.back);
        okButton = (Button) findViewById(R.id.ok);
        }
}
效果是这样的:
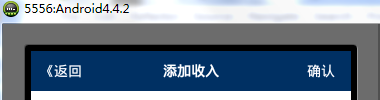
返回button和确认button被按下去时按钮背景颜色会改变,这是由上面的txtback_txtok.xml实现的。
Focus on technology, enjoy life!—— 杨焕州 QQ:804212028
原文链接:http://blog.csdn.net/y18334702058/article/details/44624305


 1836
1836


 被折叠的 条评论
为什么被折叠?
被折叠的 条评论
为什么被折叠?
 到【灌水乐园】发言


