本系列文章由 @YhL_Leo 出品,转载请注明出处。
文章链接: http://blog.csdn.net/yhl_leo/article/details/49427383
Opencv中Camera Calibration and 3D Reconstruction中使用的是Z. Zhang(PAMI, 2000). A Flexible New Technique for Camera Calibration的方法。原理见原理简介(五)本文将对其进行介绍。
1 标定步骤
简单来说,Opencv中基于二维标定平面的标定方法主要步骤有:
- 1 读取相关设置信息,包括采用的pattern 信息(类型,尺寸),输入标定数据的信息(图像列表文件,视频采样方法),输出文件设置等,这些信息可以存为XML或YAML文件的形式或者在代码里直接显示设置。这里给出Opencv中提供的configuration file:
<?xml version="1.0"?>
<opencv_storage>
<Settings>
<!--
 Number of inner corners per a item row and column. (square, circle)
-->
<BoardSize_Width>9</BoardSize_Width>
<BoardSize_Height>6</BoardSize_Height>
<!--
 The size of a square in some user defined metric system (pixel, millimeter)
-->
<Square_Size>50</Square_Size>
<!--
 The type of input used for camera calibration. One of: CHESSBOARD CIRCLES_GRID ASYMMETRIC_CIRCLES_GRID
-->
<Calibrate_Pattern>"CHESSBOARD"</Calibrate_Pattern>
<!--
 The input to use for calibration.
        To use an input camera -> give the ID of the camera, like "1"
        To use an input video  -> give the path of the input video, like "/tmp/x.avi"
        To use an image list   -> give the path to the XML or YAML file containing the list of the images, like "/tmp/circles_list.xml"

-->
<Input>"images/CameraCalibraation/VID5/VID5.xml"</Input>
<!--
  If true (non-zero) we flip the input images around the horizontal axis.
-->
<Input_FlipAroundHorizontalAxis>0</Input_FlipAroundHorizontalAxis>
<!--  Time delay between frames in case of camera.  -->
<Input_Delay>100</Input_Delay>
<!--  How many frames to use, for calibration.  -->
<Calibrate_NrOfFrameToUse>25</Calibrate_NrOfFrameToUse>
<!--
 Consider only fy as a free parameter, the ratio fx/fy stays the same as in the input cameraMatrix.
       Use or not setting. 0 - False Non-Zero - True
-->
<Calibrate_FixAspectRatio>1</Calibrate_FixAspectRatio>
<!--
 If true (non-zero) tangential distortion coefficients  are set to zeros and stay zero.
-->
<Calibrate_AssumeZeroTangentialDistortion>1</Calibrate_AssumeZeroTangentialDistortion>
<!--
 If true (non-zero) the principal point is not changed during the global optimization.
-->
<Calibrate_FixPrincipalPointAtTheCenter>1</Calibrate_FixPrincipalPointAtTheCenter>
<!--  The name of the output log file.  -->
<Write_outputFileName>"out_camera_data.xml"</Write_outputFileName>
<!--
 If true (non-zero) we write to the output file the feature points.
-->
<Write_DetectedFeaturePoints>1</Write_DetectedFeaturePoints>
<!--
 If true (non-zero) we write to the output file the extrinsic camera parameters.
-->
<Write_extrinsicParameters>1</Write_extrinsicParameters>
<!--
 If true (non-zero) we show after calibration the undistorted images.
-->
<Show_UndistortedImage>1</Show_UndistortedImage>
</Settings>
</opencv_storage>其中,图像文件列表images/CameraCalibraation/VID5/VID5.xmlOpencv中采用列举法:
<?xml version="1.0"?>
<opencv_storage>
<images>
images/CameraCalibraation/VID5/xx1.jpg
images/CameraCalibraation/VID5/xx2.jpg
images/CameraCalibraation/VID5/xx3.jpg
images/CameraCalibraation/VID5/xx4.jpg
images/CameraCalibraation/VID5/xx5.jpg
images/CameraCalibraation/VID5/xx6.jpg
images/CameraCalibraation/VID5/xx7.jpg
images/CameraCalibraation/VID5/xx8.jpg
</images>
</opencv_storage>
文件中参数的含义比较清晰明了,此处就不累述。
- 2 依次从图像中检测pattern信息,如果检测成功,角点信息将会存储记录,用于标定解算。
cv::Mat viewGray;
if ( view.channels() == 3 )
    cv::cvtColor( view, viewGray, CV_BGR2GRAY );
else
    view.copyTo( viewGray );

std::vector<cv::Point2f> imagePoints;
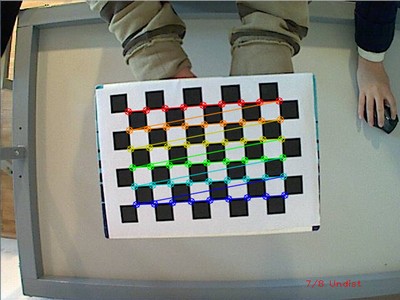
bool success = cv::findChessboardCorners( viewGray , boardSize, imagePoints);- 3 优化角点检测精度,将上述检测成功的角点,通过精确角点定位方法,提高精度,下图为Opencv提供的检测结果。
cv::cornerSubPix( viewGray,
              imagePoints,
              cv::Size(11,11),
cv::TermCriteria( CV_TERMCRIT_EPS+CV_TERMCRIT_ITER, 30, 0.1 ));- 4 标定解算,每幅图像都进行上述的角点检测后,一般给像点对应的物方角点虚拟坐标的方式赋予对应的坐标,即可进行相机标定解算,包括相机内参,相机畸变系数,以及相机在虚拟坐标所在坐标系中相对于每幅图像的相对位置姿态(旋转向量和平移向量)。
double reprojectionError= cv::calibrateCamera(
    objectPoints,   // calibration pattern points in the calibration pattern coordinate space
    imagePoints,    // projections of calibration pattern points
    imageSize,      // Size of the image u


 本文介绍了使用Opencv进行相机标定的详细步骤,包括读取设置、检测pattern、优化角点、解算内参与畸变、精度评估和图像校正。作者提供了个人代码示例,并展示了运行结果,包括角点检测图和反投影点云。

 最低0.47元/天 解锁文章


 2804
2804

 被折叠的 条评论
为什么被折叠?


