


 本文介绍如何在Android应用中创建一个模态更新提示框,包括使用TableLayout平分按钮、相对布局设置对话框样式、定义Activity并设置对话框主题等步骤。
Android布局中,同样可以与网页的div布局,用百分比来指定宽度。同样也可以像vb,c#,或者网页中的absolute布局一样,利用style为主题对话框的Activity整出模态窗口。比如,如下图所示的布局,在现在各类的安卓应用中很常见的。同时,设定在这个安卓程序一开始就弹出一个更新软件的Activity。那该如何完成呢?
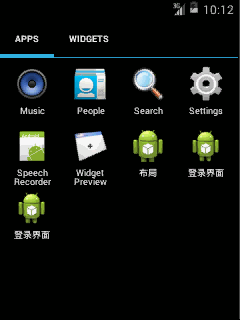
1、首先,先到res\values\string.xml中布置好各个组件的字体,当然你可以边做安卓工程边添加。命名的时候有一定的规则,指明这个字体,是在哪个Activity,然后指明这个字体是哪个组件的。我也想直接把字体放在各个布局文件当中,但那样Eclipse会提出警告,同时也不利于以后国际化软件需要。可以从这个文件看到,这个程序有两个Activity,一个是mainActivity,里面有6个按钮,一个是updateActivity就是那个更新提醒的对话框。
<?xml version="1.0" encoding="utf-8"?>
<resources>
    <string name="app_name">布局</string>
    <string name="updateActivity_name">更新提醒</string>
    <string name="action_settings">Settings</string>
    <string name="hello_world">Hello world!</string>
    <string name="mainActivity_button1">功能1</string>
    <string name="mainActivity_button2">功能2</string>
    <string name="mainActivity_button3">功能3</string>
    <string name="mainActivity_button4">功能4</string>
    <string name="mainActivity_button5">功能5</string>
    <string name="mainActivity_button6">功能6</string>
	<string name="updateActivity_textView1">发现新版本,是否更新?</string>
	<string name="updateActivity_button1">更新</string>
	<string name="updateActivity_button2">取消</string>
</resources>
<TableLayout xmlns:android="http://schemas.android.com/apk/res/android"
    xmlns:tools="http://schemas.android.com/tools"
    android:layout_width="match_parent"
    android:layout_height="match_parent"
    android:gravity="center" >

    <TableRow android:layout_weight="1" >

        <LinearLayout
            android:layout_width="0dip"
            android:layout_height="match_parent"
            android:layout_weight="1" >

            <Button
                android:id="@+id/button1"
                android:layout_width="0dip"
                android:layout_height="match_parent"
                android:layout_weight="1"
                android:text="@string/mainActivity_button1" />

            <Button
                android:id="@+id/button2"
                android:layout_width="0dip"
                android:layout_height="match_parent"
                android:layout_weight="1"
                android:text="@string/mainActivity_button2" />
        </LinearLayout>

        <LinearLayout
            android:layout_width="0dip"
            android:layout_height="match_parent"
            android:layout_weight="1" >

            <Button
                android:id="@+id/button3"
                android:layout_width="0dip"
                android:layout_height="match_parent"
                android:layout_weight="1"
                android:text="@string/mainActivity_button3" />
        </LinearLayout>
    </TableRow>

    <TableRow
        android:layout_width="match_parent"
        android:layout_weight="1" >

        <Button
            android:id="@+id/button4"
            android:layout_width="0dip"
            android:layout_height="match_parent"
            android:layout_weight="1"
            android:text="@string/mainActivity_button4" />

        <Button
            android:id="@+id/button5"
            android:layout_width="0dip"
            android:layout_height="match_parent"
            android:layout_weight="1"
            android:text="@string/mainActivity_button5" />
    </TableRow>

    <TableRow
        android:layout_width="match_parent"
        android:layout_weight="1" >

        <Button
            android:id="@+id/button6"
            android:layout_width="match_parent"
            android:layout_height="match_parent"
            android:layout_weight="1"
            android:text="@string/mainActivity_button6" />
    </TableRow>

</TableLayout>
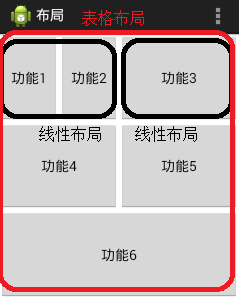
设置一个铺满屏幕的Table布局,Table布局默认是不占据一行的,你设置其match_parent也没有什么用。
只要对每一行指定其android:layout_weight="1"。
这里的1不是100%的意思。是其所占据的权重。如果有两个及两个组件以上,则根据这个权重来划分整行
比如在第一行的两个线性布局,皆设置android:layout_width="0dip"之后配合android:layout_weight="1"。则两个布局在表格布局的第一行的所占据的宽度,皆为这行的1/(1+1)=50%。也就是说,如果你要让组件或者布局平分这行,可以为各个组件在设定android:layout_width="0dip"之后,再用android:layout_weight设定权重。
第一行,其实也可以不要线性布局,在三个按钮都设置了android:layout_width="0dip"之后,按钮1的android:layout_weight="1",按钮2的android:layout_weight="1",按钮3的android:layout_weight="2"皆能做出上面的效果。
之后两个同理。
3、接着,如同《【Android】多个Activity之间利用bundle传递数值》(点击打开链接)一样,新建一个Activity的类名为UpdateActivity.java,其布局文件是activity_update.xml,安卓规定布局文件只能是a-z,0-9,_不能有其它符号,也不能有大写,很讨厌的。主要其害怕有其它符号,在R文件给你注册不了。在工程包中弄好了Activity类,在res\layout中弄好相应的布局文件,先在AndroidManifest.xml的application节点注册这个Activity,指定实现类,同时指定其主题为主题对话框,这样,这个Activity打开就不会覆盖整个屏幕,以模态窗口的形势打开,整个AndroidManifest.xml修改之后如下:
<?xml version="1.0" encoding="utf-8"?>
<manifest xmlns:android="http://schemas.android.com/apk/res/android"
    package="com.example.layouttest"
    android:versionCode="1"
    android:versionName="1.0" >

    <uses-sdk
        android:minSdkVersion="8"
        android:targetSdkVersion="18" />

    <application
        android:allowBackup="true"
        android:icon="@drawable/ic_launcher"
        android:label="@string/app_name"
        android:theme="@style/AppTheme" >
        <activity
            android:name="com.example.layouttest.MainActivity"
            android:label="@string/app_name" >
            <intent-filter>
                <action android:name="android.intent.action.MAIN" />
                <category android:name="android.intent.category.LAUNCHER" />
            </intent-filter>
        </activity>
        <!-- 注册UpdateActivity -->
        <activity
            android:name="com.example.layouttest.UpdateActivity"
            android:label="@string/updateActivity_name"
            android:theme="@android:style/Theme.Dialog" >
        </activity>
    </application>

</manifest><RelativeLayout xmlns:android="http://schemas.android.com/apk/res/android"
android:layout_width="match_parent"
android:layout_height="match_parent" >
<TextView
android:id="@+id/textView1"
android:layout_width="wrap_content"
android:layout_height="wrap_content"
android:text="@string/updateActivity_textView1"
android:textSize="24sp" />
<Button
android:id="@+id/button2"
android:layout_width="wrap_content"
android:layout_height="wrap_content"
android:layout_alignRight="@+id/textView1"
android:layout_below="@+id/textView1"
android:text="@string/updateActivity_button2"
android:textSize="18sp" />
<Button
android:id="@+id/button1"
android:layout_width="wrap_content"
android:layout_height="wrap_content"
android:layout_below="@+id/textView1"
android:layout_toLeftOf="@+id/button2"
android:text="@string/updateActivity_button1"
android:textSize="18sp" />
</RelativeLayout>package com.example.layouttest;
import android.app.Activity;
import android.os.Bundle;
import android.widget.Button;
import android.view.View;
import android.view.View.OnClickListener;
public class UpdateActivity extends Activity {
private Button button2;
protected void onCreate(Bundle savedInstanceState) {
super.onCreate(savedInstanceState);
setContentView(R.layout.activity_update);
button2 = (Button) findViewById(R.id.button2);
button2.setOnClickListener(new OnClickListener() {// 为button2添加点击事件
@Override
public void onClick(View v) {
finish();// 关闭此Activity
}
});
}
}
package com.example.layouttest;

import android.os.Bundle;
import android.app.Activity;
import android.content.Intent;
import android.view.Menu;

public class MainActivity extends Activity {

	@Override
	protected void onCreate(Bundle savedInstanceState) {
		super.onCreate(savedInstanceState);
		setContentView(R.layout.activity_main);
		Intent intent = new Intent(MainActivity.this, UpdateActivity.class);
		startActivity(intent);
	}

	@Override
	public boolean onCreateOptionsMenu(Menu menu) {
		// Inflate the menu; this adds items to the action bar if it is present.
		getMenuInflater().inflate(R.menu.main, menu);
		return true;
	}

}


 2320
2320

 被折叠的 条评论
为什么被折叠?
被折叠的 条评论
为什么被折叠?
 到【灌水乐园】发言


