


最近这一两周看到不少互联网公司都已经开始秋招提前批面试了。
不同以往的是,当前职场环境已不再是那个双向奔赴时代了。求职者在变多,HC 在变少,岗位要求还更高了。
最近,我们又陆续整理了很多大厂的面试题,帮助一些球友解惑答疑,分享技术面试中的那些弯弯绕绕。
总结链接如下:
喜欢本文记得收藏、关注、点赞。
作者 wangs,毕业于985高校,曾在中国科学院国家重点实验室开展科研工作。从学期间,发表了1篇SCI论文、1篇EI论文,并申请了若干项专利。
主要研究方向集中在大模型(LLM)和(RAG)等领域,在自然语言处理(NLP)领域深耕数载。
本博客是降低从业人员学习门槛,奉献自己价值,致力于开源贡献,为技术赋能。后续将会持续推进,敬情关注。
本文将深入分析千问模型推理代码,详细解析其内部实现机制, 简单阅读下官方推理代码:
from transformers import AutoModelForCausalLM, AutoTokenizer
model_name = "qwen/Qwen2___5-7B-Instruct"
model = AutoModelForCausalLM.from_pretrained(
    model_name,
    torch_dtype="auto",
    device_map="auto"
)
tokenizer = AutoTokenizer.from_pretrained(model_name)
prompt = "Give me a short introduction to large language model."
messages = [
    {"role": "system", "content": "You are Qwen, created by Alibaba Cloud. You are a helpful assistant."},
    {"role": "user", "content": prompt},
]
text = tokenizer.apply_chat_template(
    messages,
    tokenize=False,
    add_generation_prompt=True,
)
model_inputs = tokenizer([text], return_tensors="pt").to(model.device)
generated_ids = model.generate(
    **model_inputs,
     max_new_tokens=512,
)
generated_ids = [
    output_ids[len(input_ids):] for input_ids, output_ids in zip(model_inputs.input_ids, generated_ids)
]
response = tokenizer.batch_decode(generated_ids, skip_special_tokens=True)[0]
批量推理
from transformers import AutoModelForCausalLM, AutoTokenizer
model_name = "qwen/Qwen2___5-7B-Instruct"
model = AutoModelForCausalLM.from_pretrained(
    model_name,
    torch_dtype="auto",
    device_map="auto"
)
tokenizer = AutoTokenizer.from_pretrained(model_name,padding_side='left')  # 批量推理,要设置 左 padding
batch_prompt = [
    "Give me a short introduction to large language model.",
    "请介绍下您自己?"
         ]
batch_massages = []
for prompt in batch_prompt:
    messages = [
    {"role": "system", "content": "You are a helpful assistant."},
    {"role": "user", "content": prompt}]
    batch_massages.append(messages)

text = tokenizer.apply_chat_template(
    batch_massages,
    tokenize=False,
    add_generation_prompt=True,
)
model_inputs = tokenizer(text, padding=True, return_tensors="pt").to(model.device)
generated_ids = model.generate(
    **model_inputs,
    max_new_tokens=512,
)
generated_ids = [
    output_ids[len(input_ids):] for input_ids, output_ids in zip(model_inputs.input_ids, generated_ids)
]
response = tokenizer.batch_decode(generated_ids, skip_special_tokens=True)
-
model实例化粗探AutoModelForCausalLM.from_pretrained方法执行过程如下:config, kwargs = AutoConfig.from_pretrained( pretrained_model_name_or_path, return_unused_kwargs=True, trust_remote_code=trust_remote_code, code_revision=code_revision, _commit_hash=commit_hash, **hub_kwargs, **kwargs, )即根据
config.json文件里字段"model_type": "qwen2"加载 实例类型:""" type(config): <class 'transformers.models.qwen2.configuration_qwen2.Qwen2Config'> """根据
config类型匹配模型类:model_class = _get_model_class(config, cls._model_mapping) """ type(model_class) <class 'transformers.models.qwen2.modeling_qwen2.Qwen2ForCausalLM'> """所以:
AutoModelForCausalLM.from_pretrained本质调用是Qwen2ForCausalLM.from_pretrained方法.外层封装绕一大圈, 换个写法也会你会一目了然内在逻辑. 简化版本, 即:# 1.加载配置文件 with open('config.json', "r", encoding="utf-8") as reader: text = reader.read() config_dict = json.loads(text) # 2.实例化配置类 config = Qwen2Config(**config_dict) # 3.实例化模型 model = Qwen2ForCausalLM.from_pretrained(pretrained_model_name_or_path, config=config, **kwarg) # 即使 不写初始化 config 实例代码, PreTrainedModel.from_pretrained也会自动完成. model = Qwen2ForCausalLM.from_pretrained(pretrained_model_name_or_path, **kwarg)
-
首先会在本地缓存中加载所需的模型文件。若文件不存在,则会自动从远程仓库下载。**(cached_file)**.
-
该方法会读取模型的配置信息
json文件,并据此创建一个配置对象,确保模型结构.
-
Qwen2Config (PretrainedConfig)实例化:参数详情:
- vocab_size :Qwen2模型的词汇表大小。定义调用[`Qwen2Model`]时`inputs_ids`可以表示的不同token的数量。 - hidden_size :隐藏表示的维度。 - intermediate_size :MLP表示的维度。 - num_hidden_layers :Transformer编码器中的隐藏层数量。 - num_attention_heads :Transformer编码器中每个注意力层的注意力头数量。 - num_key_value_heads :应使用的key_value头的数量以实现分组查询注意力(Grouped Query Attention)。如果`num_key_value_heads=num_attention_heads`,模型将使用多头注意力(MHA),如果`num_key_value_heads=1`,模型将使用多查询注意力(MQA),否则使用GQA。在将多头检查点转换为GQA检查点时,每个分组的关键和值头应由该组内的所有原始头的平均池化构建。 - hidden_act (`str` 或 `function`, *可选*, 默认为`"silu"`):解码器中的非线性激活函数(函数或字符串)。 - max_position_embeddings :模型可能使用的最大序列长度。 - initializer_range :用于初始化所有权重矩阵的截断正态初始化器的标准差。 - rms_norm_eps:rms规范化层使用的epsilon。 - use_cache:模型是否应返回最后的key/values注意力(并非所有模型都使用)。仅当`config.is_decoder=True`时相关。 - tie_word_embeddings :模型输入和输出词嵌入是否应绑定。 - rope_theta :RoPE嵌入的基本周期。 - use_sliding_window:是否使用滑动窗口注意力。 - sliding_window :滑动窗口注意力(SWA)窗口大小。如果未指定,将默认为`4096`。 - max_window_layers :使用SWA(滑动窗口注意力)的层数。底部图层使用SWA,而顶部图层使用全部注意力。 - attention_dropout :注意力概率的dropout比率。 -
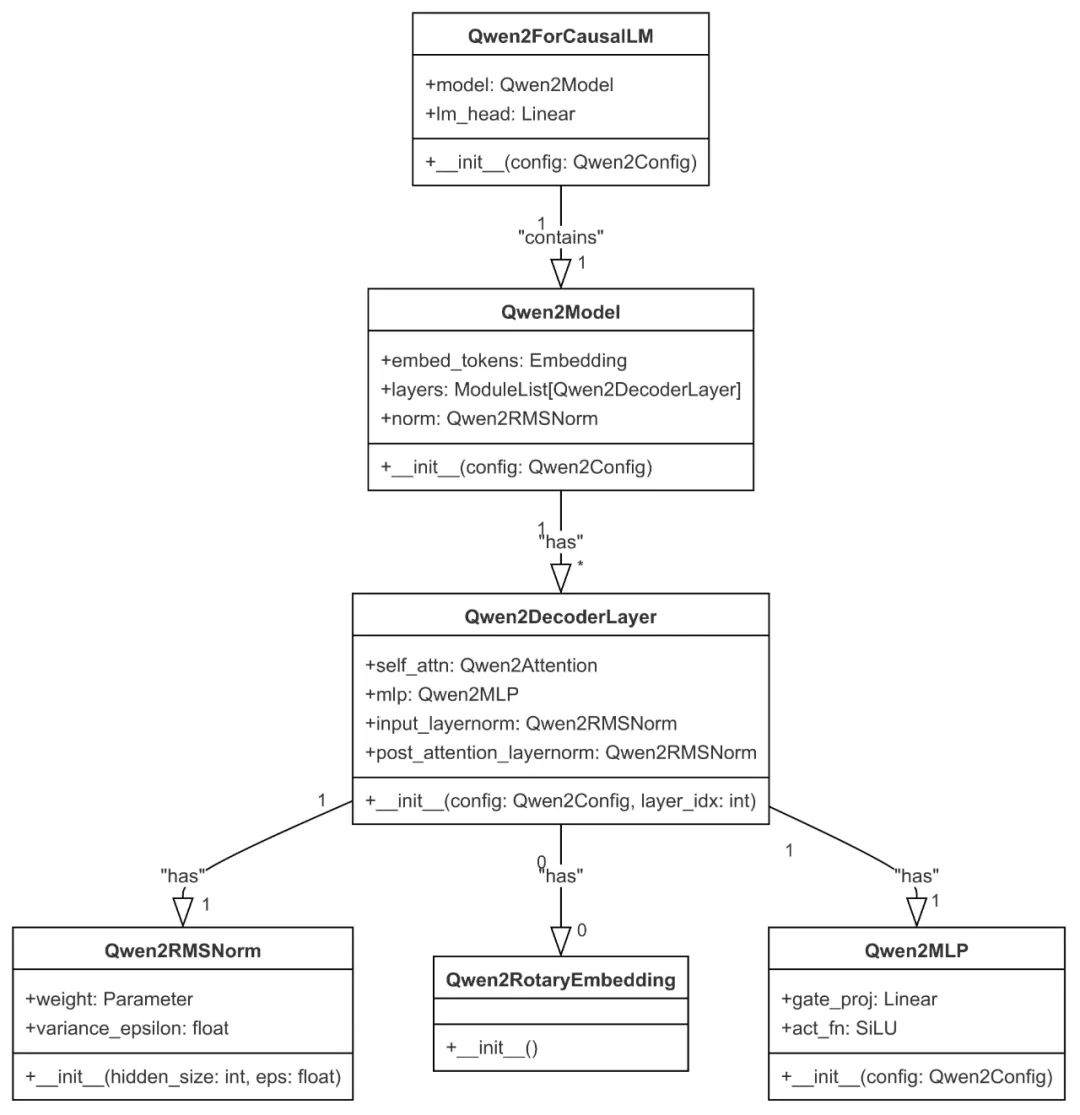
Qwen2ForCausalLM实例化:主要类模块和相关类属性如下图所示:
-
Qwen2RotaryEmbeddingRoPE的基本思想是将输入的token embeddings视为复数向量,然后根据其位置信息进行旋转变换。具体来说,对于每个token,都会根据其位置生成一个旋转矩阵,然后将这个旋转矩阵应用于token embedding。这样,不同位置的token就会具有不同的旋转角度,从而实现了位置编码。在RoPE中,对于输入序列中的每个位置 (i),其嵌入向量 (x_i) 会被一个旋转矩阵 (R_i) 进行变换:其中,旋转矩阵 (R_i) 是根据位置 (i) 计算得到的。具体来说,旋转矩阵 (R_i) 的形式通常是:import torch from torch import nn class Qwen2RotaryEmbedding(nn.Module): def __init__(self,dim = 128 , base = 10000,max_max_position_embeddings = 2048, device = None): super().__init__() self.dim = dim self.base = base self.max_position_embeddings = max_position_embeddings inv_freq = 1.0 / (self.base ** (torch.arange(0,self.dim, 2,dtype = torch.int64).float().to(device)) / self.dim ) self.register_buffer("inv_freq", inv_freq, persistent=False) self._set_cos_sin_cache( seq_len=max_position_embeddings, device=self.inv_freq.device, dtype=torch.get_default_dtype() ) def _set_cos_sin_cache(self, seq_len, device, dtype): self.max_seq_len_cached = seq_len t = torch.arange(self.max_seq_len_cached, device=device, dtype=torch.int64).type_as(self.inv_freq) freqs = torch.outer(t, self.inv_freq) # Different from paper, but it uses a different permutation in order to obtain the same calculation emb = torch.cat((freqs, freqs), dim=-1) self.register_buffer("cos_cached", emb.cos().to(dtype), persistent=False) self.register_buffer("sin_cached", emb.sin().to(dtype), persistent=False)上述旋转矩阵应用于
k,v向量,很巧妙,先看论文实现方法。向量元素(element) 两两分组旋转,即原本 (q_0,q_1)为旋转一组,代码实现中(q_0, q_d/2) 设置一组,构思很巧:
def rotata_half(x): x1 = x[..., :x.shape[-1] //2] x2 = x[..., x.shape[-1] // 2 :] retuwn torch.cat((-x2,x1),dim = -1) def apply_rotary_pos_emb(q, k, cos, sin, position_ids, unsqueeze_dim=1): cos = cos[position_ids].unsqueeze(unsqueeze_dim) sin = sin[position_ids].unsqueeze(unsqueeze_dim) q_embed = (q * cos) + (rotate_half(q) * sin) k_embed = (k * cos) + (rotate_half(k) * sin) return q_embed, k_embed -
Qwen2Attention
Qwen2Model 正在使用 Qwen2SdpaAttention,但 torch.nn.functional.scaled_dot_product_attention 不支持 output_attentions=True。因此回退到手动实现注意力机制,即外层封装Qwen2SdpaAttention 类,继承Qwen2Attention.
  class Qwen2Attention(nn.Module):
      def __init__(self, config: Qwen2Config, layer_idx: Optional[int] = None):
          super().__init__()
          self.config = config                              # 配置类
          self.layer_idx = layer_idx                        # 模型层id
          self.hidden_size = config.hidden_size                    # 隐藏层维度 28 * 128
              self.num_heads = config.num_attention_heads          # q 注意力头: 28
          self.head_dim = self.hidden_size // self.num_heads       # 注意力头向量:128
          self.num_key_value_heads = config.num_key_value_heads    # k,v 注意力头: 4 ,广播 28
          self.num_key_value_groups = self.num_heads // self.num_key_value_heads     # GQA 分 7 组, 每组 k,v 共享。
          self.max_position_embeddings = config.max_position_embeddings
          self.rope_theta = config.rope_theta
          self.is_causal = True
          self.attention_dropout = config.attention_dropout
          if (self.head_dim * self.num_heads) != self.hidden_size:
              raise ValueError(
                  f"hidden_size must be divisible by num_heads (got `hidden_size`: {self.hidden_size}"
                  f" and `num_heads`: {self.num_heads})."
              )
          self.q_proj = nn.Linear(self.hidden_size, self.num_heads * self.head_dim, bias=True)
          self.k_proj = nn.Linear(self.hidden_size, self.num_key_value_heads * self.head_dim, bias=True)
          self.v_proj = nn.Linear(self.hidden_size, self.num_key_value_heads * self.head_dim, bias=True)
          self.o_proj = nn.Linear(self.num_heads * self.head_dim, self.hidden_size, bias=False)

          self.rotary_emb = Qwen2RotaryEmbedding(
              self.head_dim,
              max_position_embeddings=self.max_position_embeddings,
              base=self.rope_theta,
          )
在 forward 里 执行 attention ,经q_proj、k_proj、v_proj 矩阵投影后,获取 Q,K,V 状态信息,分别是:[batch_size, seq_len, hidden], 按config配置信息将 hidden 进行切头处理,Q :[ num_heads * head_dim]; k,v :[ num_key_value_heads* head_dim]; 每个头认为是channel,转化后维度信息:
Q,K,V: [bs, channel, seq_len,head_dimhead_dim]
K,V 作用于旋转矩阵后保存,加速解码过程。代码实现缓存相对简单,key_cache、value_cache 列表实现。
if layer_idx == 0:
     self._seen_tokens += key_states.shape[-2]
# Update the cache
if len(self.key_cache) <= layer_idx:
    self.key_cache.append(key_states)
    self.value_cache.append(value_states)
else:
    self.key_cache[layer_idx] = torch.cat([self.key_cache[layer_idx], key_states], dim=-2)
    self.value_cache[layer_idx] = torch.cat([self.value_cache[layer_idx], value_states], dim=-2)
K,V 在 channel 维度上广播,对齐 Q 维度,执行 torch.nn.functional.scaled_dot_product_attention 操作。
 attn_output = torch.nn.functional.scaled_dot_product_attention(
            query_states,
            key_states,
            value_states,
            attn_mask=causal_mask,
            dropout_p=self.attention_dropout if self.training else 0.0,
            is_causal=is_causal,
        )
该方法 Torch 实现:
def scaled_dot_product_attention(query, key, value, attn_mask=None, dropout_p=0.0, is_causal=False, scale=None) -> torch.Tensor:
    L, S = query.size(-2), key.size(-2)
    scale_factor = 1 / math.sqrt(query.size(-1)) if scale is None else scale
    attn_bias = torch.zeros(L, S, dtype=query.dtype)
    if is_causal:
        assert attn_mask is None
        temp_mask = torch.ones(L, S, dtype=torch.bool).tril(diagonal=0)
        attn_bias.masked_fill_(temp_mask.logical_not(), float("-inf"))
        attn_bias.to(query.dtype)
    if attn_mask is not None:
        if attn_mask.dtype == torch.bool:
            attn_bias.masked_fill_(attn_mask.logical_not(), float("-inf"))
        else:
            attn_bias += attn_mask
    attn_weight = query @ key.transpose(-2, -1) * scale_factor
    attn_weight += attn_bias
    attn_weight = torch.softmax(attn_weight, dim=-1)
    attn_weight = torch.dropout(attn_weight, dropout_p, train=True)
    return attn_weight @ value
推理预填充阶段, is_causal 设置 True;在解码阶段,is_causal 设置 False;整个过程涉及transpose,view 操作可能会导致tensor 在内存里不连续,注意contiguous方法使用。
Qwen2MLP

    class Qwen2MLP(nn.Module):
        def __init__(self, config):
            super().__init__()
            self.hidden_size = config.hidden_size
            self.intermediate_size = config.intermediate_size
            self.gate_proj = nn.Linear(self.hidden_size, self.intermediate_size, bias=False)
            self.up_proj = nn.Linear(self.hidden_size, self.intermediate_size, bias=False)
            self.down_proj = nn.Linear(self.intermediate_size, self.hidden_size, bias=False)
            self.act_fn = ACT2FN[config.hidden_act]

        def forward(self, hidden_state):
            return self.down_proj(self.act_fn(self.gate_proj(hidden_state)) * self.up_proj(hidden_state))
激活函数是SiLU:
-
Qwen2RMSNorm核心是通过均方根进行归一化,从而在保持模型性能的同时,减少了计算复杂度.
class Qwen2RMSNorm(nn.Module): def __init__(self, hidden_size, eps=1e-6): super().__init__() self.weight = nn.Parameter(torch.ones(hidden_size)) self.variance_epsilon = eps def forward(self, hidden_states): input_dtype = hidden_states.dtype hidden_states = hidden_states.to(torch.float32) variance = hidden_states.pow(2).mean(-1,keepdim=True) hidden_states = hidden_states * torch.rsqrt(variance + self.variance_epsilon) return self.weight * hidden_states.to(input_dtype) -
Pipeline
    Qwen2ForCausalLM(
      (model): Qwen2Model(
        (embed_tokens): Embedding(152064, 3584)
        (layers): ModuleList(
          (0-27): 28 x Qwen2DecoderLayer(
            (self_attn): Qwen2SdpaAttention(
              (q_proj): Linear(in_features=3584, out_features=3584, bias=True)
              (k_proj): Linear(in_features=3584, out_features=512, bias=True)
              (v_proj): Linear(in_features=3584, out_features=512, bias=True)
              (o_proj): Linear(in_features=3584, out_features=3584, bias=False)
              (rotary_emb): Qwen2RotaryEmbedding()
            )
            (mlp): Qwen2MLP(
              (gate_proj): Linear(in_features=3584, out_features=18944, bias=False)
              (up_proj): Linear(in_features=3584, out_features=18944, bias=False)
              (down_proj): Linear(in_features=18944, out_features=3584, bias=False)
              (act_fn): SiLU()
            )
            (input_layernorm): Qwen2RMSNorm((3584,), eps=1e-06)
            (post_attention_layernorm): Qwen2RMSNorm((3584,), eps=1e-06)
          )
        )
        (norm): Qwen2RMSNorm((3584,), eps=1e-06)
      )
      (lm_head): Linear(in_features=3584, out_features=152064, bias=False)
    )
    ```

    查看模型参数命名:

    ```python
     for name, parameters in model.named_parameters():
         print(name)
    """
    model.embed_tokens.weight
    model.layers.0.self_attn.q_proj.weight
    model.layers.0.self_attn.q_proj.bias
    model.layers.0.self_attn.k_proj.weight
    model.layers.0.self_attn.k_proj.bias
    model.layers.0.self_attn.v_proj.weight
    model.layers.0.self_attn.v_proj.bias
    model.layers.0.self_attn.o_proj.weight
    model.layers.0.mlp.gate_proj.weight
    model.layers.0.mlp.up_proj.weight
    model.layers.0.mlp.down_proj.weight
    model.layers.0.input_layernorm.weight
    model.layers.0.post_attention_layernorm.weight
    ...
    model.norm.weight
    lm_head.weight
    """
    ```

    模型参数名 和 `model.safetensors.index.json` 文件里 `weight_map`字典下key 值一致,根据参数名去加载相关的权重矩阵。

+ `Load_checkpoints` **加载权重:**

  调用方法: `Qwen2ForCausalLM._load_pretrained_model`, 入参信息:

  ```python
  def _load_pretrained_model(
          cls,
          model,                # 实例化模型
          state_dict,
          loaded_keys,           # 模型参数的命名
          resolved_archive_file, # 模型权重文件路径,eg suffix.safetensors
          **kwargs)
读取权重文件简要代码:
"""摘自官方部分,仅供参考"""
def set_module_tensor(module, tensor_name, value):
    if "." in tensor_name:
        splits = tensor_name.split(".")
        for split in splits[:-1]:
            new_module = getattr(module, split)
            module = new_module
        tensor_name = splits[-1]
    '''
    举例:origin:
       module      : Qwen2ForCausalLM
       tensor_name : 'model.embed_tokens.weight'
    执行上述递归后更新为:
       module      : Embedding(152064, 3584)
       tensor_name : 'weight'
    '''
    param = module._parameters[tensor_name] # 初始化参数
    param_cls = type(param)  # param类型:orch.nn.parameter.Parameter'>
    # value 是个 <class 'torch.Tensor'> 需要类型转化为<class 'torch.nn.parameter.Parameter'>
    new_value = param_cls(value, requires_grad = param.requires_grad)
    # 赋值替换,更新参数
    module._parameters[tensor_name] = new_value

for shard_file in resolved_archive_file:
    state_dict = load_state_dict(shard_file, is_quantized=is_quantized)
    for param_name, param in state_dict.items():
        set_module_tensor(model, param_name, param)
- 解析参数路径
-
输入:
module(模型对象)、tensor_name(参数名称,例如'model.embed_tokens.weight')、value(参数值)。 -
处理:
-
如果
tensor_name包含".",说明参数路径是嵌套的(例如'model.embed_tokens.weight')。 -
代码通过递归的方式逐层解析
tensor_name,直到找到最终的模块和参数名称。 -
例如,对于
'model.embed_tokens.weight',最终会找到Embedding模块,并将tensor_name更新为'weight'。
- 获取并更新参数
-
获取参数:通过
module._parameters[tensor_name]获取当前模块中的参数对象。 -
类型转换:将传入的
value(torch.Tensor类型)转换为与原参数相同的类型(torch.nn.parameter.Parameter)。 -
更新参数:将转换后的
new_value赋值给module._parameters[tensor_name],从而更新模型的参数。
- 加载分片文件并设置参数
-
遍历分片文件:对于每个分片文件
shard_file,使用load_state_dict函数加载其中的参数。 -
设置参数:对于每个参数
param_name和对应的param,调用set_module_tensor函数将参数设置到模型的相应模块中。 -
GenerationConfig实例化:读取
'generation_config.json'文件, 实例化赋值model.generation_config.GenerationConfig { "bos_token_id": 151643, "do_sample": true, "eos_token_id": [ 151645, 151643 ], "pad_token_id": 151643, "repetition_penalty": 1.05, "temperature": 0.7, "top_k": 20, "top_p": 0.8 } -
AutoTokenizer实例化:['<|im_start|>', '<|im_end|>', '<|object_ref_start|>', '<|object_ref_end|>', '<|box_start|>', '<|box_end|>', '<|quad_start|>', '<|quad_end|>', '<|vision_start|>', '<|vision_end|>', '<|vision_pad|>', '<|image_pad|>', '<|video_pad|>']token转化为AddedToken对象:AddedToken("<|endoftext|>", rstrip=False, lstrip=False, single_word=False, normalized=False, special=True)
-
分词器构建:
fast_tokenizer = TokenizerFast.from_file('tokenizer.json') encodings = fast_tokenizer.encode_batch('您好') [self._convert_encoding(encoding) for encoding in encodings] -
先检查
tokenizer_type参数是否传递,若无,则使用tokenizer_config文件来获取tokenizer类;<class 'transformers.models.qwen2.tokenization_qwen2_fast.Qwen2TokenizerFast'>; 即Qwen2TokenizerFast.from_pretrained方法。 -
特殊标记占位符:
-
generate方法:generation_config: 大多数控制生成的参数都设置在
generation_config中,如果没有传递,将使用模型的默认生成配置。您可以通过向generate()传递相应的参数来覆盖任何generation_config,例如.generate(inputs, num_beams=4, do_sample=True)logits_processor: 自定义的 logits 处理器,用于补充(基于参数和生成配置构建的默认 logits 处理器)。如果传递的 logit 处理器已经基于参数或生成配置创建,则会抛出错误。
LogitsProcessorList这个类可以用来创建一个[LogitsProcessor]或[LogitsWarper]的列表,随后用于处理一个scores输入张量。这个类从列表继承并添加了一个特定的__call__方法,用于将每个[LogitsProcessor]或[LogitsWarper]应用到输入上。eg:<transformers.generation.logits_process.RepetitionPenaltyLogitsProcessor object at 0x7f55df1d6390> <transformers.generation.logits_process.TemperatureLogitsWarper object at 0x7f571c31bed0> <transformers.generation.logits_process.TopKLogitsWarper object at 0x7f571c319cd0> <transformers.generation.logits_process.TopPLogitsWarper object at 0x7f55db6c3910>模型推理,logits_processor 处理
next_token_logits:stopping_criteria:
StoppingCriteriaList自定义的停止标准,用于补充(基于参数和生成配置构建的默认停止标准)。如果传递的停止标准已经基于参数或生成配置创建,则会抛出错误。eg:<transformers.generation.stopping_criteria.MaxLengthCriteria object at 0x7f5744a25c50> <transformers.generation.stopping_criteria.EosTokenCriteria object at 0x7f5744b2ead0采样策略:
-
原理: 束采样结合了束搜索和采样的特点,在每一步生成时,既保留多个候选序列,又通过采样选择下一个词。
-
特点:
-
多样性: 生成的文本具有较高的多样性。
-
平衡性: 在生成速度和生成质量之间取得平衡。
-
原理: 束搜索是一种扩展贪心搜索的方法,在每一步生成时,保留多个候选序列,最终选择概率最高的序列。
-
特点:
-
平衡性: 在生成速度和生成质量之间取得平衡。
-
多样性: 生成的文本比贪心搜索更具多样性
-
原理: 辅助生成是一种结合了多种解码方法的策略,通常在生成过程中引入外部知识或规则,以指导生成过程。
-
特点:
-
指导性: 生成的文本受到外部知识或规则的指导,质量较高。
-
多样性: 通过引入外部知识,生成多样化的文本。
-
原理: 贪心搜索是一种简单的解码方法,每次选择概率最高的词作为下一个生成的词。
-
GenerationMode.SAMPLE:在处理
next_token_scores时,通常会先通过LogitsProcessor或LogitsWarper进行预处理,这包括诸如去除不合法的token、应用温度调整或是执行top-k或top-p采样等操作。随后,对处理后的分数进行softmax归一化,将其转换为概率分布。最后,从多项式分布进行采样。next_token_scores = logits_processor(input_ids, next_token_logits) next_token_scores = logits_warper(input_ids, next_token_scores) probs = nn.functional.softmax(next_token_scores, dim=-1) next_tokens = torch.multinomial(probs, num_samples=1).squeeze(1) -
GenerationMode.GREEDY_SEARCH -
GenerationMode.ASSISTED_GENERATION: -
GenerationMode.. BEAM_SEARCH -
GenerationMode.. BEAM_SAMPLE -
EosTokenCriteria
class EosTokenCriteria(StoppingCriteria): def __call__(self, input_ids: torch.LongTensor, scores: torch.FloatTensor, **kwargs) -> torch.BoolTensor: is_done = torch.isin(input_ids[:, -1], self.eos_token_id) return is_done -
MaxLengthCriteria
class MaxLengthCriteria(StoppingCriteria): def __call__(self, input_ids: torch.LongTensor, scores: torch.FloatTensor, **kwargs) -> torch.BoolTensor: cur_len = input_ids.shape[-1] is_done = cur_len >= self.max_length return torch.full((input_ids.shape[0],), is_done, device=input_ids.device, dtype=torch.bool) -
repetition_penalty
class RepetitionPenaltyLogitsProcessor(LogitsProcessor): def __call__(self, input_ids: torch.LongTensor, scores: torch.FloatTensor) -> torch.FloatTensor: score = torch.gather(scores, 1, input_ids) score = torch.where(score < 0, score * self.penalty, score / self.penalty) scores_processed = scores.scatter(1, input_ids, score) return scores_processed -
temperature
class TemperatureLogitsWarper(LogitsWarper): def __call__(self, input_ids: torch.LongTensor, scores: torch.FloatTensor) -> torch.FloatTensor: scores_processed = scores / self.temperature return scores_processed -
top_k
class TopKLogitsWarper(LogitsWarper): def __call__(self, input_ids: torch.LongTensor, scores: torch.FloatTensor) -> torch.FloatTensor: top_k = min(self.top_k, scores.size(-1)) # Safety check # Remove all tokens with a probability less than the last token of the top-k indices_to_remove = scores < torch.topk(scores, top_k)[0][..., -1, None] scores_processed = scores.masked_fill(indices_to_remove, -float("Inf")) return scores_processed -
top_p
class TopPLogitsWarper(LogitsWarper): def __call__(self, input_ids: torch.LongTensor, scores: torch.FloatTensor) -> torch.FloatTensor: sorted_logits, sorted_indices = torch.sort(scores, descending=False) cumulative_probs = sorted_logits.softmax(dim=-1).cumsum(dim=-1) # Remove tokens with cumulative top_p above the threshold (token with 0 are kept) sorted_indices_to_remove = cumulative_probs <= (1 - self.top_p) # Keep at least min_tokens_to_keep sorted_indices_to_remove[..., -self.min_tokens_to_keep :] = 0 # scatter sorted tensors to original indexing indices_to_remove = sorted_indices_to_remove.scatter(1, sorted_indices, sorted_indices_to_remove) scores_processed = scores.masked_fill(indices_to_remove, self.filter_value) return scores_processed -
批量推理
在批量推理过程中,每个样本输出模型长度不一致,left padding能够在 推理预填充阶段实现批量计算。在解码阶段怎么实现批量推理呢?
假设解码阶段输入:
eos_token_id  = 151643
# kv cache 解码阶段输入:
model_inputs['input_ids']
tensor([[ 77235],
        [151643]], device='cuda:0')
# 输出:
next_tokens
tensor([ 11, 43959], device='cuda:0')
上述,当输入token为 eos_token_id时, 输出的token 未必是 eos_token_id;transformer 处理方式很直接:
# finished sentences should have their next token be a padding token
# has_eos_stopping_criteria = [1,0],  1表示未完成,0表示完成
if has_eos_stopping_criteria:
    next_tokens = next_tokens * unfinished_sequences + pad_token_id * (1 - unfinished_sequences)
先用stopping_criteria 判断哪个样本完成,并设置标识符。已完成的样本后续推理过程,用padding 填充;当样本间数据prompt分布不一致,或者任务难度不能对齐,批量处理也会造成资源的浪费。


 893
893

 被折叠的 条评论
为什么被折叠?
被折叠的 条评论
为什么被折叠?
 到【灌水乐园】发言


