


1.更改图像和视频的亮度
更改亮度
更改图像的亮度是常用的点操作。在此操作中,图像中每个像素的值应增加/减少一个常数。要更改视频的亮度,应对视频中的每一帧执行相同的操作。
如果要增加图像的亮度,则必须为图像中的每个像素添加一些正常量值。
new_image (i, j) = image(i, j) + c
如果要降低图像的亮度,则必须从图像中的每个像素中减去一些正常量值。
new_image (i, j) = 图像(i, j) - c
例如,说,这是您的原始图像。假设图像的数据类型是CV_8U(即 - 图像中的像素是 8 位无符号的。因此,图像中每个像素的有效值范围应为 0 - 255。
 |
|---|
| 原始图像 |
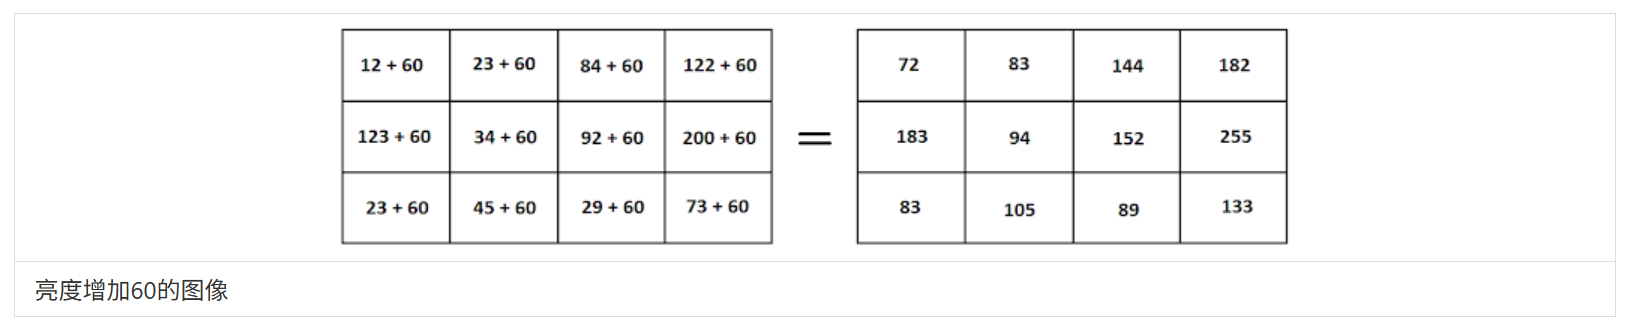
假设您想将原始图像的亮度提高 60。因此,您应该为原始图像中的每个像素添加 60。您必须通过在原始图像上加 60 来确保输出图像中的像素值不应超过允许的最大限制。如果超过最大限制,则必须分配最大值而不是正确的值。
这是亮度增加60的输出图像。您可能已经注意到,(3, 1) 位置的像素值为 255,尽管在 200 上加上 60 后,它应该是 260。这是因为此图像的最大允许像素值为 255。
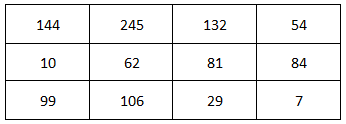
假设您想将原始图像的亮度降低 20。因此,您应该从原始图像中的每个像素中减去 20。您必须确保从原始图像中减去 20 后,输出图像中的像素值不应低于允许的最小限制。如果它低于最小限制,则必须分配最小值而不是正确的值。
这是亮度降低20的输出图像。您可能已经注意到 (0, 0) 位置的像素值为 0,尽管从 8 中减去 20 后它应该是 -12。这是因为具有无符号数据类型的图像的最小允许像素值为 0。

使用 OpenCV 更改图像的亮度
需要在QT中配置包含路径及类库路径
1 2INCLUDEPATH += D:\Application\opencvdev\opencv3.4.6\rebuild_for_qt\install\include LIBS += D:\Application\opencvdev\opencv3.4.6\rebuild_for_qt\lib\libopencv_*.a
将上述代码片段复制并粘贴到 IDE 中并运行它。
#include <QCoreApplication>
#include <opencv2/opencv.hpp>

using namespace std;
using namespace cv;

int main(int argc, char *argv[])
{
    QCoreApplication a(argc, argv);
    // 读取图像
    String rootDir = "D:/Gerry/project/opencvproj/singleandslot/OpenCV-2/ImageAndVideoHandle/resources/lena.png";
    Mat image = imread(rootDir);

    // 对图片进行亮度增强
    Mat imageBright50;
    image.convertTo(imageBright50, -1, 1, 50);

    Mat imageBright100;
    image.convertTo(imageBright100, -1, 1, 100);
    // 对图像进行亮度减少
    Mat imageDark50;
    image.convertTo(imageDark50, -1, 1, -50);

    Mat imageDark100;
    image.convertTo(imageDark100, -1, 1, -100);

    // 定义窗口标题
    String OriginWind = "原图像";
    String Bright50Wind = "增亮50";
    String Bright100Wind = "增亮100";
    String Dark50Wind = "减少亮度50";
    String Dark100Wind = "减少亮度100";
    // 创建四个窗体
    namedWindow(OriginWind, WINDOW_NORMAL);
    namedWindow(Bright50Wind, WINDOW_NORMAL);
    namedWindow(Bright100Wind, WINDOW_NORMAL);
    namedWindow(Dark50Wind, WINDOW_NORMAL);
    namedWindow(Dark100Wind, WINDOW_NORMAL);

    // 分别在四个窗口中显示出来完成的图像
    imshow(OriginWind, image);
    imshow(Bright50Wind, imageBright50);
    imshow(Bright100Wind, imageBright100);
    imshow(Dark50Wind, imageDark50);
    imshow(Dark100Wind, imageDark100);

    waitKey(0);

    destroyAllWindows();


    return a.exec();
}
 |
|---|
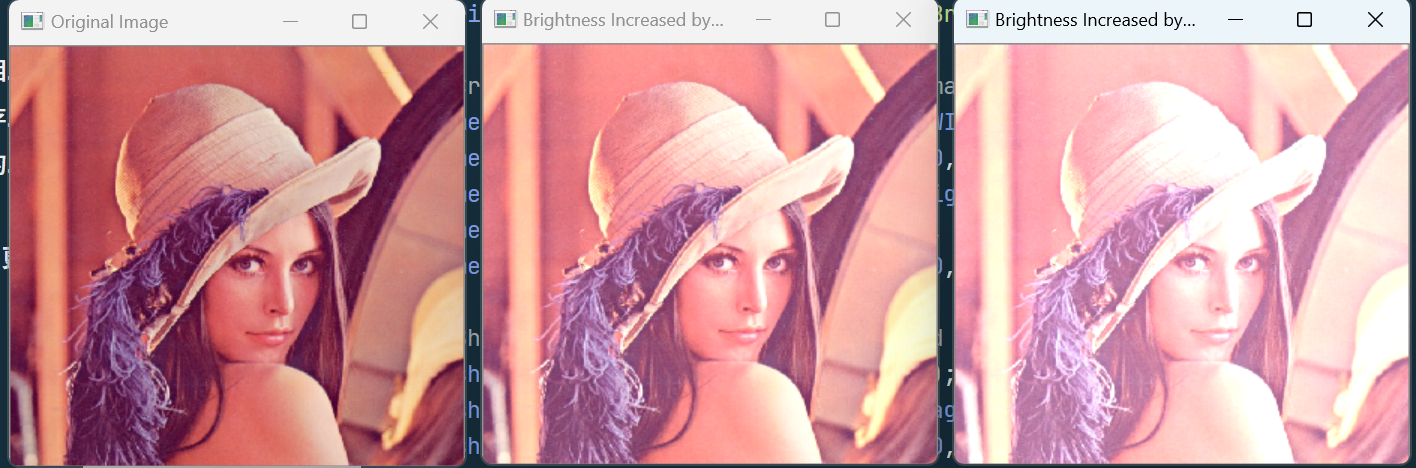
| 亮度增加 |
 |
|---|
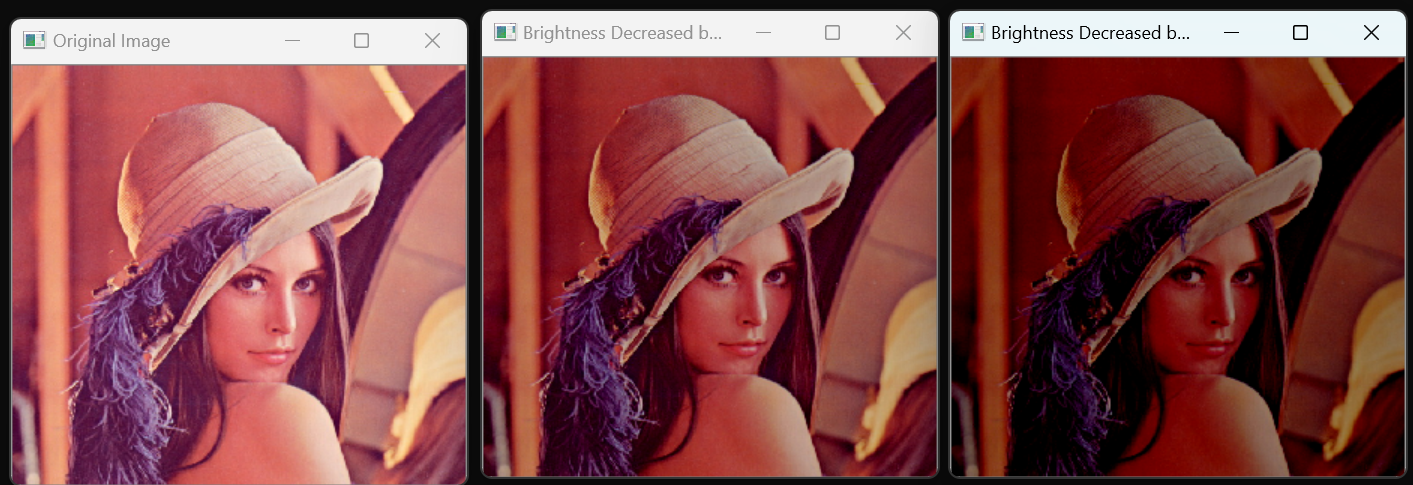
| 亮度降低 |
解释
让我们逐行浏览上面的示例。
// Read the image file
Mat image = imread("D:/My OpenCV Website/My Guitar.jpg");

// Check for failure
if (image.empty())
{
    cout << "Could not open or find the image" << endl;
    cin.get(); //wait for any key press
    return -1;
}
此代码段从指定文件加载图像。如果加载图像失败,程序将退出。
上面的代码段将像素值增加指定的量,并将其存储在给定的输出图像中。如果指定的值为正,则输出图像的亮度将增加。如果指定的值为负,则输出图像的亮度将降低。
Mat imageBrighnessHigh50;
image.convertTo(imageBrighnessHigh50, -1, 1, 50); //increase the brightness by 50

Mat imageBrighnessHigh100;
image.convertTo(imageBrighnessHigh100, -1, 1, 100); //increase the brightness by 100

Mat imageBrighnessLow50;
image.convertTo(imageBrighnessLow50, -1, 1, -50); //decrease the brightness by 50

Mat imageBrighnessLow100;
image.convertTo(imageBrighnessLow100, -1, 1, -100); //decrease the brightness by 100
void Mat::convertTo( OutputArray m, int rtype, double alpha=1, double beta=0 ) const
此函数将每个像素值转换为目标数据类型,并按照以下公式更改值。
pixel_value_of_output_image(x, y) = pixel_value_of_input_image(x, y) * alpha + beta;
- m - 输出图像。如果需要,将重新分配此数据结构。
- rtype - 输出图像的类型。如果 rtype 为负值,则输出图像的类型将与输入图像的类型相同。
- alpha - 在分配给输出图像之前,输入图像中的每个像素将乘以此数字。
- beta - 此值将添加到输入图像中的每个像素并分配给输出图像。
//Defining window names for above images
String windowNameOriginalImage = "Original Image";
String windowNameBrightnessHigh50 = "Brightness Increased by 50";
String windowNameWithBrightnessHigh100 = "Brightness Increased by 100";
String windowNameBrightnessLow50 = "Brightness Decreased by 50";
String windowNameBrightnessLow100 = "Brightness Decreased by 100";

//Create and open windows for above images
namedWindow(windowNameOriginalImage, WINDOW_NORMAL);
namedWindow(windowNameBrightnessHigh50, WINDOW_NORMAL);
namedWindow(windowNameWithBrightnessHigh100, WINDOW_NORMAL);
namedWindow(windowNameBrightnessLow50, WINDOW_NORMAL);
namedWindow(windowNameBrightnessLow100, WINDOW_NORMAL);

//Show above images inside the created windows.
imshow(windowNameOriginalImage, image);
imshow(windowNameBrightnessHigh50, imageBrighnessHigh50);
imshow(windowNameWithBrightnessHigh100, imageBrighnessHigh100);
imshow(windowNameBrightnessLow50, imageBrighnessLow50);
imshow(windowNameBrightnessLow100, imageBrighnessLow100);
上面的代码片段将创建窗口并在其中显示图像。
上面的代码段将等待,直到按下任何键。按键后,所有创建的窗口将被销毁。
1 2 3waitKey(0); // Wait for any key stroke destroyAllWindows(); //destroy all open windows
使用 OpenCV 更改视频的亮度
#include <QCoreApplication>
#include <opencv2/opencv.hpp>

using namespace std;
using namespace cv;

int main(int argc, char *argv[])
{
    QCoreApplication a(argc, argv);
    // 读取图像
    String VideoDir = "D:/Gerry/project/opencvproj/singleandslot/OpenCV-2/ImageAndVideoHandle/resources/点云应用.mp4";
    // 打开视频文件并进行数据读取
    VideoCapture cap(VideoDir);

    // 定义窗口标题
    String OriginWind = "原视频";
    String Bright50Wind = "增亮50";
    String Bright100Wind = "增亮100";
    String Dark50Wind = "减少亮度50";
    String Dark100Wind = "减少亮度100";
    // 创建四个窗体
    namedWindow(OriginWind, WINDOW_NORMAL);
    namedWindow(Bright50Wind, WINDOW_NORMAL);
    namedWindow(Bright100Wind, WINDOW_NORMAL);
    namedWindow(Dark50Wind, WINDOW_NORMAL);
    namedWindow(Dark100Wind, WINDOW_NORMAL);

    while(true)
    {
        // 可以把视频中每一帧看成一张图像来进行处理
        Mat frame;
        // 通过视频捕获对象来获取每一帧
        cap.read(frame);

        // 对图片进行亮度增强
        Mat imageBright50;
        frame.convertTo(imageBright50, -1, 1, 50);

        Mat imageBright100;
        frame.convertTo(imageBright100, -1, 1, 100);
        // 对图像进行亮度减少
        Mat imageDark50;
        frame.convertTo(imageDark50, -1, 1, -50);

        Mat imageDark100;
        frame.convertTo(imageDark100, -1, 1, -100);

        // 分别在四个窗口中显示出来完成的图像
        imshow(OriginWind, frame);
        imshow(Bright50Wind, imageBright50);
        imshow(Bright100Wind, imageBright100);
        imshow(Dark50Wind, imageDark50);
        imshow(Dark100Wind, imageDark100);

        if (waitKey(10) == 27)
        {
            cout << "ESC退出程序";
            break;
        }
    }

    destroyAllWindows();
    return a.exec();
}
2.更改图像和视频的对比度
更改图像的对比度也是一种常用的点操作。在此操作中,图像中每个像素的值应乘以不等于 1 的正常数。要更改视频的对比度,应对视频中的每个帧执行相同的操作。为了增加图像的对比度,图像中的每个像素都应乘以大于1的正常数。
new_image (i, j) = image(i, j) * c (c > 1)
为了降低图像的对比度,图像中的每个像素都应乘以小于该常数的正常数。
new_image (i, j) = image(i, j) * c (0 < c < 1)
例如,说,这是您的原始图像。假设图像的数据类型为 CV_8U.(即 - 图像中的像素是 8 位无符号的。请参阅 OpenCV C++ API 了解更多信息。因此,图像中每个像素的有效值范围应为 0 - 255。
 |
|---|
| 原始图像 |
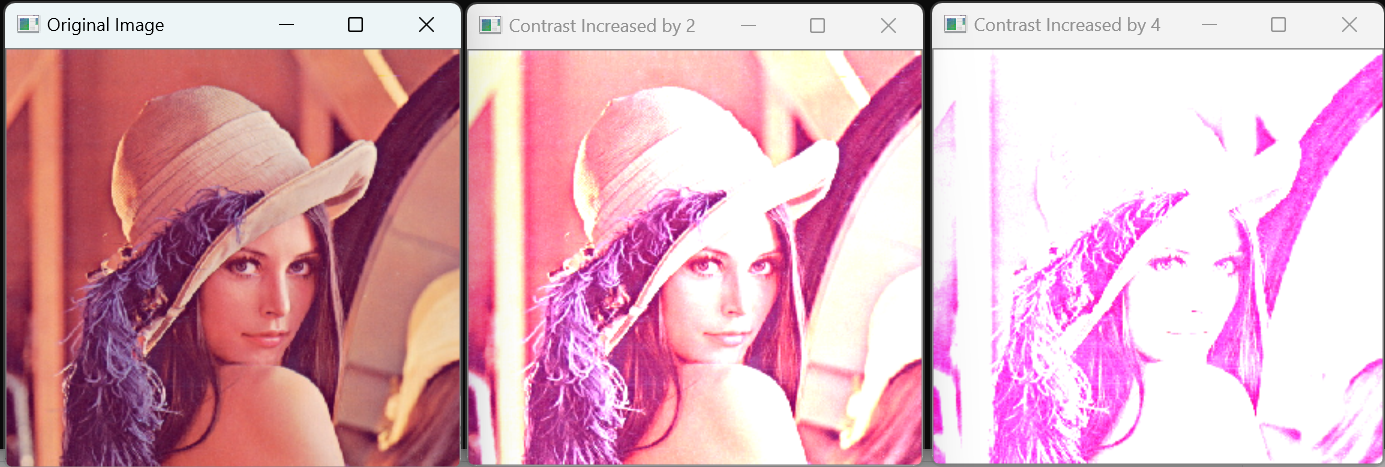
假设您想将原始图像的对比度提高 2 倍。因此,您应该将原始图像中的每个像素乘以 2。必须确保输出图像中的像素值在乘法后不应超过允许的最大限制。如果超过最大限制,则必须分配最大值而不是正确的值。
这是对比度增加 2 倍的图像。您可能已经注意到 (0, 0) 位置的像素值为 255,尽管将 288 乘以 144 后它应该是 2。这是因为此图像的最大允许像素值为 255。
 |
|---|
| 对比度增加 2 倍的图像 |
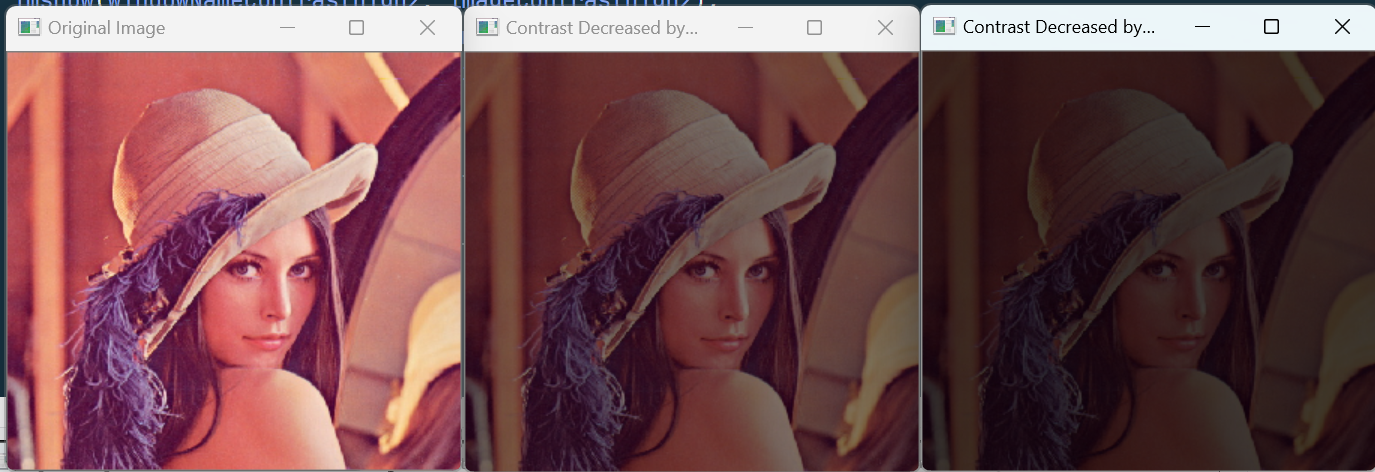
比如说,你想将原始图像的对比度减半。因此,您应该将原始图像中的每个像素乘以 0.5。这是对比度降低的图像。

使用 OpenCV 更改图像的对比度
#include <QCoreApplication>
#include <opencv2/opencv.hpp>

using namespace std;
using namespace cv;

int main(int argc, char *argv[])
{
    QCoreApplication a(argc, argv);
    // 从文件读取到对象中
    String rootDir = "D:/Gerry/project/opencvproj/singleandslot/OpenCV-2/ImageAndVideoHandle/resources/lena.png";
    Mat image = imread(rootDir);
    // 增加图像对比度
    Mat constrast2;
    image.convertTo(constrast2, -1, 2, 0);

    Mat constrast4;
    image.convertTo(constrast4, -1, 4, 0);
    // 减少图形对比度
    Mat constrastLow_0_5;
    image.convertTo(constrastLow_0_5, -1, 0.5, 0);

    Mat constrastLow_0_2_5;
    image.convertTo(constrastLow_0_2_5, -1, 0.25, 0);

    // 定义窗口标题
    String OriginWind = "原图像";
    String Bright50Wind = "增加2倍";
    String Bright100Wind = "增加4倍";
    String Dark50Wind = "减少0.5倍";
    String Dark100Wind = "减少0.25倍";
    // 创建四个窗体
    namedWindow(OriginWind, WINDOW_NORMAL);
    namedWindow(Bright50Wind, WINDOW_NORMAL);
    namedWindow(Bright100Wind, WINDOW_NORMAL);
    namedWindow(Dark50Wind, WINDOW_NORMAL);
    namedWindow(Dark100Wind, WINDOW_NORMAL);

    // 分别在四个窗口中显示出来完成的图像
    imshow(OriginWind, image);
    imshow(Bright50Wind, constrast2);
    imshow(Bright100Wind, constrast4);
    imshow(Dark50Wind, constrastLow_0_5);
    imshow(Dark100Wind, constrastLow_0_2_5);

    waitKey(0);

    destroyAllWindows();

    return a.exec();
}
 |
|---|
| 对比度增加 |
 |
|---|
| 对比度降低 |
代码解释
// Read the image file
Mat image = imread("D:/My OpenCV Website/Christmas.jpg");

// Check for failure
if (image.empty())
{
    cout << "Could not open or find the image" << endl;
    cin.get(); //wait for any key press
    return -1;
}
此代码段从指定文件加载图像。如果加载图像失败,程序将退出。
上面的代码段将像素值乘以指定的量,并将其存储在给定的输出图像中。如果指定的值大于 1,则输出图像的对比度将增加。如果指定的值小于 1,则输出图像的对比度将降低。
Mat imageContrastHigh2;
image.convertTo(imageContrastHigh2, -1, 2, 0); //increase the contrast by 2

Mat imageContrastHigh4;
image.convertTo(imageContrastHigh4, -1, 4, 0); //increase the contrast by 4

Mat imageContrastLow0_5;
image.convertTo(imageContrastLow0_5, -1, 0.5, 0); //decrease the contrast by 0.5

Mat imageContrastLow0_25;
image.convertTo(imageContrastLow0_25, -1, 0.25, 0); //decrease the contrast by 0.25
void Mat::convertTo( OutputArray m, int rtype, double alpha=1, double beta=0 ) const
此函数将每个像素值转换为目标数据类型,并按照以下公式更改值。
pixel_value_of_output_image(x, y) = pixel_value_of_input_image(x, y) * alpha + beta;
- m - 输出图像。如果需要,将重新分配此数据结构。
- rtype - 输出图像的类型。如果 rtype 为负值,则输出图像的类型将与输入图像的类型相同。
- alpha - 在分配给输出图像之前,输入图像中的每个像素将乘以此数字。
- beta - 此值将添加到输入图像中的每个像素并分配给输出图像。
//Defining window names for above images
String windowNameOriginalImage = "Original Image";
String windowNameContrastHigh2 = "Contrast Increased by 2";
String windowNameContrastHigh4 = "Contrast Increased by 4";
String windowNameContrastLow0_5 = "Contrast Decreased by 0.5";
String windowNameContrastLow0_25 = "Contrast Decreased by 0.25";

//Create and open windows for above images
namedWindow(windowNameOriginalImage, WINDOW_NORMAL);
namedWindow(windowNameContrastHigh2, WINDOW_NORMAL);
namedWindow(windowNameContrastHigh4, WINDOW_NORMAL);
namedWindow(windowNameContrastLow0_5, WINDOW_NORMAL);
namedWindow(windowNameContrastLow0_25, WINDOW_NORMAL);

//Show above images inside the created windows.
imshow(windowNameOriginalImage, image);
imshow(windowNameContrastHigh2, imageContrastHigh2);
imshow(windowNameContrastHigh4, imageContrastHigh4);
imshow(windowNameContrastLow0_5, imageContrastLow0_5);
imshow(windowNameContrastLow0_25, imageContrastLow0_25);
上面的代码片段将创建窗口并在其中显示图像。由于窗口是通过传递标志WINDOW_NORMAL创建的,因此可以自由调整窗口大小。
上面的代码段将等待,直到按下任何键。按键后,所有创建的窗口将被销毁。
1 2waitKey(0); // Wait for any key stroke destroyAllWindows(); //destroy all open windows
使用 OpenCV 更改视频的对比度
#include <QCoreApplication>
#include <opencv2/opencv.hpp>

using namespace std;
using namespace cv;

int main(int argc, char *argv[])
{
    QCoreApplication a(argc, argv);

    String VideoDir = "D:/Gerry/project/opencvproj/singleandslot/OpenCV-2/ImageAndVideoHandle/resources/点云应用.mp4";
    // 打开视频文件并进行数据读取
    VideoCapture cap(VideoDir);

    // 定义窗口标题
    String OriginWind = "原视频";
    String Bright50Wind = "增加2倍对比度";
    String Bright100Wind = "增加4倍对比度";
    String Dark50Wind = "减少0.5倍对比度";
    String Dark100Wind = "减少0.25倍对比度";
    // 创建四个窗体
    namedWindow(OriginWind, WINDOW_NORMAL);
    namedWindow(Bright50Wind, WINDOW_NORMAL);
    namedWindow(Bright100Wind, WINDOW_NORMAL);
    namedWindow(Dark50Wind, WINDOW_NORMAL);
    namedWindow(Dark100Wind, WINDOW_NORMAL);

    while(true)
    {
        // 可以把视频中每一帧看成一张图像来进行处理
        Mat frame;
        // 通过视频捕获对象来获取每一帧
        cap.read(frame);

        // 对图片进行对比度增强
        Mat imageConstrast2;
        frame.convertTo(imageConstrast2, -1, 2, 0);

        Mat imageConstrast4;
        frame.convertTo(imageConstrast4, -1, 4, 0);
        // 对图像进行对比度减少
        Mat imageDark0_5;
        frame.convertTo(imageDark0_5, -1, 0.5, 0);

        Mat imageDark0_2_5;
        frame.convertTo(imageDark0_2_5, -1, 0.25, 0);

        // 分别在四个窗口中显示出来完成的图像
        imshow(OriginWind, frame);
        imshow(Bright50Wind, imageConstrast2);
        imshow(Bright100Wind, imageConstrast4);
        imshow(Dark50Wind, imageDark0_5);
        imshow(Dark100Wind, imageDark0_2_5);

        if (waitKey(10) == 27)
        {
            cout << "ESC退出程序";
            break;
        }
    }

    destroyAllWindows();

    return a.exec();
}


 903
903

 被折叠的 条评论
为什么被折叠?
被折叠的 条评论
为什么被折叠?
 到【灌水乐园】发言


