


在前几次的实验当中,我们已经对数字图像处理的知识及代码有了一定的了解,于是在这次实验中,我们接触到了一个新鲜事物——PyQt5。
PyQt5简介
PyQt5 是 Python 的一个 GUI(Graphical User Interface,图形用户界面)框架,它提供了丰富的功能和工具,用于创建交互式桌面应用程序。
特点
跨平台性:基于 Qt 框架,PyQt5 可以在多种操作系统上运行,包括 Windows、Mac OS、Linux 等,允许开发者编写一次代码,在不同平台上使用。
丰富的功能:提供了大量的类和方法,涵盖了各种 GUI 元素,如窗口、按钮、文本框、菜单等,还支持多媒体、网络编程、数据库操作等功能。
面向对象设计:采用面向对象的编程方式,使得代码结构清晰,易于维护和扩展。开发者可以通过继承和重写类的方法来实现自定义的功能。
信号与槽机制:这是 PyQt5 的核心机制之一。信号是对象发出的事件通知,槽是接收到信号后执行的函数。通过信号与槽机制,不同的对象之间可以方便地进行通信和交互,使得代码的逻辑更加清晰和易于理解。
强大的布局管理:提供了多种布局管理器,如水平布局、垂直布局、网格布局等,能够方便地管理界面上组件的位置和大小,确保界面在不同平台和不同分辨率下都能正确显示。
下面是对PyQt5的一个简单使用:
import sys
from PyQt5.QtWidgets import QApplication, QWidget
if __name__ == '__main__':
    # 创建应用程序对象
    app = QApplication(sys.argv)
    # 创建窗口对象
    window = QWidget()
    window.setWindowTitle('这是用pyqt5创建的窗口')
    window.resize(400, 300)
    # 显示窗口
    window.show()
    # 进入应用程序的主循环
sys.exit(app.exec_())这段代码通过QApplication和QWidget类,以及相关的方法,实现了一个基本的 GUI 应用程序框架。

因此,我们不妨可以想到为什么不将PyQt5和学习过的DIP结合起来,进而自己设计一个交互框架,在这个框架当中来实现不同的图像处理功能呢?
PyQt5与DIP结合
TEST1
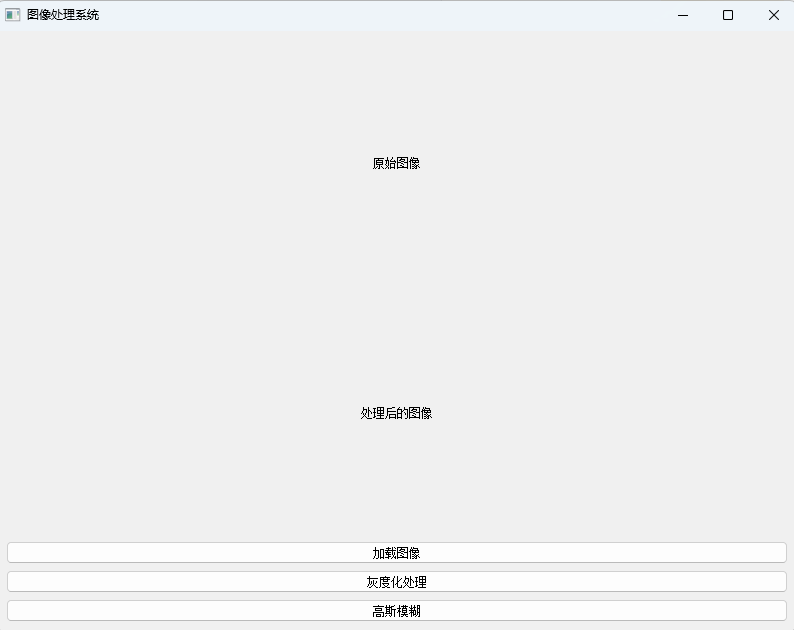
首先,我们不需要这个界面过于复杂,只在其中加入了灰度化处理和高斯模糊两个处理步骤。
# 使用PyQt5和OpenCV实现一个简单的图像处理系统界面
import sys
import cv2
import numpy as np
from PyQt5.QtWidgets import QApplication, QMainWindow, QLabel, QPushButton, QVBoxLayout, QWidget, QFileDialog
from PyQt5.QtGui import QPixmap, QImage
from PyQt5.QtCore import Qt


class ImageProcessingApp(QMainWindow):
    def __init__(self):
        super().__init__()
        self.setWindowTitle("图像处理系统")
        self.setGeometry(100, 100, 800, 600)  # 设置窗口位置和大小

        # 创建中心部件
        self.central_widget = QWidget()
        self.setCentralWidget(self.central_widget)

        # 创建布局
        self.layout = QVBoxLayout(self.central_widget)

        # 创建标签用于显示原始图像
        self.original_label = QLabel("原始图像", self)
        self.original_label.setAlignment(Qt.AlignCenter)
        self.layout.addWidget(self.original_label)

        # 创建标签用于显示处理后的图像
        self.processed_label = QLabel("处理后的图像", self)
        self.processed_label.setAlignment(Qt.AlignCenter)
        self.layout.addWidget(self.processed_label)

        # 创建按钮用于加载图像
        self.load_button = QPushButton("加载图像", self)
        self.layout.addWidget(self.load_button)
        self.load_button.clicked.connect(self.load_image)

        # 创建按钮用于处理图像
        self.process_button = QPushButton("灰度化处理", self)
        self.layout.addWidget(self.process_button)
        self.process_button.clicked.connect(self.process_image)
        # 创建按钮用于高斯模糊处理
        self.blur_button = QPushButton("高斯模糊", self)
        self.layout.addWidget(self.blur_button)
        self.blur_button.clicked.connect(self.blur_image)
        # 初始化图像变量
        self.original_image = None
        self.processed_image = None
    def load_image(self):
        """加载图像"""
        file_path, _ = QFileDialog.getOpenFileName(self, "选择图像文件", "", "Image Files (*.png *.jpg *.bmp *.gif)")
        if file_path:
            # 使用 OpenCV 加载图像
            self.original_image = cv2.imread(file_path)
            if self.original_image is not None:
                # 将 OpenCV 图像转换为 QPixmap 并显示
                self.display_image(self.original_image, self.original_label)
                self.processed_image = None
                self.processed_label.setText("处理后的图像")
    def process_image(self):
        """将图像转换为灰度图"""
        if self.original_image is not None:
            # 将图像转换为灰度图
            gray_image = cv2.cvtColor(self.original_image, cv2.COLOR_BGR2GRAY)
            # 转换为BGR格式以便显示
            self.processed_image = cv2.cvtColor(gray_image, cv2.COLOR_GRAY2BGR)
            self.display_image(self.processed_image, self.processed_label)

    def blur_image(self):
        """对图像进行高斯模糊处理"""
        if self.original_image is not None:
            # 对图像进行高斯模糊处理
            blurred_image = cv2.GaussianBlur(self.original_image, (5, 5), 0)
            self.processed_image = blurred_image
            self.display_image(self.processed_image, self.processed_label)
    def display_image(self, cv_image, label):
        """将OpenCV图像显示在QLabel上"""
        # 获取图像的高度、宽度和通道数
        height, width, channel = cv_image.shape
        bytes_per_line = 3 * width
        # 将BGR格式转换为RGB格式
        rgb_image = cv2.cvtColor(cv_image, cv2.COLOR_BGR2RGB)
        # 创建QImage对象
        qimage = QImage(rgb_image.data, width, height, bytes_per_line, QImage.Format_RGB888)
        # 创建QPixmap对象
        pixmap = QPixmap.fromImage(qimage)
        # 在标签上显示图像
        label.setPixmap(pixmap.scaled(label.size(), Qt.KeepAspectRatio, Qt.SmoothTransformation))
if __name__ == "__main__":
    app = QApplication(sys.argv)
    window = ImageProcessingApp()
    window.show()
    sys.exit(app.exec_())
通过这段代码,我们便实现了一个简单的数字图像处理界面。
我们可以看到,在界面上我们可以加载图像,然后对图像进行 一系列操作。
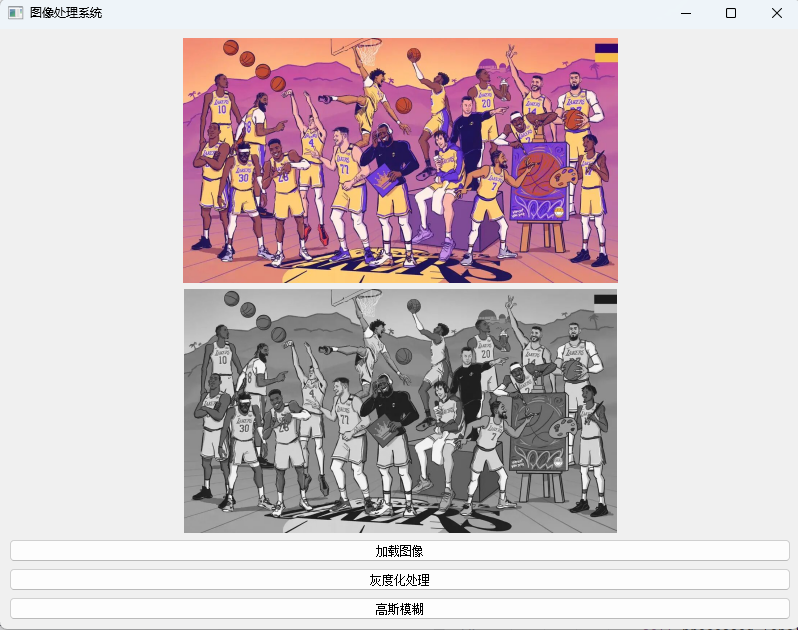
可以发现,我们在这个界面中成功的进行了一次图像处理操作。
TEST2
下面,我们便开始思考如何对这个界面进行改进,比如对界面进行一些美化操作(可以给处理框增加一些底色啥的) 以及增添一些图像处理操作(像滤波、锐化、直方图、直方图均衡化······)。
import sys
import cv2
import numpy as np
from PyQt5.QtWidgets import (QApplication, QMainWindow, QLabel, QPushButton, QVBoxLayout,
                             QHBoxLayout, QWidget, QFileDialog, QDialog, QGridLayout,
                             QScrollArea, QFrame, QSizePolicy, QMessageBox)
from PyQt5.QtGui import QPixmap, QImage, QFont, QPalette, QColor
from PyQt5.QtCore import Qt, QSize


class ImageProcessingApp(QMainWindow):
    def __init__(self):
        super().__init__()
        self.setWindowTitle("图像处理系统 - 专业版")
        self.setGeometry(100, 100, 1280, 900)

        # 设置主窗口背景和字体
        self.setStyleSheet("""
            QMainWindow {
                background-color: #f5f7fa;
            }
            QLabel {
                color: #333333;
            }
        """)

        # 主窗口布局
        self.central_widget = QWidget()
        self.setCentralWidget(self.central_widget)
        self.main_layout = QVBoxLayout(self.central_widget)
        self.main_layout.setContentsMargins(1, 1, 20, 20)
        self.main_layout.setSpacing(20)

        # 原始图像显示区域
        self.setup_original_image_section()

        # 操作按钮区域
        self.setup_buttons_section()

        # 结果展示区域 - 修改为只显示一个结果
        self.setup_result_section()

        # 存储变量
        self.original_image = None
        self.current_image = None  # 当前处理的图像

    def setup_original_image_section(self):
        """设置原始图像显示区域"""
        original_frame = QFrame()
        original_frame.setFrameShape(QFrame.StyledPanel)
        original_frame.setStyleSheet("""
            QFrame {
                background-color: white;
                border-radius: 8px;
                border: 1px solid #d1d5db;
            }
        """)

        original_layout = QVBoxLayout(original_frame)
        original_layout.setContentsMargins(1, 1, 15, 15)

        title_label = QLabel("原始图像")
        title_label.setStyleSheet("""
            QLabel {
                font-size: 16px;
                font-weight: bold;
                color: #374151;
                padding-bottom: 10px;
                border-bottom: 1px solid #e5e7eb;
            }
        """)
        title_label.setAlignment(Qt.AlignCenter)

        self.original_label = QLabel()
        self.original_label.setAlignment(Qt.AlignCenter)
        self.original_label.setStyleSheet("""
            QLabel {
                background-color: #f9fafb;
                border-radius: 6px;
                border: 1px dashed #d1d5db;
            }
        """)
        self.original_label.setFixedSize(400, 250)

        original_layout.addWidget(title_label)
        original_layout.addWidget(self.original_label, 1, Qt.AlignCenter)
        self.main_layout.addWidget(original_frame, 1)

    def setup_buttons_section(self):
        """设置操作按钮区域"""
        buttons_frame = QFrame()
        buttons_frame.setStyleSheet("""
            QFrame {
                background-color: white;
                border-radius: 8px;
                border: 1px solid #d1d5db;
            }
        """)

        buttons_layout = QVBoxLayout(buttons_frame)
        buttons_layout.setContentsMargins(1, 1, 15, 15)

        # 按钮组标题
        title_label = QLabel("图像处理操作")
        title_label.setStyleSheet("""
            QLabel {
                font-size: 16px;
                font-weight: bold;
                color: #374151;
                padding-bottom: 10px;
                border-bottom: 1px solid #e5e7eb;
            }
        """)
        title_label.setAlignment(Qt.AlignCenter)
        buttons_layout.addWidget(title_label)

        # 按钮网格布局
        button_grid = QGridLayout()
        button_grid.setSpacing(8)  # 减小按钮间距

        # 第一行按钮
        button_grid.addWidget(self.create_button("加载图片", "#3b82f6", self.load_image), 0, 0)
        button_grid.addWidget(self.create_button("保存结果", "#10b981", self.save_result), 0, 1)
        button_grid.addWidget(self.create_button("重置处理", "#ef4444", self.reset_processing), 0, 2)

        # 第二行按钮 - 基本操作
        button_grid.addWidget(self.create_button("灰度化", "#6366f1", self.grayscale), 1, 0)
        button_grid.addWidget(self.create_button("旋转", "#8b5cf6", self.rotate_image), 1, 1)
        button_grid.addWidget(self.create_button("水平翻转", "#ec4899", self.flip_horizontal), 1, 2)
        button_grid.addWidget(self.create_button("垂直翻转", "#f472b6", self.flip_vertical), 1, 3)

        # 第三行按钮 - 滤波操作
        button_grid.addWidget(self.create_button("高斯模糊", "#14b8a6", self.gaussian_blur), 2, 0)
        button_grid.addWidget(self.create_button("中值滤波", "#0ea5e9", self.median_filter), 2, 1)
        button_grid.addWidget(self.create_button("均值滤波", "#f59e0b", self.mean_filter), 2, 2)
        button_grid.addWidget(self.create_button("双边滤波", "#0284c7", self.bilateral_filter), 2, 3)

        # 第四行按钮 - 高级操作
        button_grid.addWidget(self.create_button("直方图均衡", "#84cc16", self.histogram_equalization), 3, 0)
        button_grid.addWidget(self.create_button("边缘检测", "#06b6d4", self.edge_detection), 3, 1)
        button_grid.addWidget(self.create_button("阈值处理", "#ec4899", self.threshold), 3, 2)
        button_grid.addWidget(self.create_button("自适应阈值", "#f97316", self.adaptive_threshold), 3, 3)

        # 第五行按钮 - 新增操作
        button_grid.addWidget(self.create_button("去噪", "#2563eb", self.denoise), 4, 0)
        button_grid.addWidget(self.create_button("锐化", "#f472b6", self.sharpen), 4, 1)
        button_grid.addWidget(self.create_button("色彩反转", "#7c3aed", self.color_invert), 4, 2)
        button_grid.addWidget(self.create_button("亮度/对比度", "#f97316", self.adjust_brightness_contrast), 4, 3)

        buttons_layout.addLayout(button_grid)
        self.main_layout.addWidget(buttons_frame, 1)

    def setup_result_section(self):
        """设置结果展示区域 - 只显示一个结果"""
        result_frame = QFrame()
        result_frame.setFrameShape(QFrame.StyledPanel)
        result_frame.setStyleSheet("""
            QFrame {
                background-color: white;
                border-radius: 8px;
                border: 1px solid #d1d5db;
            }
        """)

        result_layout = QVBoxLayout(result_frame)
        result_layout.setContentsMargins(1, 1, 15, 15)

        # 结果区域标题
        self.result_title_label = QLabel("处理结果")
        self.result_title_label.setStyleSheet("""
            QLabel {
                font-size: 16px;
                font-weight: bold;
                color: #374151;
                padding-bottom: 10px;
                border-bottom: 1px solid #e5e7eb;
            }
        """)
        self.result_title_label.setAlignment(Qt.AlignCenter)
        result_layout.addWidget(self.result_title_label)

        # 结果图像标签
        self.result_label = QLabel()
        self.result_label.setAlignment(Qt.AlignCenter)
        self.result_label.setStyleSheet("""
            QLabel {
                background-color: #f9fafb;
                border-radius: 6px;
                border: 1px solid #e5e7eb;
            }
        """)
        self.result_label.setFixedSize(400, 300)  # 增大结果显示区域

        result_layout.addWidget(self.result_label, 1, Qt.AlignCenter)
        self.main_layout.addWidget(result_frame, 5)

    def create_button(self, text, color, callback):
        """创建美观的按钮"""
        button = QPushButton(text)
        button.setCursor(Qt.PointingHandCursor)
        button.setFixedHeight(40)
        button.setStyleSheet(f"""
            QPushButton {{
                background-color: {color};
                color: white;
                font-size: 14px;
                font-weight: medium;
                border: none;
                border-radius: 6px;
                padding: 8px 16px;
            }}
            QPushButton:hover {{
                background-color: {self.darken_color(color)};
            }}
            QPushButton:pressed {{
                background-color: {self.darken_color(color, 20)};
            }}
        """)
        button.clicked.connect(callback)
        return button

    def darken_color(self, hex_color, percent=10):
        """使颜色变暗"""
        color = QColor(hex_color)
        darker = color.darker(100 + percent)
        return darker.name()

    def load_image(self):
        """加载原始图像"""
        file_path, _ = QFileDialog.getOpenFileName(
            self, "选择图像", "",
            "图片文件 (*.png *.jpg *.jpeg *.bmp *.gif)"
        )
        if file_path:
            self.original_image = cv2.imread(file_path)
            if self.original_image is not None:
                self.current_image = self.original_image.copy()
                self.display_image(self.original_image, self.original_label)
                self.display_image(self.current_image, self.result_label)
                self.result_title_label.setText("原始图像")
                QMessageBox.information(self, "成功", "图像加载成功")

    def save_result(self):
        """保存当前处理的结果"""
        if self.current_image is None:
            QMessageBox.warning(self, "警告", "没有可保存的图像")
            return

        file_path, _ = QFileDialog.getSaveFileName(
            self, "保存图像", "",
            "PNG图像 (*.png);;JPEG图像 (*.jpg *.jpeg);;位图 (*.bmp)"
        )
        if file_path:
            cv2.imwrite(file_path, self.current_image)
            QMessageBox.information(self, "成功", f"图像已保存至: {file_path}")

    def reset_processing(self):
        """重置处理,回到原始图像"""
        if self.original_image is not None:
            self.current_image = self.original_image.copy()
            self.display_image(self.current_image, self.result_label)
            self.result_title_label.setText("原始图像")
            QMessageBox.information(self, "重置", "图像处理已重置为原始图像")

    def display_image(self, image, label):
        """在指定标签显示图像"""
        if len(image.shape) == 2:  # 灰度图
            image = cv2.cvtColor(image, cv2.COLOR_GRAY2BGR)

        height, width, channel = image.shape
        bytes_per_line = 3 * width
        q_img = QImage(image.data, width, height, bytes_per_line, QImage.Format_RGB888).rgbSwapped()
        pixmap = QPixmap.fromImage(q_img)
        label.setPixmap(pixmap.scaled(
            label.width(), label.height(),
            Qt.KeepAspectRatio,
            Qt.SmoothTransformation
        ))

    # 图像处理方法 - 全部修改为基于current_image而非original_image
    def grayscale(self):
        if self.current_image is not None:
            gray = cv2.cvtColor(self.current_image, cv2.COLOR_BGR2GRAY)
            self.current_image = gray
            self.display_image(self.current_image, self.result_label)
            self.result_title_label.setText("灰度图像")

    def rotate_image(self):
        if self.current_image is not None:
            rotated = cv2.rotate(self.current_image, cv2.ROTATE_90_CLOCKWISE)
            self.current_image = rotated
            self.display_image(self.current_image, self.result_label)
            self.result_title_label.setText("旋转90度")

    def flip_horizontal(self):
        if self.current_image is not None:
            flipped = cv2.flip(self.current_image, 1)
            self.current_image = flipped
            self.display_image(self.current_image, self.result_label)
            self.result_title_label.setText("水平翻转")

    def flip_vertical(self):
        if self.current_image is not None:
            flipped = cv2.flip(self.current_image, 0)
            self.current_image = flipped
            self.display_image(self.current_image, self.result_label)
            self.result_title_label.setText("垂直翻转")

    def gaussian_blur(self):
        if self.current_image is not None:
            blurred = cv2.GaussianBlur(self.current_image, (5, 5), 0)
            self.current_image = blurred
            self.display_image(self.current_image, self.result_label)
            self.result_title_label.setText("高斯模糊")

    def median_filter(self):
        if self.current_image is not None:
            if len(self.current_image.shape) == 3:
                gray = cv2.cvtColor(self.current_image, cv2.COLOR_BGR2GRAY)
            else:
                gray = self.current_image
            filtered = cv2.medianBlur(gray, 5)
            self.current_image = filtered
            self.display_image(self.current_image, self.result_label)
            self.result_title_label.setText("中值滤波")

    def mean_filter(self):
        if self.current_image is not None:
            kernel = np.ones((5, 5), np.float32) / 25
            filtered = cv2.filter2D(self.current_image, -1, kernel)
            self.current_image = filtered
            self.display_image(self.current_image, self.result_label)
            self.result_title_label.setText("均值滤波")

    def bilateral_filter(self):
        if self.current_image is not None:
            filtered = cv2.bilateralFilter(self.current_image, 9, 75, 75)
            self.current_image = filtered
            self.display_image(self.current_image, self.result_label)
            self.result_title_label.setText("双边滤波")

    def histogram_equalization(self):
        if self.current_image is not None:
            if len(self.current_image.shape) == 3:
                ycrcb = cv2.cvtColor(self.current_image, cv2.COLOR_BGR2YCrCb)
                channels = cv2.split(ycrcb)
                channels[0] = cv2.equalizeHist(channels[0])
                equalized_ycrcb = cv2.merge(channels)
                equalized = cv2.cvtColor(equalized_ycrcb, cv2.COLOR_YCrCb2BGR)
            else:
                equalized = cv2.equalizeHist(self.current_image)
            self.current_image = equalized
            self.display_image(self.current_image, self.result_label)
            self.result_title_label.setText("直方图均衡")

    def edge_detection(self):
        if self.current_image is not None:
            if len(self.current_image.shape) == 3:
                gray = cv2.cvtColor(self.current_image, cv2.COLOR_BGR2GRAY)
            else:
                gray = self.current_image
            edges = cv2.Canny(gray, 100, 200)
            self.current_image = edges
            self.display_image(self.current_image, self.result_label)
            self.result_title_label.setText("边缘检测")

    def threshold(self):
        if self.current_image is not None:
            if len(self.current_image.shape) == 3:
                gray = cv2.cvtColor(self.current_image, cv2.COLOR_BGR2GRAY)
            else:
                gray = self.current_image
            _, thresh = cv2.threshold(gray, 127, 255, cv2.THRESH_BINARY)
            self.current_image = thresh
            self.display_image(self.current_image, self.result_label)
            self.result_title_label.setText("阈值处理")

    def adaptive_threshold(self):
        if self.current_image is not None:
            if len(self.current_image.shape) == 3:
                gray = cv2.cvtColor(self.current_image, cv2.COLOR_BGR2GRAY)
            else:
                gray = self.current_image
            thresh = cv2.adaptiveThreshold(gray, 255, cv2.ADAPTIVE_THRESH_GAUSSIAN_C,
                                           cv2.THRESH_BINARY, 11, 2)
            self.current_image = thresh
            self.display_image(self.current_image, self.result_label)
            self.result_title_label.setText("自适应阈值")

    def denoise(self):
        if self.current_image is not None:
            if len(self.current_image.shape) == 3:
                denoised = cv2.fastNlMeansDenoisingColored(self.current_image, None, 10, 10, 7, 21)
            else:
                denoised = cv2.fastNlMeansDenoising(self.current_image, None, 10, 7, 21)
            self.current_image = denoised
            self.display_image(self.current_image, self.result_label)
            self.result_title_label.setText("去噪后图像")

    def sharpen(self):
        if self.current_image is not None:
            kernel = np.array([[-1, -1, -1],
                               [-1, 9, -1],
                               [-1, -1, -1]])
            sharpened = cv2.filter2D(self.current_image, -1, kernel)
            self.current_image = sharpened
            self.display_image(self.current_image, self.result_label)
            self.result_title_label.setText("锐化后图像")

    def color_invert(self):
        if self.current_image is not None:
            inverted = cv2.bitwise_not(self.current_image)
            self.current_image = inverted
            self.display_image(self.current_image, self.result_label)
            self.result_title_label.setText("色彩反转后图像")

    def adjust_brightness_contrast(self):
        if self.current_image is not None:
            # 创建一个简单的对话框来调整亮度和对比度
            dialog = QDialog(self)
            dialog.setWindowTitle("调整亮度和对比度")
            dialog.setMinimumWidth(300)
            layout = QVBoxLayout(dialog)

            # 亮度调整
            brightness_label = QLabel("亮度: 0")
            brightness_slider = QSlider(Qt.Horizontal)
            brightness_slider.setRange(-100, 100)
            brightness_slider.setValue(0)
            brightness_slider.valueChanged.connect(lambda value: brightness_label.setText(f"亮度: {value}"))

            # 对比度调整
            contrast_label = QLabel("对比度: 100")
            contrast_slider = QSlider(Qt.Horizontal)
            contrast_slider.setRange(50, 150)
            contrast_slider.setValue(100)
            contrast_slider.valueChanged.connect(lambda value: contrast_label.setText(f"对比度: {value}"))

            # 应用按钮
            apply_button = QPushButton("应用")
            apply_button.clicked.connect(dialog.accept)

            layout.addWidget(brightness_label)
            layout.addWidget(brightness_slider)
            layout.addWidget(contrast_label)
            layout.addWidget(contrast_slider)
            layout.addWidget(apply_button)

            if dialog.exec_():
                brightness = brightness_slider.value()
                contrast = contrast_slider.value() / 100.0

                # 调整亮度和对比度
                adjusted = cv2.convertScaleAbs(self.current_image, alpha=contrast, beta=brightness)
                self.current_image = adjusted
                self.display_image(self.current_image, self.result_label)
                self.result_title_label.setText(f"亮度: {brightness}, 对比度: {contrast:.2f}")


if __name__ == "__main__":
    app = QApplication(sys.argv)
    # 设置应用程序字体
    font = QFont()
    font.setFamily("Microsoft YaHei")
    font.setPointSize(10)
    app.setFont(font)

    window = ImageProcessingApp()
    window.show()
    sys.exit(app.exec_())
运行结果如图:
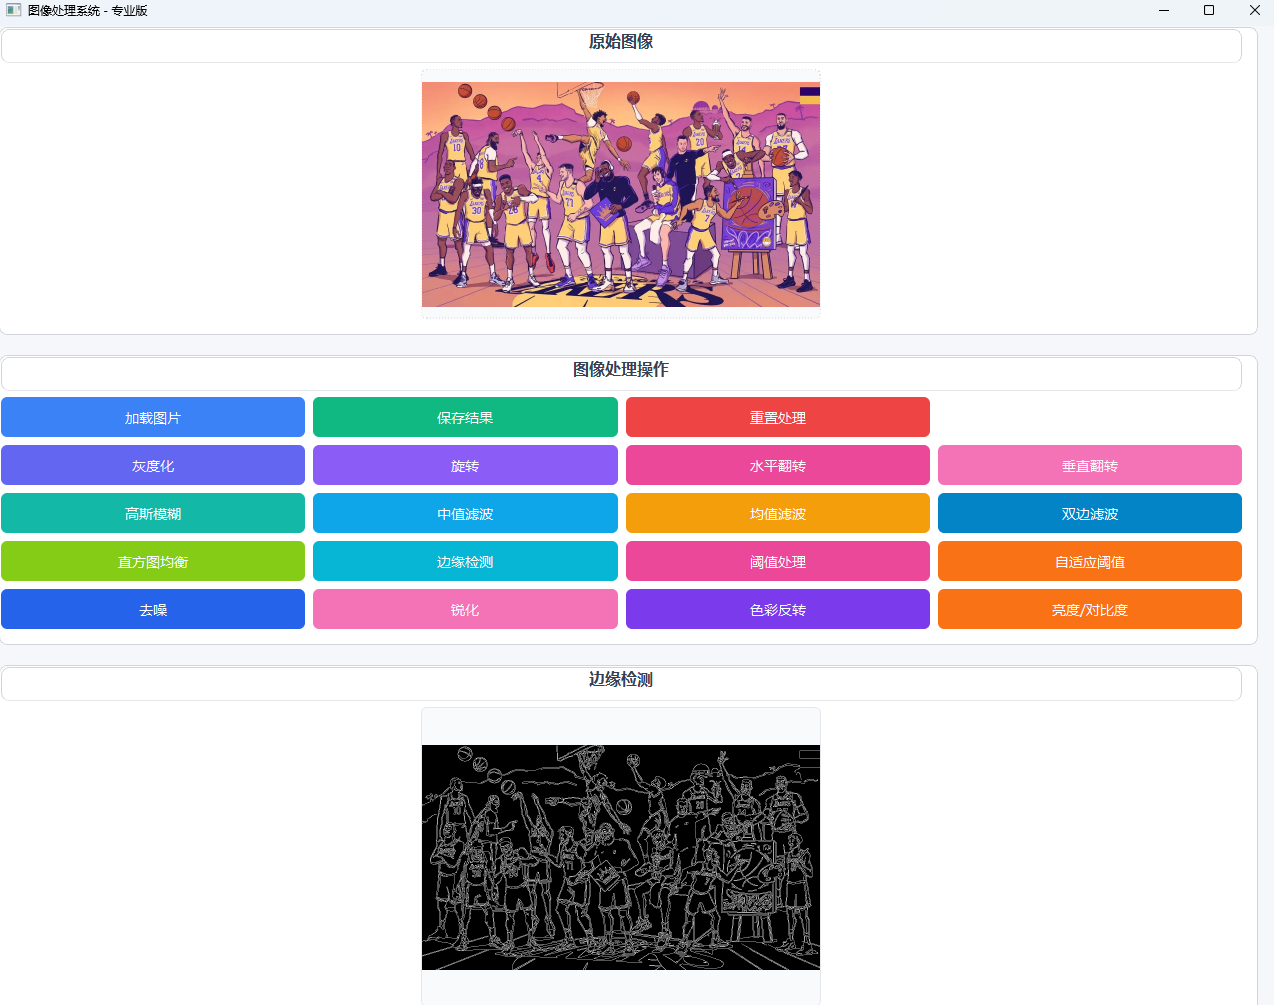
观察运行结果我们不难能够发现, 界面更加美观,且增加了更多的图像处理操作,可仍然存在不足,每次运行时结果只会显示一张,且每次操作都是基于原始图像的基础上,而不是在处理完上次图片的基础上,需要继续改进。
TEST3
经过多次更改后,成功改进了上次结果的不足。
import sys
import cv2
import numpy as np
from PyQt5.QtWidgets import (QApplication, QMainWindow, QLabel, QPushButton, QVBoxLayout,
                             QHBoxLayout, QWidget, QFileDialog, QDialog, QGridLayout,
                             QScrollArea, QFrame, QSizePolicy, QMessageBox, QMenu, QAction)
from PyQt5.QtGui import QPixmap, QImage, QFont, QPalette, QColor, QCursor
from PyQt5.QtCore import Qt, QSize


class ImageProcessingApp(QMainWindow):
    def __init__(self):
        super().__init__()
        self.setWindowTitle("图像处理系统 - 专业版")
        self.setGeometry(100, 100, 1280, 900)

        # 设置主窗口背景和字体
        self.setStyleSheet("""
            QMainWindow {
                background-color: #f5f7fa;
            }
            QLabel {
                color: #333333;
            }
        """)

        # 主窗口布局
        self.central_widget = QWidget()
        self.setCentralWidget(self.central_widget)
        self.main_layout = QVBoxLayout(self.central_widget)
        self.main_layout.setContentsMargins(1, 1, 20, 20)
        self.main_layout.setSpacing(20)

        # 原始图像显示区域
        self.setup_original_image_section()

        # 操作按钮区域
        self.setup_buttons_section()

        # 结果展示区域
        self.setup_results_section()

        # 存储变量
        self.original_image = None
        self.current_image = None  # 新增:跟踪当前处理的图像
        self.result_count = 0
        self.is_processing_chain = False  # 新增:标记是否在处理链中

    def setup_original_image_section(self):
        """设置原始图像显示区域"""
        original_frame = QFrame()
        original_frame.setFrameShape(QFrame.StyledPanel)
        original_frame.setStyleSheet("""
            QFrame {
                background-color: white;
                border-radius: 8px;
                border: 1px solid #d1d5db;
            }
        """)

        original_layout = QVBoxLayout(original_frame)
        original_layout.setContentsMargins(1, 1, 15, 15)

        title_label = QLabel("原始图像")
        title_label.setStyleSheet("""
            QLabel {
                font-size: 16px;
                font-weight: bold;
                color: #374151;
                padding-bottom: 10px;
                border-bottom: 1px solid #e5e7eb;
            }
        """)
        title_label.setAlignment(Qt.AlignCenter)

        self.original_label = QLabel()
        self.original_label.setAlignment(Qt.AlignCenter)
        self.original_label.setStyleSheet("""
            QLabel {
                background-color: #f9fafb;
                border-radius: 6px;
                border: 1px dashed #d1d5db;
            }
        """)
        self.original_label.setFixedSize(400, 250)

        original_layout.addWidget(title_label)
        original_layout.addWidget(self.original_label, 1, Qt.AlignCenter)
        self.main_layout.addWidget(original_frame, 1)

    def setup_buttons_section(self):
        """设置操作按钮区域"""
        buttons_frame = QFrame()
        buttons_frame.setStyleSheet("""
            QFrame {
                background-color: white;
                border-radius: 8px;
                border: 1px solid #d1d5db;
            }
        """)

        buttons_layout = QVBoxLayout(buttons_frame)
        buttons_layout.setContentsMargins(1, 1, 15, 15)

        # 按钮组标题
        title_label = QLabel("图像处理操作")
        title_label.setStyleSheet("""
            QLabel {
                font-size: 16px;
                font-weight: bold;
                color: #374151;
                padding-bottom: 10px;
                border-bottom: 1px solid #e5e7eb;
            }
        """)
        title_label.setAlignment(Qt.AlignCenter)
        buttons_layout.addWidget(title_label)

        # 按钮网格布局
        button_grid = QGridLayout()
        button_grid.setSpacing(8)  # 减小按钮间距

        # 第一行按钮
        button_grid.addWidget(self.create_button("加载图片", "#3b82f6", self.load_image), 0, 0)
        button_grid.addWidget(self.create_button("保存结果", "#10b981", self.save_result), 0, 1)
        button_grid.addWidget(self.create_button("清除结果", "#ef4444", self.clear_results), 0, 2)
        button_grid.addWidget(self.create_button("重置到原始", "#9333ea", self.reset_to_original), 0, 3)  # 新增按钮

        # 第二行按钮 - 基本操作
        button_grid.addWidget(self.create_button("灰度化", "#6366f1", self.grayscale), 1, 0)
        button_grid.addWidget(self.create_button("旋转", "#8b5cf6", self.rotate_image), 1, 1)
        button_grid.addWidget(self.create_button("水平翻转", "#ec4899", self.flip_horizontal), 1, 2)
        button_grid.addWidget(self.create_button("垂直翻转", "#f472b6", self.flip_vertical), 1, 3)  # 新增操作

        # 第三行按钮 - 滤波操作
        button_grid.addWidget(self.create_button("高斯模糊", "#14b8a6", self.gaussian_blur), 2, 0)
        button_grid.addWidget(self.create_button("中值滤波", "#0ea5e9", self.median_filter), 2, 1)
        button_grid.addWidget(self.create_button("均值滤波", "#f59e0b", self.mean_filter), 2, 2)
        button_grid.addWidget(self.create_button("双边滤波", "#0284c7", self.bilateral_filter), 2, 3)  # 新增操作

        # 第四行按钮 - 高级操作
        button_grid.addWidget(self.create_button("直方图", "#f97316", self.show_histogram), 3, 0)
        button_grid.addWidget(self.create_button("直方图均衡", "#84cc16", self.histogram_equalization), 3, 1)
        button_grid.addWidget(self.create_button("边缘检测", "#06b6d4", self.edge_detection), 3, 2)
        button_grid.addWidget(self.create_button("阈值处理", "#ec4899", self.threshold), 3, 3)  # 新增操作

        # 第五行按钮 - 新增操作
        button_grid.addWidget(self.create_button("去噪", "#2563eb", self.denoise), 4, 0)
        button_grid.addWidget(self.create_button("锐化", "#f472b6", self.sharpen), 4, 1)
        button_grid.addWidget(self.create_button("色彩反转", "#7c3aed", self.color_invert), 4, 2)
        button_grid.addWidget(self.create_button("亮度/对比度", "#f97316", self.adjust_brightness_contrast), 4, 3)  # 新增操作

        buttons_layout.addLayout(button_grid)
        self.main_layout.addWidget(buttons_frame, 1)

    def setup_results_section(self):
        """设置结果展示区域"""
        results_frame = QFrame()
        results_frame.setStyleSheet("""
            QFrame {
                background-color: white;
                border-radius: 8px;
                border: 1px solid #d1d5db;
            }
        """)

        results_layout = QVBoxLayout(results_frame)
        results_layout.setContentsMargins(1, 1, 15, 15)

        # 结果区域标题
        title_label = QLabel("处理结果")
        title_label.setStyleSheet("""
            QLabel {
                font-size: 16px;
                font-weight: bold;
                color: #374151;
                padding-bottom: 10px;
                border-bottom: 1px solid #e5e7eb;
            }
        """)
        title_label.setAlignment(Qt.AlignCenter)
        results_layout.addWidget(title_label)

        # 滚动区域
        self.scroll_area = QScrollArea()
        self.scroll_area.setWidgetResizable(True)
        self.scroll_area.setStyleSheet("""
            QScrollArea {
                border: none;
            }
            QScrollBar:vertical {
                width: 10px;
                background: #f1f5f9;
            }
            QScrollBar::handle:vertical {
                background: #cbd5e1;
                border-radius: 4px;
            }
        """)

        self.scroll_content = QWidget()
        self.results_layout = QGridLayout(self.scroll_content)
        self.results_layout.setSpacing(15)
        self.results_layout.setContentsMargins(5, 5, 5, 5)
        self.scroll_area.setWidget(self.scroll_content)

        results_layout.addWidget(self.scroll_area)
        self.main_layout.addWidget(results_frame, 5)

    def create_button(self, text, color, callback):
        """创建美观的按钮"""
        button = QPushButton(text)
        button.setCursor(Qt.PointingHandCursor)
        button.setFixedHeight(40)
        button.setStyleSheet(f"""
            QPushButton {{
                background-color: {color};
                color: white;
                font-size: 14px;
                font-weight: medium;
                border: none;
                border-radius: 6px;
                padding: 8px 16px;
            }}
            QPushButton:hover {{
                background-color: {self.darken_color(color)};
            }}
            QPushButton:pressed {{
                background-color: {self.darken_color(color, 20)};
            }}
        """)
        button.clicked.connect(callback)
        return button

    def darken_color(self, hex_color, percent=10):
        """使颜色变暗"""
        color = QColor(hex_color)
        darker = color.darker(100 + percent)
        return darker.name()

    def load_image(self):
        """加载原始图像"""
        file_path, _ = QFileDialog.getOpenFileName(
            self, "选择图像", "",
            "图片文件 (*.png *.jpg *.jpeg *.bmp *.gif)"
        )
        if file_path:
            self.original_image = cv2.imread(file_path)
            if self.original_image is not None:
                self.current_image = self.original_image.copy()  # 初始化当前图像
                self.display_image(self.original_image, self.original_label)
                self.clear_results()
                self.is_processing_chain = False
                self.add_result_frame(self.current_image, "原始图像")

    def save_result(self):
        """保存当前选中的结果"""
        if self.current_image is None:
            QMessageBox.warning(self, "警告", "没有可保存的图像")
            return

        file_path, _ = QFileDialog.getSaveFileName(
            self, "保存图像", "",
            "PNG图像 (*.png);;JPEG图像 (*.jpg *.jpeg);;位图 (*.bmp)"
        )
        if file_path:
            cv2.imwrite(file_path, self.current_image)
            QMessageBox.information(self, "成功", f"图像已保存至: {file_path}")

    def clear_results(self):
        """清除所有结果"""
        for i in reversed(range(self.results_layout.count())):
            widget = self.results_layout.itemAt(i).widget()
            if widget is not None:
                widget.deleteLater()
        self.result_count = 0

    def reset_to_original(self):
        """重置到原始图像"""
        if self.original_image is not None:
            self.current_image = self.original_image.copy()
            self.clear_results()
            self.add_result_frame(self.current_image, "原始图像")
            self.is_processing_chain = False

    def add_result_frame(self, image, title):
        """添加一个新的结果框"""
        frame = QFrame()
        frame.setFrameShape(QFrame.StyledPanel)
        frame.setStyleSheet("""
            QFrame {
                background-color: white;
                border-radius: 8px;
                border: 1px solid #e5e7eb;
            }
        """)
        frame.setSizePolicy(QSizePolicy.Fixed, QSizePolicy.Fixed)

        layout = QVBoxLayout(frame)
        layout.setContentsMargins(12, 12, 12, 12)
        layout.setSpacing(8)

        # 标题标签
        title_label = QLabel(title)
        title_label.setStyleSheet("""
            QLabel {
                font-size: 14px;
                font-weight: medium;
                color: #4b5563;
                padding-bottom: 6px;
                border-bottom: 1px solid #f3f4f6;
            }
        """)
        title_label.setAlignment(Qt.AlignCenter)
        layout.addWidget(title_label)

        # 图像标签
        image_label = QLabel()
        image_label.setAlignment(Qt.AlignCenter)
        image_label.setStyleSheet("""
            QLabel {
                background-color: #f9fafb;
                border-radius: 4px;
                border: 1px solid #e5e7eb;
            }
        """)
        image_label.setFixedSize(300, 200)
        self.display_image(image, image_label)
        layout.addWidget(image_label, 1, Qt.AlignCenter)

        # 添加右键菜单 - 设为当前处理图像
        frame.setContextMenuPolicy(Qt.CustomContextMenu)
        frame.customContextMenuRequested.connect(lambda pos, img=image: self.show_context_menu(pos, img))

        # 添加到结果区域
        row = self.result_count // 3
        col = self.result_count % 3
        self.results_layout.addWidget(frame, row, col)
        self.result_count += 1
        self.current_image = image  # 更新当前图像

    def show_context_menu(self, pos, image):
        """显示右键菜单"""
        menu = QMenu()
        set_as_current_action = QAction("设为当前处理图像", self)
        set_as_current_action.triggered.connect(lambda: self.set_as_current_image(image))
        menu.addAction(set_as_current_action)
        menu.exec_(self.sender().mapToGlobal(pos))

    def set_as_current_image(self, image):
        """将选中的图像设为当前处理图像"""
        self.current_image = image.copy()
        self.is_processing_chain = True
        QMessageBox.information(self, "提示", "已将此图像设为当前处理图像")

    def display_image(self, image, label):
        """在指定标签显示图像"""
        if len(image.shape) == 2:  # 灰度图
            image = cv2.cvtColor(image, cv2.COLOR_GRAY2BGR)

        height, width, channel = image.shape
        bytes_per_line = 3 * width
        q_img = QImage(image.data, width, height, bytes_per_line, QImage.Format_RGB888).rgbSwapped()
        pixmap = QPixmap.fromImage(q_img)
        label.setPixmap(pixmap.scaled(
            label.width(), label.height(),
            Qt.KeepAspectRatio,
            Qt.SmoothTransformation
        ))

    # 图像处理方法 - 全部修改为基于current_image而非original_image
    def grayscale(self):
        if self.current_image is not None:
            gray = cv2.cvtColor(self.current_image, cv2.COLOR_BGR2GRAY)
            self.add_result_frame(gray, "灰度图像")
            self.is_processing_chain = True

    def rotate_image(self):
        if self.current_image is not None:
            rotated = cv2.rotate(self.current_image, cv2.ROTATE_90_CLOCKWISE)
            self.add_result_frame(rotated, "旋转90度")
            self.is_processing_chain = True

    def flip_horizontal(self):
        if self.current_image is not None:
            flipped = cv2.flip(self.current_image, 1)
            self.add_result_frame(flipped, "水平翻转")
            self.is_processing_chain = True

    def flip_vertical(self):
        if self.current_image is not None:
            flipped = cv2.flip(self.current_image, 0)
            self.add_result_frame(flipped, "垂直翻转")
            self.is_processing_chain = True

    def gaussian_blur(self):
        if self.current_image is not None:
            blurred = cv2.GaussianBlur(self.current_image, (5, 5), 0)
            self.add_result_frame(blurred, "高斯模糊")
            self.is_processing_chain = True

    def median_filter(self):
        if self.current_image is not None:
            if len(self.current_image.shape) == 3:
                gray = cv2.cvtColor(self.current_image, cv2.COLOR_BGR2GRAY)
            else:
                gray = self.current_image
            filtered = cv2.medianBlur(gray, 5)
            self.add_result_frame(filtered, "中值滤波")
            self.is_processing_chain = True

    def mean_filter(self):
        if self.current_image is not None:
            kernel = np.ones((5, 5), np.float32) / 25
            filtered = cv2.filter2D(self.current_image, -1, kernel)
            self.add_result_frame(filtered, "均值滤波")
            self.is_processing_chain = True

    def bilateral_filter(self):
        if self.current_image is not None:
            filtered = cv2.bilateralFilter(self.current_image, 9, 75, 75)
            self.add_result_frame(filtered, "双边滤波")
            self.is_processing_chain = True

    def show_histogram(self):
        if self.current_image is not None:
            if len(self.current_image.shape) == 3:
                gray = cv2.cvtColor(self.current_image, cv2.COLOR_BGR2GRAY)
            else:
                gray = self.current_image
            hist = cv2.calcHist([gray], [0], None, [256], [0, 256])
            hist_img = np.zeros((256, 256, 3), dtype=np.uint8)
            cv2.normalize(hist, hist, 0, 255, cv2.NORM_MINMAX)
            for i in range(255):
                cv2.line(hist_img, (i, 255), (i, 255 - int(hist[i][0])), (255, 255, 255), 1)
            self.add_result_frame(hist_img, "灰度直方图")

    def histogram_equalization(self):
        if self.current_image is not None:
            if len(self.current_image.shape) == 3:
                gray = cv2.cvtColor(self.current_image, cv2.COLOR_BGR2GRAY)
            else:
                gray = self.current_image
            equalized = cv2.equalizeHist(gray)
            self.add_result_frame(equalized, "直方图均衡")
            self.is_processing_chain = True

    def edge_detection(self):
        if self.current_image is not None:
            if len(self.current_image.shape) == 3:
                gray = cv2.cvtColor(self.current_image, cv2.COLOR_BGR2GRAY)
            else:
                gray = self.current_image
            edges = cv2.Canny(gray, 100, 200)
            self.add_result_frame(edges, "边缘检测")
            self.is_processing_chain = True

    def threshold(self):
        if self.current_image is not None:
            if len(self.current_image.shape) == 3:
                gray = cv2.cvtColor(self.current_image, cv2.COLOR_BGR2GRAY)
            else:
                gray = self.current_image
            _, thresh = cv2.threshold(gray, 127, 255, cv2.THRESH_BINARY)
            self.add_result_frame(thresh, "阈值处理")
            self.is_processing_chain = True

    def denoise(self):
        if self.current_image is not None:
            if len(self.current_image.shape) == 3:
                denoised = cv2.fastNlMeansDenoisingColored(self.current_image, None, 10, 10, 7, 21)
            else:
                denoised = cv2.fastNlMeansDenoising(self.current_image, None, 10, 7, 21)
            self.add_result_frame(denoised, "去噪后图像")
            self.is_processing_chain = True

    def sharpen(self):
        if self.current_image is not None:
            kernel = np.array([[-1, -1, -1],
                               [-1, 9, -1],
                               [-1, -1, -1]])
            sharpened = cv2.filter2D(self.current_image, -1, kernel)
            self.add_result_frame(sharpened, "锐化后图像")
            self.is_processing_chain = True

    def color_invert(self):
        if self.current_image is not None:
            inverted = cv2.bitwise_not(self.current_image)
            self.add_result_frame(inverted, "色彩反转后图像")
            self.is_processing_chain = True

    def adjust_brightness_contrast(self):
        if self.current_image is not None:
            # 创建一个简单的对话框来调整亮度和对比度
            dialog = QDialog(self)
            dialog.setWindowTitle("调整亮度和对比度")
            dialog.setMinimumWidth(300)
            layout = QVBoxLayout(dialog)

            # 亮度调整
            brightness_label = QLabel("亮度: 0")
            brightness_slider = QSlider(Qt.Horizontal)
            brightness_slider.setRange(-100, 100)
            brightness_slider.setValue(0)
            brightness_slider.valueChanged.connect(lambda value: brightness_label.setText(f"亮度: {value}"))

            # 对比度调整
            contrast_label = QLabel("对比度: 100")
            contrast_slider = QSlider(Qt.Horizontal)
            contrast_slider.setRange(50, 150)
            contrast_slider.setValue(100)
            contrast_slider.valueChanged.connect(lambda value: contrast_label.setText(f"对比度: {value}"))

            # 应用按钮
            apply_button = QPushButton("应用")
            apply_button.clicked.connect(dialog.accept)

            layout.addWidget(brightness_label)
            layout.addWidget(brightness_slider)
            layout.addWidget(contrast_label)
            layout.addWidget(contrast_slider)
            layout.addWidget(apply_button)

            if dialog.exec_():
                brightness = brightness_slider.value()
                contrast = contrast_slider.value() / 100.0
                # 调整亮度和对比度
                adjusted = cv2.convertScaleAbs(self.current_image, alpha=contrast, beta=brightness)
                self.add_result_frame(adjusted, f"亮度: {brightness}, 对比度: {contrast:.2f}")
                self.is_processing_chain = True


if __name__ == "__main__":
    app = QApplication(sys.argv)
    # 设置应用程序字体
    font = QFont()
    font.setFamily("Microsoft YaHei")
    font.setPointSize(10)
    app.setFont(font)

    window = ImageProcessingApp()
    window.show()
sys.exit(app.exec_())在TEST2代码的基础上,将图像处理操作现在都基于current_image变量而不是original_image,这样每次处理都会在上一次的结果上进行。 同时添加了 "重置到原始" 按钮,可以随时回到原始图像状态。且每个处理结果都可以通过右键菜单设为当前处理图像,方便在多个处理步骤之间切换。

运行结果如图:

我们可以选取任意一张处理过的图片右键:
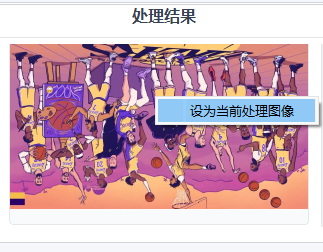
点击设为当前处理图像之后,我们便可以在这幅图像的基础上再次进行图像处理操作。
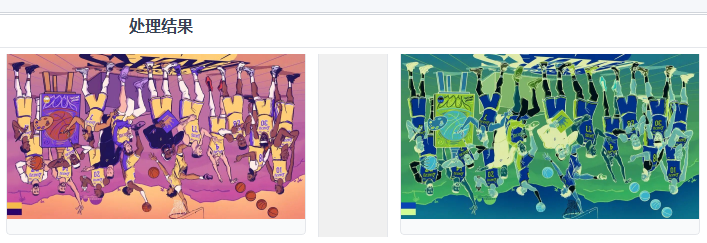 (色彩反转)
经此,我的PyQt5与DIP结合实验到此结束,收获满满!
总结
通过这次实验,我对PyQt5 有了很深的了解:作为一个GUI框架,可以为数字图像处理系统提供便捷的交互界面,同时PyQt5 的信号与槽机制为图像处理系统赋予了良好的交互性:用户通过点击按钮触发相应的图像处理操作,并即时在界面上看到结果,这种交互模式提升了用户体验。而在代码方面,可以很清楚的看到每个图像处理操作都对应一个独立的方法,便于代码的理解、维护和扩展。


 1206
1206

 被折叠的 条评论
为什么被折叠?
被折叠的 条评论
为什么被折叠?
 到【灌水乐园】发言


