Spring Boot整合OAuth2,附详细注释

import org.springframework.security.oauth2.provider.password.ResourceOwnerPasswordTokenGranter;

import org.springframework.security.oauth2.provider.token.AuthorizationServerTokenServices;

import org.springframework.security.oauth2.provider.token.TokenStore;

import org.springframework.security.oauth2.provider.token.store.JwtAccessTokenConverter;

import org.springframework.security.oauth2.provider.token.store.redis.RedisTokenStore;

import javax.sql.DataSource;

import java.util.ArrayList;

import java.util.Arrays;

import java.util.List;

/**

  • 授权服务器配置

  • @author 向振华

  • @date 2020/11/05 17:43

*/

@Configuration

@EnableAuthorizationServer

public class AuthorizationServerConfig extends AuthorizationServerConfigurerAdapter {

@Autowired

@Qualifier(“dataSource”)

private DataSource dataSource;

@Autowired

private RedisConnectionFactory redisConnectionFactory;

@Autowired

private UserDetailsServiceImpl userDetailsService;

@Autowired

private AuthenticationManager authenticationManager;

/**

  • 配置令牌端点(内置的/oauth/* 接口)的安全约束

  • @param security

*/

@Override

public void configure(AuthorizationServerSecurityConfigurer security) {

security

// 允许访问/oauth/token授权接口

.allowFormAuthenticationForClients()

// 开启/oauth/check_token访问

.checkTokenAccess(“permitAll()”);

}

/**

  • 配置客户端详情

  • @param clients

  • @throws Exception

*/

@Override

public void configure(ClientDetailsServiceConfigurer clients) throws Exception {

// 读DB客户端详情

clients.withClientDetails(new RedisClientDetailsService(dataSource));

// 客户端详情配置

// clients

// .inMemory()

// // 客户端ID

// .withClient(“order-client-id”)

// // 客户端密码

// .secret(passwordEncoder.encode(“123456”))

// // 授权的类型

// .authorizedGrantTypes(“password”, “refresh_token”)

// // 令牌有效期

// .accessTokenValiditySeconds(120)

// // 范围

// .scopes(“all”);

}

/**

  • 配置令牌管理

  • @param endpoints

*/

@Override

public void configure(AuthorizationServerEndpointsConfigurer endpoints) {

List tokenGranters = getTokenGranters(endpoints.getTokenServices(), endpoints.getClientDetailsService(), endpoints.getOAuth2RequestFactory());

endpoints

// 登录模式

.tokenGranter(new CompositeTokenGranter(tokenGranters))

// 请求方式

.allowedTokenEndpointRequestMethods(HttpMethod.GET, HttpMethod.POST)

// 用户账号密码认证

.userDetailsService(userDetailsService)

// 指定认证管理器

.authenticationManager(authenticationManager)

// 指定token存储位置

.tokenStore(tokenStore())

// JWTToken

.tokenEnhancer(jwtTokenConverter())

// 是否重复使用refresh_token

.reuseRefreshTokens(false)

// 自定义异常翻译

.exceptionTranslator(new CustomWebResponseExceptionTranslator());

}

/**

  • 获取登录类型

  • @param tokenServices

  • @param clientDetailsService

  • @param requestFactory

  • @return

*/

private List getTokenGranters(

AuthorizationServerTokenServices tokenServices,

ClientDetailsService clientDetailsService,

OAuth2RequestFactory requestFactory) {

return new ArrayList<>(Arrays.asList(

// 内置的密码模式登录

new ResourceOwnerPasswordTokenGranter(authenticationManager, tokenServices, clientDetailsService, requestFactory),

// 短信验证码登录

new ResourceOwnerSmsTokenGranter(tokenServices, clientDetailsService, requestFactory)

));

}

/**

  • 于Redis实现,令牌保存到缓存

  • @return

*/

@Bean

public TokenStore tokenStore() {

RedisTokenStore tokenStore = new RedisTokenStore(redisConnectionFactory);

// redis key 前缀
自我介绍一下,小编13年上海交大毕业,曾经在小公司待过,也去过华为、OPPO等大厂,18年进入阿里一直到现在。

深知大多数Java工程师,想要提升技能,往往是自己摸索成长或者是报班学习,但对于培训机构动则几千的学费,着实压力不小。自己不成体系的自学效果低效又漫长,而且极易碰到天花板技术停滞不前!

因此收集整理了一份《2024年Java开发全套学习资料》,初衷也很简单,就是希望能够帮助到想自学提升又不知道该从何学起的朋友,同时减轻大家的负担。img

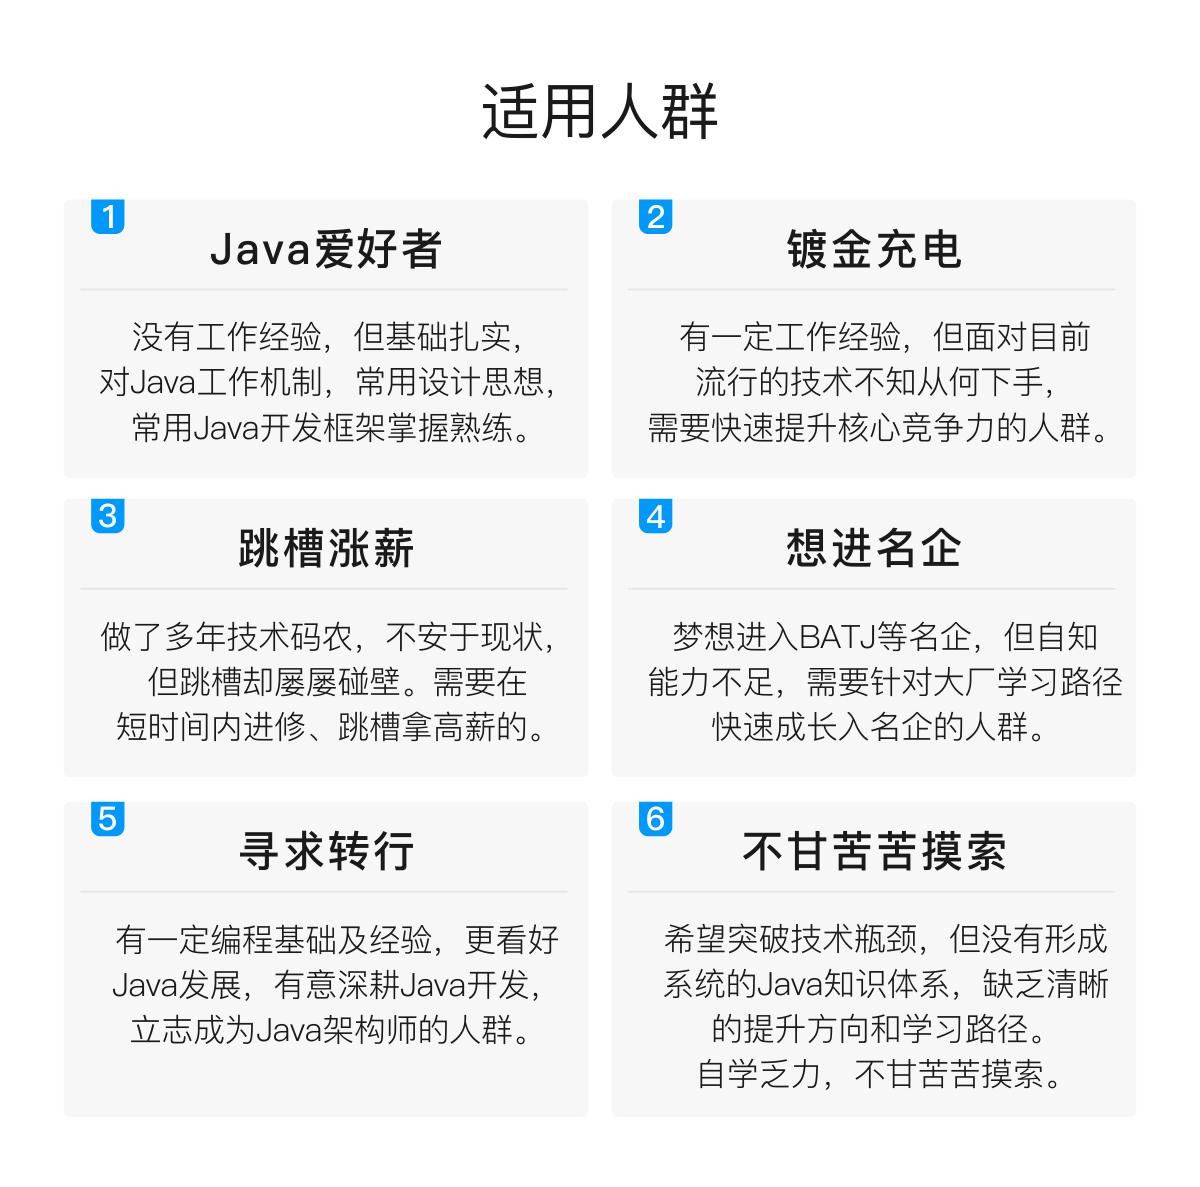
既有适合小白学习的零基础资料,也有适合3年以上经验的小伙伴深入学习提升的进阶课程,基本涵盖了95%以上Java开发知识点,真正体系化!

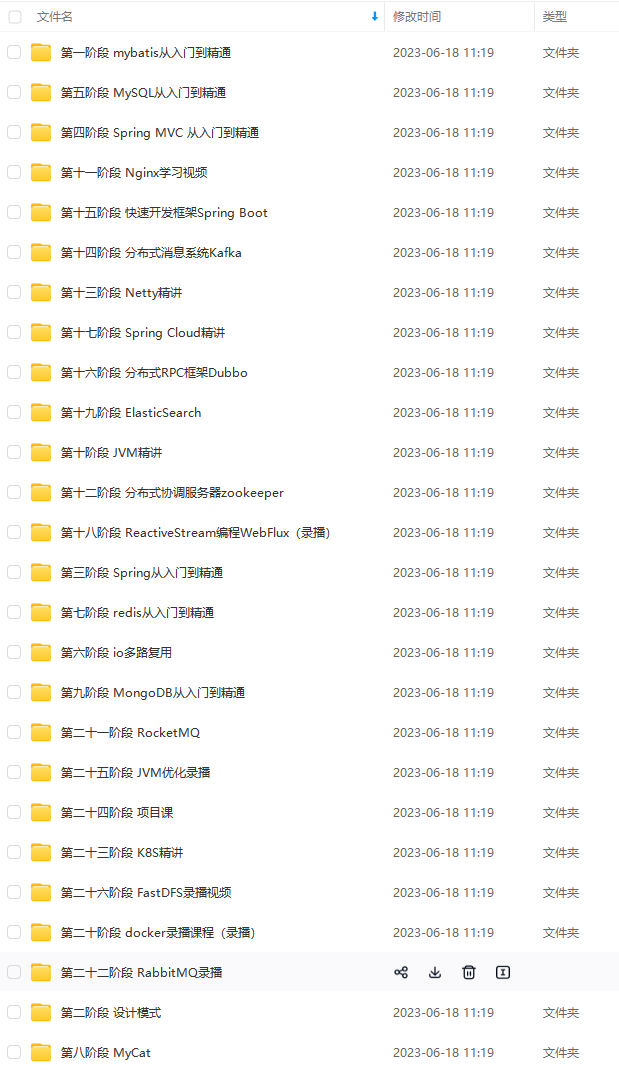
由于文件比较大,这里只是将部分目录截图出来,每个节点里面都包含大厂面经、学习笔记、源码讲义、实战项目、讲解视频,并且会持续更新!

如果你觉得这些内容对你有帮助,可以扫码获取!!(备注Java获取)

img

Java核心架构进阶知识点

面试成功其实都是必然发生的事情,因为在此之前我做足了充分的准备工作,不单单是纯粹的刷题,更多的还会去刷一些Java核心架构进阶知识点,比如:JVM、高并发、多线程、缓存、Spring相关、分布式、微服务、RPC、网络、设计模式、MQ、Redis、MySQL、设计模式、负载均衡、算法、数据结构、kafka、ZK、集群等。而这些也全被整理浓缩到了一份pdf——《Java核心架构进阶知识点整理》,全部都是精华中的精华,本着共赢的心态,好东西自然也是要分享的

image

image

image

内容颇多,篇幅却有限,这就不在过多的介绍了,大家可根据以上截图自行脑补
《互联网大厂面试真题解析、进阶开发核心学习笔记、全套讲解视频、实战项目源码讲义》点击传送门即可获取!

[外链图片转存中…(img-VvC1hzJD-1713391215912)]

[外链图片转存中…(img-OxX99uEq-1713391215913)]

[外链图片转存中…(img-mhRy9IyG-1713391215913)]

内容颇多,篇幅却有限,这就不在过多的介绍了,大家可根据以上截图自行脑补
《互联网大厂面试真题解析、进阶开发核心学习笔记、全套讲解视频、实战项目源码讲义》点击传送门即可获取!

  • 18
    点赞
  • 12
    收藏
    觉得还不错? 一键收藏
  • 0
    评论
以下是一个基于Spring Boot Security、OAuth2和JWT实现的示例代码: 1. 添加Maven依赖 在pom.xml文件中添加以下依赖: ``` <dependency> <groupId>org.springframework.boot</groupId> <artifactId>spring-boot-starter-security</artifactId> </dependency> <dependency> <groupId>org.springframework.security</groupId> <artifactId>spring-security-oauth2</artifactId> <version>2.3.7.RELEASE</version> </dependency> <dependency> <groupId>io.jsonwebtoken</groupId> <artifactId>jjwt</artifactId> <version>0.9.1</version> </dependency> ``` 2. 配置Spring Security 在Spring Boot应用程序中,您可以通过@Configuration配置类来配置Spring Security。以下是一个示例配置类: ``` @Configuration @EnableWebSecurity public class SecurityConfig extends WebSecurityConfigurerAdapter { @Autowired private UserDetailsService userDetailsService; @Autowired private PasswordEncoder passwordEncoder; @Override protected void configure(HttpSecurity http) throws Exception { http.csrf().disable() .authorizeRequests() .antMatchers("/oauth/**").permitAll() .antMatchers("/api/**").authenticated() .and() .formLogin().permitAll() .and() .logout().permitAll(); } @Override protected void configure(AuthenticationManagerBuilder auth) throws Exception { auth.userDetailsService(userDetailsService).passwordEncoder(passwordEncoder); } } ``` 在上面的配置类中,我们禁用了CSRF保护,并配置了访问权限。具体来说: - /oauth/** URL模式应该允许所有人访问,因为我们将使用OAuth2协议进行身份验证和授权。 - /api/** URL模式应该需要身份验证。 - 我们还配置了表单登录和注销。 3. 配置OAuth2 在Spring Boot应用程序中,您可以使用@Configuration配置类来配置OAuth2。以下是一个示例配置类: ``` @Configuration @EnableAuthorizationServer public class OAuth2Config extends AuthorizationServerConfigurerAdapter { @Autowired private AuthenticationManager authenticationManager; @Autowired private UserDetailsService userDetailsService; @Autowired private PasswordEncoder passwordEncoder; @Bean public JwtAccessTokenConverter jwtAccessTokenConverter() { JwtAccessTokenConverter converter = new JwtAccessTokenConverter(); converter.setSigningKey("my-signing-key"); // 设置JWT签名密钥 return converter; } @Bean public JwtTokenStore jwtTokenStore() { return new JwtTokenStore(jwtAccessTokenConverter()); } @Override public void configure(ClientDetailsServiceConfigurer clients) throws Exception { clients.inMemory() .withClient("my-client-id") .secret(passwordEncoder.encode("my-client-secret")) .authorizedGrantTypes("password", "refresh_token") .scopes("read", "write") .accessTokenValiditySeconds(3600) .refreshTokenValiditySeconds(86400); } @Override public void configure(AuthorizationServerEndpointsConfigurer endpoints) throws Exception { endpoints.authenticationManager(authenticationManager) .userDetailsService(userDetailsService) .accessTokenConverter(jwtAccessTokenConverter()) .tokenStore(jwtTokenStore()); } } ``` 在上面的配置类中,我们使用@EnableAuthorizationServer注释启用OAuth2,并实现了AuthorizationServerConfigurer接口以配置客户端和端点。具体来说: - 我们配置了一个内存中的客户端,使用密码和刷新令牌授权类型,以及读写作用域。 - 我们还配置了JWT令牌转换器和令牌存储。 - 我们将身份验证管理器、用户详细信息服务、JWT令牌转换器和令牌存储配置为端点。 4. 实现用户详细信息服务 我们需要实现UserDetailsService接口来加载用户详细信息。以下是一个示例实现: ``` @Service public class UserDetailsServiceImpl implements UserDetailsService { @Autowired private UserRepository userRepository; @Override public UserDetails loadUserByUsername(String username) throws UsernameNotFoundException { User user = userRepository.findByUsername(username); if (user == null) { throw new UsernameNotFoundException("User not found with username: " + username); } return new org.springframework.security.core.userdetails.User( user.getUsername(), user.getPassword(), Collections.emptyList()); } } ``` 在上面的实现中,我们使用Spring Data JPA从数据库中加载用户,并创建一个SimpleGrantedAuthority对象列表作为用户的权限。 5. 实现密码编码器 我们需要实现PasswordEncoder接口,以便在创建用户时对密码进行编码。以下是一个示例实现: ``` @Service public class PasswordEncoderImpl implements PasswordEncoder { @Override public String encode(CharSequence rawPassword) { return BCrypt.hashpw(rawPassword.toString(), BCrypt.gensalt()); } @Override public boolean matches(CharSequence rawPassword, String encodedPassword) { return BCrypt.checkpw(rawPassword.toString(), encodedPassword); } } ``` 在上面的实现中,我们使用BCrypt编码算法对密码进行编码和验证。 6. 实现控制器 最后,我们需要实现一个控制器来测试OAuth2和JWT。以下是一个示例实现: ``` @RestController @RequestMapping("/api") public class ApiController { @GetMapping("/hello") public String hello() { return "Hello, World!"; } @GetMapping("/user") public Principal user(Principal principal) { return principal; } } ``` 在上面的实现中,我们有两个端点:/api/hello和/api/user。前者返回一个简单的字符串,后者返回当前用户的Principal对象。 7. 测试应用程序 现在,您可以启动应用程序并使用以下步骤测试OAuth2和JWT: - 获取访问令牌。使用以下curl命令以密码授权方式获取访问令牌: ``` curl -X POST \ -d 'grant_type=password&username=my-username&password=my-password' \ -H 'Authorization: Basic bXktY2xpZW50LWlkOm15LWNsaWVudC1zZWNyZXQ=' \ http://localhost:8080/oauth/token ``` 在上面的命令中,my-username和my-password应该是您的用户名和密码,bXktY2xpZW50LWlkOm15LWNsaWVudC1zZWNyZXQ=应该是Base64编码的客户端ID和客户端密钥。 - 使用访问令牌访问API。使用以下curl命令使用JWT访问/api/hello端点: ``` curl -H 'Authorization: Bearer <access-token>' \ http://localhost:8080/api/hello ``` 在上面的命令中,<access-token>应该是您在第一步中获取的访问令牌。 - 获取用户信息。使用以下curl命令使用JWT访问/api/user端点: ``` curl -H 'Authorization: Bearer <access-token>' \ http://localhost:8080/api/user ``` 在上面的命令中,<access-token>应该是您在第一步中获取的访问令牌。
评论
添加红包

请填写红包祝福语或标题

红包个数最小为10个

红包金额最低5元

当前余额3.43前往充值 >
需支付:10.00
成就一亿技术人!
领取后你会自动成为博主和红包主的粉丝 规则
hope_wisdom
发出的红包
实付
使用余额支付
点击重新获取
扫码支付
钱包余额 0

抵扣说明:

1.余额是钱包充值的虚拟货币,按照1:1的比例进行支付金额的抵扣。
2.余额无法直接购买下载,可以购买VIP、付费专栏及课程。

余额充值