


-
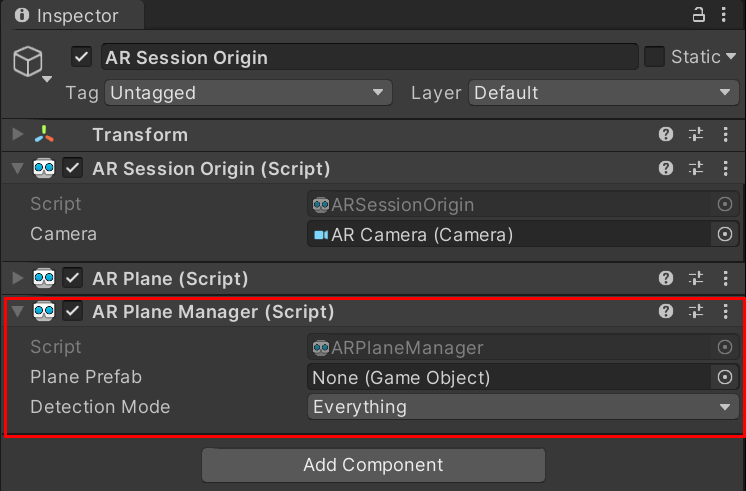
Plane Prefab:平面预制体,不赋值的会自动实例化一个空对象
-
Detection Mode:设置平面检测方式,如水平平面(Horizontal),垂直平面(Vertical),水平和垂直平面(Everything),不检测平面(Nothing)
要可视化平面,您需要创建一个 Prefab 或 GameObject,其中包含一个订阅 ARPlane 的 boundaryChanged 事件的组件。 ARFoundation 提供了一个 ARPlaneMeshVisualizer。该组件从边界顶点生成网格并将其分配给 MeshCollider、MeshFilter 和 LineRenderer(如果存在)。
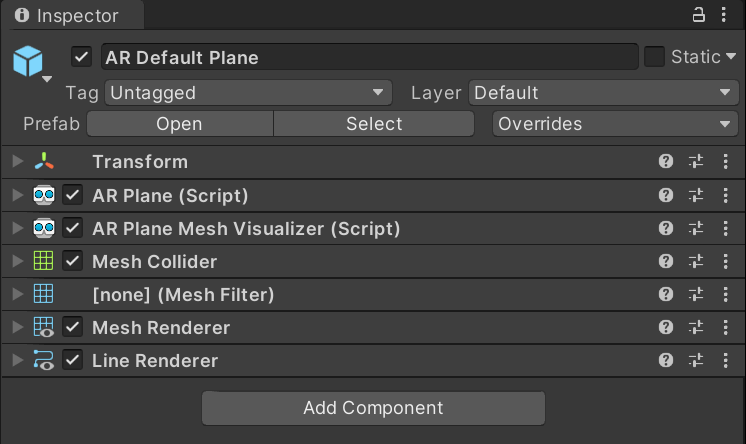
要创建一个新的 GameObject,然后您可以使用它来创建您的 Prefab,请在您的 Scene 视图中单击鼠标右键,然后从出现的上下文菜单中选择 GameObject > XR > AR Default Plane
新建一个AR Default Plane对象作为预制体(默认平面预制体)
其中各属性的说明:
AR Plane:负责各类属性事宜,如是否在移除平面时销毁此实例化对象
AR Plane Mesh Visualizer:主要从边界特征点和其他特征点三角化生成一个平面网格
Mesh Renderer:使用Mesh Renderer采用合适材质渲染平面
Line Renderer:负责渲染平面可视化后的边界连线
演示视频:默认浅黄色的平面,黑色的边界线
https://www.bilibili.com/video/BV1pZ4y1f7Ru?spm_id_from=333.999.0.0
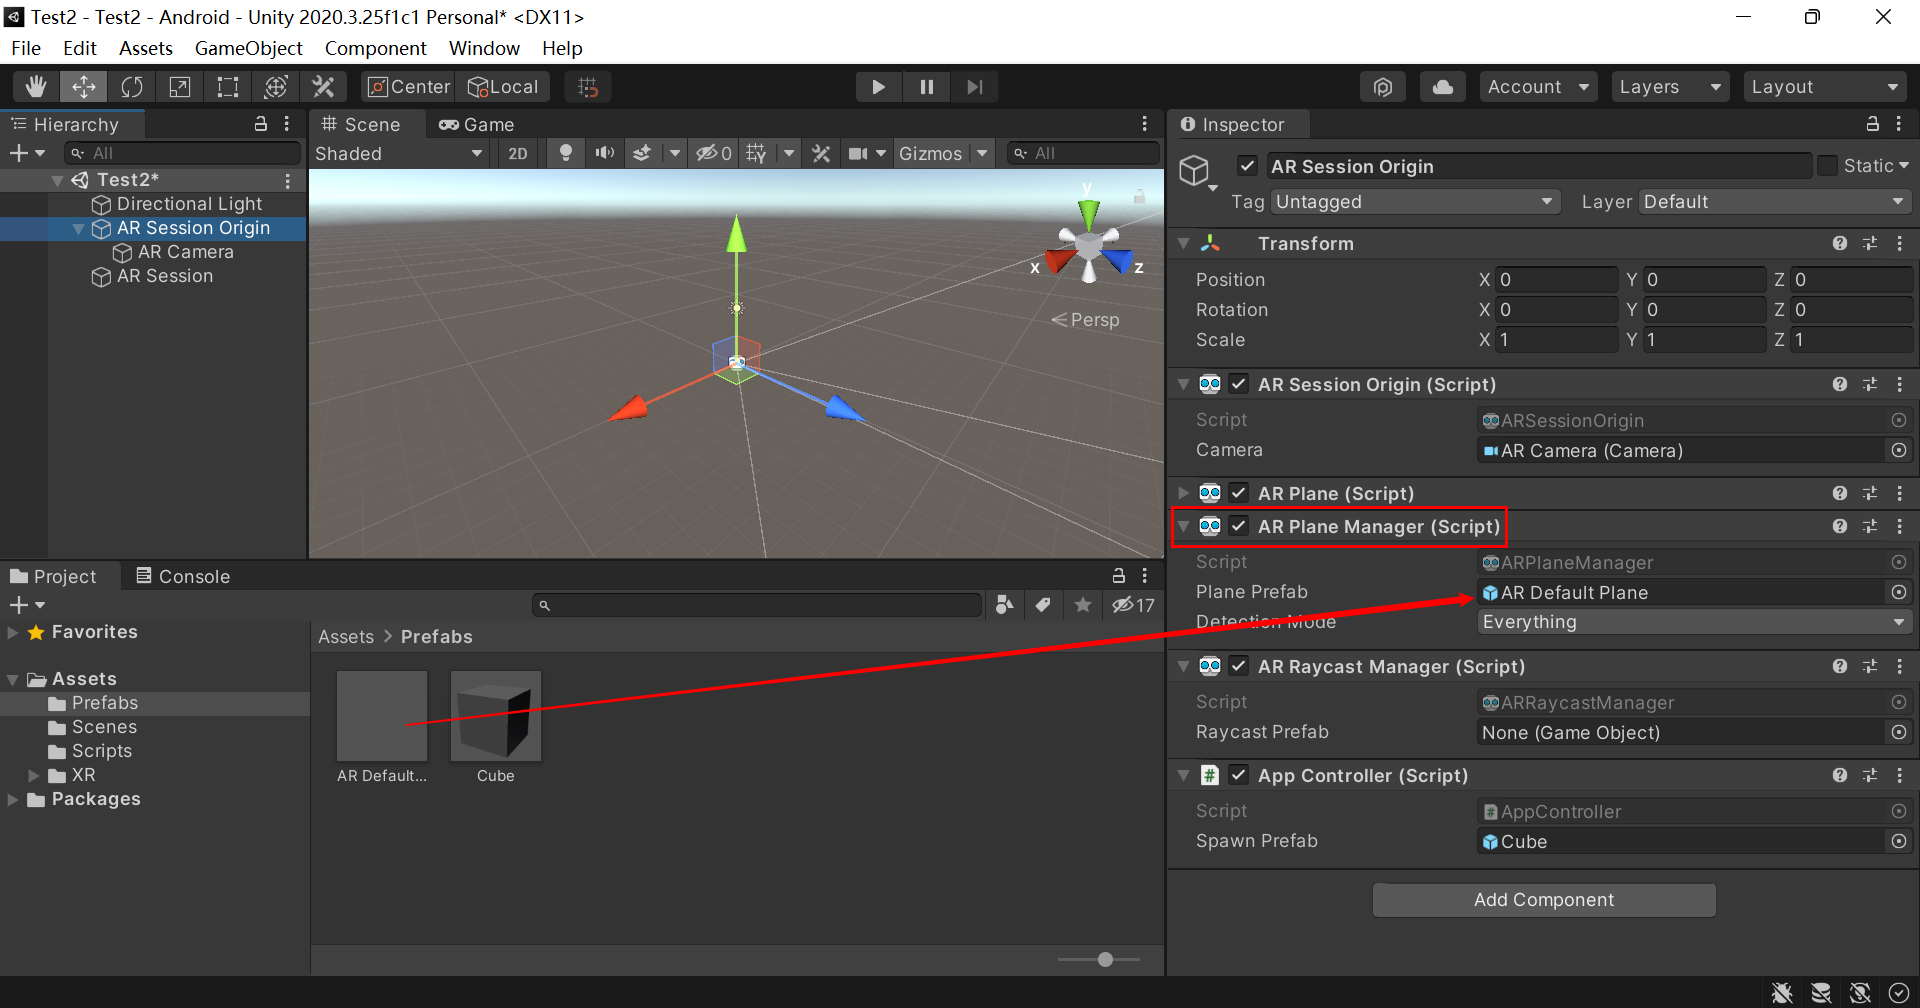
创建 AR Default Plane 后,将其分配给 ARPlaneManager 的 Plane Prefab 字段。您可以直接使用它,也可以通过将AR Default Plane 拖到 Assets 文件夹中来创建 Prefab。默认平面如下所示:
我下载的是官方的demo
-
首先将AR Default Plane对象下的Line Renderer组件移除
-
编写一个c#脚本ARFeatheredPlaneMeshVisualizer,并将其作为组件添加到AR Default Plane对象上
using System.Collections.Generic;

using UnityEngine;

using UnityEngine.XR.ARFoundation;


/// <summary>

/// This plane visualizer demonstrates the use of a feathering effect

/// at the edge of the detected plane, which reduces the visual impression

/// of a hard edge.

/// </summary>

[RequireComponent(typeof(ARPlaneMeshVisualizer), typeof(MeshRenderer), typeof(ARPlane))]

public class ARFeatheredPlaneMeshVisualizer : MonoBehaviour

{

    [Tooltip("The width of the texture feathering (in world units).")]

    [SerializeField]

    float m_FeatheringWidth = 0.2f;


    /// <summary>

    /// The width of the texture feathering (in world units).

    /// </summary>

    public float featheringWidth

    {

        get { return m_FeatheringWidth; }

        set { m_FeatheringWidth = value; }

    }


    void Awake()

    {

        m_PlaneMeshVisualizer = GetComponent<ARPlaneMeshVisualizer>();

        m_FeatheredPlaneMaterial = GetComponent<MeshRenderer>().material;

        m_Plane = GetComponent<ARPlane>();

    }


    void OnEnable()

    {

        m_Plane.boundaryChanged += ARPlane_boundaryUpdated;

    }


    void OnDisable()

    {

        m_Plane.boundaryChanged -= ARPlane_boundaryUpdated;

    }


    void ARPlane_boundaryUpdated(ARPlaneBoundaryChangedEventArgs eventArgs)

    {

        GenerateBoundaryUVs(m_PlaneMeshVisualizer.mesh);

    }


    /// <summary>

    /// Generate UV2s to mark the boundary vertices and feathering UV coords.

    /// </summary>

    /// <remarks>

    /// The <c>ARPlaneMeshVisualizer</c> has a <c>meshUpdated</c> event that can be used to modify the generated

    /// mesh. In this case we'll add UV2s to mark the boundary vertices.

    /// This technique avoids having to generate extra vertices for the boundary. It works best when the plane is

    /// is fairly uniform.

    /// </remarks>

    /// <param name="mesh">The <c>Mesh</c> generated by <c>ARPlaneMeshVisualizer</c></param>

    void GenerateBoundaryUVs(Mesh mesh)

    {

        int vertexCount = mesh.vertexCount;


        // Reuse the list of UVs

        s_FeatheringUVs.Clear();

        if (s_FeatheringUVs.Capacity < vertexCount) { s_FeatheringUVs.Capacity = vertexCount; }


        mesh.GetVertices(s_Vertices);


        Vector3 centerInPlaneSpace = s_Vertices[s_Vertices.Count - 1];

        Vector3 uv = new Vector3(0, 0, 0);

        float shortestUVMapping = float.MaxValue;


        // Assume the last vertex is the center vertex.

        for (int i = 0; i < vertexCount - 1; i++)

        {

            float vertexDist = Vector3.Distance(s_Vertices[i], centerInPlaneSpace);


            // Remap the UV so that a UV of "1" marks the feathering boudary.

            // The ratio of featherBoundaryDistance/edgeDistance is the same as featherUV/edgeUV.

            // Rearrange to get the edge UV.

            float uvMapping = vertexDist / Mathf.Max(vertexDist - featheringWidth, 0.001f);

            uv.x = uvMapping;


            // All the UV mappings will be different. In the shader we need to know the UV value we need to fade out by.

            // Choose the shortest UV to guarentee we fade out before the border.

            // This means the feathering widths will be slightly different, we again rely on a fairly uniform plane.

            if (shortestUVMapping > uvMapping) { shortestUVMapping = uvMapping; }


            s_FeatheringUVs.Add(uv);

        }


        m_FeatheredPlaneMaterial.SetFloat("_ShortestUVMapping", shortestUVMapping);


        // Add the center vertex UV

        uv.Set(0, 0, 0);

        s_FeatheringUVs.Add(uv);


        mesh.SetUVs(1, s_FeatheringUVs);

        mesh.UploadMeshData(false);

    }


    static List<Vector3> s_FeatheringUVs = new List<Vector3>();


    static List<Vector3> s_Vertices = new List<Vector3>();


    ARPlaneMeshVisualizer m_PlaneMeshVisualizer;


    ARPlane m_Plane;


    Material m_FeatheredPlaneMaterial;

}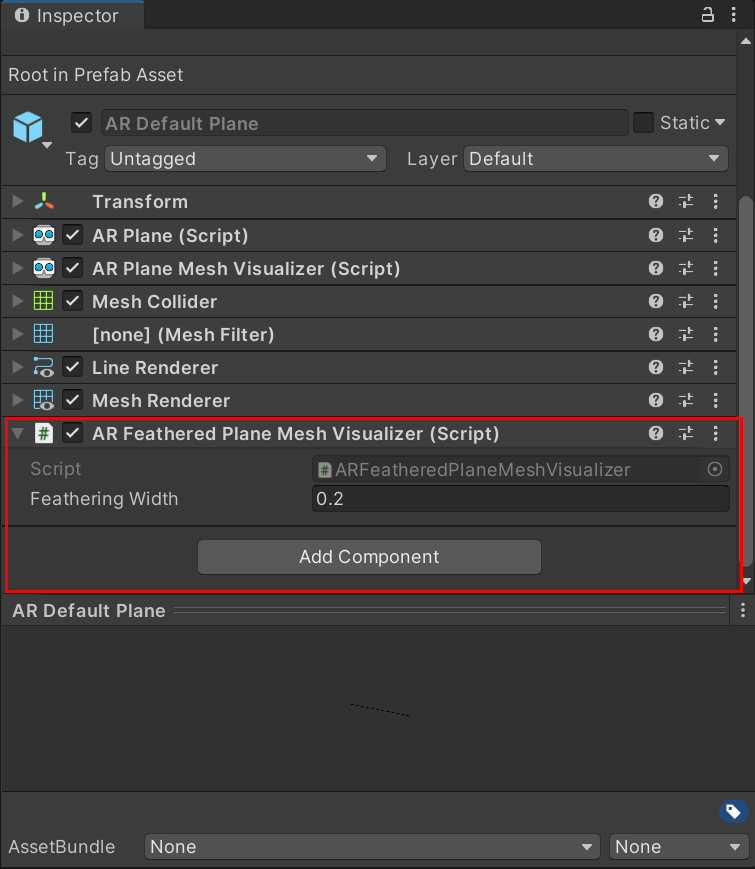
-
在project窗口的Assets下新建一个文件夹Shaders,在其中右键-》create-》shader-》Unlit Shader创建一个shader文件,并命名为FeatheredPlaneShader
Shader "Unlit/FeatheredPlaneShader"

{

    Properties

    {

        _MainTex("Texture", 2D) = "white" {}

        _TexTintColor("Texture Tint Color", Color) = (1,1,1,1)

        _PlaneColor("Plane Color", Color) = (1,1,1,1)

    }

        SubShader
尾声
在我的博客上很多朋友都在给我留言,需要一些系统的面试高频题目。之前说过我的复习范围无非是个人技术博客还有整理的笔记,考虑到笔记是手写版不利于保存,所以打算重新整理并放到网上,时间原因这里先列出面试问题,题解详见:

展示学习笔记


网上学习资料一大堆,但如果学到的知识不成体系,遇到问题时只是浅尝辄止,不再深入研究,那么很难做到真正的技术提升。
一个人可以走的很快,但一群人才能走的更远!不论你是正从事IT行业的老鸟或是对IT行业感兴趣的新人,都欢迎加入我们的的圈子(技术交流、学习资源、职场吐槽、大厂内推、面试辅导),让我们一起学习成长!
Ks2wK-1714518006488)]
展示学习笔记
[外链图片转存中…(img-dP80EOIJ-1714518006488)]
[外链图片转存中…(img-piKGIRZU-1714518006488)]
网上学习资料一大堆,但如果学到的知识不成体系,遇到问题时只是浅尝辄止,不再深入研究,那么很难做到真正的技术提升。
一个人可以走的很快,但一群人才能走的更远!不论你是正从事IT行业的老鸟或是对IT行业感兴趣的新人,都欢迎加入我们的的圈子(技术交流、学习资源、职场吐槽、大厂内推、面试辅导),让我们一起学习成长!


 1066
1066

 被折叠的 条评论
为什么被折叠?
被折叠的 条评论
为什么被折叠?
 到【灌水乐园】发言


