


深度学习中基于yolov8螺栓识别检测数据集进行目标检测任务 VOC 使用YOLOv8进行训练、评估和结果分析。来识别螺栓螺丝并训练数据集的权重
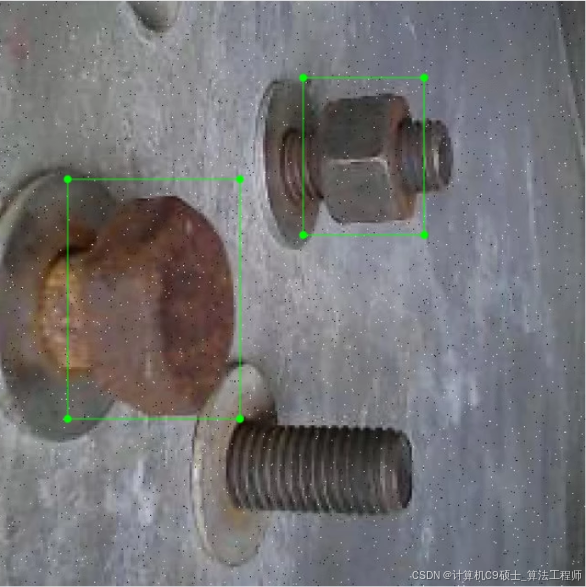
_螺栓识别检测数据集VOC YOLO目标检测数据集 2100张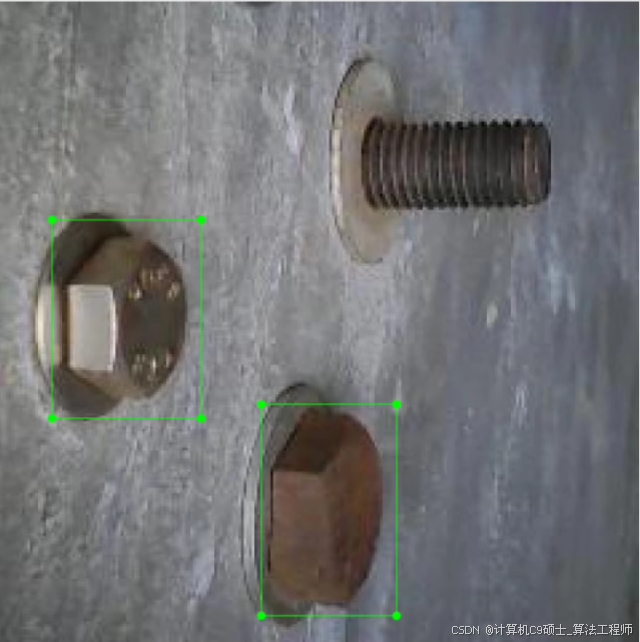
标签名称和数量:
bolt:3750

如何基于螺栓识别检测数据集进行目标检测任务。假设同学你的
数据集包含2100张图片,并且已经标注为VOC (XML) 格式。我们将使用YOLOv8进行训练、评估和结果分析。
那么我们如何操作呢?
以下代码仅供同学参考!
环境准备
确保您已经安装了以下软件和库:
- Python 3.8 或更高版本
- PyTorch 1.9 或更高版本
- torchvision 0.10 或更高版本
- OpenCV
- numpy
- pandas
- matplotlib
- lxml(用于解析XML文件)
- albumentations(用于数据增强)
您可以使用以下命令安装所需的Python库:
pip install torch torchvision opencv-python numpy pandas matplotlib lxml albumentations ultralytics
数据集准备
假设您的数据集已经按照VOC格式组织好,并且包含训练集、验证集和测试集。以下是数据集的预期结构:
datasets/
└── bolt_detection/
    ├── images/
    │   ├── train/
    │   ├── val/
    │   └── test/
    ├── annotations/
    │   ├── train/
    │   ├── val/
    │   └── test/
    └── labels/
        ├── train/
        ├── val/
        └── test/
同时,有一个 classes.txt 文件包含类别名称,每行一个类别名称。
类别文件 (classes.txt)
bolt
划分数据集的脚本
假设您已经有了一个脚本来划分数据集,我们将其命名为 split_dataset.py。以下是一个示例脚本:
[<title="Data Splitting Script">]
import os
import shutil
import random
from sklearn.model_selection import train_test_split

def create_directory_structure(root_dir):
    for split in ['train', 'val', 'test']:
        os.makedirs(os.path.join(root_dir, 'images', split), exist_ok=True)
        os.makedirs(os.path.join(root_dir, 'annotations', split), exist_ok=True)
        os.makedirs(os.path.join(root_dir, 'labels', split), exist_ok=True)

def move_files(source_img_dir, source_ann_dir, dest_img_dir, dest_ann_dir, files):
    for file in files:
        img_file = f"{file}.jpg"
        ann_file = f"{file}.xml"
        shutil.move(os.path.join(source_img_dir, img_file), os.path.join(dest_img_dir, img_file))
        shutil.move(os.path.join(source_ann_dir, ann_file), os.path.join(dest_ann_dir, ann_file))

def split_dataset(data_root, train_ratio=0.7, val_ratio=0.15, test_ratio=0.15):
    image_files = [os.path.splitext(f)[0] for f in os.listdir(os.path.join(data_root, 'images')) if f.endswith('.jpg')]

    # Shuffle the files
    random.shuffle(image_files)

    # Split the files
    train_files, temp_files = train_test_split(image_files, test_size=(1 - train_ratio))
    val_files, test_files = train_test_split(temp_files, test_size=test_ratio / (val_ratio + test_ratio))

    # Move files to respective directories
    move_files(os.path.join(data_root, 'images'), os.path.join(data_root, 'annotations'),
               os.path.join(data_root, 'images/train'), os.path.join(data_root, 'annotations/train'), train_files)
    move_files(os.path.join(data_root, 'images'), os.path.join(data_root, 'annotations'),
               os.path.join(data_root, 'images/val'), os.path.join(data_root, 'annotations/val'), val_files)
    move_files(os.path.join(data_root, 'images'), os.path.join(data_root, 'annotations'),
               os.path.join(data_root, 'images/test'), os.path.join(data_root, 'annotations/test'), test_files)

if __name__ == '__main__':
    data_root = '../datasets/bolt_detection/'
    create_directory_structure(data_root)
    split_dataset(data_root)
转换XML到YOLO格式
如果您的数据集是XML格式,需要将其转换为YOLO格式。以下是一个示例脚本 convert_xml_to_yolo.py:
[<title="Convert XML to YOLO Format">]
import os
import xml.etree.ElementTree as ET
import cv2
import numpy as np

def convert(size, box):
    dw = 1./size[0]
    dh = 1./size[1]
    x = (box[0] + box[1])/2.0 - 1
    y = (box[2] + box[3])/2.0 - 1
    w = box[1] - box[0]
    h = box[3] - box[2]
    x = x*dw
    w = w*dw
    y = y*dh
    h = h*dh
    return (x,y,w,h)

def convert_annotation(xml_file, output_path, class_mapping):
    tree = ET.parse(xml_file)
    root = tree.getroot()
    size = root.find('size')
    w = int(size.find('width').text)
    h = int(size.find('height').text)

    with open(output_path, 'w') as out_file:
        for obj in root.iter('object'):
            difficult = obj.find('difficult').text
            cls = obj.find('name').text
            if cls not in class_mapping or int(difficult) == 1:
                continue
            cls_id = class_mapping[cls]
            xmlbox = obj.find('bndbox')
            b = (float(xmlbox.find('xmin').text), float(xmlbox.find('xmax').text), float(xmlbox.find('ymin').text), float(xmlbox.find('ymax').text))
            bb = convert((w,h), b)
            out_file.write(str(cls_id) + " " + " ".join([str(a) for a in bb]) + '\n')

def main(input_dir, output_dir, class_mapping):
    for filename in os.listdir(input_dir):
        if filename.endswith('.xml'):
            xml_path = os.path.join(input_dir, filename)
            txt_filename = filename.replace('.xml', '.txt')
            txt_path = os.path.join(output_dir, txt_filename)
            convert_annotation(xml_path, txt_path, class_mapping)

if __name__ == "__main__":
    class_mapping = {
        'bolt': 0
    }

    input_train_dir = '../datasets/bolt_detection/annotations/train/'
    output_train_dir = '../datasets/bolt_detection/labels/train/'
    main(input_train_dir, output_train_dir, class_mapping)

    input_val_dir = '../datasets/bolt_detection/annotations/val/'
    output_val_dir = '../datasets/bolt_detection/labels/val/'
    main(input_val_dir, output_val_dir, class_mapping)

    input_test_dir = '../datasets/bolt_detection/annotations/test/'
    output_test_dir = '../datasets/bolt_detection/labels/test/'
    main(input_test_dir, output_test_dir, class_mapping)
模型训练
我们将使用YOLOv8进行训练。首先,克隆YOLOv8仓库并设置环境。
git clone https://github.com/ultralytics/ultralytics.git
cd ultralytics
pip install -r requirements.txt
准备配置文件
创建一个 data.yaml 文件来定义数据集路径和类别:
[<title="YOLOv8 Data Configuration File">]
train: ../datasets/bolt_detection/images/train/
val: ../datasets/bolt_detection/images/val/

nc: 1  # number of classes
names: ['bolt']  # list of class names
训练模型
使用以下命令开始训练:
yolo task=detect mode=train model=yolov8n.pt data=data.yaml epochs=50 imgsz=640 batch=16
结果评估
训练完成后,可以使用以下命令评估模型性能:
yolo task=detect mode=val model=runs/detect/train/weights/best.pt data=data.yaml
使用说明
-
配置路径:
- 确保
datasets/bolt_detection/目录结构正确。 - 确保
data.yaml中的路径和类别名称正确。
- 确保
-
运行脚本:
- 在终端中依次运行数据分割脚本、XML转YOLO脚本、训练脚本和评估脚本。
-
注意事项:
- 根据需要调整超参数和训练设置。
- 可以通过修改
model参数来选择不同的YOLOv8模型架构(如yolov8s.pt,yolov8m.pt,yolov8l.pt,yolov8x.pt)。
示例
假设您的数据集文件夹结构如下:
datasets/
└── bolt_detection/
    ├── images/
    │   ├── all/
    │   ├── train/
    │   ├── val/
    │   └── test/
    ├── annotations/
    │   ├── all/
    │   ├── train/
    │   ├── val/
    │   └── test/
    └── labels/
        ├── train/
        ├── val/
        └── test/
并且 all/ 目录包含所有的图片和对应的XML标注文件。运行上述脚本后,您可以查看训练日志和最终的模型权重文件。
总结
通过上述步骤,我们可以构建一个全面的螺栓识别检测系统,包括数据集准备、数据转换、模型训练和结果评估。以下是所有相关的代码文件:
- 数据分割脚本 (
split_dataset.py) - XML转YOLO格式脚本 (
convert_xml_to_yolo.py) - YOLOv8数据集配置文件 (
data.yaml)
希望这些信息对同学有所帮助!


 799
799

 被折叠的 条评论
为什么被折叠?
被折叠的 条评论
为什么被折叠?
 到【灌水乐园】发言


