


使用YOLOv8训练DOTA数据集的目标检测任务。从数据准备、模型训练、评估和结果可视化等多个步骤
文章目录
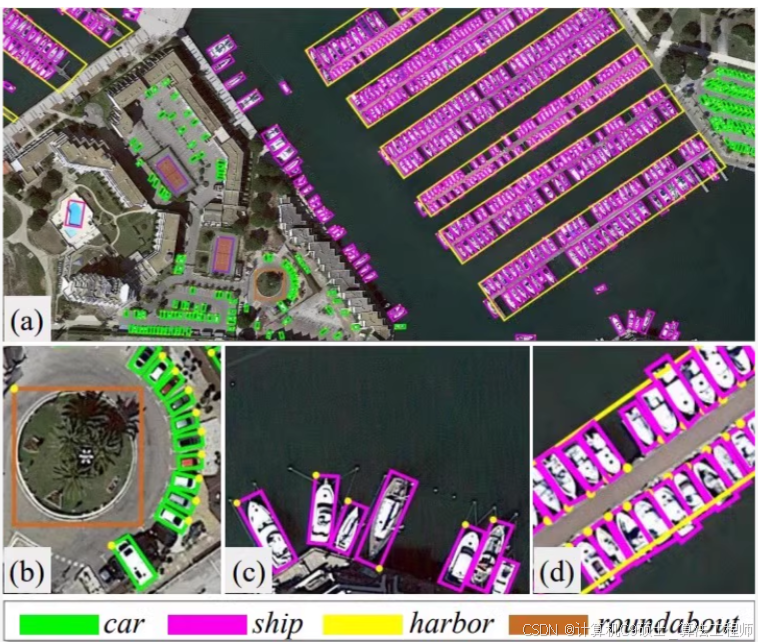

好的,针对DOTA数据集的任务,我们将从数据准备、模型训练、评估和可视化等方面详细介绍整个流程。DOTA数据集(Dataset for Object Detection in Aerial Images)包含2806张4000 × 4000的航拍图像,总共包含188282个目标,涉及14个类别。我们将使用YOLOv8进行目标检测任务,并提供一些常用的脚本来帮助你更高效地处理数据和训练模型。
1. 环境准备
首先,确保你已经安装了必要的库和工具。你可以使用以下命令安装所需的库:
pip install ultralytics
pip install torch torchvision
pip install opencv-python
pip install pandas
pip install matplotlib
pip install shapely
2. 数据准备
假设你的数据集目录结构如下:
dota/
├── images/
│   ├── train/
│   └── val/
├── labels/
│   ├── train/
│   └── val/
每个图像文件和对应的标签文件都以相同的文件名命名,例如 P0001.png 和 P0001.txt。
3. 创建数据配置文件
创建一个名为dota.yaml的文件,内容如下:
# DOTA Dataset Configuration

# Path to the dataset directory
path: ./dota

# Training and validation image directories
train: images/train
val: images/val

# Training and validation label directories
train_labels: labels/train
val_labels: labels/val

# Number of classes
nc: 14

# Class names
names:
  0: small-vehicle
  1: large-vehicle
  2: plane
  3: storage-tank
  4: ship
  5: harbor
  6: ground-track-field
  7: soccer-ball-field
  8: swimming-pool
  9: helicopter
  10: roundabout
  11: tennis-court
  12: basketball-court
  13: baseball-diamond
4. 训练模型
使用YOLOv8进行目标检测任务训练,可以使用以下命令:
yolo detect train data=dota.yaml model=yolov8n.pt epochs=100 imgsz=512
解释:
data=dota.yaml: 指定数据配置文件。model=yolov8n.pt: 使用预训练的YOLOv8检测模型(yolov8n)。你可以选择其他大小的模型,如yolov8s、yolov8m、yolov8l或yolov8x。epochs=100: 训练的轮数。imgsz=512: 图像的尺寸。
5. 评估模型
训练完成后,可以使用以下命令来评估模型在验证集上的性能:
yolo detect val data=dota.yaml model=runs/detect/train/weights/best.pt imgsz=512
解释:
data=dota.yaml: 指定数据配置文件。model=runs/detect/train/weights/best.pt: 指定训练过程中保存的最佳模型权重文件。imgsz=512: 图像的尺寸。
6. 可视化预测结果
使用以下Python代码来可视化模型的预测结果:
import cv2
import torch
from ultralytics import YOLO

# 加载模型
model = YOLO('runs/detect/train/weights/best.pt')

# 读取图像
image_path = 'dota/images/val/P0001.png'
image = cv2.imread(image_path)

# 进行预测
results = model(image)

# 可视化预测结果
for result in results:
    boxes = result.boxes.xyxy
    confidences = result.boxes.conf
    class_ids = result.boxes.cls

    for box, conf, class_id in zip(boxes, confidences, class_ids):
        x1, y1, x2, y2 = map(int, box)
        label = model.names[int(class_id)]
        confidence = float(conf)

        # 绘制边界框
        cv2.rectangle(image, (x1, y1), (x2, y2), (0, 255, 0), 2)
        text = f'{label}: {confidence:.2f}'
        cv2.putText(image, text, (x1, y1 - 10), cv2.FONT_HERSHEY_SIMPLEX, 0.5, (0, 255, 0), 2)

# 显示图像
cv2.imshow('Detection Prediction', image)
cv2.waitKey(0)
cv2.destroyAllWindows()
7. 常用的五个脚本
- 数据增强脚本:用于生成更多的训练数据。
- 数据检查脚本:用于检查数据集的完整性和一致性。
- 模型评估脚本:用于评估模型在不同指标上的性能。
- 预测结果保存脚本:用于将预测结果保存为文件。
- 模型推理脚本:用于在新的图像上进行推理。
1. 数据增强脚本
import os
import cv2
from imgaug import augmenters as iaa

def augment_image(image_path, output_dir, num_augmentations=5):
    image = cv2.imread(image_path)

    seq = iaa.Sequential([
        iaa.Fliplr(0.5),  # 水平翻转
        iaa.Affine(rotate=(-10, 10)),  # 旋转
        iaa.Multiply((0.8, 1.2))  # 改变亮度
    ])

    for i in range(num_augmentations):
        augmented_image = seq(image=image)
        new_image_path = os.path.join(output_dir, f"{os.path.splitext(os.path.basename(image_path))[0]}_aug{i}.png")
        cv2.imwrite(new_image_path, augmented_image)

# 数据集路径
image_dir = 'dota/images/train'
output_dir = 'dota/augmented/train'

os.makedirs(output_dir, exist_ok=True)

# 获取所有图像文件
image_files = [os.path.join(image_dir, f) for f in os.listdir(image_dir) if f.endswith('.png')]

for image_file in image_files:
    augment_image(image_file, output_dir)
2. 数据检查脚本
import os

def check_data_consistency(image_dir, label_dir):
    image_files = set(os.listdir(image_dir))
    label_files = set(os.listdir(label_dir))

    missing_labels = image_files - {f.replace('.txt', '.png') for f in label_files}
    missing_images = {f.replace('.txt', '.png') for f in label_files} - image_files

    if missing_labels:
        print("Missing labels for images:")
        for file in missing_labels:
            print(file)

    if missing_images:
        print("Missing images for labels:")
        for file in missing_images:
            print(file)

    if not missing_labels and not missing_images:
        print("Data consistency check passed.")

# 数据集路径
image_dir = 'dota/images/train'
label_dir = 'dota/labels/train'

check_data_consistency(image_dir, label_dir)
3. 模型评估脚本
import torch
from ultralytics import YOLO
from pycocotools.coco import COCO
from pycocotools.cocoeval import COCOeval

def evaluate_model(model_path, data_config, ann_file):
    model = YOLO(model_path)
    coco = COCO(ann_file)
    results = []

    for img_id in coco.getImgIds():
        img_info = coco.loadImgs(img_id)[0]
        image_path = os.path.join(data_config['path'], img_info['file_name'])
        image = cv2.imread(image_path)

        predictions = model(image)

        for pred in predictions:
            boxes = pred.boxes.xyxy
            confidences = pred.boxes.conf
            class_ids = pred.boxes.cls

            for box, conf, class_id in zip(boxes, confidences, class_ids):
                x1, y1, x2, y2 = map(int, box)
                w, h = x2 - x1, y2 - y1
                results.append({
                    "image_id": img_id,
                    "category_id": int(class_id) + 1,
                    "bbox": [x1, y1, w, h],
                    "score": float(conf)
                })

    with open('results.json', 'w') as f:
        json.dump(results, f)

    coco_dt = coco.loadRes('results.json')
    coco_eval = COCOeval(coco, coco_dt, 'bbox')
    coco_eval.evaluate()
    coco_eval.accumulate()
    coco_eval.summarize()

# 模型路径和数据配置
model_path = 'runs/detect/train/weights/best.pt'
data_config = {
    'path': './dota',
    'annotations': 'annotations/instances_val.json'
}
ann_file = os.path.join(data_config['path'], data_config['annotations'])

evaluate_model(model_path, data_config, ann_file)
4. 预测结果保存脚本
import cv2
import torch
from ultralytics import YOLO
import json

def save_predictions(model_path, image_dir, output_dir):
    model = YOLO(model_path)
    os.makedirs(output_dir, exist_ok=True)

    image_files = [os.path.join(image_dir, f) for f in os.listdir(image_dir) if f.endswith('.png')]

    results = []
    for image_file in image_files:
        image = cv2.imread(image_file)
        predictions = model(image)

        for pred in predictions:
            boxes = pred.boxes.xyxy
            confidences = pred.boxes.conf
            class_ids = pred.boxes.cls

            for box, conf, class_id in zip(boxes, confidences, class_ids):
                x1, y1, x2, y2 = map(int, box)
                w, h = x2 - x1, y2 - y1
                results.append({
                    "image_path": image_file,
                    "category_id": int(class_id),
                    "bbox": [x1, y1, w, h],
                    "score": float(conf)
                })

    with open(os.path.join(output_dir, 'predictions.json'), 'w') as f:
        json.dump(results, f)

# 模型路径和数据集路径
model_path = 'runs/detect/train/weights/best.pt'
image_dir = 'dota/images/val'
output_dir = 'dota/predictions'

save_predictions(model_path, image_dir, output_dir)
5. 模型推理脚本
import cv2
import torch
from ultralytics import YOLO

def infer_model(model_path, image_path):
    model = YOLO(model_path)
    image = cv2.imread(image_path)

    results = model(image)

    for result in results:
        boxes = result.boxes.xyxy
        confidences = result.boxes.conf
        class_ids = result.boxes.cls

        for box, conf, class_id in zip(boxes, confidences, class_ids):
            x1, y1, x2, y2 = map(int, box)
            label = model.names[int(class_id)]
            confidence = float(conf)

            # 绘制边界框
            cv2.rectangle(image, (x1, y1), (x2, y2), (0, 255, 0), 2)
            text = f'{label}: {confidence:.2f}'
            cv2.putText(image, text, (x1, y1 - 10), cv2.FONT_HERSHEY_SIMPLEX, 0.5, (0, 255, 0), 2)

    # 显示图像
    cv2.imshow('Inference', image)
    cv2.waitKey(0)
    cv2.destroyAllWindows()

# 模型路径和图像路径
model_path = 'runs/detect/train/weights/best.pt'
image_path = 'dota/images/val/P0001.png'

infer_model(model_path, image_path)
8. 总结
以上步骤提供了一个完整的框架,用于使用YOLOv8训练DOTA数据集的目标检测任务。代码包括数据准备、模型训练、评估和结果可视化等多个步骤。


 822
822

 被折叠的 条评论
为什么被折叠?
被折叠的 条评论
为什么被折叠?
 到【灌水乐园】发言


