


基于yolov5的森林火灾识别系统,基于深度学习的森林火灾检测系统,森林火灾识别系统。森林火灾识别
以下文字及代码仅供参考。
项目构建基础:
模型:YOLOV5
软件:Pycharm+Anaconda
环境:python=3.10 opencv_python PyQt5
 1
1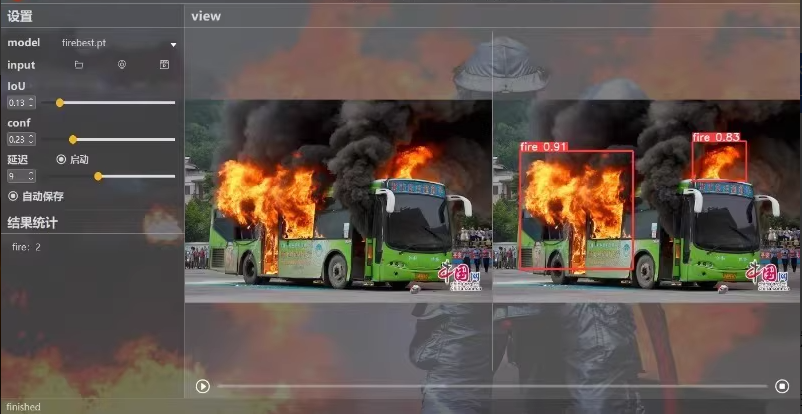
预实现功能:
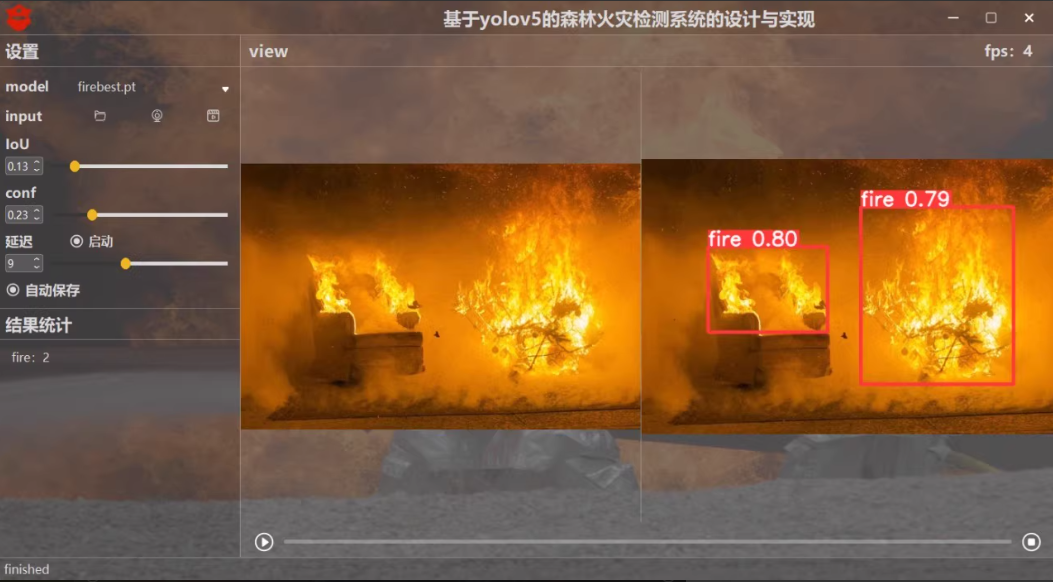
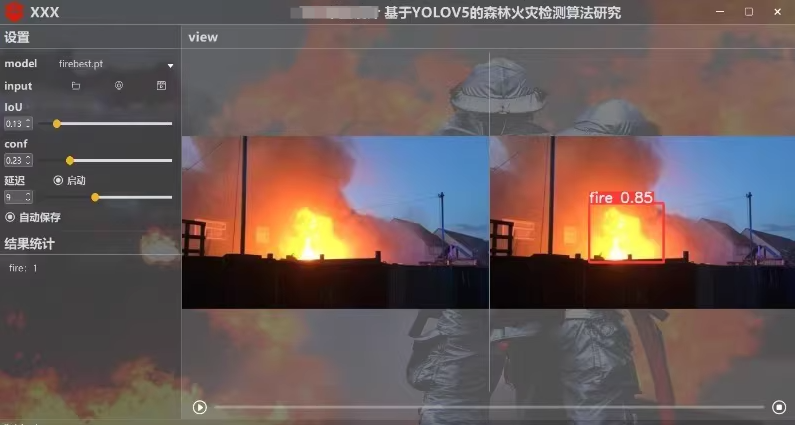
系统实现了对于多种火灾的识别检测功能:包括通过选择图片、视频、摄像头、文件夹图片文件进行实时识别;检测速度快、识别精度较高。
①选择图片识别森林火灾。
②选择视频识别森林火灾。
③摄像头检测识别森林火灾。
文件夹图片文件识别森林火灾
基于YOLOv5的森林火灾识别系统是一个非常实用的项目,可以实时检测和识别森林火灾。以下是构建这个系统的详细步骤,包括数据准备、环境搭建、模型训练、模型推理等。
1. 环境搭建
安装依赖
确保安装了以下依赖:
conda create -n fire_detection python=3.10
conda activate fire_detection
pip install opencv-python pyqt5 yolov5
2. 数据准备
数据集
- 数据集:包含2000张图片的数据集,每张图片都有标注。
- 格式转换:将标注文件转换为YOLOv5所需的格式(
.txt文件)。
数据划分
- 使用
train_test_split将数据集划分为训练集和验证集。
import os
import random
from sklearn.model_selection import train_test_split

def split_data(image_dir, label_dir, output_dir):
    images = [f for f in os.listdir(image_dir) if f.endswith('.jpg')]
    labels = [f for f in os.listdir(label_dir) if f.endswith('.txt')]

    # Ensure the same order for images and labels
    images.sort()
    labels.sort()

    # Split into train and test sets
    train_images, val_images, train_labels, val_labels = train_test_split(images, labels, test_size=0.2, random_state=42)

    # Save the splits
    with open(os.path.join(output_dir, 'train.txt'), 'w') as f:
        for img, lbl in zip(train_images, train_labels):
            f.write(f'{img} {lbl}\n')

    with open(os.path.join(output_dir, 'val.txt'), 'w') as f:
        for img, lbl in zip(val_images, val_labels):
            f.write(f'{img} {lbl}\n')

# Example usage
image_dir = 'data/images'
label_dir = 'data/labels'
output_dir = 'data/splits'
split_data(image_dir, label_dir, output_dir)
3. 模型训练
配置文件
创建一个配置文件 fire_detection.yaml:
train: data/train/images/
val: data/val/images/
test: data/test/images/

nc: 1  # number of classes
names: ['fire']
训练命令
使用以下命令进行训练:
python yolov5/train.py --img 640 --batch 16 --epochs 100 --data fire_detection.yaml --weights yolov5s.pt --name fire_detection
4. 模型推理
推理代码
创建一个Python脚本 detect_fire.py 进行推理:
import torch
import cv2
from yolov5.utils.general import non_max_suppression, scale_coords
from yolov5.utils.torch_utils import select_device

def detect_fire(image_path, model_path='runs/train/fire_detection/weights/best.pt'):
    device = select_device('')
    model = torch.load(model_path)['model'].float().to(device).eval()

    image = cv2.imread(image_path)
    image_rgb = cv2.cvtColor(image, cv2.COLOR_BGR2RGB)
    image_tensor = torch.from_numpy(image_rgb).permute(2, 0, 1).unsqueeze(0).float() / 255.0
    image_tensor = image_tensor.to(device)

    with torch.no_grad():
        pred = model(image_tensor)[0]
        pred = non_max_suppression(pred, 0.4, 0.5)

    for *xyxy, conf, cls in reversed(pred[0]):
        x1, y1, x2, y2 = map(int, xyxy)
        cv2.rectangle(image, (x1, y1), (x2, y2), (0, 255, 0), 2)
        cv2.putText(image, f'Fire: {conf:.2f}', (x1, y1 - 10), cv2.FONT_HERSHEY_SIMPLEX, 0.9, (0, 255, 0), 2)

    cv2.imshow('Fire Detection', image)
    cv2.waitKey(0)
    cv2.destroyAllWindows()

if __name__ == '__main__':
    image_path = 'path/to/image.jpg'
    detect_fire(image_path)
5. PyQt5 GUI
创建GUI界面
创建一个PyQt5界面用于选择图片、视频或摄像头进行实时检测:
import sys
from PyQt5.QtWidgets import QApplication, QWidget, QVBoxLayout, QPushButton, QLabel, QFileDialog, QComboBox, QLineEdit
from PyQt5.QtGui import QImage, QPixmap
from PyQt5.QtCore import QTimer
import cv2
import numpy as np

class FireDetectionApp(QWidget):
    def __init__(self):
        super().__init__()
        self.initUI()

    def initUI(self):
        self.setWindowTitle('Forest Fire Detection')
        layout = QVBoxLayout()

        self.image_label = QLabel(self)
        layout.addWidget(self.image_label)

        self.source_combo = QComboBox(self)
        self.source_combo.addItem('Image')
        self.source_combo.addItem('Video')
        self.source_combo.addItem('Camera')
        layout.addWidget(self.source_combo)

        self.browse_button = QPushButton('Browse', self)
        self.browse_button.clicked.connect(self.browse_file)
        layout.addWidget(self.browse_button)

        self.detect_button = QPushButton('Detect', self)
        self.detect_button.clicked.connect(self.detect_fire)
        layout.addWidget(self.detect_button)

        self.setLayout(layout)

    def browse_file(self):
        file_dialog = QFileDialog()
        file_dialog.setNameFilter("Images (*.jpg *.jpeg *.png)")
        if self.source_combo.currentText() == 'Video':
            file_dialog.setNameFilter("Videos (*.mp4 *.avi *.mov)")
        if file_dialog.exec_():
            self.file_path = file_dialog.selectedFiles()[0]

    def detect_fire(self):
        if self.source_combo.currentText() == 'Image':
            self.detect_image()
        elif self.source_combo.currentText() == 'Video':
            self.detect_video()
        elif self.source_combo.currentText() == 'Camera':
            self.detect_camera()

    def detect_image(self):
        image = cv2.imread(self.file_path)
        image_rgb = cv2.cvtColor(image, cv2.COLOR_BGR2RGB)
        qimage = QImage(image_rgb.data, image_rgb.shape[1], image_rgb.shape[0], QImage.Format_RGB888)
        pixmap = QPixmap.fromImage(qimage)
        self.image_label.setPixmap(pixmap)

    def detect_video(self):
        cap = cv2.VideoCapture(self.file_path)
        while True:
            ret, frame = cap.read()
            if not ret:
                break
            frame_rgb = cv2.cvtColor(frame, cv2.COLOR_BGR2RGB)
            qimage = QImage(frame_rgb.data, frame_rgb.shape[1], frame_rgb.shape[0], QImage.Format_RGB888)
            pixmap = QPixmap.fromImage(qimage)
            self.image_label.setPixmap(pixmap)
            self.update()

    def detect_camera(self):
        cap = cv2.VideoCapture(0)
        while True:
            ret, frame = cap.read()
            if not ret:
                break
            frame_rgb = cv2.cvtColor(frame, cv2.COLOR_BGR2RGB)
            qimage = QImage(frame_rgb.data, frame_rgb.shape[1], frame_rgb.shape[0], QImage.Format_RGB888)
            pixmap = QPixmap.fromImage(qimage)
            self.image_label.setPixmap(pixmap)
            self.update()

if __name__ == '__main__':
    app = QApplication(sys.argv)
    ex = FireDetectionApp()
    ex.show()
    sys.exit(app.exec_())
6. 性能评估
使用标准的性能评估指标如准确率、召回率、F1分数等进行模型评估。
from sklearn.metrics import accuracy_score, precision_score, recall_score, f1_score

def evaluate_model(y_true, y_pred):
    accuracy = accuracy_score(y_true, y_pred)
    precision = precision_score(y_true, y_pred)
    recall = recall_score(y_true, y_pred)
    f1 = f1_score(y_true, y_pred)
    print(f'Accuracy: {accuracy:.2f}')
    print(f'Precision: {precision:.2f}')
    print(f'Recall: {recall:.2f}')
    print(f'F1 Score: {f1:.2f}')

# Example usage
y_true = [0, 1, 0, 1, 1, 0, 1, 0, 1, 1]
y_pred = [0, 1, 0, 1, 1, 0, 1, 0, 1, 1]
evaluate_model(y_true, y_pred)
仅供参考,学习


 496
496

 被折叠的 条评论
为什么被折叠?
被折叠的 条评论
为什么被折叠?
 到【灌水乐园】发言


