


1. 点云转化为.dae
因为gazebo并不支持直接加载.ply文件,我们首先转化.ply文件为.dae。并且.dae是携带颜色信息的。如何转化参考这里。How to import PLY/PCD to Gazebo world for simulation? · Issue #13 · ethz-asl/voxblox_ground_truth · GitHub
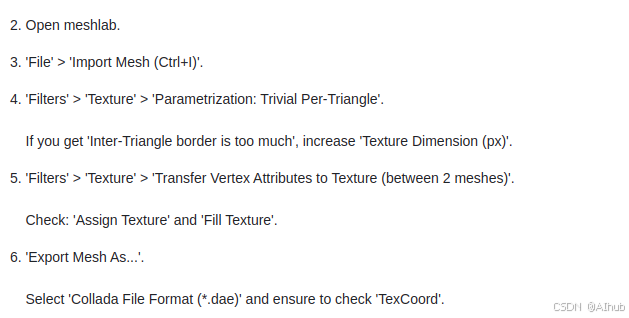
注意:生成的.dae和_txt.png文件要放在同一个文件夹下,以后要移动也一直放在同一个文件夹下。否则会不显示颜色,这应该是因为.dae已经定义了两个文件的相对位置。
2. 导入.dae到gazebo中
注意这里我们在terminal中使用代码导入。也可以使用python或者c++在脚本中导入。因为我们的项目需要代码和仿真中的模型频繁交互,动态的增加和删除模型,所以我们使用这种方法。即使不需要频繁交互,这种方法也没有问题。
2.1. 通过.world导入
首先写一个.world文件,在文件中包含生成的.dae.如下所示。注意: .world文件需要与生成在plant.dae 和 meshlab中导出的 _tex.png在同一个文件夹下, 否则会找不到模型文件。这种方法是脱离ROS的,如果使用ROS,那么这个路径的定义方法不同,类似这样。<uri>model://tomato/meshes/tomato5.dae</uri>
<?xml version="1.0"?>
<sdf version="1.4">
  <world name="default">
    <include>
      <uri>model://ground_plane</uri>
    </include>
    <include>
      <uri>model://sun</uri>
    </include>
    <model name="my_mesh">
      <pose>0 0 0  0 0 0</pose>
      <static>true</static>
      <link name="body">
        <visual name="visual">
          <geometry>
            <mesh><uri>file://plant0.dae</uri></mesh>
          </geometry>
        </visual>
      </link>
    </model>
  </world>
</sdf>
然后在terminal中运行
gazebo 'full/path/of/world/file.world'
2.1 通过.sdf导入。
个人更喜欢这种,因为.sdf也可以通过脚本导入。更适合如果你需要用代码删除或者添加模型。如果添加模型后不需要再删除或者添加,那么使用.world应该就足够了。
具体方法类似.首先写一个.sdf文件。比如。
<?xml version="1.0" ?>
<sdf version="1.6">
  <model name="plant_model">
    <static>true</static> <!-- Set to true if the plant is static -->
    <link name="link">
      <visual name="plant0">
        <geometry>
          <mesh><uri>file://plant0.dae</uri></mesh>
        </geometry>
      </visual>
    </link>
  </model>
</sdf>
然后运行gazebo
gazebo然后导入模型
gz model --spawn-file='full/path/of/your/sdf/file.sdf' --model-name=your_model_name
或者删除模型
gz model --delete --model-name your_model_name
注意这种方法是在terminal中运行,当在代码中导入.sdf时,需要不同的语句, python参考这里: ros_gazebo_spawn_models/spawn_urdf_sdf/scripts/spawn_sdf.py at master · roboticist8/ros_gazebo_spawn_models · GitHub
3 Demo
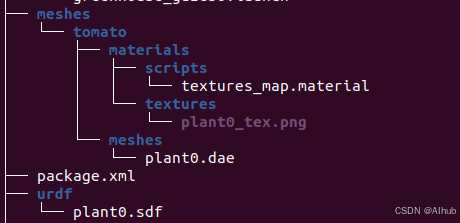
3.1 文件夹结构
附赠一个demo关于如何组织文件夹,以及如何写.sdf脚本来导入模型。注意将meshes文件夹加到系统路径中,保证它能被都搜到。可以参考这里:Gazebo : Tutorial : Color And Texture Models
也有其他较方便的方法,比如修改meshes文件夹所在功能包的package.xml文件,在最后</package>前加上这个:
<export>
<!-- Other tools can request additional information be placed here -->
<gazebo_ros gazebo_model_path="${prefix}/meshes/"/>
</export>
这样,在每次gazebo启动,这个路径会被默认加进去。
关键是建立三个文件夹,(1)meshes:放置你的.dae文件 (2)scripts:放置 .materials 文件 (3)textures: 放置材质 .png文件。scripts文件夹包含 .material文件,描述了材质文件,下边我会放一个例子。
3.2 .sdf脚本
最重要的是如何写你的.sdf文件, 示例如下:
<?xml version="1.0" ?>
<sdf version="1.4">
  <model name='tomato1'>
    <pose>0 0 0 0 0 0</pose>
    <!-- <static>1</static> -->
    <static>0</static>
    <link name='link'>
      <gravity>0</gravity>
      <collision name='collision'>
        <geometry>
          <mesh>
            <uri>model://tomato/meshes/plant0.dae</uri>
          </mesh>
        </geometry>
        <max_contacts>10</max_contacts>
        <surface>
          <contact>
            <ode/>
          </contact>
          <bounce/>
          <friction>
            <ode/>
          </friction>
        </surface>
      </collision>
      <visual name='tomato1'>
        <geometry>
          <mesh>
            <uri>model://tomato/meshes/plant0.dae</uri>
          </mesh>
        </geometry>
        <material>
          <script>
            <uri>model://tomato/materials/scripts</uri>
            <uri>model://tomato/materials/textures</uri>
            <name>plant0</name>
          </script>
        </material>
      </visual>
      <velocity_decay>
        <linear>0</linear>
        <angular>0</angular>
      </velocity_decay>
      <self_collide>0</self_collide>
      <kinematic>0</kinematic>
      <gravity>1</gravity>
    </link>
  </model>
</sdf>
注意这里边所有url的路径都是相对路径, 因为上层路径已经被 explort 到系统路径了。分别对应.dae 文件,scripts文件夹,和 textures文件夹。下边的<name>plant0<>/name>是在.materials 中定义的,如下所示:
material plant0
{
    receive_shadows on
    technique
    {
        pass
        {
            alpha_rejection greater 128
            texture_unit
            {
                texture plant0_tex.png
            }
        }
    }
}
本质上,你可以理解为 .material文件定义了一个映射,将plant0_tex.png材质映射到名字plant0上。然后在.sdf中,你只需要refer到这个名字,就能找到这个.png。
3.3 python 导入.sdf
def spawn_plant(self, plant_idx, plant_rotation, plant_position = [0, 0, 0], print_log = True):
        # Set poses for plants.  use -0.024 if acc_pc is above the ground plan
        # plant_pose = Pose(position=Point(1, 0, 1.15), orientation = Quaternion(*quaternion_from_euler(0, 0, plant_rotation))) #plant_poses saved the poses of all plant 0-10 that you want to create

        self.plant_idx = plant_idx
        self.plant_rotation = plant_rotation
        plant_pose = Pose(position=Point(plant_position[0]/100, plant_position[1]/100, plant_position[2]/100), orientation = Quaternion(*quaternion_from_euler(0, 0, plant_rotation))) #plant_poses saved the poses of all plant 0-10 that you want to create
        # self.visual_roi(plant_idx, plant_rotation)
        plant_position = [str(i) for i in plant_position]
        plant_position = ''.join(plant_position)
        rospy.wait_for_service("/gazebo/spawn_sdf_model")
        try:
            spawner = rospy.ServiceProxy("/gazebo/spawn_sdf_model", SpawnModel)  ###many methods to call a service. (1) spawner(para1, para2, para3) (2) spawner.call(para_class)

            spawner(

                model_name=self.model_name + str(plant_idx),
                model_xml=open(
                    self.model_path + self.model_name + str(plant_idx) + ".sdf",
                    "r",
                ).read(),
                robot_namespace="/map",
                initial_pose=plant_pose,
                reference_frame="world",
            )
            if print_log:
                print('spawning plants [%s] successfully'% str(self.model_name + str(plant_idx)))
        except rospy.ServiceException as e:
            print("Service call failed: ", e)
这个过程经过本人探索,基本上是使用自定义模型 (结构及颜色复杂),使用自定义texture最简便的方法。有更简便的方法也欢迎交流。
4. 模型只有单面被相机获取
在gazebo中加载的模型通常需要与相机交互,即-模型能够被相机捕捉到。包括RGB,深度, 或者雷达。有时候会出现这样一个问题,模型只有单面能被相机捕捉,而模型另一面相机光线会直接穿透,而不能被捕捉。比如,有一片叶子,相机能从叶子的一个方向看到,而从另一个面就看不到。经过多次测试,终于找到一个方法。这个问题主要是三维模型的画法造成的。比如有人画薄的东西 喜欢用一个面,经过多次弯折, 比如叶子。这就造成一个问题。面只有一个法线方向,而gazebo中只有法线射出的方向能够被观测到。比如画一个球,法线方向从球的每一个三角面朝外。那么从球外的每一个角度都能看到这个球,因为法线方向总是朝外。而进入球的内部,看不到球,因为法线方向朝外。解决方法也很简单,就是给面加一个厚度。下边提供一个解决办法。具体使用blender.
具体:
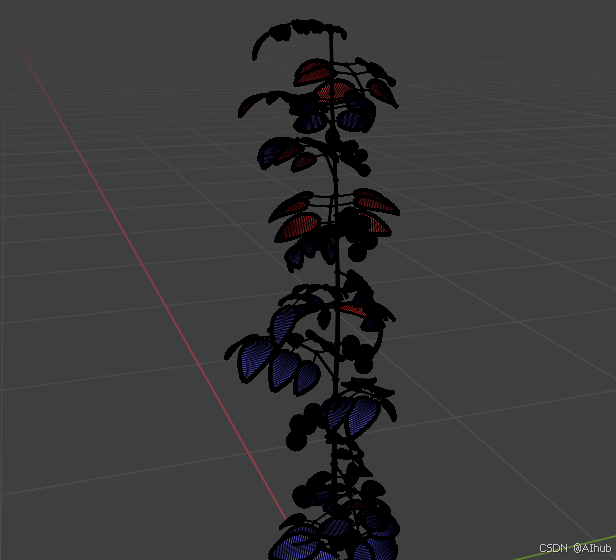
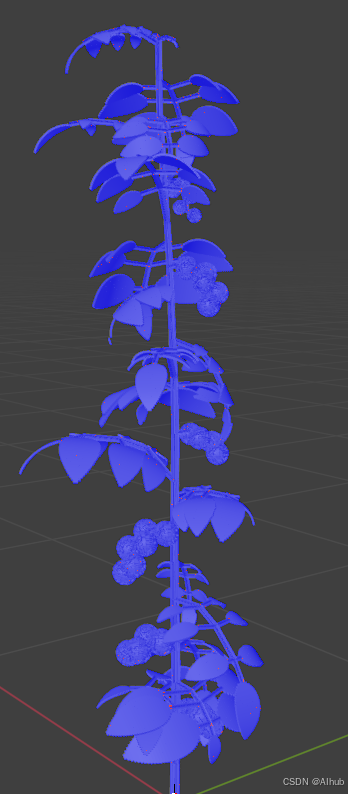
(1) 点击物体->进入编辑模型 (TAB)->全选所有点(A) -> overlays (一个小向下的箭头,如下所示)->face orientation。

会得到如下的模型。会看到,面有红的蓝的。蓝的是朝外的方向(能被相机拍到),红的是朝内的方向(拍不到)。
解决方法是加厚度。右边小扳手,加一个实体化修改器(solidify)。在厚度那里加一个小厚度。
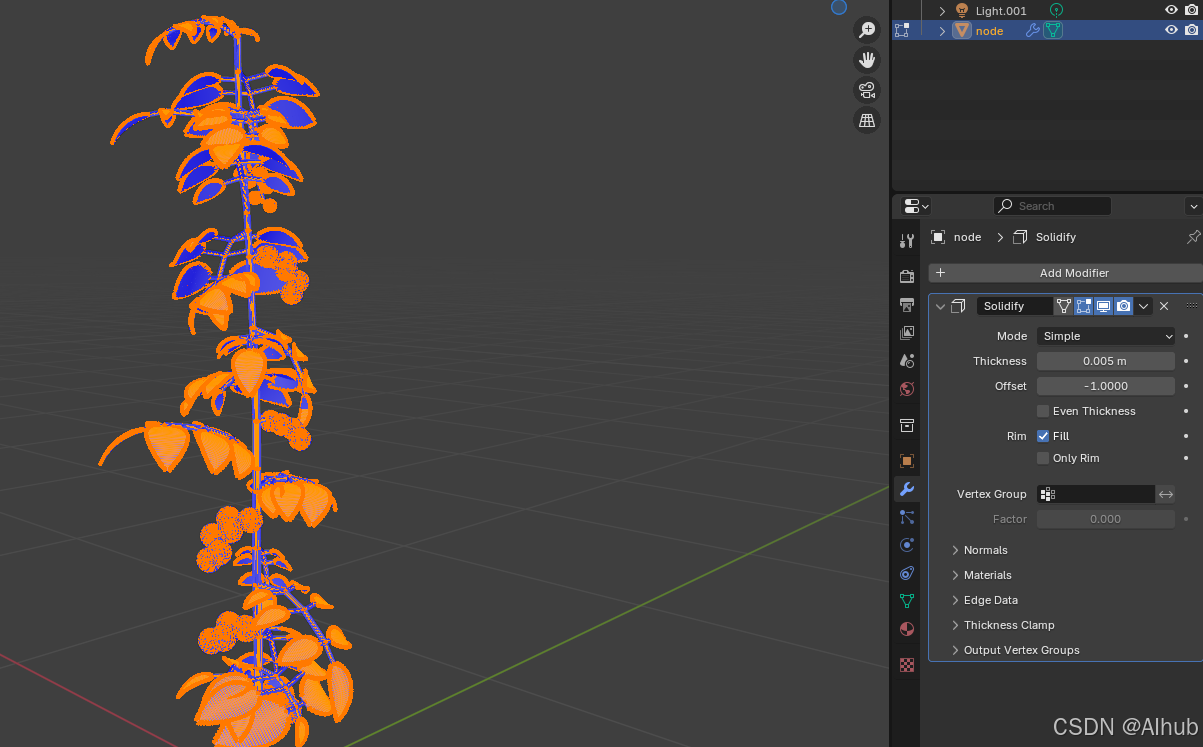
可以看到模型变成了全蓝色,所以从每个角度都能被观察到。最后export 新的 .dae.


 953
953

 被折叠的 条评论
为什么被折叠?
被折叠的 条评论
为什么被折叠?
 到【灌水乐园】发言


