


Lab4 Blending 线性混合与拉普拉斯金字塔混合对比
参考自同济大学蒋磊老师编写的IPMV实验说明
同济大学自动化专业IMPV课程学习记录 (包含知识点以及实验)
Lab0 实验环境准备与OpenCV Hello World
Lab1-1 OpenCV入门与实践——从基础操作到实时视频处理(一)
Lab1-2 OpenCV入门与实践——从基础操作到实时视频处理(二)
Lab2-1 从零玩转Eigen库:掌握线性代数与OpenCV互操作的神器(一)
Lab2-2 从零玩转Eigen库:掌握线性代数与OpenCV互操作的神器!(二)
Lab4 Blending 线性混合与拉普拉斯金字塔混合对比
…
待更新
文章目录
0 前言
你是否见过半橘半白的"杂交虎"?在图像处理领域,我们可以通过图像融合技术创造这种神奇效果。本文将带你实现:
- 线性混合:简单粗暴的"五五开"融合
- 拉普拉斯金字塔混合:专业级的多尺度融合
- 深度对比两种算法的效果差异
1 🎯实验目标
- 掌握图像混合权重蒙版的生成技巧
- 实现线性混合算法
- 深入理解拉普拉斯金字塔混合原理
- 对比分析不同过渡宽度的融合效果

2 🌌 混合原理探秘
2.1 线性混合:最简单的融合术
I
b
l
e
n
d
(
x
,
y
)
=
α
(
x
,
y
)
⋅
I
1
(
x
,
y
)
+
(
1
−
α
(
x
,
y
)
)
⋅
I
2
(
x
,
y
)
I_{blend}(x,y) = α(x,y)·I_1(x,y) + (1-α(x,y))·I_2(x,y)
Iblend(x,y)=α(x,y)⋅I1(x,y)+(1−α(x,y))⋅I2(x,y)
其中
α
(
x
,
y
)
α(x,y)
α(x,y)为位置相关的混合权重
- 优点:计算速度快(O(1)时间复杂度)
- 缺点: 过渡区会出现"鬼影"现象
2.2 拉普拉斯金字塔混合:多尺度融合
模仿人类视觉系统,分三个层次处理:
| 金字塔层级 | 处理内容 | 效果 |
|---|---|---|
| 高层(小图) | 混合低频背景色 | 决定整体色调过渡 |
| 中层 | 混合中等频率纹理 | 控制虎纹的自然衔接 |
| 底层(原图) | 混合高频细节 | 保留毛发等细微特征 |
- 构建高斯金字塔:
G i = D o w n s a m p l e ( G i − 1 ) , i = 1 , 2 , . . . , n G_i = Downsample(G_{i-1}), i=1,2,...,n Gi=Downsample(Gi−1),i=1,2,...,n

- 构建拉普拉斯金字塔
L i = G i − U p s a m p l e ( G i + 1 ) L_i = G_i - Upsample(G_{i+1}) Li=Gi−Upsample(Gi+1)

- 分层混合后重建:
I b l e n d = C o l l a p s e ( α i L i 1 + ( 1 − α i ) L i 2 ) I_{blend} = Collapse({α_iL_i^1 + (1-α_i)L_i^2}) Iblend=Collapse(αiLi1+(1−αi)Li2)
融合流程示意图:

3 🛠️ 核心代码实现
3.1 权重蒙版生成
cv::Mat weights(img.size(), CV_32FC1, Scalar(1.0f));
weights.colRange(cols/2, cols).setTo(0.0f);
cv::blur(weights, weights, Size(600,1)); // 300px过渡区
3.2 线性混合实现
cv::Mat linearBlend(const Mat& img1, const Mat& img2, const Mat& w) {
    return w.mul(img1) + (1-w).mul(img2);
}`
3.3 拉普拉斯金字塔混合
高斯金字塔构建
vector<Mat> buildGaussianPyramid(const Mat& img) {
    vector<Mat> pyramid;
    Mat current = img.clone();
    while(current.cols > 16) {
        pyramid.push_back(current);
        pyrDown(current, current);
    }
    return pyramid;
}
图像重建
Mat reconstruct(const vector<Mat>& pyramid) {
    Mat result = pyramid.back();
    for(int i=pyramid.size()-2; i>=0; --i) {
        pyrUp(result, result, pyramid[i].size());
        result += pyramid[i];
    }
    return result;
}
4 🐯 Guide
Step1. Get lab code template
Download lab code template using git in your Ubuntu terminal:
git clone https://git.tongji.edu.cn/ipmv/examples/lab_4.git
There are 3 images in PNG extension.
lion.png/tiger.png/white_tiger.png
These images are in 1200x1200 pixels each.
Step2. Read and convert images
Read image files with cv::imread() function.
Then convert the images to CV_32F format, to scale the image pixels so that they get values between [0,1].
// Load images.
// TODO: Load the images using cv::imread() and convert to 32-bit floating point images.
// Using relative filenames such as "../tiger.png" should work.
// Remember to rescale so that they have values in the interval [0, 1].
// Hint: convertTo().
cv::Mat img_1, img_2;
img_1 = cv::imread("../white_tiger.png");
img_2 = cv::imread("../tiger.png");

img_1.convertTo(img_1, CV_32F, 1.0/255.0);
img_2.convertTo(img_2, CV_32F, 1.0/255.0);

showResult("Lab 4 - Image 1 original", img_1);
showResult("Lab 4 - Image 2 original", img_2);

Step3. Create an image of blend weights
Note this mask should fulfill following requirements:
- Same size as the input images
- Left half of the columns are black (0.0)
- Right half of the columns are white (1.0)
- How to make this ramp?
首先创建一个水平mask:左侧 = 1.0(黑色,用于显示img_1),右侧 = 0.0(白色,用于显示img_2)。
- 创建一个与
img_1尺寸相同的单通道32浮点图像并将所有像素值初始化为1.0f(黑色) - 计算图像中间列的位置
- 将图像右半部分(从中间列到最后一列)设为0.0f(白色)
使用 cv::blur() 在两半之间创建一个平滑过渡的ramp,以避免出现尖锐的接缝。
- 定义ramp宽度300像素
- 使用水平方向的模糊(x方向)创建平滑过渡
- 模糊核的大小
ramp_width * 2 + 1, 1 - 垂直方向:1像素(不进行垂直模糊)
- 模糊核的大小
最后,我们将单通道mask合并为 3 通道,以兼容 RGB。
- 创建3个相同的单通道图像(base)
- 使用
cv::merge合并为一个3通道图像
  // Construct weights.
  // TODO: Create a 32-bit, 3 channel floating point weight image.
  // The first half of the columns should be black (1.0f).
  // The last half of the coSlumns should be white (0.0f).
  // Then make a ramp between these two halves.
  // Hint: Use cv::blur() to make the ramp.

  // Create 1-channel float image: left half = 1.0, right half = 0.0
  cv::Mat base(img_1.size(), CV_32FC1, cv::Scalar(1.0f));
  int mid_col = base.cols / 2;
  base.colRange(mid_col, base.cols).setTo(0.0f);
  // Apply blur to create a smooth ramp
  const int ramp_width = 300;
  cv::blur(base, base, cv::Size(ramp_width * 2 + 1, 1));
  // Convert to 3 channels (RGB float)
  cv::Mat weights;
  cv::Mat channels[] = {base, base, base};
  cv::merge(channels, 3, weights);
  showResult("Lab 4 - Weights", weights);

Step4. Simple linear blending
  // TODO: Finish linear_blending.cpp.
  cv::Mat lin_blend = linearBlending(img_1, img_2, weights);
  showResult("Lab 4 - Linear blend", lin_blend);
Implement simple blending of two images using the weight mask you just created.
cv::Mat linearBlending(const cv::Mat& img_1, const cv::Mat& img_2, const cv::Mat& weights)
{
  // TODO: Blend the two images according to the weights: result = weights*img_1 + (1-weights)*img_2
  // No need to loop through all pixels!
  // Hint: https://docs.opencv.org/3.3.1/d1/d10/classcv_1_1MatExpr.html
  cv::Mat blended = weights.mul(img_1) + (cv::Scalar(1.0, 1.0, 1.0) - weights).mul(img_2);
  return blended;
}
- 无需逐个循环所有像素,直接利用 OpenCV 的矢量化矩阵(
mul())更有效率。 weights.mul(img_1)→ 权重矩阵与图像1逐像素相乘cv::Scalar(1.0, 1.0, 1.0)→3通道全1标量
Refer to: https://docs.opencv.org/4.9.0/d1/d10/classcv_1_1MatExpr.html
Run the code and observe the results. The result image should look like this with ramp_width=300:

Step5. Laplace blending
  // TODO: Finish laplace_blending.cpp.
  cv::Mat lap_blend = laplaceBlending(img_1, img_2, weights);
  showResult("Lab 4 - Laplace blend", lap_blend);
Construct a Gaussian pyramid
std::vector<cv::Mat, std::allocator<cv::Mat>> constructGaussianPyramid(const cv::Mat& img)
{
  // Construct the pyramid starting with the original image.
  std::vector<cv::Mat> pyr;
  pyr.push_back(img.clone());

  // Add new downscaled images to the pyramid
  // until image width is <= 16 pixels
  while(pyr.back().cols > 16)
  {
    // TODO: Add the next level in the pyramid.
    // Hint cv::pyrDown(...)
   cv::Mat downsampled;
   cv::pyrDown(pyr.back(), downsampled);
   pyr.push_back(downsampled);
  }
  return pyr;
}
- 将图像复制到金字塔最底层
img.clone():对输入图像进行深拷贝pyr.push_back():写入金字塔最底层图像(第0层)
- 循环下采样
- 首先创建空Mat对象
downsampled - 执行
pyrDown- 对当前最后一级图像(
pyr.back())进行高斯模糊 - 删除偶数行/列实现2倍降采样
- 结果存入
downsampled
- 对当前最后一级图像(
- 更新金字塔:将结果加入
pyr末尾
- 首先创建空Mat对象
- 返回完整金字塔
Construct a Laplacian pyramid
std::vector<cv::Mat> constructLaplacianPyramid(const cv::Mat& img)
{
  // TODO: Use constructGaussianPyramid() to construct a laplacian pyramid.
  // Hint: cv::pyrUp(...)

  // Construct a Gaussian Pyramid
  std::vector<cv::Mat> gaussian_pyr = constructGaussianPyramid(img);
  std::vector<cv::Mat> laplacian_pyr;
  // Construct a Laplacian Pyramid
  for(size_t i = 0; i < gaussian_pyr.size() - 1; ++i){
    cv::Mat upsampled;
    cv::pyrUp(gaussian_pyr[i + 1], upsampled, gaussian_pyr[i].size());
    cv::Mat lap;
    cv::subtract(gaussian_pyr[i], upsampled, lap);
    laplacian_pyr.push_back(lap);
  }
  // Add the smallest image as the last layer
  laplacian_pyr.push_back(gaussian_pyr.back());
  return laplacian_pyr;
}
- 首先构建高斯金字塔(
constructGaussianPyramid()) - 拉普拉斯金字塔计算
- 遍历高斯金字塔所有层(除最后一层)
- 上采样
pyrUp函数将金字塔的第i+1层图像上采样,上采样后尺寸与第i相同- 上采样过程:先将图像尺寸通过插入零值扩大2倍,然后用相同的高斯核进行卷积
- 差分计算
- 计算高斯金字塔当前层与上采样结果的插值作为拉普拉斯金字塔的当前层
- 该层包含当前尺度下的高频细节
- 添加最后一层
- 高斯金字塔最小层作为拉普拉斯金字塔最后一层
- 上采样
- 遍历高斯金字塔所有层(除最后一层)
Reconstruct an image by collapsing a Laplacian pyramid
cv::Mat collapsePyramid(const std::vector<cv::Mat>& pyr)
{
  // TODO: Collapse the pyramid.

  cv::Mat current = pyr.back().clone();
  // Reconstruct the image
  for (int i = static_cast<int>(pyr.size()) - 2; i >= 0; --i){
    // Upsample the current image to the size of the next layer
    cv::Mat upsampled;
    cv::pyrUp(current, upsampled, pyr[i].size());
    current = upsampled + pyr[i];
  }
  return current;
}
- 根据拉普拉斯金字塔重建全分辨率图像。每个层次添加高频细节。
- 首先从金字塔的最后一层开始(最小、最粗糙)
- 重建循环(从倒数第二层开始向上重建)
- 上采样:将当前重建结果
current上采样到下一层尺寸 - 添加细节层:上采样结果与拉普拉斯金字塔当前层相加(
**<font style="color:rgb(64, 64, 64);background-color:rgb(236, 236, 236);">current = upsampled + pyr[i][i]</font>**)恢复出高斯金字塔当前层
- 上采样:将当前重建结果
- 返回重建结果
Perform the Laplace blending
cv::Mat laplaceBlending(const cv::Mat& img_1, const cv::Mat& img_2, const cv::Mat& weights)
{
  // Construct a gaussian pyramid of the weight image.
  // TODO: Finish constructGaussianPyramid().
  std::vector<cv::Mat> weights_pyr = constructGaussianPyramid(weights);

  // Construct a laplacian pyramid of each of the images.
  // TODO: Finish constructLaplacianPyramid().
  std::vector<cv::Mat> img_1_pyr = constructLaplacianPyramid(img_1);
  std::vector<cv::Mat> img_2_pyr = constructLaplacianPyramid(img_2);

  // Blend the laplacian pyramids according to the corresponding weight pyramid.
  std::vector<cv::Mat> blend_pyr(img_1_pyr.size());
  for (size_t i = 0; i < img_1_pyr.size(); ++i)
  {
    // TODO: Blend the images using linearBlending() on each pyramid level.
    blend_pyr[i] = linearBlending(img_1_pyr[i], img_2_pyr[i], weights_pyr[i]);
  }

  // Collapse the blended laplacian pyramid.
  // TODO: Finish collapsePyramid().
  return collapsePyramid(blend_pyr);
}

Compare the result with linear blending
- Try different ramp widths.
| 宽度(px) | 效果图 |
|---|---|
| 50 | 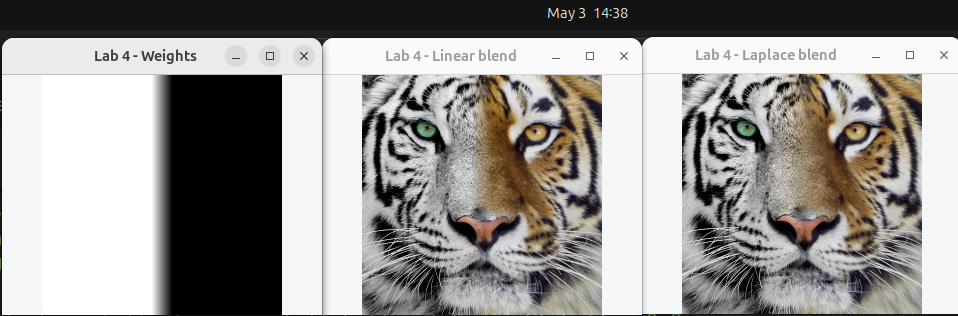 |
| 100 |  |
| 300 |  |
| 500 | 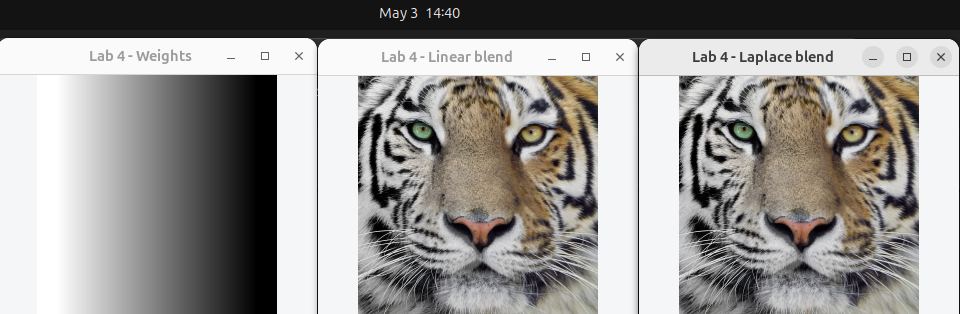 |
5 📌 总结
💡Blending 应用场景
-
全景图拼接:消除接缝
-
HDR成像:平衡曝光差异
-
电影特效:数字演员与实景融合
-
医学影像:多模态图像融合
💡线性混合和金字塔混合对比
| 指标 | 线性混合 | 金字塔混合 |
|---|---|---|
| 计算速度 | ⚡⚡⚡⚡⚡ | ⚡⚡⚡ |
| 计算速度 | ⚡⚡ | ⚡⚡⚡⚡⚡ |
| 计算速度 | 1x | 3x |
✅ 选择线性混合,当:
-
实时性要求高(如视频会议背景替换)
-
硬件资源有限(手机APP)
-
图像内容简单(如纯色背景)
✅ 选择金字塔混合,当:
-
需要专业级效果(电影特效)
-
图像包含丰富纹理(毛发、建筑)
-
可接受较高计算成本


 2266
2266

 被折叠的 条评论
为什么被折叠?
被折叠的 条评论
为什么被折叠?
 到【灌水乐园】发言


