


恩,昨儿说了俩布局其实就是比较常用的布局了,老师是这么说的。然后今儿又补上了剩下的三个布局,三个加起来不到20分钟就说完了。。。。
布局
FrameLayout帧布局
FrameLayout是最简单的布局。所有放在布局里的控件,都按照层次堆叠在屏幕的左上角。后加进来的控件覆盖前面的控件。
android:visibility=”invisible”android:layout_margin=”10dp”,第一个属性控制可见与否(invisible,visible),第二个属性就是该控件离自己四周10dp。关于它我们就学了这俩属性,就是辣么简单╮(╯▽╰)╭
TableLayout表格布局
介个老师也没咋讲。。。
- TableRow //行
layout_stretchColumns”0,1”//第一二列平分剩余空间
layout_collapseColumns=”0”//隐藏第一列
layout_shrinkColumns= “0” //限制第一列在界面之内
layout_span=”3”//占三列,紧接着控件写,一行
例子中着重演示了shrinkColumns用法。
<?xml version="1.0" encoding="utf-8"?>
<TableLayout xmlns:android="http://schemas.android.com/apk/res/android"
    android:layout_width="match_parent"
    android:layout_height="match_parent"
    android:stretchColumns="0,1"
     android:shrinkColumns="1">

    <TableRow>

        <Button android:text="button0.1" android:layout_span="0" />

        <Button android:text="button0.22222222222222222222222" />

        <Button android:text="button0.3"
            />
    </TableRow>

    <TableRow>

        <Button android:text="button0.4" />

        <Button android:text="button0.5" />

        <Button android:text="button0.6" />
    </TableRow>

    <TableRow>

        <Button android:text="button0.7" />

        <Button android:text="button0.8" />

        <Button android:text="button0.9" />
    </TableRow>
</TableLayout>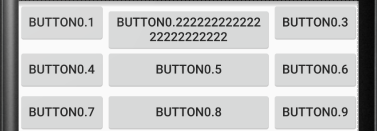
AbsoluteLayout绝对布局
直接往手机界面拖控件。。。。╮(╯▽╰)╭
Activity
启动
- 直接启动
public class MainActivity extends Activity {
    private Button button1;

    @Override
    protected void onCreate(Bundle savedInstanceState) {
        super.onCreate(savedInstanceState);
        setContentView(R.layout.activity_main);
        Log.d("myActivity", "运行onCreate");
        button1= (Button) findViewById(R.id.button1);
        button1.setOnClickListener(new View.OnClickListener() {
            @Override
            public void onClick(View v) {
                Intent intent=new Intent(MainActivity.this,SecondActivity.class);//XX启动XX
                startActivityForResult(intent,0x23);
            }
        });
    }
}
//记得在Android中添加相应Activity
<?xml version="1.0" encoding="utf-8"?>
<manifest xmlns:android="http://schemas.android.com/apk/res/android"
    package="com.example.laowang.myapplication" >
    <application
        android:allowBackup="true"
        android:icon="@mipmap/ic_launcher"
        android:label="@string/app_name"
        android:theme="@style/AppTheme" >
        <activity
            android:name=".MainActivity"
            android:label="@string/app_name"
            >
            <intent-filter>
                <action android:name="android.intent.action.MAIN" />

                <category android:name="android.intent.category.LAUNCHER" />
            </intent-filter>
        </activity>
        <activity android:name=".SecondActivity">
        </activity>
    </application>
</manifest>
带返回值的启动
第一个界面掉用startActivityForResult(intent,requestCode);
第二个界面先掉用getIntent()得到启动的intent;
在关闭第二个界面钱先封装数据intent.putExtra
(“secondbackdata,editText,getText().toString()”);
设置resultCode setRusetlt(RESULT_OK,intent);
关闭第二个界面第一个界面准备接受数据
重写onActivityResult(requestCode,resultCode,Intent data)
判断resultCode
然后从data中取出数据- 显式Intent:通过指定Intent组件名称来实现的,它一般用在知道目标组件名称的前提下,一般是在相同的应用程序内部实现的。
Intent(Context packageContext,Class<?>cls),第一个参数Context要求一个启动活动的上下文,第二个参数Class则是指定想要启动的活动目标,构造出Intent的“意图”Intent(Context packageContext,Class
import android.app.Activity;
import android.content.Intent;
import android.support.v7.app.AppCompatActivity;
import android.os.Bundle;
import android.util.Log;
import android.view.Menu;
import android.view.MenuItem;
import android.view.View;
import android.widget.Button;
import android.widget.TextView;

public class MainActivity extends Activity {
    private Button button1;
    private TextView textView;

    @Override
    protected void onCreate(Bundle savedInstanceState) {
        super.onCreate(savedInstanceState);
        setContentView(R.layout.activity_main);
        Log.d("myActivity", "运行onCreate");
        textView= (TextView) findViewById(R.id.textView2);

        button1= (Button) findViewById(R.id.button1);
        button1.setOnClickListener(new View.OnClickListener() {
            @Override
            public void onClick(View v) {
                Intent intent=new Intent(MainActivity.this,SecondActivity.class);
                startActivityForResult(intent,0x23);
            }
        });
    }

    @Override
    protected void onActivityResult(int requestCode, int resultCode, Intent data) {
        super.onActivityResult(requestCode, resultCode, data);
        textView.setText(data.getStringExtra("secondbackdata"));
    }
}

//第二个Activity
import android.app.Activity;
import android.content.Intent;
import android.os.Bundle;
import android.view.View;
import android.widget.Button;
import android.widget.TextView;

public class SecondActivity extends Activity {
    private Intent intent;
    private TextView textView1;
    private Button button;

    protected void onCreate(Bundle savedInstanceState) {
        super.onCreate(savedInstanceState);
        setContentView(R.layout.activity_second);
        button= (Button) findViewById(R.id.button2);
        button.setOnClickListener(new View.OnClickListener() {
            @Override
            public void onClick(View v) {
                textView1 = (TextView) findViewById(R.id.textView1);
                intent=getIntent();
                intent.putExtra("secondbackdata", textView1.getText().toString());
                setResult(RESULT_OK, intent);
                SecondActivity.this.finish();
            }
        });

    }
}

//activity_main.xml
<LinearLayout xmlns:android="http://schemas.android.com/apk/res/android"
    xmlns:tools="http://schemas.android.com/tools"
    android:layout_width="match_parent"
    android:layout_height="match_parent"
    android:gravity="center"
    android:orientation="vertical"
    android:weightSum="3"
    tools:context=".MainActivity">

    <Button
        android:id="@+id/button1"
        android:layout_width="match_parent"
        android:layout_height="0dp"
        android:layout_weight="1"
        android:text="@string/button1"/>/>
    <TextView
        android:id="@+id/textView2"
        android:layout_width="wrap_content"
        android:layout_height="wrap_content"
        />
</LinearLayout>

//activity_second.xml
<?xml version="1.0" encoding="utf-8"?>
<LinearLayout xmlns:android="http://schemas.android.com/apk/res/android"
    android:layout_width="match_parent" android:layout_height="match_parent"
    android:gravity="center">
<Button
    android:id="@+id/button2"
    android:layout_width="wrap_content"
    android:layout_height="wrap_content"
    android:text="返回"/>
    <TextView
        android:id="@+id/textView1"
        android:layout_width="wrap_content"
        android:layout_height="wrap_content"
        android:text="返回数据"/>
</LinearLayout>

Intent
下午讲的是Intent中的Action属性+隐式显示,然后实现了打电话发送邮件打开网页的功能。
Action属性:
- Intent.ACTION_DIAL显示打电话按键界面
- Intent.ACTION_CALL直接打电话,注意要在AndroidMainfest中添加打电话的权限
<uses-permission android:name="android.permission.CALL_PHONE"/>- Intent.ACTION_SENDTO发送短信,介个也要添加权限
<uses-permission android:name="android.permission.SEND_SMS"/>- Intent.ACTION_VIEW显示网页
隐式启动activity
隐式Intent:通过Intent Filter来实现的,它一般用在没有明确指出目标组件名称的前提下,一般是用于在不同应用程序之间。需要AndroidManifest.xml中增加Activity的声明,并设置对应的Intent Filter和Action,才能被Android的应用程序框架所匹配。它并不明确的指出我们想要启动哪一个活动,而是指定了一系列更为抽象的action和category等信息,然后交给系统分析这个Intent,并找到合适的方法启动。
intent-filter intent过滤器
将要启动的界面中在mainfest中添加intent_filter
在intent-filter中必须添加action_name。
category必须填写default的
在启动界面中使用intent设置action,隐式启动该界面
<?xml version="1.0" encoding="utf-8"?>
<manifest xmlns:android="http://schemas.android.com/apk/res/android"
    package="com.example.laowang.android0819" >
    <!-- 添加权限-->
   <uses-permission android:name="android.permission.CALL_PHONE"/>
    <uses-permission android:name="android.permission.SEND_SMS"/>
    <application
        android:allowBackup="true"
        android:icon="@mipmap/ic_launcher"
        android:label="@string/app_name"
        android:theme="@style/AppTheme" >

        <activity
            android:name=".MainActivity"
            android:label="@string/app_name" >
            <intent-filter>
                <action android:name="android.intent.action.MAIN" />

                <category android:name="android.intent.category.LAUNCHER" />
            </intent-filter>
        </activity>
        <activity
            android:name=".SecondActivity">
            <intent-filter>
                <action android:name="com.example.laowang.android0819.SecondActivity"/>
                <category android:name="android.intent.category.DEFAULT"/>
            </intent-filter>
        </activity>
    </application>
</manifest>

//MainActivity
import android.content.Intent;
import android.net.Uri;
import android.support.v7.app.AppCompatActivity;
import android.os.Bundle;
import android.view.Menu;
import android.view.MenuItem;
import android.view.View;
import android.widget.Button;
import android.widget.EditText;

public class MainActivity extends AppCompatActivity {
    private Button button_phone;
    private Button button_callPhone;
    private EditText phone_number;
    private Button mBtn_send;
    private Button mBtn_web;
    private Button mBtn_hide;
    private EditText mEdit_hide;
    @Override
    protected void onCreate(Bundle savedInstanceState) {
        super.onCreate(savedInstanceState);
        setContentView(R.layout.activity_main);
        button_phone= (Button) findViewById(R.id.button_phone);
        button_callPhone= (Button) findViewById(R.id.button_callPhone);
        phone_number= (EditText) findViewById(R.id.ephone_number);
        mBtn_send= (Button) findViewById(R.id.button_send);
        mBtn_web= (Button) findViewById(R.id.button_web);
        mBtn_hide= (Button) findViewById(R.id.button_hide);
        mEdit_hide= (EditText) findViewById(R.id.edit_hide);

        button_phone.setOnClickListener(new View.OnClickListener() {
            @Override
            public void onClick(View v) {
                Intent intent=new Intent();
                intent.setAction(Intent.ACTION_DIAL);
                startActivity(intent);
            }
        });
        button_callPhone.setOnClickListener(new View.OnClickListener() {
            @Override
            public void onClick(View v) {
                Intent intent=new Intent();
                intent.setAction(Intent.ACTION_CALL);
                intent.setData(Uri.parse("tel:" + phone_number.getText().toString()));
                startActivity(intent);
            }
        });

        mBtn_send.setOnClickListener(new View.OnClickListener() {
            @Override
            public void onClick(View v) {
                Intent intent=new Intent();
                intent.setAction(Intent.ACTION_SENDTO);
                intent.setData(Uri.parse("smsto:" + phone_number.getText().toString()));
                intent.putExtra("sms_body", "你好");
                startActivity(intent);
            }
        });

        mBtn_web.setOnClickListener(new View.OnClickListener() {
            @Override
            public void onClick(View v) {
                Intent intent=new Intent(Intent.ACTION_VIEW);
                intent.setData(Uri.parse("http://www.baidu.com"));
                startActivity(intent);
            }
        });
        mBtn_hide.setOnClickListener(new View.OnClickListener() {
            @Override
            public void onClick(View v) {
                Intent intent=new Intent("com.example.laowang.android0819.SecondActivity");
                String value=mEdit_hide.getText().toString();
                intent.putExtra(Config.BACK,value);
                startActivity(intent);
            }
        });
    }
}

//activity_main.xml
<LinearLayout xmlns:android="http://schemas.android.com/apk/res/android"
    xmlns:tools="http://schemas.android.com/tools" android:layout_width="match_parent"
    android:layout_height="match_parent" android:paddingLeft="@dimen/activity_horizontal_margin"
    android:paddingRight="@dimen/activity_horizontal_margin"
    android:paddingTop="@dimen/activity_vertical_margin"
    android:paddingBottom="@dimen/activity_vertical_margin" tools:context=".MainActivity"
    android:weightSum="1"
    android:orientation="vertical">

    <TextView android:text="@string/hello_world" android:layout_width="wrap_content"
        android:layout_height="wrap_content" />
<Button
    android:id="@+id/button_phone"
    android:layout_width="wrap_content"
    android:layout_height="wrap_content"
    android:text="弹出打电话界面"/>
    <Button
        android:id="@+id/button_callPhone"
        android:layout_width="wrap_content"
        android:layout_height="wrap_content"
        android:text="拨打电话"/>
    <EditText
        android:layout_gravity="bottom"
        android:id="@+id/ephone_number"
        android:layout_width="match_parent"
        android:layout_height="wrap_content"
        />
    <Button
        android:id="@+id/button_send"
        android:layout_width="wrap_content"
        android:layout_height="wrap_content"
        android:text="发送短信"/>
    <Button
        android:id="@+id/button_web"
        android:layout_width="wrap_content"
        android:layout_height="wrap_content"
        android:text="打开百度"/>
    <Button
        android:id="@+id/button_hide"
        android:layout_width="wrap_content"
        android:layout_height="wrap_content"
        android:text="隐式打开"/>
    <EditText
        android:layout_gravity="bottom"
        android:id="@+id/edit_hide"
        android:layout_width="match_parent"
        android:layout_height="wrap_content"
        />
</LinearLayout>

//SecondActivity
import android.app.Activity;
import android.content.Intent;
import android.os.Bundle;
import android.widget.TextView;

public class SecondActivity extends Activity {
    private Intent intent;
    private TextView mView_main;
    protected void onCreate(Bundle savedInstanceState) {
        super.onCreate(savedInstanceState);
        setContentView(R.layout.activity_second);
        intent=getIntent();
        mView_main= (TextView) findViewById(R.id.view_main);
        String s=intent.getStringExtra(Config.BACK);
        mView_main.setText(s);

    }
}

//activity_second.xml
<?xml version="1.0" encoding="utf-8"?>
<LinearLayout xmlns:android="http://schemas.android.com/apk/res/android"
    android:orientation="vertical"
    android:layout_width="match_parent"
    android:layout_height="match_parent"
    android:gravity="center">

    <TextView
        android:id="@+id/view_main"
        android:layout_width="wrap_content"
        android:layout_height="wrap_content"
        android:text="这是第二个界面"
        android:textColor="#ff00"
        android:textSize="40dp"/>
</LinearLayout>

不得不说,界面有点丑,把按键的android:layout_width=”wrap_content”改成android:layout_width=”match_parent”后界面稍微好看了点╮(╯▽╰)╭
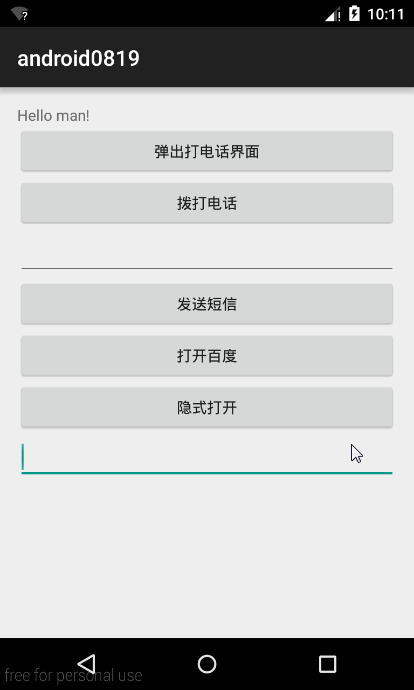
补充一点:上面在写打开打电话界面的时候漏了一条代码,导致点击后没有直接出现拨号的界面,现在补回来╮(╯▽╰)╭
 button_phone.setOnClickListener(new View.OnClickListener() {
            @Override
            public void onClick(View v) {
                Intent intent=new Intent();
                intent.setAction(Intent.ACTION_DIAL);
                intent.setData(Uri.parse("tel:" + phone_number.getText().toString()));
                startActivity(intent);
            }
        });
上效果


 73
73

 被折叠的 条评论
为什么被折叠?
被折叠的 条评论
为什么被折叠?
 到【灌水乐园】发言


