


引言
CLIP是OpenAI推出的采用对比学习的文本-图像预训练模型,是近年来在多模态研究领域的经典之作。
很多模型都用到了CLIP,虽然它结构简单但是在各个任务上表现都不错。
本文没有根据论文的内容从头到尾分析,而是从模型结构入手结合源码来进行分析,希望能够帮助各位小伙伴对CLIP有一个更深的了解!
CLIP架构
如原论文中的结构图所示:
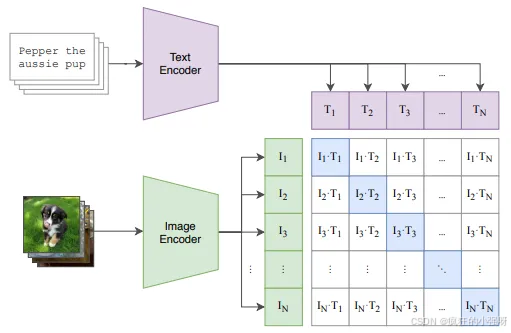
● text encoder:用来提取文本特征,作者这里用的是nn.Embedding
● image encoder:用来提取图像特征,原文中image encoder可选的模型有很多,比如ViT-B/32、RN101等
● 相似度计算:图像特征和文本特征映射到同一维度后,通过矩阵乘法来计算图像特征和文本特征之间的相似度
原论文代码并没有给出训练代码,如果大家想看是怎么训练的,可参考快速完成多模态模型-CLIP的训练
针对架构中的核心部分,我们来看一下源码细节加深理解!
clip核心代码:
def forward(self, image, text):
        # 分别提取图像和文本特征
        image_features = self.encode_image(image) # [batch_size,output_dim]
        text_features = self.encode_text(text)  # [batch_size,output_dim]

        # 对图像和文本特征进行归一化操作
        image_features = image_features / image_features.norm(dim=1, keepdim=True)
        text_features = text_features / text_features.norm(dim=1, keepdim=True)

        # logit_scale是一个可训练参数,用来控制图像和文本特征之间相似度的尺度
        logit_scale = self.logit_scale.exp()

        #  @ 是矩阵乘法操作符,text_features.t()表示将文本特征矩阵转置
        # 最终得到每张图片与每段文本的相似度
        logits_per_image = logit_scale * image_features @ text_features.t()

        # 表示每段文本与每张图像的相似度
        logits_per_text = logits_per_image.t()

        # shape = [batch_size, global_batch_size]
        return logits_per_image, logits_per_text
在上述代码中,得到维度为[batch_size,output_dim]的图像特征image_features和维度为[batch_size,output_dim]的文本特征text_features做矩阵乘法,得到相似度矩阵 [batch_size, batch_size],这个相似度矩阵中,对角线上的值是一一对应的正样本的相似度,非对角线的值是每个样本与其负样本的相似度
可能到这里大家跟小编最开始的疑惑是一样的,对比学习具体是怎么实现的呢?
对比学习是在训练中体现的,得到相似度矩阵后,我们知道每个对角线上的值就是正样本对,那么就可以以此来创建标签
比如有batch=4,我们就可以得到标签值[0,1,2,3],通过标签值可以找到相似度矩阵中正样本对,一个batch中正样本找到了,其他的就是负样本对,这里认为正样本对之间是同一类别,正样本与负样本之间是不同类别,然后通过交叉熵损失函数来计算损失,以此来达到使正样本对之间更近,负样本对之间更远的效果
其中,text encoder核心代码:
def encode_text(self, text):
        # 对文本序列提取特征
        x = self.token_embedding(text).type(self.dtype)  # [batch_size, n_ctx, d_model]

        # 给文本序列添加位置编码
        x = x + self.positional_embedding.type(self.dtype)
        x = x.permute(1, 0, 2)  # NLD -> LND

        # 用transformer编码器对文本进行编码
        x = self.transformer(x)
        x = x.permute(1, 0, 2)  # LND -> NLD

        # 归一化操作
        x = self.ln_final(x).type(self.dtype)

        # x.shape = [batch_size, n_ctx, transformer.width]
        # text.argmax(dim=-1)表示选择最大值的索引,即每个batch所在序列的eot_token特征作为文本特征
        # eot_token是结束标记,这里视为全局特征
        # self.text_projection 是一个线性变换矩阵
        # x与self.text_projection做矩阵乘法,将特征映射到目标任务所需的空间
        x = x[torch.arange(x.shape[0]), text.argmax(dim=-1)] @ self.text_projection

        return x  # 这里x的维度为[batch_size,transformer.width]
这里image encoder核心代码,我们以VisionTransformer为例:
class VisionTransformer(nn.Module):
    def __init__(self, input_resolution: int, patch_size: int, width: int, layers: int, heads: int, output_dim: int):
        super().__init__()
        self.input_resolution = input_resolution
        self.output_dim = output_dim
        self.conv1 = nn.Conv2d(in_channels=3, out_channels=width, kernel_size=patch_size, stride=patch_size, bias=False)

        scale = width ** -0.5
        self.class_embedding = nn.Parameter(scale * torch.randn(width))
        self.positional_embedding = nn.Parameter(scale * torch.randn((input_resolution // patch_size) ** 2 + 1, width))
        self.ln_pre = LayerNorm(width)

        self.transformer = Transformer(width, layers, heads)

        self.ln_post = LayerNorm(width)
        self.proj = nn.Parameter(scale * torch.randn(width, output_dim))

    def forward(self, x: torch.Tensor):
        # 对输入的图像进行卷积操作,得到高维特征
        x = self.conv1(x)  # shape = [*, width, grid, grid]

        # 将空间维度(grid)展平为一维,以便后续处理
        x = x.reshape(x.shape[0], x.shape[1], -1)  # shape = [*, width, grid ** 2]
        x = x.permute(0, 2, 1)  # shape = [*, grid ** 2, width]

        # 在特征序列的开头添加一个可学习的分类嵌入(class_embedding)作为序列的开始标记
        # class_embedding也可作为图像序列的一个全局特征表示
        x = torch.cat([self.class_embedding.to(x.dtype) + torch.zeros(x.shape[0], 1, x.shape[-1], dtype=x.dtype, device=x.device), x], dim=1)  # shape = [*, grid ** 2 + 1, width]
        x = x + self.positional_embedding.to(x.dtype)  # 添加位置编码
        x = self.ln_pre(x)  # 进行归一化操作

        x = x.permute(1, 0, 2)  # NLD -> LND
        x = self.transformer(x)  # 对图像特征进行编码
        x = x.permute(1, 0, 2)  # LND -> NLD

        # x[:, 0, :]表示选择每个批次中的第一个位置的特征,通常这是序列的全局表示
        # 然后进行归一化操作,x的维度为[batch,width]
        x = self.ln_post(x[:, 0, :])

        # self.proj 是一个线性变换矩阵
        # x与self.proj做矩阵乘法,将特征映射到目标任务所需的空间
        if self.proj is not None:
            x = x @ self.proj

        return x  # 最终x的维度为[batch,output_dim]
參考
官方代码库:https://github.com/openai/CLIP


 6160
6160

 被折叠的 条评论
为什么被折叠?
被折叠的 条评论
为什么被折叠?
 到【灌水乐园】发言


