


数据的基本操作
在深度学习中,我们通常会频繁地对数据进行操作。作为动手学深度学习的基础,掌握对内存中数据的处理,以及一些函数的掌握很有必要,本章是开篇对深度学习的Pytorch版本的学习与记录,原书是李沐 MXNet版本《动手学深度学习》,!
1-tensor创建
Tensor和NumPy的多维数组非常类似
"tensor"这个单词一般可译作“张量”,张量可以看作是一个多维数组。标量可以看作是0维张量,向量可以看作1维张量,矩阵可以看作是二维张量.
import torch

x=torch.empty(5,3)#创建一个5x3的未初始化的Tensor
print(x)
#tensor([[2.8035e+10, 5.6332e-43, 2.8035e+10],
#        [5.6332e-43, 2.8035e+10, 5.6332e-43],
#        [2.8035e+10, 5.6332e-43, 2.8035e+10],
#        [5.6332e-43, 2.8035e+10, 5.6332e-43],
#        [2.8035e+10, 5.6332e-43, 2.8035e+10]])

x=torch.rand(5)#返回区间[0, 1) np.random.rand(5)
#tensor([0.2398, 0.4620, 0.0815, 0.1845, 0.7786])

torch.zeros((2,2),dtype=torch.long)#创建一个2x2的long型全0的Tensor: np.zeros((2,2),dtype=np.int8)
#tensor([[0, 0],
#        [0, 0]])
torch.tensor([5.5000, 3.0000])#直接按照数据创建
#tensor([5.5000, 3.0000]

x=x.new_ones(5, 3, dtype=torch.float64)  # 返回的tensor默认具有相同的torch.dtype和torch.device

#返回一个均值为0.方差为1的正态分布的随机数,指定类型为float
torch.randn_like(x, dtype=torch.float) # 指定新的数据类型
# 查看纬度张量大小
x.shape / x.size()
2-功能函数
这些方法在创建的时候可以指定数据类型dtype和存放device(cpu/gpu)
#可以联想Numpy的一些函数,很类似,可以去官方API查阅
ones(size)# 全1,
zeros(size) #全 0,
eye(size) #对角1矩阵,
arrange(s,e,steps) #从s到e,步长为step 类似循环循
linspace(s,e,steps)#从s到e,均匀切分成steps份
rand/randn(*size) #均匀/标准分布
normal(mean,std)/uniform(from,to) ##正态分布/均匀分布
randperm(m) #随机排列 m为int 随机返回[0,m)
3-算术操作
#加法 x+x1 add(x,x1) add(x,x1,out=torch.empty(size))
y  = torch.tensor([5, 3])
y1 = torch.tensor([4, -1])
print(y+y1)#tensor([9, 2])
print(torch.add(y,y1))#函数tensor([9, 2])
#可以指定输出
result = torch.empty(2)
torch.add(y1, y, out=result)
print(result)
PyTorch操作inplace版本都有后缀_, 例如x.copy_(y), x.t_() 修改原值
y.add_(y1)# y的值从tensor([5, 3])变为tensor([9, 2])
#而y.add(y1) 不修改y的值
4-数据操作
索引可以联想Numpy的用法,索引出来的结果与原数据共享内存,也即修改一个,另一个会跟着修改
#切片的操作 共享内存一起修改
y = x[0, :]
y += 1
print(y)
print(x[0, :]) # 源tensor也被改了 x的0行也修改了
#==>tensor([1.6035, 1.8110, 0.9549])
#   tensor([1.6035, 1.8110, 0.9549])
4_1. index_select
index_select(input,dim.index) 在指定维度dim上选取,比如选取某些行、某些列
切片操作的话的会修改原共享内存,源数据
x=torch.tensor([[ 2.3967,  2.0892,  1.4369],
       			[ 1.6995,  2.0453,  0.6539],
		        [-0.1553,  3.7016, -0.3599]])

##在x 的基础上,0表示按行 选择index 0,2行的数据
torch.index_select(x,0,index=torch.tensor([0,2]))
#tensor([[ 2.3967,  2.0892,  1.4369],
#        [-0.1553,  3.7016, -0.3599]])

#在x 的基础上,1表示按列 选择index 0列,2列的数
torch.index_select(x,1,index=torch.tensor([0,2]))
#tensor([[ 2.3967,  1.4369],
#        [ 1.6995,  0.6539],
#        [-0.1553, -0.3599]])
4_2. masked_select
masked_select(input, mask) mask的类似于过滤的操作 df[df.age>0] mask 有四种类型:
torch.ge(input, other, out=None) → Tensor ------input >= other
torch.gt (input, other, out=None) → Tensor ------input > other
torch.le (input, other, out=None) → Tensor ------input <= other
torch.lt (input, other, out=None) → Tensor ------input < other
other 可以是一个数也可以是一个与input 同类型的张量,输出一个bool形的张量。
x.ge(1)#筛选大于1的数据 生成bool true or False
torch.masked_select(x,x.ge(1))#筛选大于1的数据
#==>tensor([1.6035, 1.8110, 1.0482, 2.8663, 1.0739, 2.2628])
4_3. torch.nonzero
帅选非零元素的下标torch.nonzero(x),然后可以通过下标获取元素
4_4. torch.gather
gather(input, dim, index) 根据index,在dim维度上选取数据,输出的size与index一样
dim=0 length矩阵中的数的值代表的是行数,所处位置代表的是列数。
dim=1 length矩阵中的数的值代表的是列数,所处位置代表的是行数。
x=torch.tensor([[ 2.3967,  2.0892,  1.4369],
        [ 1.6995,  2.0453,  0.6539],
        [-0.1553,  3.7016, -0.3599]])
#dim=0 [[00,01],[10,01]]   index矩阵表示行数  列数表示位置所处的列数
torch.gather(x,0, torch.tensor([[0, 0], [1, 0]]))
#tensor([[2.3967, 2.0892],
#       [1.6995, 2.0892]])

#dim=1 index矩阵的数字表示列数 [[00,00],[11,10]] 01->表示0行1列 行数表示位置所处的行数
torch.gather(x,1, torch.tensor([[0, 0], [1, 0]]))
#tensor([[2.3967, 2.3967],
#        [2.0453, 1.6995]])
4_5. view
用于改变view的形状
注意view()返回的新Tensor与源Tensor虽然可能有不同的size,但是是共享data的,也即更改其中的一个,另外一个也会改变
x.shape# (5,3)
z=x.view(-1,5)#(3,5)
x.view(-1)#(1,15)
z+=1#修改操作  源x 也改变了
用view()会修改源数据,一般会先clone创造一个副本然后再使用view
x_cp = x.clone().view(15)#先用clone创造一个副本然后再使用view  copy
#修改x 不影响x_cp的值
x-=1
item 将一个标量 tensor 转化为number
x = torch.randn(1)
print(x)
print(x.item())
5-线性函数
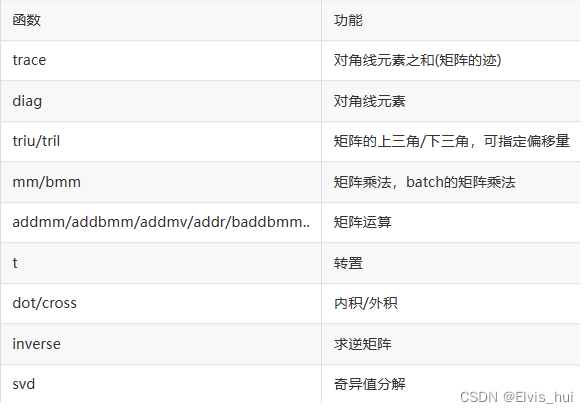
支持很多操作如转置、索引、切片、数学运算、线性代数、随机数等等,更多可参考官方文档
6-Tensor与Numpy相互转换
6_1. broadcasting
当对两个形状不同的Tensor按元素运算时,可能会触发广播(broadcasting)机制:先适当复制元素使这两个Tensor形状相同后再按元素运算
x = torch.arange(1, 3).view(1, 2)
print(x)
y = torch.arange(1, 4).view(3, 1)
print(y)
------------------------------------
==> tensor([[1, 2]])
	tensor([[1],
        [2],
        [3]])
6_2. 内存机制
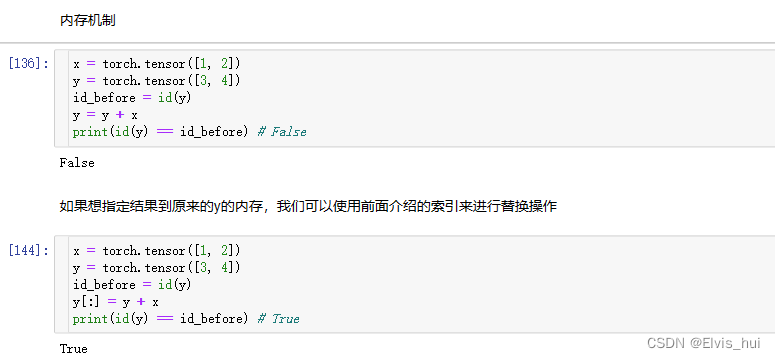
还可以使用运算符全名函数中的out参数或者自加运算符+=(也即add_())达到上述效果,例如torch.add(x, y, out=y)和y += x(y.add_(x))
x = torch.tensor([1, 2])
y = torch.tensor([3, 4])
id_before = id(y)
torch.add(x, y, out=y) # y += x, y.add_(x)
print(id(y) == id_before) # True
print(y)#tensor([4, 6]) 因为共享内存 值改变
注:虽然view返回的Tensor与源Tensor是共享data的,但是依然是一个新的Tensor(因为Tensor除了包含data外还有一些其他属性),二者id(内存地址)并不一致。
6_3. 自动梯度求导
numpy()和from_numpy()将Tensor和NumPy中的数组相互转换。但是需要注意的一点是: 这两个函数所产生的的Tensor和NumPy中的数组共享相同的内存(所以他们之间的转换很快),改变其中一个时另一个也会改变!!!
1-Tensor 转Numpy
import numpy as np

a=torch.ones(5)#tensor([1., 1., 1., 1., 1.])
b=a.numpy()#转numpy  array([1., 1., 1., 1., 1.], dtype=float32)
#执行操作a+=1 or b+=1 都会修改对应的数据
a+=1
print(a,b)#(tensor([2., 2., 2., 2., 2.]), array([2., 2., 2., 2., 2.], dtype=float32))
2-Numpy 数组转 Tensor
a = np.ones(5)#
b = torch.from_numpy(a)
print(a,b)#[1. 1. 1. 1. 1.] tensor([1., 1., 1., 1., 1.], dtype=torch.float64)
#执行操作a+=1 or b+=1 都会修改对应的数据
通过以下方式的不会共享内存。torch.tensor()
c = torch.tensor(a)
a += 1
print(a, c)
#==>[2. 2. 2. 2. 2.] tensor([1., 1., 1., 1., 1.], dtype=torch.float64)


 481
481


 被折叠的 条评论
为什么被折叠?
被折叠的 条评论
为什么被折叠?
 到【灌水乐园】发言


