


这个部分主要是教我们如何将我们自己的图片load进来,对数据进行resize,随机crop的一些操作,当中有两个依赖包
scikit-image 和 pandas, 使用conda install或者pip install应该很容易就可以安装上了
#导入对应的依赖包
    from __future__ import print_function, division
    import os
    import torch
    import pandas as pd
    from skimage import io, transform
    import numpy as np
    import matplotlib.pyplot as plt
    from torch.utils.data import Dataset, DataLoader
    from torchvision import transforms, utils

    import warnings
    warnings.filterwarnings("ignore")

    plt.ion()
需要下载对应数据集,放到./data/faces文件https://download.pytorch.org/tutorial/faces.zip
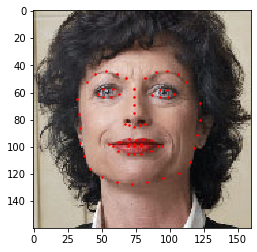
具体标注的格式如下:

# 使用pandas可以很容易的解析csv文件
landmarks_frame = pd.read_csv('./data/faces/face_landmarks.csv')

n = 65
img_name = landmarks_frame.iloc[n, 0]
landmarks = landmarks_frame.iloc[n, 1:].as_matrix()
landmarks = landmarks.astype('float').reshape(-1, 2)

print('Image name: {}'.format(img_name))
print('Landmarks shape: {}'.format(landmarks.shape))
print('First 4 landmarks: {}'.format(landmarks[:4]))
Image name: person-7.jpg
Landmarks shape: (68, 2)
First 4 landmarks: [[32. 65.]
 [33. 76.]
 [34. 86.]
 [34. 97.]]
def show_landmarks(image, landmarks):
    plt.imshow(image)
    plt.scatter(landmarks[:, 0], landmarks[:, 1], s=10, marker='.', c='r')
    plt.pause(0.001)

plt.figure()
show_landmarks(io.imread(os.path.join('./data/faces/', img_name)), landmarks)
plt.show()
class FaceLandmarksDataset(Dataset):
    def __init__(self, csv_file, root_dir, transform=None):
        self.landmarks_frame = pd.read_csv(csv_file)
        self.root_dir = root_dir
        self.transform = transform

    def __len__(self):
        return len(self.landmarks_frame)

    def __getitem__(self, idx):
        if torch.is_tensor(idx):
            idx = idx.tolist()

        img_name = os.path.join(self.root_dir, self.landmarks_frame.iloc[idx, 0])
        #iloc基于位置的纯基于整数位置的索引,仅支持索引列位置,试图选择行位置将引发ValueError。
        image = io.imread(img_name)
        landmarks = self.landmarks_frame.iloc[idx, 1:]
        landmarks = np.array([landmarks])
        landmarks = landmarks.astype('float').reshape(-1, 2)
        sample = {'image':image, 'landmarks': landmarks}

        if self.transform:
            sample = self.transform(sample)

        return sample
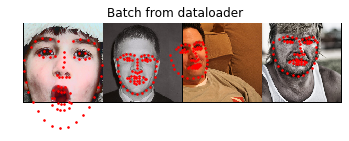
face_dataset =  FaceLandmarksDataset(csv_file='./data/faces/face_landmarks.csv', root_dir='./data/faces/')

fig = plt.figure()
for i in range(len(face_dataset)):
    sample = face_dataset[i]

    print(i, sample['image'].shape, sample['landmarks'].shape)

    ax = plt.subplot(1, 4, i+1)
    #tight_layout会自动调整子图参数,使之填充整个图像区域
    plt.tight_layout()
    ax.set_title('Sample #{}'.format(i))
    ax.axis('off')
    #**kwargs 允许你将不定长度的键值对, 作为参数传递给一个函数。 如果你想要在一个函数里处理带名字的参数, 你应该使用**kwargs
    show_landmarks(**sample)


    if i == 3:
        plt.show()
        break

0 (324, 215, 3) (68, 2)

1 (500, 333, 3) (68, 2)

2 (250, 258, 3) (68, 2)

3 (434, 290, 3) (68, 2)
这边建议还是在自己的IDE下面跑代码比较合适,如果使用jupyter notebook可能不会显示在同一个picture上。
class Rescale(object):
"""Rescale the image in a sample to a given size.

    Args:
        output_size (tuple or int): Desired output size. If tuple, output is
            matched to output_size. If int, smaller of image edges is matched
            to output_size keeping aspect ratio the same.
 """
    def __init__(self, output_size):
        assert isinstance(output_size, (int, tuple))
        self.output_size = output_size

    def __call__(self, sample):
        image, landmarks = sample['image'], sample['landmarks']

        h, w = image.shape[:2]

        if isinstance(self.output_size, int):
            if h>w:
                new_h, new_w = self.output_size * h/w, self.output_size
            else:
                new_h, new_w = self.output_size, self.output_size*w/h
        else:
            new_h, new_w = self.output_size

        new_h, new_w = int(new_h), int(new_w)

        img = transform.resize(image, (new_h, new_w))

        landmarks = landmarks * [new_w/w, new_h/h]

        return {'image': img, 'landmarks': landmarks}


class RandomCrop(object):
"""Crop randomly the image in a sample.

    Args:
        output_size (tuple or int): Desired output size. If int, square crop
            is made.
    """
    def __init__(self, output_size):

        assert isinstance(output_size, (int, tuple))
        if isinstance(output_size, int):
            self.output_size = (output_size, output_size)

        else:
            assert len(output_size) == 2
            self.output_size = output_size

    def __call__(self, sample):
        image, landmarks = sample['image'], sample['landmarks']
        h, w = image.shape[:2]
        new_h, new_w = self.output_size

        top = np.random.randint(0, h-new_h)
        left = np.random.randint(0, w-new_w)

        image = image[top:top+new_h, left:left+new_w]
        landmarks = landmarks - [left, top]
        return {'image':image, 'landmarks':landmarks}


class ToTensor(object):
"""Convert ndarrays in sample to Tensors."""
    def __call__(self, sample):
        image, landmarks = sample['image'], sample['landmarks']
		# swap color axis because
        # numpy image: H x W x C
        # torch image: C X H X W
        image = image.transpose((2, 0, 1))
        return {'image':torch.from_numpy(image),
               'landmarks': torch.from_numpy(landmarks)}
scale = Rescale(256)
crop = RandomCrop(128)
composed = transforms.Compose([Rescale(256),
                               RandomCrop(224)])

fig = plt.figure()
sample = face_dataset[65]

for i, tsfrm in enumerate([scale, crop, composed]):
    transformed_sample = tsfrm(sample)

    ax = plt.subplot(1, 3, i + 1)
    plt.tight_layout()
    ax.set_title(type(tsfrm).__name__)
    show_landmarks(**transformed_sample)


plt.show()

transformed_dataset = FaceLandmarksDataset(csv_file='./data/faces/face_landmarks.csv', root_dir='./data/faces/',
                                       transform= transforms.Compose([Rescale(256), RandomCrop(224), ToTensor()]))

for i in range(len(transformed_dataset)):
    sample = transformed_dataset[i]

    print(i, sample['image'].size(), sample['landmarks'].size())

    if i == 3:
        break
0 torch.Size([3, 224, 224]) torch.Size([68, 2])
1 torch.Size([3, 224, 224]) torch.Size([68, 2])
2 torch.Size([3, 224, 224]) torch.Size([68, 2])
3 torch.Size([3, 224, 224]) torch.Size([68, 2])
dataloader = DataLoader(transformed_dataset, batch_size=4, shuffle=True, num_workers=4)


def show_landmarks_batch(sample_batched):
    images_batch, landmarks_batch = sample_batched['image'], sample_batched['landmarks']
    batch_size = len(images_batch)
    im_size = images_batch.size(2)
    grid_border_size = 2

    grid = utils.make_grid(images_batch)
    plt.imshow(grid.numpy().transpose(1, 2, 0))

    for i in range(batch_size):
        plt.scatter(landmarks_batch[i, :, 0].numpy() + i*im_size+(i+1)*grid_border_size,
                   landmarks_batch[i, :, 1].numpy()+grid_border_size, s=10, marker='.', c='r')
        plt.title('Batch from dataloader')

for i_batch, sample_batched in enumerate(dataloader):
    print(i_batch, sample_batched['image'].size(), sample_batched['landmarks'].size())

    if i_batch == 3:
        plt.figure()
        show_landmarks_batch(sample_batched)
        plt.axis('off')
        plt.ioff()
        plt.show()
        break
0 torch.Size([4, 3, 224, 224]) torch.Size([4, 68, 2])
1 torch.Size([4, 3, 224, 224]) torch.Size([4, 68, 2])
2 torch.Size([4, 3, 224, 224]) torch.Size([4, 68, 2])
3 torch.Size([4, 3, 224, 224]) torch.Size([4, 68, 2])
这样就学会了怎么利用pytorch读取数据,做数据增广等基本的预处理操作。
参考地址:
https://pytorch.org/tutorials/beginner/data_loading_tutorial.html


 816
816


 被折叠的 条评论
为什么被折叠?
被折叠的 条评论
为什么被折叠?
 到【灌水乐园】发言


