


 本文档详细介绍了如何使用Python在GNURadio 3.8中创建自定义模块,包括创建过程、编写测试文件和主处理函数。相较于C++,Python的语法简洁,开发效率更高,适合创建简单功能的模块。通过gr_modtool添加模块,编写qa测试文件和实际的python模块代码,然后配置yaml文件,最后进行测试和安装,即可在GRC中使用新创建的square3_ff模块。
GNU Radio 学习使用 OOT 系列教程:
GNU Radio3.8创建OOT的详细过程(基础/C++)
GNU Radio3.8创建OOT的详细过程(进阶/C++)
GNU Radio3.8创建OOT的详细过程(python)
GNU Radio自定义模块:Embedded Python Block的使用
----------------------------------------------------------------------------------------
在 GNU 3.8创建OOT的详细过程(基础/C++) 以及 GNU 3.8创建OOT的详细过程(进阶/C++) 中,我们详细介绍了如何使用 C++ 来创建自定义模块,这里我们将继续介绍如何使用 python 来进行自定义模块的创建。python 因其简介的代码可以大大曾快开发的效率 但是 python 固有的执行效率慢的问题使其不适用于复杂功能模块的编写,因此对于复杂的模块编写还是建议使用 C++,一些功能简单的模块使用 python 编写。
使用 python 编写模块的过程相比 C++ 简直不要太人性化!同样是创建一个具有平方功能的块,我们在 mymod 模块中 创建一个 python 块:
gr_modtool add -t sync -l python square3_ff
注意这里的命令行参数 -l 后是 python
wsx@wsx:~/temp/gr-mymod$ gr_modtool add -t sync -l python square3_ff
GNU Radio module name identified: mymod
Language: Python
Block/code identifier: square3_ff
Please specify the copyright holder:
Enter valid argument list, including default arguments:
Add Python QA code? [Y/n] y
Adding file 'python/square3_ff.py'...
Adding file 'python/qa_square3_ff.py'...
Editing python/CMakeLists.txt...
Adding file 'grc/mymod_square3_ff.block.yml'...
Editing grc/CMakeLists.txt...
首先,还是编写测试文件 python/qa_square3_ff.py :
from gnuradio import gr, gr_unittest
from gnuradio import blocks
from square3_ff import square3_ff

class qa_square3_ff(gr_unittest.TestCase):

    def setUp(self):
        self.tb = gr.top_block()

    def tearDown(self):
        self.tb = None

    def test_001_square3_ff (self):
        src_data = (-3, 4, -5.5, 2, 3)
        expected_result = (9, 16, 30.25, 4, 9)
        src = blocks.vector_source_f (src_data)
        sqr = square3_ff ()
        dst = blocks.vector_sink_f ()
        self.tb.connect (src, sqr)
        self.tb.connect (sqr, dst)
        self.tb.run ()
        result_data = dst.data ()
        self.assertFloatTuplesAlmostEqual (expected_result, result_data, 6)
        # check data


if __name__ == '__main__':
    gr_unittest.run(qa_square3_ff)
与之前 C++ 块的 python 测试代码相比,主要是 square3_ff 的 import 方式 发生了变化。
接下来是 python 文件 python/square3_ff.py 的编写:
import numpy
from gnuradio import gr

class square3_ff(gr.sync_block):
    """
    docstring for block square3_ff
    """
    def __init__(self):
        gr.sync_block.__init__(self,
            name="square3_ff",
            in_sig=[numpy.float32],  # 输入端口
            out_sig=[numpy.float32])  # 输出端口


    def work(self, input_items, output_items):
        # <+signal processing here+>
        output_items[0][:] = input_items[0][:] * input_items[0][:]  # 平方
        return len(output_items[0])
看了这代码的简洁程度,真想说,python 还是大爷(— . —)
昂,不扯了哈哈,来看下与之前的C++代码的对比吧:
同样是 sync 类型的块,因此信号处理的主函数为 work() , 在 python 中是继承自父类 gr.sync_block ,这在 C++ 版本中是 gr::sync_block 。
与 C++ 不同,这里的输入输出端口 in_sig/out_sig 的设置使用列表形式来列举 ,列表中的每一个元素都代表这个端口的数据流中包含的 item 的数量。这里的定义为:
in_sig = [numpy.float32],
out_sig = [numpy.float32],
代表着输入输出端各有一个端口,端口的数据类型为 numpy.float32 。另外,如果想让端口可以输入/输出 vectors 或其他复杂的数据,则可以像这样定义
in_sig = [(numpy.float32, 4), numpy.float32] 这个定义意味着输入有两个端口,第一个端口是具有 4 个单精度浮点型类型数据的 vector ,第二个端口是一个单精度浮点型的标量。
另外,这里的 input_items 和 output_items 都是 numpy 数组,可以使用 numpy 方法进行操作。
wsx@wsx:~/temp/gr-mymod/build$ cmake ../
-- Build type not specified: defaulting to release.
-- Using GMP.
-- User set python executable /usr/bin/python3
-- Found PythonLibs: /usr/lib/x86_64-linux-gnu/libpython3.8.so (found suitable exact version "3.8.10")
-- Using install prefix: /usr/local
-- Building for version: v1.0-compat-xxx-xunknown / 1.0.0git
-- No C++ unit tests... skipping
--
-- Checking for module SWIG
-- Found SWIG version 4.0.1.
-- Found PythonLibs: /usr/lib/x86_64-linux-gnu/libpython3.8.so (found version "3.8.10")
-- Configuring done
-- Generating done
-- Build files have been written to: /home/wsx/temp/gr-mymod/build

wsx@wsx:~/temp/gr-mymod/build$ make test
Running tests...
Test project /home/wsx/temp/gr-mymod/build
    Start 1: qa_square1_ff
1/3 Test #1: qa_square1_ff ....................   Passed    0.52 sec
    Start 2: qa_square2_ff
2/3 Test #2: qa_square2_ff ....................   Passed    0.50 sec
    Start 3: qa_square3_ff
3/3 Test #3: qa_square3_ff ....................   Passed    0.55 sec

100% tests passed, 0 tests failed out of 3

Total Test time (real) =   1.57 sec
使用 python 来写 block 就没有C++那样复杂的编译安装等步骤了,遇到 bug 的概率也少了不少,开发效率直接上天!
然后是编写 yaml 文件,由于 gr_modtool makeyaml ××× 命令是针对 C++ 的,因此这里就只能手动修改 yaml 文件了,不过有了前面的基础,这一步也很容易完成,有关 yaml 代码的 修改 可以看这篇博客,修改后的 yaml 文件如下:
id: mymod_square3_ff
label: square3_ff
category: '[Mymod]'
templates:
  imports: import mymod
  make: mymod.square3_ff()
inputs:
- label: in
  domain: stream
  dtype: float
outputs:
- label: out
  domain: stream
  dtype: float
file_format: 1
可以发现,除了命名,其他的与之前的一模一样。
最后一步,同样是回到 build/ 文件夹中,重新 cmake 一下,然后不需要再编译(make)了,直接运行 make test 进行测试,然后在 sudo make install 进行安装,这时再重新打开GRC,可以发现 square3_ff 模块:

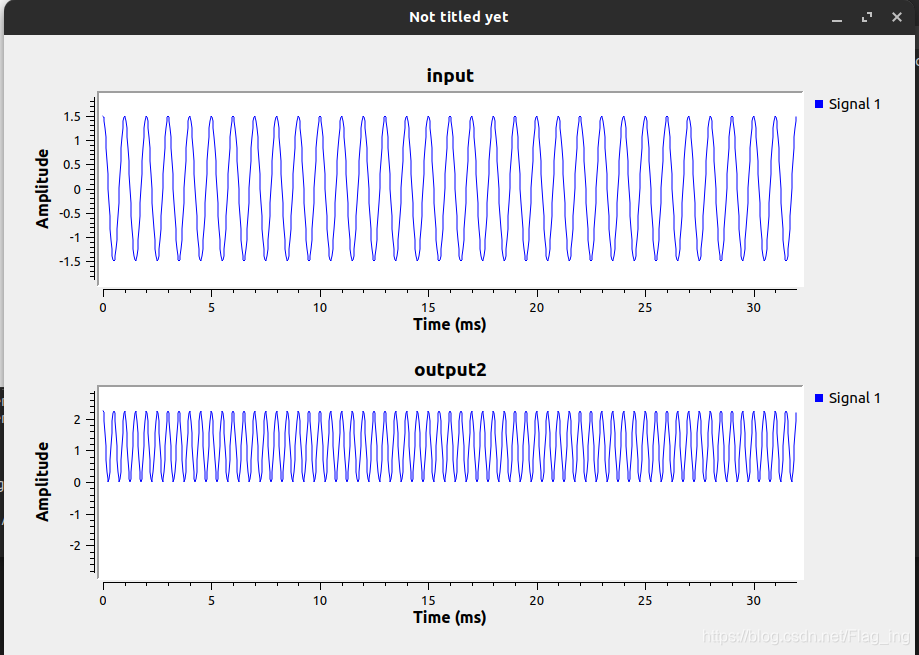
运行该流图,结果如下:
最后多提一嘴,如果有小伙伴使用过 GRC 中的 Embedded Python Block 的话就会发现这两个其实是同样的,只不过这里是从头开始编辑模块的,而 Embedded Python Block 中是创建好了 block,我们只用往里面填写代码就行了。
最后,如同使用 C++ 进行 block 的创建及编写一样,使用 python 也可以创建所有类型的 block,python 中的四种 blocks 如下:
gr.sync_blockgr.decim_blockgr.interp_blockgr.basic_block- (这里对应 C++ 中的gr::block)
另外,与 C++ 中的一样,python 中也会根据 block 的类型来选择是否需要重写 forecast()、 work()、以及 general_work() 函数。
def work(self, input_items, output_items):
    # Do stuff

def general_work(self, input_items, output_items):
    # Do stuff
参考:


 5473
5473

 被折叠的 条评论
为什么被折叠?
被折叠的 条评论
为什么被折叠?
 到【灌水乐园】发言


