


最近搞机器学习,很多东西都在重复做。重复的代码可以使用函数,重复的调用就要写py文件了。每次导入py又很麻烦,怎么才能省事呢?于是我想到了pip,言归正传,下面分布介绍pip。
注册Pypi账号
创建项目工程或者独立py文件
1.文件不允许在ifmain以外的地方出现print函数以及控制运行的函数数量
如果非要这么做,请使用以下代码:
if __name__ == "__main__":
    your example code goes here
2.项目结构应该为如下标准(名字仅供参考):
/packaging_tutorial
 /example_pkg
  __init__.py
其中,packaging_tutorial 是一个文件目录,example_pkg 是一个你希望上传的 Python 包。
3.init.py文件Import设置访问的类
4.包文件夹之外需要放置的文件:
setup.py
setup.cfg
LICENSE.txt
README.md (optinal but highly recommended)
sertup写法:
setup.py文件包含关于PyPi需要的包的信息,比如它的名称、描述、当前版本等。复制并粘贴以下代码,并替换从你匹配内容:
from distutils.core import setup
setup(
  name = 'YOURPACKAGENAME',         # How you named your package folder (MyLib)
  packages = ['YOURPACKAGENAME'],   # Chose the same as "name"
  version = '0.1',      # Start with a small number and increase it with every change you make
  license='MIT',        # Chose a license from here: https://help.github.com/articles/licensing-a-repository
  description = 'TYPE YOUR DESCRIPTION HERE',   # Give a short description about your library
  author = 'YOUR NAME',                   # Type in your name
  author_email = 'your.email@domain.com',      # Type in your E-Mail
  url = 'https://github.com/user/reponame',   # Provide either the link to your github or to your website
  download_url = 'https://github.com/user/reponame/archive/v_01.tar.gz',    # I explain this later on
  keywords = ['SOME', 'MEANINGFULL', 'KEYWORDS'],   # Keywords that define your package best
  install_requires=[            # I get to this in a second
          'validators',       # 可以加上版本号,如validators=1.5.1
          'beautifulsoup4',
      ],
  classifiers=[
    'Development Status :: 3 - Alpha',      # Chose either "3 - Alpha", "4 - Beta" or "5 - Production/Stable" as the current state of your package
    'Intended Audience :: Developers',      # Define that your audience are developers
    'Topic :: Software Development :: Build Tools',
    'License :: OSI Approved :: MIT License',   # Again, pick a license
    'Programming Language :: Python :: 3',      #Specify which pyhton versions that you want to support
    'Programming Language :: Python :: 3.4',
    'Programming Language :: Python :: 3.5',
    'Programming Language :: Python :: 3.6',
  ],
)
setup.cfg:
# Inside of setup.cfg
[metadata]
description-file = README.md
LICENSE.txt:
MIT License
Copyright (c) 2018 YOUR NAME
Permission is hereby granted, free of charge, to any person obtaining a copy
of this software and associated documentation files (the "Software"), to deal
in the Software without restriction, including without limitation the rights
to use, copy, modify, merge, publish, distribute, sublicense, and/or sell
copies of the Software, and to permit persons to whom the Software is
furnished to do so, subject to the following conditions:
The above copyright notice and this permission notice shall be included in all
copies or substantial portions of the Software.
THE SOFTWARE IS PROVIDED "AS IS", WITHOUT WARRANTY OF ANY KIND, EXPRESS OR
IMPLIED, INCLUDING BUT NOT LIMITED TO THE WARRANTIES OF MERCHANTABILITY,
FITNESS FOR A PARTICULAR PURPOSE AND NONINFRINGEMENT. IN NO EVENT SHALL THE
AUTHORS OR COPYRIGHT HOLDERS BE LIABLE FOR ANY CLAIM, DAMAGES OR OTHER
LIABILITY, WHETHER IN AN ACTION OF CONTRACT, TORT OR OTHERWISE, ARISING FROM,
OUT OF OR IN CONNECTION WITH THE SOFTWARE OR THE USE OR OTHER DEALINGS IN THE
SOFTWARE.
readme
上传
1.cd 到 setup.py所在的目录
2.现在,我们用下面的命令创建一个source distribution:
python setup.py sdist
twine upload dist/*
说明:
未安装twine运行
pip install twine
提示twine不是内部或外部命令:
python-m twine upload --repository dist/*
可以pip install 你的代码了
实列:
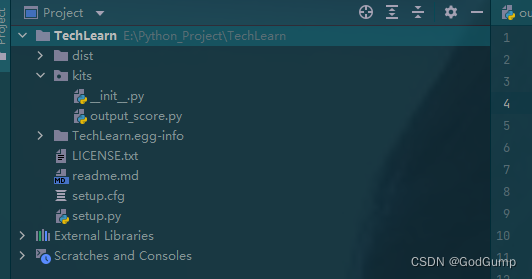
本人的项目结构(没有写的,是上传到pypi自动生成的):
setup内容:
from distutils.core import setup
setup(
  name = 'TechLearn',         # How you named your package folder
  packages = ['kits'],   # Chose the same as "name"
  version = '1.0',      # Start with a small number and increase it with every change you make
  license='MIT',        # Chose a license from here: https://help.github.com/articles/licensing-a-repository
  description = 'TYPE YOUR DESCRIPTION HERE',   # Give a short description about your library
  author = 'YOUR NAME',                   # Type in your name
  author_email = 'wzzhangzheyuan@163.com',      # Type in your E-Mail
  url = 'https://github.com/GodOn514/TechLearn',   # Provide either the link to your github or to your website
  download_url = 'https://codeload.github.com/GodOn514/TechLearn/zip/refs/heads/main',    # I explain this later on
  keywords = ['SOME', 'MEANINGFULL', 'KEYWORDS'],   # Keywords that define your package best
  install_requires=[            # I get to this in a second
          'validators',       # 可以加上版本号,如validators=1.5.1
          'beautifulsoup4',
      ],
  classifiers=[
    'Development Status :: 3 - Alpha',      # Chose either "3 - Alpha", "4 - Beta" or "5 - Production/Stable" as the current state of your package
    'Intended Audience :: Developers',      # Define that your audience are developers
    'Topic :: Software Development :: Build Tools',
    'License :: OSI Approved :: MIT License',   # Again, pick a license
    'Programming Language :: Python :: 3',      #Specify which pyhton versions that you want to support
    'Programming Language :: Python :: 3.4',
    'Programming Language :: Python :: 3.5',
    'Programming Language :: Python :: 3.6',
  ],
)
包的更新方法很多不一一列举了(以下为简单,但可能出证书问题的方法)
python setup.py sdist
twine upload dist/*
pip install XXX --upgrade


 582
582


 被折叠的 条评论
为什么被折叠?
被折叠的 条评论
为什么被折叠?
 到【灌水乐园】发言


