


文章目录
参考资料:https://www.bilibili.com/video/BV1fy4y1b7TC
上面 xiao bing 老师的视频讲的很详细,收获超级大
一、环境的搭建
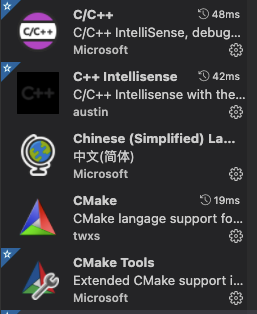
VSCode 和 CMake 从官网上下,然后 VSCode 中装几个插件,有很多教程的
mac 中编译C++要装 Xcode,然后默认的C++编译器就会变成clang,但是clang又不支持#include <omp.h>,所以要先装个gcc,装gcc前要装Homebrew
但是我安装了gcc 还是会出现不支持#include <omp.h>问题,目前未解决。
1、Homebrew 的安装与使用
Homebrew国内如何自动安装(国内地址):https://zhuanlan.zhihu.com/p/111014448
Homebrew介绍和使用:https://www.jianshu.com/p/de6f1d2d37bf
2、gcc 的安装
brew install gcc
按理说,该是这么安装的,但是会报错,根据错误提示安装,大致的命令可能是
brew install --build-from-source gcc@8
没有@8的话会默认安装最新版的gcc
二、软件的使用
1、VSCode
VSCode 界面分为四块:最上面、侧边栏、编辑栏、状态栏
侧边栏中有很多插件可以安装,进而实现不同的功能。这也是其强大之处。
它的使用还是自己动手多练习,实践出真知
2、CMakeLists.txt 语法
https://blog.csdn.net/afei__/article/details/81201039
上文讲的很详细,可认真学习下。

3、json 语法
launch.json 是调试用的,tasks.json是在launch.json中通过preLaunchTask项来控制,先于launch.json,可以做编译的工作。
官网地址:https://code.visualstudio.com/docs/cpp/launch-json-reference
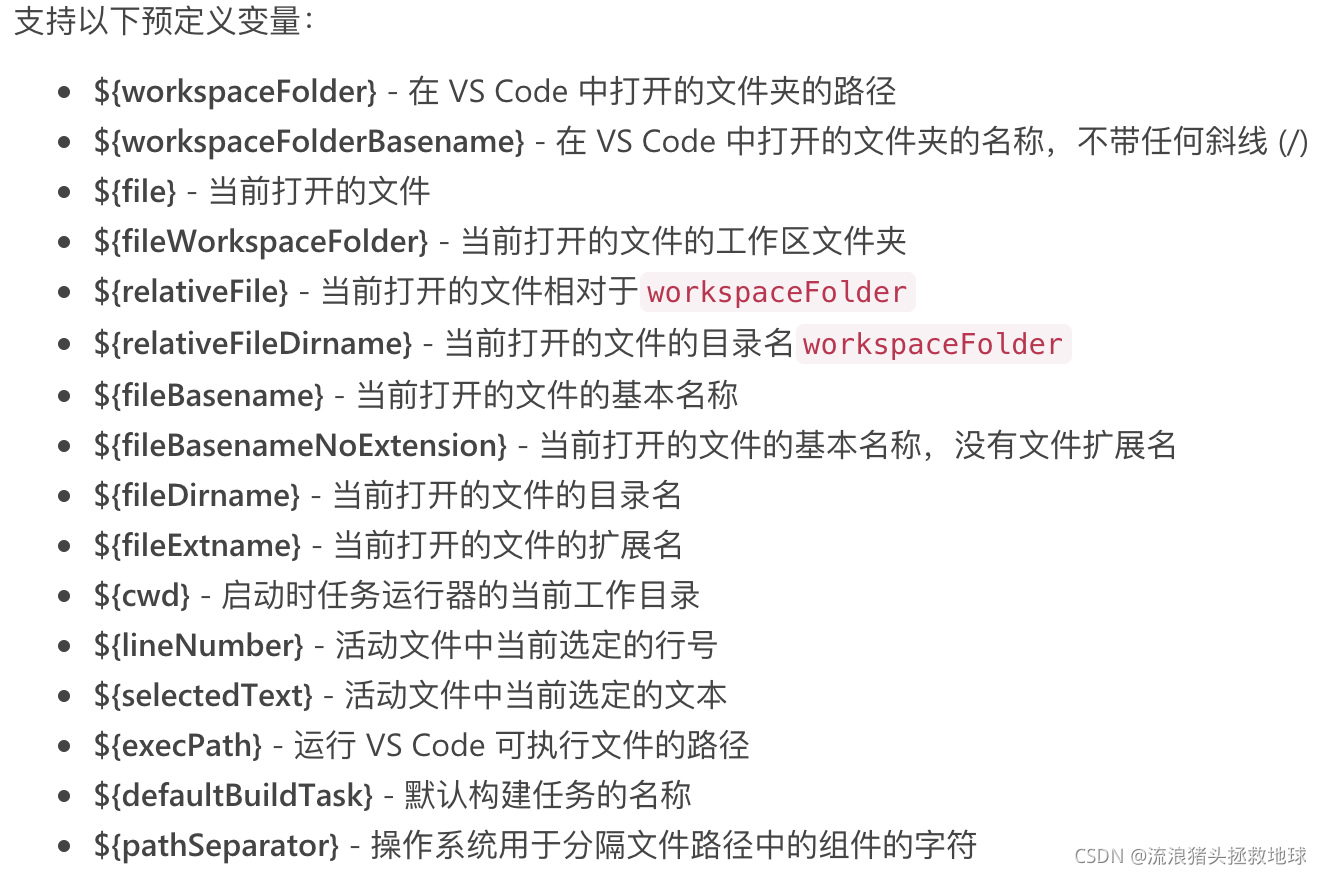
预定义变量说明:https://code.visualstudio.com/docs/editor/variables-reference
附:一个实例【来自文首视频教程】
1、所需文件结构及内容
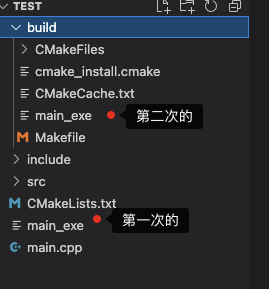
文件结构如下:
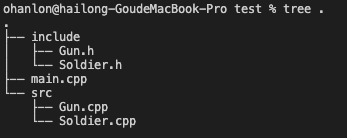
tree 命令可通过 brew 安装
brew install tree
这个例子中有两个类Gun、Soldier,Soldier 类中调用了Gun类。头文件放在include文件夹下,源文件放在src文件夹下,主文件是main.cpp。
各个文件的内容为:
Gun.h
#pragma once
#include <string>

class Gun
{
public:
    Gun(std::string type){
        this->_type= type;
        this->_bullet_count=0;
    }

    void addBullet(int bullet_num);
    bool shoot();
private:
    int _bullet_count;
    std::string _type;

};
Soldier.h
#pragma once

#include <string>
#include "Gun.h"

class Soldier
{
public:
    Soldier(std::string name);
    ~Soldier();
    bool addBulletToGun(int bullet_num);
    bool fire();
    void addGun(Gun *ptr_gun);

private:
    std::string _name;
    Gun *_ptr_gun;
};
Gun.cpp
#include "Gun.h"
#include <iostream>
using namespace std;

void Gun::addBullet(int bullet_num)
{
    this->_bullet_count += bullet_num;
}

bool Gun::shoot()
{
    if (this->_bullet_count <= 0)
    {
        cout << "Error[Gun::shoot]::There is no bullet!" << endl;
        return false;
    }
    this->_bullet_count -= 1;
    cout << "shoot!" << endl;
    return true;
}
Soldier.cpp
#include "Soldier.h"
#include <iostream>
using namespace std;

Soldier::Soldier(std::string name)
{
    this->_name = name;
    this->_ptr_gun = nullptr;
}

void Soldier::addGun(Gun *ptr_gun)
{
    this->_ptr_gun = ptr_gun;
}

bool Soldier::addBulletToGun(int bullet_num)
{
    if (this->_ptr_gun != nullptr)
    {
        this->_ptr_gun->addBullet(bullet_num);
    }
    else
    {
        cout << "Error[Soldier::addBulletToGun]::The Soldier hasn't a Gun!" << endl;
        return false;
    }
    return true;
}

bool Soldier::fire()
{
    if (!this->_ptr_gun->shoot())
    {
        cout << "Error[Soldier::fire]::The Soldier hasn't a bullet in the Gun!" << endl;
        return false;
    }
    else
    {
        return true;
    }
}

Soldier::~Soldier()
{
    if (this->_ptr_gun == nullptr)
    {
        return;
    }
    delete this->_ptr_gun;
    this->_ptr_gun = nullptr;
}
main.cpp
#include <iostream>
#include "Gun.h"
#include "Soldier.h"

using namespace std;

void test()
{
    Soldier sanduo("XuSanduo");
    sanduo.addBulletToGun(20);
    sanduo.addGun(new Gun("AK47"));
    sanduo.addBulletToGun(2);
    for (int i = 0; i < 3; i++)
    {
        sanduo.fire();
    }
}

int main()
{
    cout << "This is a test string..." << endl;
    test();
    return 0;
}
2、实现程序运行的几种方式
1. 终端上
首先cd到test所在目录,然后生成可执行文件main_exe
g++ main.cpp src/Gun.cpp src/Soldier.cpp -Iinclude -o main_exe
然后即可运行可执行文件,输出结果
2. 通过CMakeLists
在test目录新建文件CMakeLists.txt,输入
cmake_minimum_required(VERSION 3.0)

project(SOLDIER)

set(CMAKE_CXX_FLAGS "${CMAKE_CXX_FLAGS} -Wall")

set(CMAKE_BUILD_TYPE Debug)

include_directories(${CMAKE_SOURCE_DIR}/include)

add_executable(main_exe main.cpp src/Gun.cpp src/Soldier.cpp)
上面include_directories(${CMAKE_SOURCE_DIR}/include)就相当于-Iinclude,add_executable(main_exe main.cpp src/Gun.cpp src/Soldier.cpp)相当于g++ main.cpp src/Gun.cpp src/Soldier.cpp -o main_exe。
一般情况下,不会在最上层目录(这里是test)中直接cmake,一般会建一个文件夹build,在里面cmake
mkdir build
cd build
cmake ..
make
于是便在build文件夹下生成了可执行文件
3. 通过 lanunch.json 可设断点调试
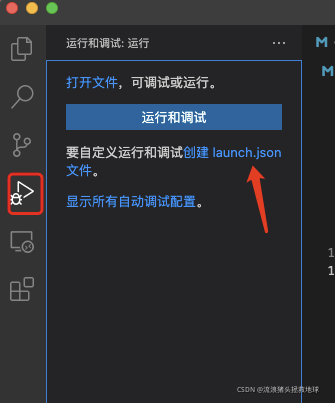
创建一个lanunch.json文件,里面内容为
{
    // 使用 IntelliSense 了解相关属性。
    // 悬停以查看现有属性的描述。
    // 欲了解更多信息,请访问: https://go.microsoft.com/fwlink/?linkid=830387
    "version": "0.2.0",
    "configurations": [
        {
            "name": "Test",
            "type": "cppdbg",
            "request": "launch",
            "program": "${workspaceFolder}/build/main_exe",
            "args": [],
            "stopAtEntry": false,
            "cwd": "${fileDirname}",
            "environment": [],
            "externalConsole": false,
            "MIMode": "lldb"
        }
    ]
}
值得注意的是,program指向的文件必须提前存在,也就是说,调试前需要先生成可执行文件。
上面这些配置的含义如下所示:
- name:调试过程的名字,不重要,自己认识就行
- type:调试类型,c++可用
cppdbg;python可用python - program:被调试的程序
- args:输入命令参数
- 后面这些可以查阅官网文件,因为笔者也是初学不知
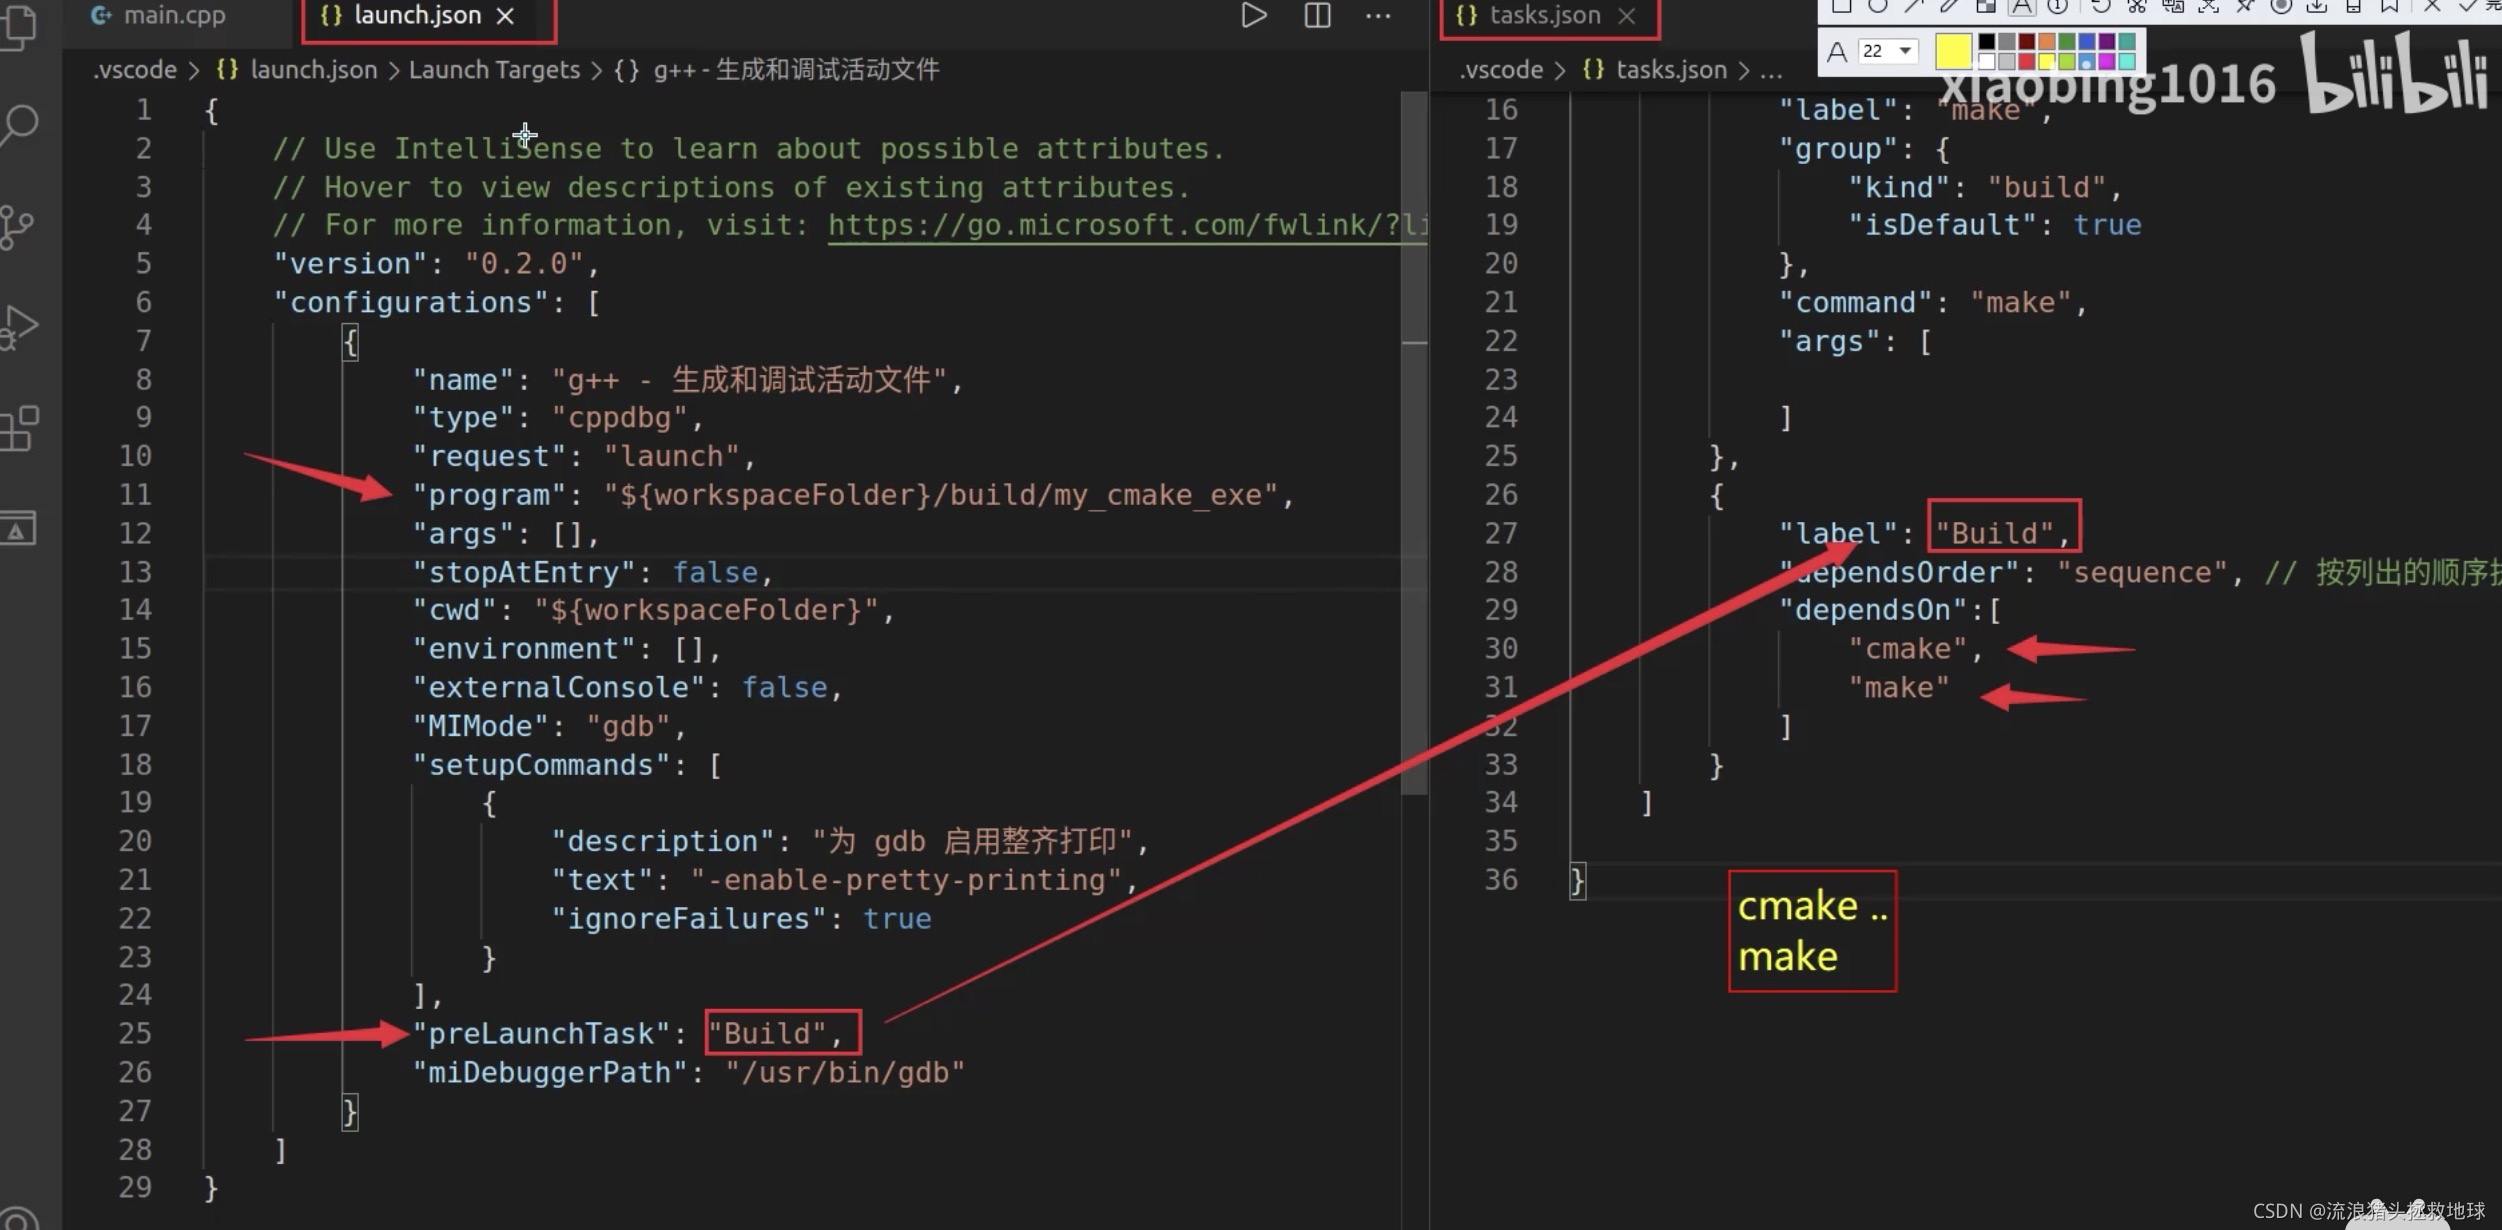
4. 通过 tasks.json 自动编译调试
点击【资源管理器】➡️【终端】➡️【配置默认生成任务…】创建tasks.json

launch.json 和 tasks.json 文件内容为
{
    // 使用 IntelliSense 了解相关属性。
    // 悬停以查看现有属性的描述。
    // 欲了解更多信息,请访问: https://go.microsoft.com/fwlink/?linkid=830387
    "version": "0.2.0",
    "configurations": [

        {
            "name": "Test",
            "type": "cppdbg",
            "request": "launch",
            "program": "${workspaceFolder}/build/main_exe",
            "args": [],
            "stopAtEntry": false,
            "cwd": "${fileDirname}",
            "environment": [],
            "externalConsole": false,
            "MIMode": "lldb",
            "preLaunchTask": "Build"
        }
    ]
}
加了关键一行"preLaunchTask": "Build",它是通过tasks.json文件来控制的
{
    // See https://go.microsoft.com/fwlink/?LinkId=733558
    // for the documentation about the tasks.json format
    "version": "2.0.0",
    "options": {
        "cwd": "${workspaceFolder}/build"
    },
    "tasks": [
        {
            "type": "shell",
            "label": "cmake",
            "command": "cmake",
            "args": [
                ".."
            ]
        },
        {
            "label": "make",
            "group": {
                "kind": "build",
                "isDefault": true
            },
            "command": "make",
            "args":[

            ]
        },
        {
            "label": "Build",
            "dependsOrder": "sequence",
            "dependsOn":[
                "cmake",
                "make"
            ]
        }
    ]
}
然后为了和前面显示出差别所在,将build文件夹中的东西都删除,然后F5运行,就可以自动编译,然后命中断点。


 4771
4771


 被折叠的 条评论
为什么被折叠?
被折叠的 条评论
为什么被折叠?
 到【灌水乐园】发言


