


缩放:
利用ffmpeg进行图像数据格式的转换以及图片的缩放应用中,主要用到了swscale.h文件中的三个函数,分别是:

  struct SwsContext *sws_getContext(int srcW, int srcH, enum AVPixelFormat srcFormat,
                               int dstW, int dstH, enum AVPixelFormat dstFormat,
                               int flags, SwsFilter *srcFilter,
                               SwsFilter *dstFilter, const double *param);
      int sws_scale(struct SwsContext *c, const uint8_t *const srcSlice[],
                     const int srcStride[], int srcSliceY, int srcSliceH,
                   uint8_t *const dst[], const int dstStride[]);
      void sws_freeContext(struct SwsContext *swsContext);
sws_getContext函数可以看做是初始化函数,它的参数定义分别为:
int srcW,int srcH 为原始图像数据的高和宽;
int dstW,int dstH 为输出图像数据的高和宽;
enum AVPixelFormat srcFormat 为输入和输出图片数据的类型;eg:AV_PIX_FMT_YUV420、PAV_PIX_FMT_RGB24;
int flags 为scale算法种类;eg:SWS_BICUBIC、SWS_BICUBLIN、SWS_POINT、SWS_SINC;
SwsFilter *srcFilter ,SwsFilter *dstFilter,const double *param 可以不用管,全为NULL即可;
sws_scale函数则为执行函数,它的参数定义分别为:
struct SwsContext *c 为sws_getContext函数返回的值;
const uint8_t *const srcSlice[],uint8_t *const dst[] 为输入输出图像数据各颜色通道的buffer指针数组;
const int srcStride[],const int dstStride[] 为输入输出图像数据各颜色通道每行存储的字节数数组;
int srcSliceY 为从输入图像数据的第多少列开始逐行扫描,通常设为0;
int srcSliceH 为需要扫描多少行,通常为输入图像数据的高度;
sws_freeContext函数为结束函数,它的参数即为sws_getContext函数返回的值;
做一个实际缩放YUV420函数打包实例如下:
int ScaleImg(AVCodecContext *pCodecCtx,AVFrame *src_picture,AVFrame *dst_picture,int nDstH ,int nDstW )
{
int i ;
int nSrcStride[3];
int nDstStride[3];
int nSrcH = pCodecCtx->height;
int nSrcW = pCodecCtx->width;
struct SwsContext* m_pSwsContext;


uint8_t *pSrcBuff[3] = {src_picture->data[0],src_picture->data[1], src_picture->data[2]};


nSrcStride[0] = nSrcW ;
nSrcStride[1] = nSrcW/2 ;
nSrcStride[2] = nSrcW/2 ;


dst_picture->linesize[0] = nDstW;
dst_picture->linesize[1] = nDstW / 2;
dst_picture->linesize[2] = nDstW / 2;


printf("nSrcW%d\n",nSrcW);


m_pSwsContext = sws_getContext(nSrcW, nSrcH, PIX_FMT_YUV420P,
nDstW, nDstH, PIX_FMT_YUV420P,
SWS_BICUBIC,
NULL, NULL, NULL);


if (NULL == m_pSwsContext)
{
printf("ffmpeg get context error!\n");
exit (-1);
}


sws_scale(m_pSwsContext, src_picture->data,src_picture->linesize, 0, pCodecCtx->height,dst_picture->data,dst_picture->linesize);


printf("line0:%d line1:%d line2:%d\n",dst_picture->linesize[0] ,dst_picture->linesize[1] ,dst_picture->linesize[2]);
sws_freeContext(m_pSwsContext);


return 1 ;
}
函数很简单,申请环境初始指针,后缩放即可。读到此文的朋友,这个函数可以直接拷贝使用哟。如果有疑问可以留言或者邮件:leoluopy@gmail.com
RGB的缩放可以参考下面:
int ScaleYUVImgToRGB(int nSrcW,int nSrcH ,uint8_t* src_data,int *linesize,int nDstW ,int nDstH )
{
    int i ; int ret ;  FILE *nRGB_file ;

    AVFrame *nDst_picture ;
    struct SwsContext* m_pSwsContext;

    nDst_picture = avcodec_alloc_frame();
    if (!nDst_picture){
        printf("nDst_picture avcodec_alloc_frame failed\n");
        exit(1);
    }
    if(avpicture_alloc((AVPicture *)nDst_picture,PIX_FMT_RGB24,nDstW, nDstH)<0){
        printf("dst_picture avpicture_alloc failed\n");
        exit(1);
    }
    m_pSwsContext = sws_getContext(nSrcW, nSrcH, PIX_FMT_YUV420P,
        nDstW, nDstH, PIX_FMT_RGB24,
        SWS_BICUBIC,
        NULL, NULL, NULL);

    if (NULL == m_pSwsContext)
    {
        printf("ffmpeg get context error!\n");
        exit (-1);
    }

    ret = sws_scale(m_pSwsContext, src_data,linesize, 0,nSrcH,nDst_picture->data,nDst_picture->linesize);

    nRGB_file = fopen("..\\YUV_STREAM\\RGBFile.rgb","ab+");
    fwrite(nDst_picture->data[0],nDstW*nDstH*3,1,nRGB_file);
    fclose(nRGB_file);

    sws_freeContext(m_pSwsContext);
    avpicture_free((AVPicture *)nDst_picture);

    return 0;
}
参数data 和 linesize 参考yuv平面指针即可。
同时如果不想使用AVPicture结构的话,可以参考下面的:(注意不同图像类型,linesize一定要写对)
char* H264Decoder_c::ScaleYUVImgToRGB(int nSrcW,int nSrcH ,uint8_t** src_data,int *linesize,int nDstW ,int nDstH )
{
    int i ; int ret ;  FILE *nRGB_file ;

    struct SwsContext* m_pSwsContext;
    char*  out_Img[3];
    int out_linesize[3];
    out_linesize[0] = 2*nDstW ; //out_linesize[1] = nDstW ;out_linesize[2] = nDstW ;
    out_Img[0] = g_RGBImg ;

    m_pSwsContext = sws_getContext(nSrcW, nSrcH, PIX_FMT_YUV420P,
        nDstW, nDstH, PIX_FMT_RGB565,
        SWS_BICUBIC,
        NULL, NULL, NULL);

    if (NULL == m_pSwsContext)
    {
        printf("ffmpeg get context error!\n");
        exit (-1);
    }

    ret = sws_scale(m_pSwsContext, src_data,linesize, 0,nSrcH,(uint8_t**)out_Img,out_linesize);
#if 0
    nRGB_file = fopen("./RGBFile.rgb","ab+");
    fwrite(out_Img[0],nDstW*nDstH*2,1,nRGB_file);
    fclose(nRGB_file);

#endif

    sws_freeContext(m_pSwsContext);

    return out_Img[0];
}
目的位图的空间申请:
注意:上面的缩放函数如果直接使用而在没有解码成功或者没有申请目的位图空间时,将报段错误。
原因:没有解码成功,位图源地址将是指向空的地址,目的位图地址同样。
申请目的位图的方式:
dst_picture = avcodec_alloc_frame();
if (!dst_picture){
return ;
}
if(avpicture_alloc((AVPicture *)dst_picture, c->pix_fmt,c->width*2, c->height*2)<0){
printf("dst_picture allocate failed\n");
exit(1);
}
初始化后即可以用于缩放了。
图像的内存Dump方法:
上文已经比较详细的阐述了ffmpeg的解码以及缩放原理及流程,然而在实际运用环境中,无论是从实时播放或者是从历史回放来看,我们需要的是像素位图,而不是ffmpeg的结构体。那么怎么转换呢?下文介绍了相关的内容。
作为实际运用环境中,像素位图格式,笔者使用的是比较常用的YUV格式。
编解码图像格式
YV12:
IYUV
http://blog.csdn.net/searchsun/article/details/2443867
如何Dump
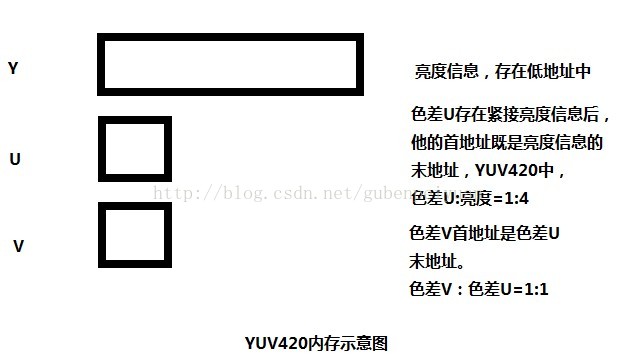
好了,对YUV格式又初步了解后,下面介绍如果导出这像素位图数据。ffmpeg将图像的亮度以及色差信息保存在AVFrame中的data[0]、data[1]、data[2]中。
详细参考:
AVFrame和AVPicture对比:
http://yul100887.blog.163.com/blog/static/200336135201211143525930/
所有操作均是针对这三个指针展开的,如下:
pgm_save(picture->data[0], picture->linesize[0], //Y
c->width, c->height, outfilename);
pgm_save(picture->data[1], picture->linesize[1],
c->width/2, c->height/2, outfilename); //U
pgm_save(picture->data[2], picture->linesize[2],
c->width/2, c->height/2, outfilename);  //V
void pgm_save(unsigned char *buf,int wrap, int xsize,int ysize,char *filename)
{
    FILE *f;
    int i;


f=fopen(filename,"ab+");


for(i=0;i<ysize;i++)
{
fwrite(buf + i * wrap, 1, xsize, f );
}
fclose(f);
}
代码对YUV三个像素通道分开dump,读者可以根据自己的需要对函数进行包装。data[0] 是亮度信息入口指针,同时传入图像长宽,以及存储内存区域行宽。 data[1] data[2] 类似。
最后需要注意的是:linesize总是容易被遗忘,livesize[0]=height ,livesize[1]=height/2 ,livesize[2]=height /2,
==================================================================================
原帖地址:http://blog.csdn.net/gubenpeiyuan/article/details/19548019?utm_source=tuicool
其参考地址:
参考文章:
使用ffmpeg进行图像格式转换及缩放
http://blog.csdn.net/skys_broyal/article/details/10337147
AVFrame和AVPicture对比:
http://yul100887.blog.163.com/blog/static/200336135201211143525930/
FFMPEG 实现 YUV,RGB各种图像原始数据之间的转换(swscale)
http://blog.csdn.net/leixiaohua1020/article/details/14215391


 746
746

 被折叠的 条评论
为什么被折叠?
被折叠的 条评论
为什么被折叠?
 到【灌水乐园】发言


