


目录
使用C 或 C++ 扩展 Python
本文介绍两种常见的C/C++扩展python的技术:python官方的API和开源社区贡献的pybind11; 最后结合pytorch的实例进行了原理分析。
Python API
关于python API更详细的官方说明文档 链接
代码示例与解析
//PyAPIExample.c

#include <Python.h>

//Step1: c function to do the application specific computation
int fact(int n)
{
  if (n <= 1)
    return 1;
  else
    return n * fact(n - 1);
}

//c function wrap
PyObject* wrap_fact(PyObject* self, PyObject* args)
{
  int n, result;

  //convert python caller parameters into c variable
  if (!PyArg_ParseTuple(args, "i:fact", &n))
    return NULL;
  result = fact(n);

  //construct PyObject to python program
  return Py_BuildValue("i", result);
}

//Step2:Construct method table to be called in python program
static PyMethodDef exampleMethods[] =
{
  {"fact", wrap_fact, METH_VARARGS, "Caculate N!"},
  {NULL, NULL}
};

//Step3:Construct Module definition to declare module name and method table
static struct PyModuleDef exampleModule = {
    PyModuleDef_HEAD_INIT,
    "PyAPIExample",   /* name of module */
    NULL, /* module documentation, may be NULL */
    -1,       /* size of per-interpreter state of the module,
                 or -1 if the module keeps state in global variables. */
    exampleMethods
};

//Step4: Declare Module initialization function PyInit_<module name> when loading by python interpreter
PyMODINIT_FUNC PyInit_PyAPIExample() {
    return PyModule_Create(&exampleModule);
}
从以上代码可以看到,通过python API扩展C/C++ 的实现有4步
- 需要扩展的C/C++业务逻辑代码
- 构造PyMethodDef的Method Table
- 构造PyModuleDef指定Module名字和Method Table,
- 构造被python解释器调用的初始化函数名字,该名字由PyModuleDef中的Module Name决定,即PyInit_<Module Name>
#CMakeLists.txt

cmake_minimum_required(VERSION 3.5)

project(pythonAPI_example)

############################################################
# Create a shared library
############################################################

set (CMAKE_C_FLAGS "${CMAKE_C_FLAGS} -fpic")

#Generate the shared library from the library sources
add_library(pyapi_example SHARED
    PyAPIExample.c
)

#indicate where to find Python.h header file
include_directories(/usr/local/include/python3.6/)
通过cmake编译后生成 libpyapi_example.so,通过objdump工具可以看到里面包含了会被python解释器装载so时候调用的PyInit_PyAPIExample
objdump -x libpyapi_example.so | grep PyInit_PyAPIExample
000000000000096a g F .text 0000000000000017 PyInit_PyAPIExample
使用下面的python程序测试结果
from ctypes import cdll

myLib = cdll.LoadLibrary("path/to/libpyapi_example.so")

myLib.fact(10)

3628800
pybind11
pybind11是个head-only的库,如果说python API主要是面向C的编程模型,那么pybind11通过很多C++的奇淫巧技成功把python API包装成了面向C++的编程模型
编译与安装
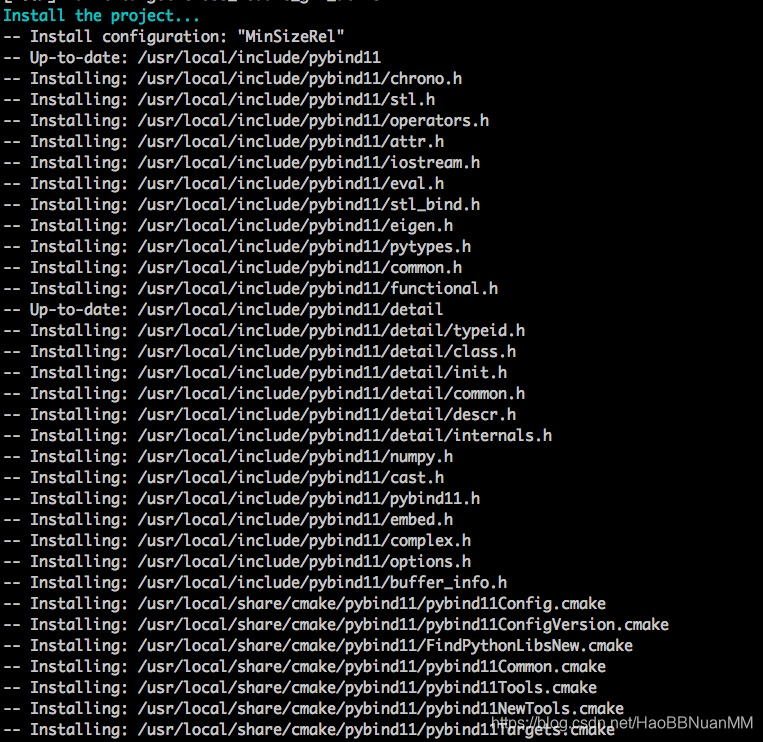
pybind11 source code下载链接;如上图所示,cmake 编译后make install安装pybind11,安装到/usr/local下面的只有头文件和其它基于cmake项目中如果依赖pybind11那么在CMakeLists.txt中find_package(pybind11 CONFIG REQUIRED)依赖的cmake文件
代码示例与解析
//Pybind11Example.cpp

#include <pybind11/pybind11.h>
namespace py = pybind11;

//Module init function PyInit_<module name> when loading by python interpreter
//this module name is pybind11_example
PYBIND11_MODULE(pybind11_example, m) {
    m.def("add", [](int i, int j) { return i + j; });
相比python API的四步操作,pybind11扩展C/C++的代码实在是很简洁,此处只需要注意Module的初始化函数的名字依然是PyInit_<module name> ,此处的module name由PYBIND11_MODULE宏的第一个参数指定,后面会继续分析这个神奇的PYBIND11_MODULE 宏定义
#CMakeLists.txt

cmake_minimum_required(VERSION 3.5)

project(pybind11_example)

############################################################
# Create a pybind11 library
############################################################

set (CMAKE_CXX_FLAGS "${CMAKE_CXX_FLAGS} -fpic")

#find pybind11 installation
find_package(pybind11 CONFIG REQUIRED)
message(STATUS "Found pybind11 v${pybind11_VERSION}: ${pybind11_INCLUDE_DIRS}")

#Generate the pybind11 module from the library sources
pybind11_add_module(pybind11_example Pybind11Example.cpp)

include_directories(${pybind11_INCLUDE_DIRS})
target_link_libraries(pybind11_example PRIVATE pybind11::module)
通过cmake编译后生成 pybind11_example.cpython-36m-x86_64-linux-gnu.so,通过objdump工具可以看到里面包含了会被python解释器装载so时候调用的PyInit_pybind11_example
objdump -x pybind11_example.cpython-36m-x86_64-linux-gnu.so | grep -i pyini
0000000000018aae g F .text 00000000000001c6 PyInit_pybind11_example
使用下面的python程序测试结果
import pybind11_example

pybind11_example.add(1,3)

4
PYBIND11_MODULE分析
这个宏以及它依赖的几个宏都定义在<pybind11 source code>/include/pybind11/detail/common.h
#define PYBIND11_MODULE(name, variable)                                        \
    static ::pybind11::module_::module_def                                     \
        PYBIND11_CONCAT(pybind11_module_def_, name) PYBIND11_MAYBE_UNUSED;     \
    PYBIND11_MAYBE_UNUSED                                                      \
    static void PYBIND11_CONCAT(pybind11_init_, name)(::pybind11::module_ &);  \
    PYBIND11_PLUGIN_IMPL(name) {                                               \
        PYBIND11_CHECK_PYTHON_VERSION                                          \
        PYBIND11_ENSURE_INTERNALS_READY                                        \
        auto m = ::pybind11::module_::create_extension_module(                 \
            PYBIND11_TOSTRING(name), nullptr,                                  \
            &PYBIND11_CONCAT(pybind11_module_def_, name));                     \
        try {                                                                  \
            PYBIND11_CONCAT(pybind11_init_, name)(m);                          \
            return m.ptr();                                                    \
        } PYBIND11_CATCH_INIT_EXCEPTIONS                                       \
    }                                                                          \
    void PYBIND11_CONCAT(pybind11_init_, name)(::pybind11::module_ &variable)


#define PYBIND11_CONCAT(first, second) first##second

#define PYBIND11_PLUGIN_IMPL(name) \
    extern "C" PYBIND11_MAYBE_UNUSED PYBIND11_EXPORT PyObject *PyInit_##name(); \
    extern "C" PYBIND11_EXPORT PyObject *PyInit_##name()

#define PYBIND11_EXPORT __attribute__ ((visibility("default")))
直接看这个宏的声明理解起来有点费力,通过gcc工具链展开示例程序中的PYBIND11_MODULE宏
g++ -I/usr/local/include -I/usr/local/include/python3.6 -std=c++11 -E ./Pybind11Example.cpp > Pybind11Example.txtstatic ::pybind11::module_::module_def pybind11_module_def_pybind11_example __attribute__ ((__unused__));
__attribute__ ((__unused__)) static void pybind11_init_pybind11_example(::pybind11::module_ &);
extern "C" __attribute__ ((__unused__)) __attribute__ ((visibility("default"))) PyObject *PyInit_pybind11_example();
extern "C" __attribute__ ((visibility("default"))) PyObject *PyInit_pybind11_example() {
{
const char *compiled_ver = "3"".""6";
const char *runtime_ver = Py_GetVersion();
size_t len = std::strlen(compiled_ver);
if (std::strncmp(runtime_ver, compiled_ver, len) != 0 || (runtime_ver[len] >= '0' && runtime_ver[len] <= '9'))
{
PyErr_Format(PyExc_ImportError, "Python version mismatch: module was compiled for Python %s, " "but the interpreter version is incompatible: %s.", compiled_ver, runtime_ver);
return nullptr;
}
}
pybind11::detail::get_internals();
auto m = ::pybind11::module_::create_extension_module(
"pybind11_example"
, nullptr,
&pybind11_module_def_pybind11_example);
try {
pybind11_init_pybind11_example(m);
return m.ptr();
} catch (pybind11::error_already_set &e)
{
PyErr_SetString(PyExc_ImportError, e.what());
return nullptr;
} catch (const std::exception &e)
{
PyErr_SetString(PyExc_ImportError, e.what());
return nullptr; }
}
void pybind11_init_pybind11_example(::pybind11::module_ &m) {
m.def("add", [](int i, int j) { return i + j; });
}
从宏的展开就可以看到几个关键点
- 生成python解释器装载so的时候会调用的入口函数PyInit_pybind11_example
- PyInit_pybind11_example创建了pybind11::module对象示例m
- 调用pybind11_init_pybind11_example将我们扩展的C/C++函数作为m.def调用的参数传入
- 在<pybind11 source code/include/pybind11/pybind11.h中我们有看到了熟悉的python API实现了m.def
    using module_def = PyModuleDef;
...

    /** \rst
        Create a new top-level module that can be used as the main module of a C extension.

        For Python 3, ``def`` should point to a staticly allocated module_def.
        For Python 2, ``def`` can be a nullptr and is completely ignored.
    \endrst */
    static module_ create_extension_module(const char *name, const char *doc, module_def *def) {
...
        // module_def is PyModuleDef
        def = new (def) PyModuleDef {  // Placement new (not an allocation).
            /* m_base */     PyModuleDef_HEAD_INIT,
            /* m_name */     name,
            /* m_doc */      options::show_user_defined_docstrings() ? doc : nullptr,
            /* m_size */     -1,
            /* m_methods */  nullptr,
            /* m_slots */    nullptr,
            /* m_traverse */ nullptr,
            /* m_clear */    nullptr,
            /* m_free */     nullptr
        };
        auto m = PyModule_Create(def);
...
pytorch 扩展
源码下载 链接,编译安装后通过TORCH_LIBRARY可以扩展C/C++实现到python
示例代码分析
//pytorchExtExample.cpp

#include <torch/script.h>
#include <opencv2/opencv.hpp>

torch::Tensor warp_perspective(torch::Tensor image, torch::Tensor warp) {
  // BEGIN image_mat
  cv::Mat image_mat(/*rows=*/image.size(0),
                    /*cols=*/image.size(1),
                    /*type=*/CV_32FC1,
                    /*data=*/image.data_ptr<float>());
  // END image_mat

  // BEGIN warp_mat
  cv::Mat warp_mat(/*rows=*/warp.size(0),
                   /*cols=*/warp.size(1),
                   /*type=*/CV_32FC1,
                   /*data=*/warp.data_ptr<float>());
  // END warp_mat

  // BEGIN output_mat
  cv::Mat output_mat;
  cv::warpPerspective(image_mat, output_mat, warp_mat, /*dsize=*/{8, 8});
  // END output_mat

  // BEGIN output_tensor
  torch::Tensor output = torch::from_blob(output_mat.ptr<float>(), /*sizes=*/{8, 8});
  return output.clone();
  // END output_tensor
}

//It's pretty much like PYBIND11_MODULE usage except that it constructs static init function and variable with module name
TORCH_LIBRARY(my_ops, m) {
  m.def("warp_perspective", warp_perspective);
}
#CMakeLists.txt
cmake_minimum_required(VERSION 3.1 FATAL_ERROR)
project(warp_perspective)
find_package(Torch REQUIRED)
find_package(OpenCV REQUIRED)
# Define our library target
add_library(warp_perspective SHARED pytorchExtExample.cpp)
# Enable C++11
#target_compile_features(warp_perspective PRIVATE cxx_std_14)
set(CMAKE_CXX_FLAGS "${CMAKE_CXX_FLAGS} -std=c++11")
# Link against LibTorch
target_link_libraries(warp_perspective "${TORCH_LIBRARIES}")
# Link against OpenCV
target_link_libraries(warp_perspective opencv_core opencv_imgproc)通过cmake编译连接后生成libwarp_perspective.so,使用下面的python测试代码可以验证扩展的C/C++程序
import torch

mylib = torch.ops.load_library("path/to/libwarp_perspective.so")

torch.ops.my_ops.warp_perspective

<function torch._ops.my_ops.PyCapsule.warp_perspective>
TORCH_LIBRARY分析
TORCH_LIBRARY的设计和实现都借签了PYBIND11_MODULE的思想,它的定义和依赖在<pytorch source code>/torch/include/torch/library.h
#define TORCH_LIBRARY(ns, m) \
  static void TORCH_LIBRARY_init_ ## ns (torch::Library&); \
  static torch::detail::TorchLibraryInit TORCH_LIBRARY_static_init_ ## ns ( \
    torch::Library::DEF, \
    &TORCH_LIBRARY_init_ ## ns, \
    #ns, c10::nullopt, __FILE__, __LINE__ \
  ); \
  void TORCH_LIBRARY_init_ ## ns (torch::Library& m)

...

class TorchLibraryInit final {
private:
  using InitFn = void(Library&);
  Library lib_;
public:
  TorchLibraryInit(Library::Kind kind, InitFn* fn, const char* ns, c10::optional<c10::DispatchKey> k, const char* file, uint32_t line)
    : lib_(kind, ns, k, file, line) {
    fn(lib_);
  }
};
通过gcc工具展开示例代码的宏定义
g++ -I/usr/local/include -std=c++14 -E pytorchExtExample.cpp > pytorchExtExample.txtstatic void TORCH_LIBRARY_init_my_ops (torch::Library&);
static torch::detail::TorchLibraryInit TORCH_LIBRARY_static_init_my_ops ( torch::Library::DEF, &TORCH_LIBRARY_init_my_ops,
"my_ops", c10::nullopt, "myTestOp.cpp", 68 );
void TORCH_LIBRARY_init_my_ops (torch::Library& m)
{
m.def("warp_perspective", warp_perspective);
}可以看到TORCH_LIBRARY的实现有几个关键点
- 声明和定义了static TORCH_LIBRARY_init_<module name> 初始化函数,其中module name是my_ops
- 声明和定义了static TORCH_LIBRARY_static_<module name>变量,其中module name是my_ops,它在libwarp_perspective.so被装载后触发构造函数进而调用了TORCH_LIBRARY_init_my_ops执行了扩展算子注册到pytorch的流程
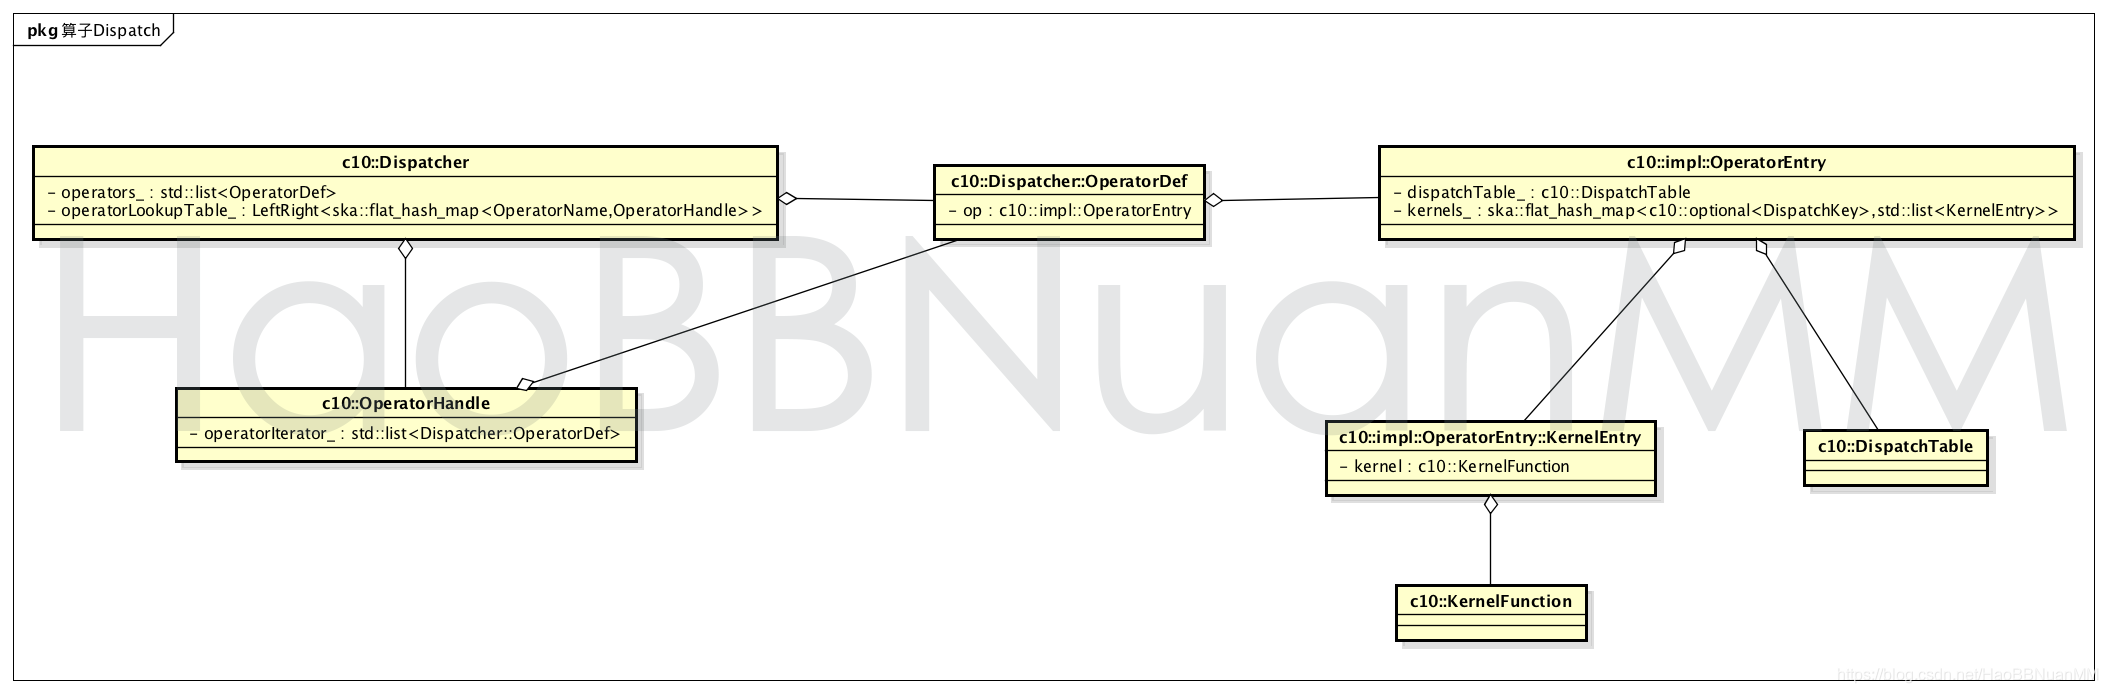
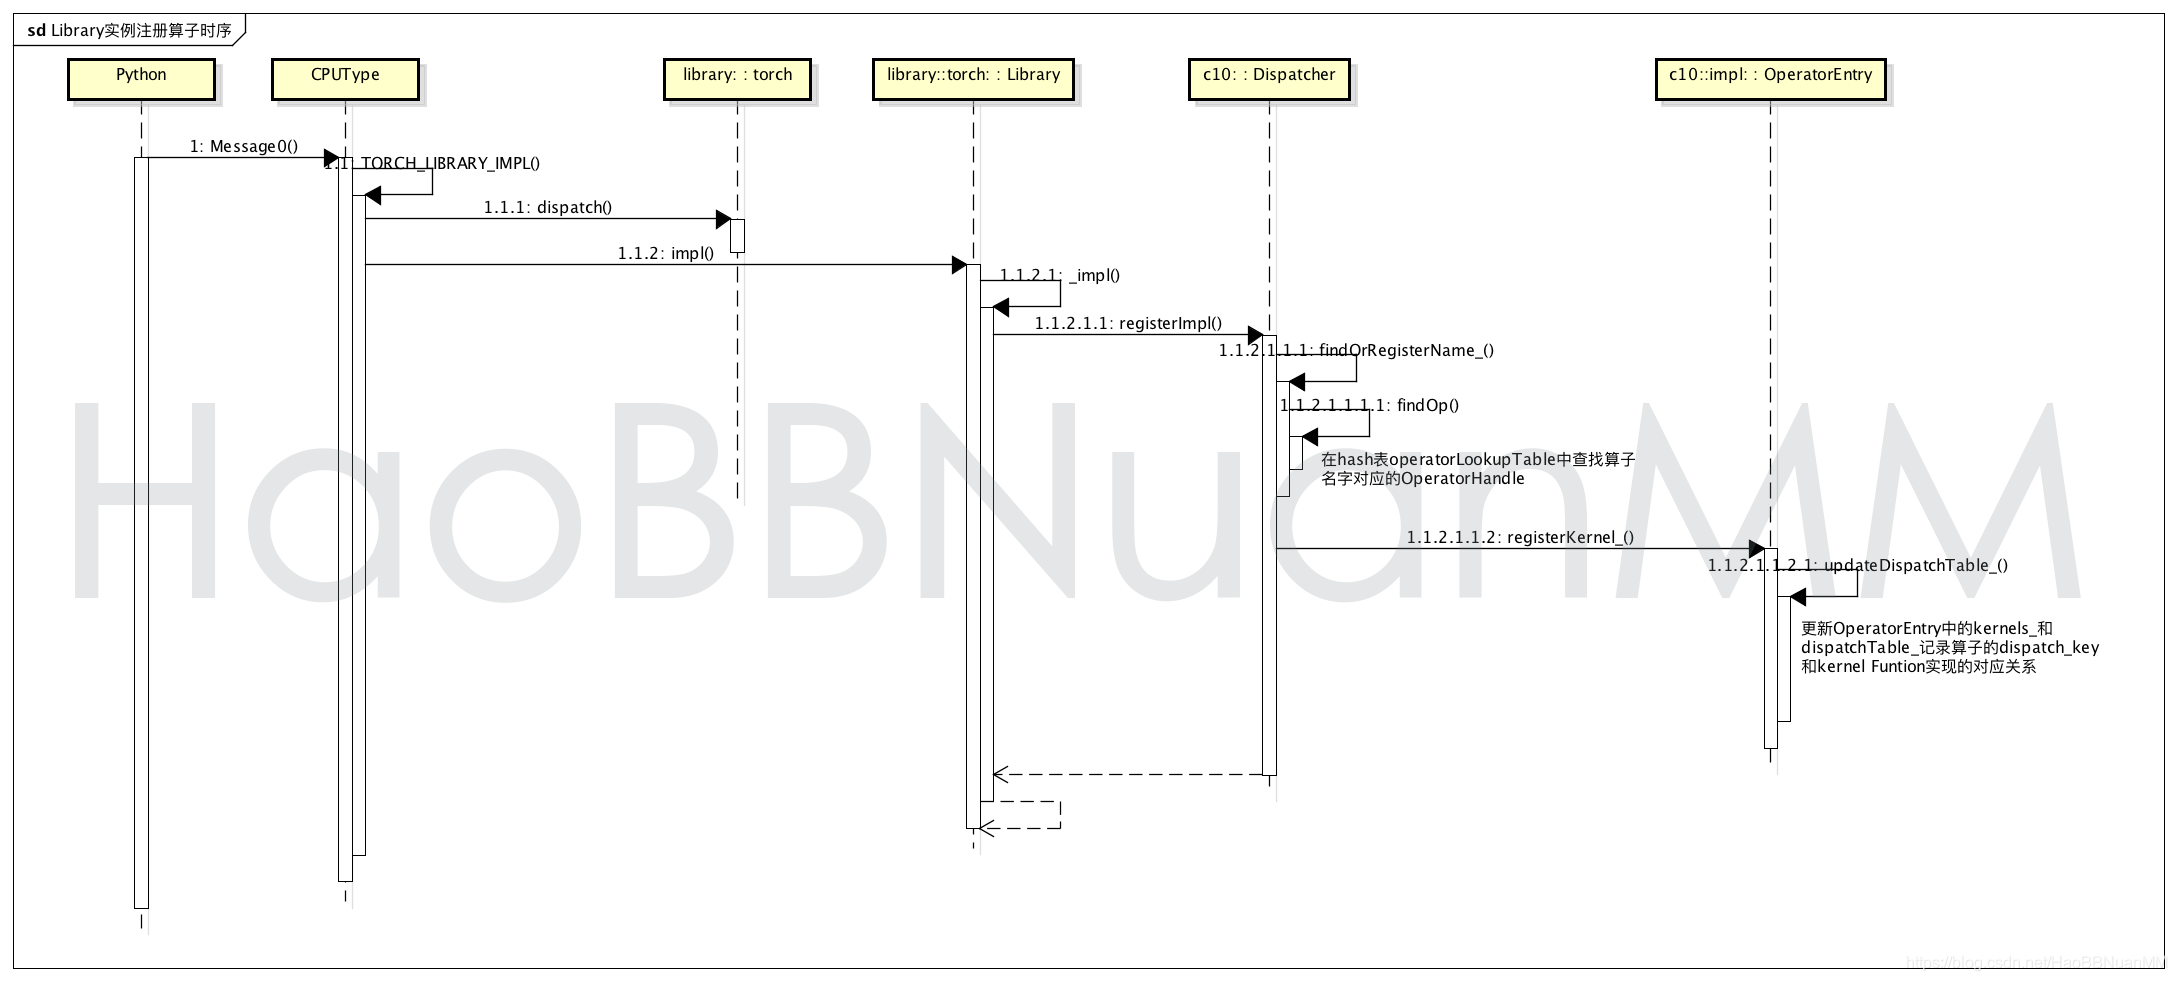
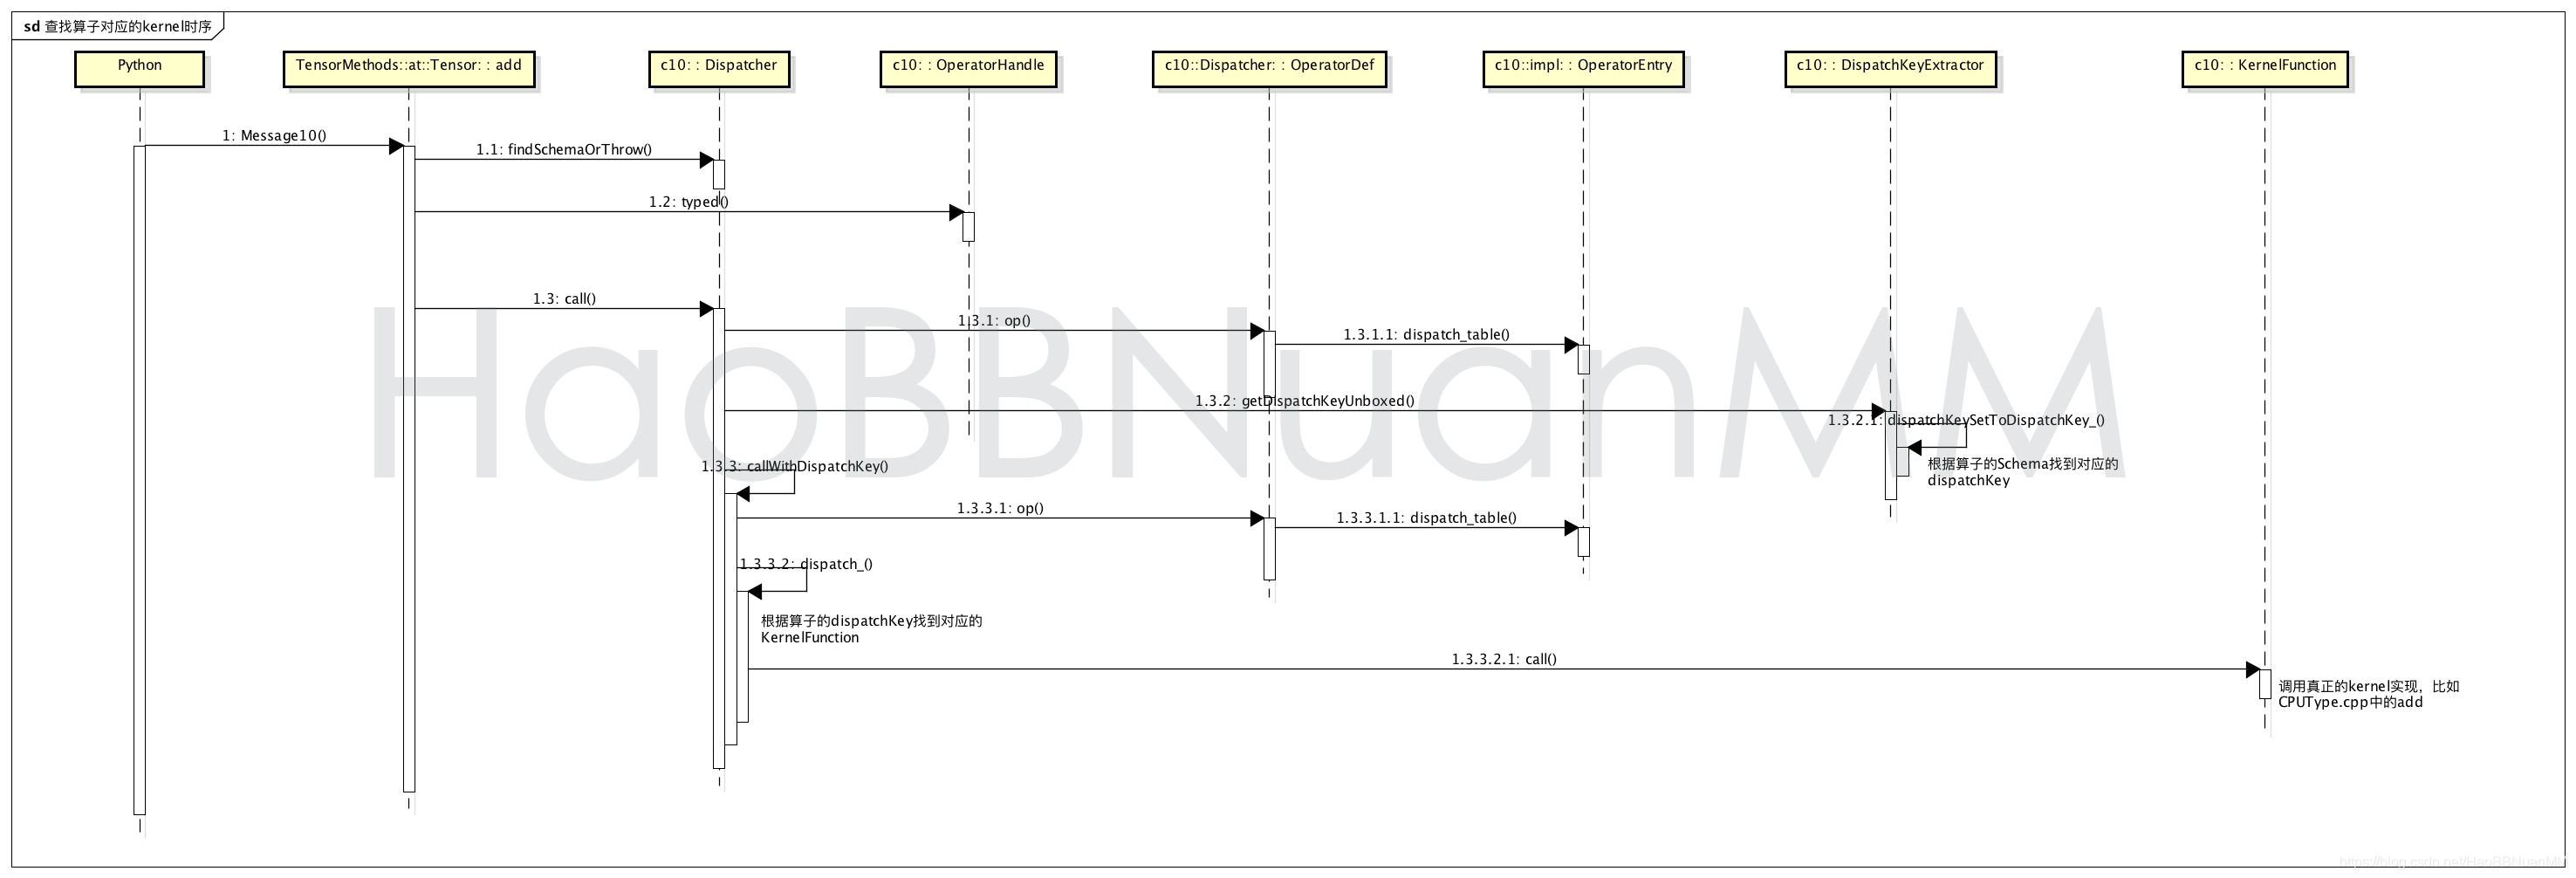
pytorch算子注册与派发


 4万+
4万+

 被折叠的 条评论
为什么被折叠?
被折叠的 条评论
为什么被折叠?
 到【灌水乐园】发言


