


注:本文使用的语言是Python3
程序引入包
import cv2
import selectivesearch
import matplotlib.pyplot as plt
import matplotlib.patches as mpatches
import numpy as np
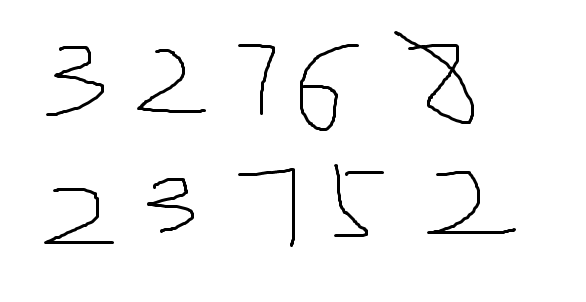
原始图片为拿画板随便写的几个数字
第一步操作:执行搜索工具,展示搜索结果
image2="images/test2.png"
#用cv2读取图片
img = cv2.imread(image2,cv2.IMREAD_UNCHANGED)
#白底黑字图 改为黑底白字图
img=255-img


'''selectivesearch 调用selectivesearch函数 对图片目标进行搜索
#Parameters
----------
    im_orig : 类型ndarray
        Input image
        输入图片
    scale : int
        Free parameter. Higher means larger clusters in felzenszwalb segmentation.
        自由参数。在felzenszwalb分割中,较高的聚类数意味着较大的聚类数。
    sigma : float
        Width of Gaussian kernel for felzenszwalb segmentation.
        用于felzenszwalb分割的高斯核宽度。
    min_size : int
        Minimum component size for felzenszwalb segmentation.
        felzenszwalb分割的最小分量大小
'''
img_lbl, regions =selectivesearch.selective_search(img, scale=500, sigma=0.9, min_size=20)
print (regions[0])
print (len(regions)) #共搜索到199个区域
# 接下来我们把窗口和图像打印出来,对它有个直观认识
fig, ax = plt.subplots(ncols=1, nrows=1, figsize=(6, 4))
ax.imshow(img)
for reg in regions:
    x, y, w, h = reg['rect']
    rect = mpatches.Rectangle((x, y), w, h, fill=False, edgecolor='red', linewidth=1)
    ax.add_patch(rect)
plt.show()
搜索完成后展示所有搜索窗

第二步操作:过滤掉冗余的窗口
#1)第一次过滤
candidates = []
for r in regions:
    # 重复的不要
    if r['rect'] in candidates:
        continue
    # 太小和太大的不要
    if r['size'] < 200 or r['size']>20000:
        continue
    x, y, w, h = r['rect']
    # 太不方的不要
    if w / h > 1.5 or h / w > 2.0:  #根据实际情况调整
        continue
    candidates.append((x,y,w,h))

##('len(candidates)', 34) 一次过滤后剩余34个窗
print ('len(candidates)',len(candidates))
#2)第二次过滤 大圈套小圈的目标 只保留大圈
num_array=[]
for i in candidates:
    if len(num_array)==0:
        num_array.append(i)
    else:
        content=False
        replace=-1
        index=0
        for j in num_array:
            ##新窗口在小圈 则滤除
            if i[0]>=j[0] and i[0]+i[2]<=j[0]+j[2] and i[1]>=j[1] and i[1]+i[3]<=j[1]+j[3]:
                content=True
                break
            ##新窗口不在小圈 而在老窗口外部 替换老窗口
            elif i[0]<=j[0] and i[0]+i[2]>=j[0]+j[2] and i[1]<=j[1] and i[1]+i[3]>=j[1]+j[3]:
                replace=index
                break
            index+=1
        if not content:
            if replace>=0:
                num_array[replace]=i
            else:
                num_array.append(i)
#窗口过滤完之后的数量
len=len(num_array)
#二次过滤后剩余10个窗
print('len====',len)
#3)对过滤完的窗口进行展示
fig, ax = plt.subplots(ncols=1, nrows=1, figsize=(6, 4))
ax.imshow(img)
for x, y, w, h in num_array:
    rect = mpatches.Rectangle(
    (x, y), w, h, fill=False, edgecolor='red', linewidth=1)
    ax.add_patch(rect)
plt.show()
过滤完成后剩余10个窗口

第三步操作:顺序提取图片上的数字
#搜索完后的窗口,上下是有序的 左右是无序的,所以上下分别进行排序 并合并
L1=num_array[0:len//2]  #上边5个数字
L2=num_array[len//2:]   #下边5个数字
L1.sort(key=lambda  x:x[0])  ##上半部分排序
print ('sorted L1==',L1)
L2.sort(key=lambda x:x[0])   ##下半部分排序
print('sorted L2',L2)
L1.extend(L2)
print ("最终筛选后的窗口是:",L1)
#提取窗口图片后转化为28*28的标准图
Width=28
Height=28
#横向图片数组
img_sample = np.zeros((len, Width*Height))
i = 0
##数字截取、方块补全、统一resize 28X28
for rect in L1:
    x, y, w, h = rect
    #大图中截图窗口图片
    img_cut = img[y :y+h, x:x +w,:]
    #截取后的小图添加padding 生成方形图
    if w > h:
        real_size=w
    else:
        real_size=h
    top_padding=(real_size - h) // 2
    left_padding=(real_size - w)//2
    #加padding方法
    img_cut = cv2.copyMakeBorder(img_cut,top_padding,top_padding,left_padding,left_padding,borderType=cv2.BORDER_REPLICATE)
    #把方形图 压缩成28*28的图
    img_resize = cv2.resize(img_cut, (Width, Height), interpolation=cv2.INTER_NEAREST)
    #压缩后的图转化成灰度图
    gray = cv2.cvtColor(img_resize, cv2.COLOR_BGR2GRAY)
    #生成的小图保存到本地
    cv2.imwrite('images/img_'+str(i)+'.png',gray)
    #生成的小图展平 放到img_sample里
    img_sample[i, :] = gray.ravel()
    i += 1

#把转换后的数据用长图来显示
img_s = np.zeros((Width, Height * img_sample.shape[0]))
for i in range(img_sample.shape[0]):
    img_s[:, i * Width:Height * (i + 1)] =img_sample[i, :].reshape(Width, Height)
fig, ax = plt.subplots(ncols=1, nrows=1, figsize=(6, 2))
ax.imshow(img_s, cmap='gray')
plt.savefig("images/number.jpg", bbox_inch="tight")
plt.show()
顺序提取结果展示:

注:接下来可以使用训练好的模型来识别这些提取出来的图片,例如mnist数据集的训练模型。
完整代码github地址:https://github.com/18600130137/selective_search.git


 334
334


 被折叠的 条评论
为什么被折叠?
被折叠的 条评论
为什么被折叠?
 到【灌水乐园】发言


