


The Breakout Game
Alright, this chapter talked a lot about helper classes and it is finally time to put them to some use. I will skip the concept phase here and basically just say that Breakout is an abbreviation of Pong for just one player to play against a wall of blocks. Breakout was initially created by Nolan Bushnell and Steve Wozniak and released by Atari in 1976. In this early version it was just a black and white game like Pong, but to make it more “exciting” transparent stripes were placed over the monitor to color the blocks (see Figure 3-13).
好了,这一章讲了这么多关于辅助类的东西,现在是时候将其赋予使用了。现在我会掠过游戏的概念阶段,因为这个游戏只是一个Pong的简化版,一个单人游戏,对抗一个由砖块组成的墙。Breakout最先是由Nolan Bushnell发明的,由Atari在1976年发布。在早期的版本中这就像Pong一样是黑白游戏,但是为了让它“更令人激动”,使用了彩色。
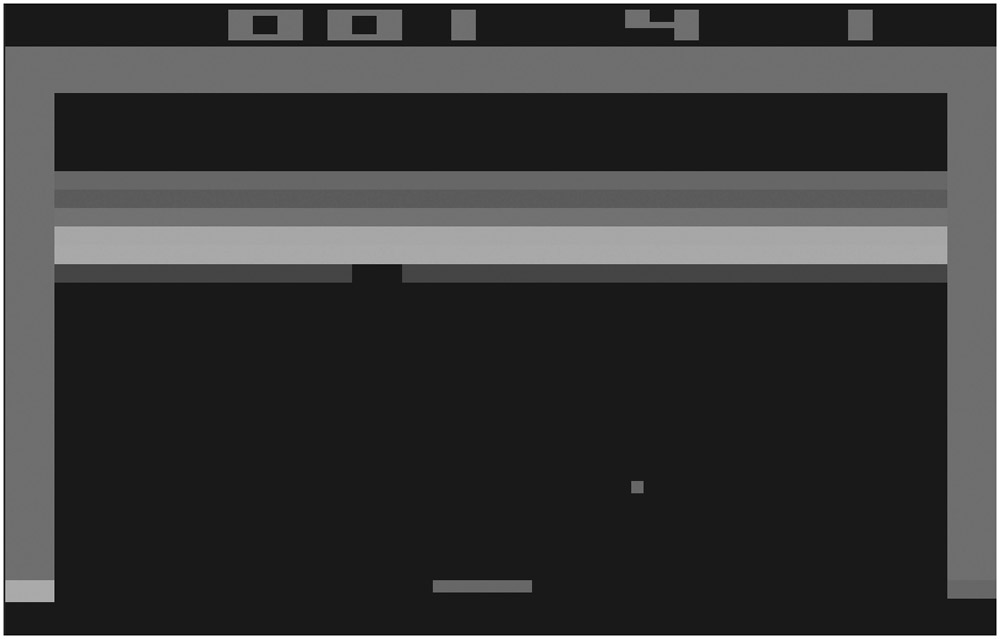
Figure 3-13
You will actually go a similar road by reusing some of the Pong components and using the helper classes you learned about in this chapter. Breakout is a more complex game than Pong; it can have many levels and can be improved quite a lot. For example, Arkanoid is a clone of Breakout and there were many games in the 1980s and 1990s that still used this basic game idea and added weapons, better graphic effects, and many levels with different block placements.
在这个游戏中,你要复用一些Pong的组件和使用在本章中学到的辅助类。Breakout比Pong更复杂;它可以有很多级别还可以更多的改进。例如,Arkanoid就是Breakout的一个克隆版,在二十世纪八九十年代还在使用基本的游戏思想,并且添加了武器,更好的图像效果,
As you can see in Figure 3-14, the BreakoutGame class is structured in a similar way to the Pong class from the last chapter. The sprite handling is missing because it is done now with help of the SpriteHelper class. Some other internal methods and calls are also replaced by some of the helper classes. For example, StartLevel generates a random new level based on the level value, and to generate the random values you will use the RandomHelper class.
从图3-14可以看出,BreakoutGame类的构造与上一章的Pong类相似。但是没有精灵操作,因为现在这个操作由SpriteHelper类完成。其他内部的方法和调用也被一些辅助类所替代。例如StartLevel用来根据游戏等级值来生成一个随机的新等级,RandomHelper类用来产生一个随机值。
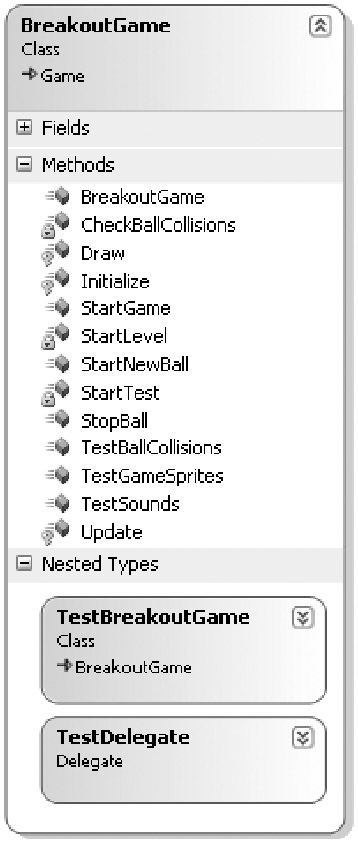
Figure 3-14
Please also note that many test methods are visible in the class. This will be improved similar to the helper classes in the next chapter, which introduces the BaseGame and TestGame classes that make handling the game class and especially unit testing a lot easier and more organized.
请注意在类里面有很多测试方法。这些将在下一章里改进成为辅助类,现在介绍BaseGame和TestGame类,来操作游戏类特别是让单元测试更简单,更有组织。
Take a look at Figure 3-15 for a quick overview of the Breakout game you are going to develop in the next few pages. It is quite a lot of fun and certainly has a greater replay value than Pong, which is only fun with two human players anyway. The Breakout game uses the same background texture and the two sound files from the Pong project, but you also add a new texture (BreakoutGame.png) for the paddle, ball, and blocks and you have new sounds for winning a level (BreakoutVictory.wav) and for destroying blocks (BreakoutBlockKill.wav).
看看图3-15的游戏,这就是你即将要开发的Breakout游戏。它非常有趣。Breakout使用和Pong项目相同的背景纹理和其中两个声音文件,但是你还需要为挡板、球和砖块添加一个新的纹理(BreakoutGame.png),一个当你赢得一关播放的声音文件(BreakoutVictory.wav)和打破砖块的效果音(BreakoutBlockKill.wav)

Figure 3-15
Unit Testing in Breakout
Before you start copying and pasting code over from the last project, using your new helper classes, and drawing the new game elements, you should think about the game and the problems you might run into. Sure you can just go ahead and implement the game, but it will be much harder to test the collisions, for example, which are the hardest part of this game. The unit tests help you out and provide you with an easy way to at least check all the basic parts of your game, and they also help you to organize your code and force you to program only what is really required. As always start with the most obvious part of the game and unit test it, then add more unit tests until you are done, and finally put everything together and test the final game.
在你开始复制粘贴最后一个项目的代码和使用新的辅助类之、绘制新的游戏元素之前,你应该考虑你可能遇到的游戏问题。确信你能继续改进游戏,但是碰撞测试会更难,这是这个游戏最难的一部分。单元测试会帮助你并为你提供一个简单的方法来检测游戏的基础部分,它们同样也会帮助你组织你的代码让你更关注编写真正需要的。如同往常开始游戏最明显的部分并测试一样,接着要添加更多的单元测试,最后把所有一切放在一起并做最终测试。
Here is a quick overview of the unit tests for the Breakout game; check the full source code for this chapter for more details. You don’t have the TestGame class yet, so you still use the same kind of unit testing you used in the last chapter. Check out the next chapter on a better way to do static unit tests. You only have three unit tests, but they were used and changed a lot as I implemented the game.
这里是Breakout的单元测试概要;这一章会更详细的检测源代码。目前你还不需要TestGame类,所以你依然使用和上一章同一种的单元测试。下一章会有做静态单元测试的更好的方法。你只有三个单元测试,但是都被做了很多改动。
§ TestSounds - Just a quick test to check out all the new sounds for your project. Press space, Alt, Control, and Shift to play the sounds. I also added a little pause after playing the next sound to make it a little easier to hear the sounds. This test was used to check out the new XACT project I created for this game.
TestSounds——快速测试项目中的新声音文件。按下空格、Alt、Control和上档键来播放声音。我还在播放下一个声音之前添加了一点小停顿,更容易分辨每一个声音。这个测试用来检验为这个游戏建立的新的XACT项目。
§ TestGameSprites - This test was initially used to test the SpriteHelper class, but then all the code was moved to the Draw method of the game. The test was also used to initialize all the blocks in the game; the code was moved to the constructor, which is shown at the end of this chapter. This test shows you that it is not important to have a complicated test at the end because it is now only four lines of code, but the important part is to make your life easier while you are coding the game. Copy and paste useful parts of unit tests to your code as often as you need. Static unit tests also don’t have to be intact like dynamic unit tests for the helper classes because you only use them to build and test your game. When the game works you don’t need the static unit tests anymore except for testing parts of the game at a later point in time.
TestGameSprites——这个测试原先是用来测试SpriteHelper类的,但是后来所有代码都被移到了Draw方法中。这个测试同样用来初始化游戏中所有的砖块;代码移到了构造器里,这个将会在本章最后部分看到。这个测试要展示给你看的不是最后复杂的测试,因为现在只有短短的四行,但是重要的是让你在写代码的时候感到轻松。复制和粘贴单元测试中有用的部分到你的代码中去。静态单元测试也不需要像动态单元测试那样原封不动,因为你只是用它们来生成和测试你的游戏。当游戏运行的时候,你不再需要静态单元测试除非是测试游戏在稍后的一个测试点。
§ TestBallCollisions - Like in the previous chapter testing the ball collisions is the most useful unit test. Here you check if the collisions happen with the screen borders and paddle as expected. Only minor changes were required to get this to work. Then you can go to the more complicated block collision code, which is explained in more detail a bit later. You might even be able to think of more ways to test the collision and improve the game if you like. For example, it would make sense to trap the ball behind the wall of blocks and see if it destroys all the blocks correctly.
TestBallCollisions——就像前面那样,测试球的碰撞是最有用的单元测试。现在检验和屏幕边缘还有挡板的碰撞是否是期望的那样。只需要改动一点点代码。然后你就可以编写更复杂的与砖块的碰撞代码,这在稍后会详细解释。你可能已经想了很多方法去测试碰撞和按你所想来改进游戏。例如,将有放到砖块后面,然后看看是否能正确销毁所有砖块。
Breakout Levels
Because you are using many of the existing Pong ideas, you can skip the code that is similar or identical. You should focus on the new variables for now:
因为你用了很多Pong中已有的构思,你可以略过相似或相同的代码。你现在应该关注的是新的变量:

 /**/
/// <summary>
/**/
/// <summary>
 /// How many block columns and rows are displayed?
/// 要显示多少行和多少列的砖块
 /// </summary>
 const
int
NumOfColumns
=
14
,
const
int
NumOfColumns
=
14
,
NumOfRows
=
12
;
/**/
/// <summary>
/// Current paddle positions, 0 means left, 1 means right.
/// 当前挡板位置,0代表左,1代表右
/// </summary>
float
paddlePosition
=
0.5f
;
/**/
/// <summary>
/// Level we are in and the current score.
/// 当前的游戏等级和分数
/// </summary>
int
level
=
0
, score
=
-
1
;
/**/
/// <summary>
/// All blocks of the current play field. If they are
/// all cleared, we advance to the next level.
/// 标记砖块是否被清除。如果砖块都被清楚了,我们就可以进到下一关
/// </summary>
bool
[,] blocks
=
new
bool
[NumOfColumns, NumOfRows];
/**/
/// <summary>
/// Block positions for each block we have, initialized in Initialize().
/// 每一个砖块的位置,在Initialize()中初始化。
/// </summary>
Vector2[,] blockPositions
=
new
Vector2[NumOfColumns, NumOfRows];
/**/
/// <summary>
/// Bounding boxes for each of the blocks, also precalculated and
/// checked each frame if the ball collides with one of the blocks.
/// 每一个砖块的范围框,预先算好的,并检查每一帧是否有砖块被球碰到
/// </summary>
BoundingBox[,] blockBoxes
=
new
BoundingBox[NumOfColumns, NumOfRows];
First you define how many columns and blocks you can have at maximum; in the first levels you will not fill all the lines and only use 10% of the blocks. The paddle position is also a little bit easier than in Pong because you have just one player. Then you store the current level and the score, which is new. In Pong each player just had three balls and the game was over if all balls were lost. In Breakout the player starts at level 1 and works his way up until he finally loses a ball. You don’t have a high score here or any game font, so the level and score data is just updated in the title of the window.
首先你要定义最大能有多少列和砖块;在第一关你不需要填充完所有的行,只需要用到10%的砖块。当班也比Pong的稍微简单,因为你只有一个玩家。然后保存当前的等级和分数。在Pong中每一个玩家只有三个球,如果所有的球都丢失了就会输掉比赛。在Breakout里,玩家从第一关开始,直到丢失掉一个球。这里你没有高分或任何的游戏字体,所以登记和分数只是在Windows的标题上更新显示。
Then all the blocks are defined; the most important array is blocks, which just tells you which block is currently used. The blocks are initialized before each level starts, whereas the blockPositions and blockBoxes are initialized only once in the constructor of the game; blockPositions is used to determine the centered position of the block for rendering and blockBoxes defines the bounding box of the block for collision testing. It is important to note that none of these lists or position values use screen coordinates. All position data is stored in the 0-1 format: 0 is left or top, and 1 is right or bottom. This way the game stays resolution-independent and makes both rendering and collision checking easier.
接着所有的砖块被定义好;最重要的数组是blocks,告诉你现在哪些砖块是可用的。Blocks数组在每一关开始前被初始化,blockPositions 和 blockBoxes自由的构造器中被初始化一次。blockPositions用来决定砖块渲染的中心位置,blockBoxes定义了碰撞测试的范围框。注意这些列表或位置值没有一个使用的是屏幕坐标。所有的位置数据都储存为0~1的格式:0代表左边或顶部,1代表右边或底部。这个方式能让游戏不依赖于分辨率,让渲染和碰撞检验变得容易。
The levels are generated in the StartLevel method, which is called at the beginning of the game and every time you advance one level:
StartLevel方法用来生成等级,这个方法在游戏开始的时候和每次晋级的时候被调用:
     void

      StartLevel()


     ...

     {
// Randomize levels, but make it more harder each level
// 初始化等级,但难度逐级递增
  for (int y = 0; y < NumOfRows; y++)
    for (int x = 0; x < NumOfColumns; x++)
      blocks[x, y] =
        RandomHelper.GetRandomInt(10) < level+1;
  // Use the lower blocks only for later levels
  if (level < 6)
    for (int x = 0; x < NumOfColumns; x++)
      blocks[x, NumOfRows - 1] = false;
  if (level < 4)
    for (int x = 0; x < NumOfColumns; x++)
      blocks[x, NumOfRows - 2] = false;
  if (level < 2)
    for (int x = 0; x < NumOfColumns; x++)
      blocks[x, NumOfRows - 3] = false;

  // Halt game
  ballSpeedVector = Vector2.Zero;

  // Wait until user presses space or A to start a level.
  pressSpaceToStart = true;

  // Update title
  Window.Title =
    "XnaBreakout - Level " + (level+1) +
    " - Score " + Math.Max(0, score);
}


     //

      StartLevel
In the first for loop you just fill the whole block array with new values depending on the level. In level 1 the level value is 0 and you will only fill 10% of the blocks. RandomHelper.GetRandomInt(10) returns 0–9, which is smaller than 1 in only 10% of the cases. In level 2 this goes up to 20% until you reach level 10 or higher, where 100% of the level is filled. The game actually has no limit; you can play as long as you want.
在第一个for循环中,根据等级用新值填充整个砖块数组。在等级1中,等级值是0,你只需要用到10%的砖块。
RandomHelper.GetRandomInt(10)返回0~9的整数,在10%的时候值小于1。当到第二关的时候会涨到20%直到你到达第十关或更高,这时登记的100%会被填充。这个游戏没有限制,你想玩多久就可以玩多久。
Then you clear the lower three lines for the first levels to make the first levels easier. At level 3 only two lines are removed and at level 5 just one line is removed until you reach level 7 where all the lines are used.
接着你清理开始等级的最低的行,来让开始等级容易进行。在第三关只有两行被移除,在第五关只有一行被移除,直到你到达第七关的时候,所有行都可以使用。
Unlike Pong the ball speed vector is not immediately started for a new game. The ball stays on the paddle until the user presses space or A. Then the ball bounces off the paddle to a random location and the ball goes between the wall blocks, the screen borders, and the player paddle until either all blocks are removed to win a level or the player loses by not catching the ball.
不像Pong那样,球的速度向量不是一开始就被使用的。球停留在挡板上直到用户按下空格或A。然后球就从挡板弹起朝着一个随机的位置飞去,接着球就在砖块、屏幕边沿和挡板间运动,知道所有转开都被清除赢得这一关或者玩家没有接住球。
Finally the window’s title is updated to show the current level number and the score the player has reached so far. In this very simple game the player only gets one point for every block he destroys; reaching a score of 100 is really good, but as I said before, there is no limit. Try to go higher and have fun with the game.
最后更新Windows的标题栏来显示当前的等级数和分数。在这个简单的游戏里,每销毁一个砖块玩家就能得到一分;能拿到100分是相当不错的,但是最终分数是没有限制的。好好享受游戏,并尽力拿到更高分吧~
The Game Loop
The game loop in Pong was quite easy and contained mostly input and collision code. Breakout is a little bit more complicated because you have to handle two states of the ball. It is either still on the paddle and awaits the user to press space or you are in the game and have to check for any collisions with the screen borders, the paddle, or any of the blocks in the game.
Pong游戏的的循环过程非常简单,并包含了大多数的输入和碰撞的代码。Breakout就要稍微复杂一些因为你需要控制球的两个状态。一个是挡板方面,等待用户按下空格,另一个是检查和屏幕边界、挡板或者砖块的碰撞。
Most of the Update method looks the same way as in the previous chapter; the second player was removed and a little bit of new code was added at the bottom:
大多数Update方法看起来都和前面章的相似;第二个玩家被移除了,并且底部部分也添加了一些新的代码:
//
Game not started yet? Then put ball on paddle.
//
游戏还没开始?把球放在挡板上
if
(pressSpaceToStart)
...
{
ballPosition = new Vector2(paddlePosition, 0.95f - 0.035f);
// Handle space
if (keyboard.IsKeyDown(Keys.Space) ||
gamePad.Buttons.A == ButtonState.Pressed)

 ...{
...{
StartNewBall();
 } // if
}
//
if
else
...
{
// Check collisions
CheckBallCollisions(moveFactorPerSecond);
// Update ball position and bounce off the borders
// 更新球的位置,让球反弹
ballPosition += ballSpeedVector *
moveFactorPerSecond * BallSpeedMultiplicator;
// Ball lost?
// 丢球?
if (ballPosition.Y > 0.985f)
...{
// Play sound
soundBank.PlayCue("PongBallLost");
// Game over, reset to level 0
level = 0;
StartLevel();
// Show lost message
lostGame = true;
} // if
// Check if all blocks are killed and if we won this level
bool allBlocksKilled = true;
for (int y = 0; y < NumOfRows; y++)
for (int x = 0; x < NumOfColumns; x++)
if (blocks[x, y])
...{
allBlocksKilled = false;
break;
} // for for if
// We won, start next level
if (allBlocksKilled == true)
...{
// Play sound
soundBank.PlayCue("BreakoutVictory");
lostGame = false;
level++;
StartLevel();
} // if
}
//
else
First you check if the ball was not started yet. If not update the ball position and put it on the center of the player’s paddle. Then check if space or A was pressed and start the ball then (just randomizes the ballSpeedVector for you and bounces the ball off to the wall of blocks).
一开始首先检查球是否已经开始。如果还没开始则更新球的位置并把球放在当班的中间。接着检查空格键或A是否被按下,然后开始游戏(随机化ballSpeedVector,将球向着砖块弹起)。
The most important method is CheckBallCollisions, which you will check out in a second. Then the ball is updated like in the Pong game and you check if the ball is lost. If the player did not catch the ball, the game is over and the player can start over at level 1.
最重要的方法是CheckBallCollisions,这个你要立即检查。然后像在Pong中那样更新球的信息,检查是否丢球。如果玩家没接到球,游戏结束,玩家从第一关重新开始。
Finally you check if all blocks were removed and the level is complete. If all blocks are killed you can play the new victory sound and start the next level. The player sees a “You Won!” message on the screen (see Draw method) and can press space to start the next level.
最后你还要检查所有砖块是否被清除完了,如果是则这一关完成。如果所有的砖块都被清楚了你就可以播放一个表示胜利的声音,然后开始下一关。玩家将会在屏幕上看到“You Won!”的信息,然后按下空格键进入下一关。
Drawing Breakout
Thanks to the SpriteHelper class the Draw method of the Breakout game is short and easy:
有了SpriteHelper类,Draw方法就变短了,也更容易了:
     protected


     override


     void

      Draw(GameTime gameTime)


     ...

     {
  // Render background
  background.Render();
  SpriteHelper.DrawSprites(width, height);

  // Render all game graphics
  paddle.RenderCentered(paddlePosition, 0.95f);
  ball.RenderCentered(ballPosition);
  // Render all blocks
  for (int y = 0; y < NumOfRows; y++)
    for (int x = 0; x < NumOfColumns; x++)
      if (blocks[x, y])
        block.RenderCentered(blockPositions[x, y]);

  if (pressSpaceToStart &&
    score >= 0)
  ...{
    if (lostGame)
      youLost.RenderCentered(0.5f, 0.65f, 2);
    else
      youWon.RenderCentered(0.5f, 0.65f, 2);
  } // if

  // Draw all sprites on the screen
  SpriteHelper.DrawSprites(width, height);

  base.Draw(gameTime);
}


     //

      Draw(gameTime)
You start by rendering the background; you don’t have to clear the background because the background texture fills the complete background. To make sure everything is rendered on top of the background, you draw it immediately before rendering the rest of the game sprites.
以渲染背景开始;你不需要清除北京,因为背景纹理会填充整个背景。要保证所有东西都在背景上面被渲染,就需要在渲染其他精灵之前立即渲染背景。
Next you draw the paddle and the ball, which is very easy to do because of the RenderCentered helpermethod in the SpriteHelper class, which works like this (the three overloads are just for a more convenient use of this method):
接下来你要绘制挡板和球,这是非常容易的,因为有了SpriteHelper类的 RenderCentered辅助方法的帮助,它就像这样工作(为了更方便使用,这个方法提供了三个重载):
RenderCentered takes a Vector2 or x and y float values and rescales the positions from 0 to 1 (the format you use in your game) to 1024×768. The Draw method of SpriteHelper then rescales everything to the current screen resolution from 1024×768. It may sound complicated, but it is really easy to use.
RenderCentered设置一个Vector2或者x和y值,并从0到1(我们游戏中使用的格式)重新缩放位置到1024×768。SpriteHelper的Draw方法接着把所有东西重新缩放以使用当前1024×768的分辨率。这看起来有点儿复杂,但实际上使用起来是很简单的。
Then all the blocks of the current level are rendered and again that is very easy thanks to the position you have calculated in the constructor of your game. Take a look at the code on how to initialize all block positions at the upper part of the screen:
当前关的所有砖块都被渲染,这如此方便的操作得益于你在游戏的构造器中已经把位置计算好了。看看如何在屏幕上面部分初始化所有的砖块位置:
//
Init all blocks, set positions and bounding boxes
for
(
int
y
=
0
; y
<
NumOfRows; y
++
)
for
(
int
x
=
0
; x
<
NumOfColumns; x
++
)
...
{ blockPositions[x, y] = new Vector2( 0.05f + 0.9f * x / (float)(NumOfColumns - 1), 0.066f + 0.5f * y / (float)(NumOfRows - 1)); Vector3 pos = new Vector3(blockPositions[x, y], 0); Vector3 blockSize = new Vector3( GameBlockRect.X/1024.0f, GameBlockRect.Y/768, 0); blockBoxes[x, y] = new BoundingBox( pos - blockSize/2, pos + blockSize/2);}
//
for for
The blockBoxes bounding boxes are used for the collision testing discussed in a second. The calculation of the position is also no big deal; the x coordinate goes from 0.05 to 0.95 in as many steps as you have columns (14 if I remember correctly). You can try to change the NumOfColumns constant to 20 and the field will have many more blocks.
blockBoxes范围框用于后面要讨论的碰撞测试。位置的计算同样不是什么大问题;在许多步骤里x轴从0.05变到0.95。你可以试着把NumOfColumns恒定在20,然后区域里就会有更多的砖块。
Finally a small message is rendered on the screen with a scaling factor of two in case the player has won a level or lost the game. Then you just call the Draw method of SpriteHelper to render all game elements on the screen. Check out the unit tests in the game for how the rendering of the blocks, paddle, and game messages was developed. I started with the unit tests again and then wrote the implementation.
最后一个小信息会被渲染到屏幕上,告知玩家通过一关或是输掉了游戏。接着你只需要调用SpriteHelper的Draw方法来在屏幕上渲染全部的游戏元素。检查游戏中的单元测试是如何渲染砖块、挡板,游戏信息已经被开发了。我有一次使用单元测试开始,然后写了执行代码。
Collision Testing
The collision testing for the Breakout game is a little bit more complicated than just checking the paddles and the screen border in Pong. The most complicated part is to correctly bounce off the blocks the ball hits. For the complete code check the source code for this chapter.
Breakout的单元测试比起只需要检测挡板和墙壁边界的Pong来说有点儿稍微复杂。最复杂的部分就是求碰撞后的正确反弹。可以查看本章的源代码。
Like the last game you have a ball with a bounding box, screen borders, and the paddle. The blocks are new and to check for any collisions you have check all of them each frame. See Figure 3-16 for an example collision happening with a block in the game.
像上一个游戏一样你有一个带范围框的球,屏幕边界和挡板。砖块是新的元素,每一帧你都需要检查任何一个碰撞。看图3-16,这是一个带有砖块的碰撞的例子。

Figure 3-16
Take a closer look at the basic collision code with the blocks. The collision with the screen border and paddle is pretty much the same as in the Pong game and is checked with the help of the TestBallCollisions unit test. To check for collisions with the blocks you iterate through all of them and check if the bounding box of the ball hits the bounding box of the blocks. The actual game code is a little bit more complicated to check which side of the bounding box you hit and in which direction you have to bounce off, but the rest of the code and the general idea is still the same.
来仔细看看基本的碰撞代码。和屏幕边界与挡板的碰撞和在Pong里的非常相像,在TestBallCollisions单元测试的帮助下完成检测。你不断反复监测和砖块的碰撞,还检查球的范围框时候碰到了砖块的范围框。真正的游戏代码中,判断你碰到的是范围框的哪一边的检查部分有点复杂,并根据方向反弹,但是剩下部分的代码和思路和Pong是一样的。
      //

       Ball hits any block?


      for

       (

      int

       y

      =


      0

      ; y

      <

       NumOfRows; y

      ++

      )


      for

       (

      int

       x

      =


      0

      ; x

      <

       NumOfColumns; x

      ++

      )


      if

       (blocks[x, y])


      ...

      {
      // Collision check
      if (ballBox.Intersects(blockBoxes[x, y]))
      ...{
        // Kill block
        blocks[x, y] = false;
    // Add score
    score++;
    // Update title
    Window.Title =
      "XnaBreakout - Level " + (level + 1) + " - Score " + score;
    // Play sound
    soundBank.PlayCue("BreakoutBlockKill");
    // Bounce ball back
    ballSpeedVector = -ballSpeedVector;
      // Go outta here, only handle 1 block at a time
      break;
    } // if
}


      //

       for for if


 被折叠的 条评论
为什么被折叠?
被折叠的 条评论
为什么被折叠?
 到【灌水乐园】发言


