


今日目标:
学习Coroutine的基本使用方法及原理
添加开始游戏时的倒计时
为障碍物添加碰撞检测,判断撞到了game over
设置好场景转换
一.协程(Coroutine)
协程Unity提供了一个能创造出(伪)多线程的方法,通过yield return能够创造出时间间隔,可以当一种非常灵活的Update()来使用,在游戏进行时进行一些计数和检查十分方便。来看一看API中对它的描述。
Description: MonoBehaviour.StartCoroutine returns a Coroutine. Instances of this class are only used to reference these coroutines and do not hold any exposed properties or functions.A coroutine is a function that can suspend its execution (yield) until the given YieldInstruction finishes.
(一)概念及相关要点
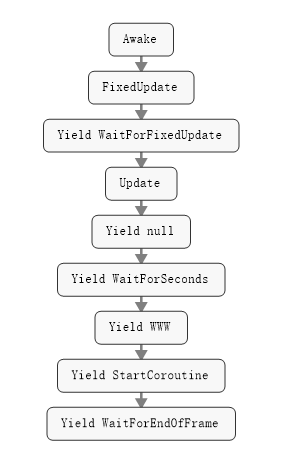
协程即协同程序,意思大概是在主线程进行的同时开启一个副线程来做一些操作,协助主程序运行。它在Update()方法之后执行,顺便搬一张图来看看MonoBehaviour的生命周期:

协程是Unity中MonoBehaviour中的方法,因此要使用协程,只能在继承了MonoBehaviour的类中进行调用。
协程在使用时一定要带有yield return
开启协程:
方法一:MonoBehaviour.StartCoroutine(string CoroutineName);
方法二:MonoBehaviour.StartCoroutine(IEnumerator cor);
一种传入方法的名字字符串,另一种是传入IEnumerator。第一种方法可以在协程结束之前就中断协程,而第二种方法就只能等待线程的结束,但第一种方法会消耗更多的资源,且只能传入一个参数。一般对初学者来说传入字符串更加常用。
停止协程:
StopCoroutine(string methodName) 中断指定协程
StopAllCoroutines() 中断所有协程
(二)使用
新建一个场景TestScene专门用来测试一些新的学习内容
创建TestCoroutine脚本,定义一个IEnumerator迭代器,随便在方法里输出一些东西,来看看协程的作用。
// Use this for initialization
 void Start () {
        Debug.Log("---------1");
        StartCoroutine("TestCoroutineMethod");
        Debug.Log("---------2");
 }

IEnumerator TestCoroutineMethod()
    {
        while (true)
        {
        Debug.Log("-------3");
        yield return new WaitForSeconds(1);
        Debug.Log("-------4");
        }
    }
从输出可以看到显示顺序是1 3 2 4 然后3 4 循环。对比一下上面的生命周期图就清楚了。算是懂了一些皮毛了,现在将其应用到项目上。
二.项目内容
我们不希望场景转换到了第一关后角色立即就开始奔跑,现在来添加一个倒计时的系统,用协程来实现。这个倒计时应该是以UI的形式来呈现,创建一个LevelOne_GUI脚本,来实现第一关的GUI。
首先需要获取倒计时的三张贴图,定义为公有变量
public Texture2D txtNum1;
public Texture2D txtNum2;
public Texture2D txtNum3;
然后是绘制贴图的函数的代码:
GUI.DrawTexture(new Rect(Screen.width / 2 - txtNum3.width / 2, 60,
txtNum3.width / 2, txtNum3.height / 2),txtNum3);
//其他两个也一样
接下来开始写倒计时的算法,定义一个bool型变量来指示是否显示贴图,一个int型变量来指示显示哪一张贴图,然后写一个嵌套的协程(整个显示过程以及单个显示过程):
IEnumerator SingleCount(int num)
    {
        _boolDisplayNum = true;
        DisplayNum = num;
        yield return new WaitForSeconds(1f);
        _boolDisplayNum = false;
        yield return new WaitForSeconds(0.5f);
    }

IEnumerator DisplayCountDown()
    {
        yield return new WaitForEndOfFrame();
        yield return StartCoroutine(SingleCount(3));
        yield return StartCoroutine(SingleCount(2));
        yield return StartCoroutine(SingleCount(1));
    }
然后用switch语句来实现贴图的选择绘制:
if(_boolDisplayNum)
        {
            switch(DisplayNum)
            {
                case 3:
                    GUI.DrawTexture(new Rect(Screen.width / 2 - txtNum3.width / 2, 60,
                        txtNum3.width / 2, txtNum3.height / 2),txtNum3);
                    break;
                case 2:
                    GUI.DrawTexture(new Rect(Screen.width / 2 - txtNum2.width / 2, 60,
                        txtNum2.width / 2, txtNum2.height / 2), txtNum2);
                    break;
                case 1:
                    GUI.DrawTexture(new Rect(Screen.width / 2 - txtNum1.width / 2, 60,
                        txtNum1.width / 2, txtNum1.height / 2), txtNum1);
                    break;
                default:
                    break;
            }
        }
    }
最后在场景中创建一个叫GUIManager的GameObject,脚本绑上去,再把对应贴图拖到脚本组件对应的公有变量栏里就行了。这样就已经可以切换绘制贴图了,还需要在倒计时时让主角不动,倒计时结束再开始奔跑,计时等。我们考虑用一个状态量来指示游戏的状态(游戏中,准备,暂停,游戏结束),这几个状态适用于整个游戏,故应该使用全局变量。之前控制音量我们创建过一个GlobalManager类,打开脚本,新添加一个枚举变量:
public enum GameState {none,Preparing,Playing,GameOver,Pause}
public static GameState GlobalState = GameState.none;//初始化为none
然后在以前设置好的场景管理器脚本中初始化好状态量
LevelOneManager中:
GlobalManager.GlobalState = GameState.Preparing;//start()中Hero_Controller_PC中(添加人物开始运动的条件):
 if(GlobalManager.GlobalState==GameState.Playing)
        {
            anime.Play("running");
            this.transform.Translate(Vector3.forward * FloRunningSpeed);
            if (Input.GetKey(KeyCode.A))
            {
                this.transform.Rotate(Vector3.down * FloRotateSpeed);
            }
            else if (Input.GetKey(KeyCode.D))
            {
                this.transform.Rotate(Vector3.up * FloRotateSpeed);
            }
        }
之前的DisplayCountDown方法中加上状态切换的代码:
IEnumerator DisplayCountDown()
    {
        yield return new WaitForEndOfFrame();
        yield return StartCoroutine(SingleCount(3));
        yield return StartCoroutine(SingleCount(2));
        yield return StartCoroutine(SingleCount(1));
        //GameStart
        GlobalManager.GlobalState = GameState.Playing;
    }
  //修改后的DisplayCountDown
这样就基本完成了,倒计时结束后主角才会开始奔跑。
然后开始写碰撞检测判断GameOver
新建一个TreeLog脚本,里面写障碍物的相关代码,拖到障碍物上作为其组件。先来写碰撞检测的代码:
private const string HERONAME = "Hero";//定义部分,主角物体的名字

//碰撞检测
    private void OnCollisionEnter(Collision collision)
    {
        if(collision.collider.name== HERONAME)
        {
            Debug.Log("collision:tree-hero");
            GlobalManager.GlobalState = GameState.GameOver;
        }
    }
碰撞检测是OnCollisionEnter方法,参数是一个collision,注意一个字母都不要写错,否则就不是一个有效的方法。若碰撞到了就切换全局的枚举变量到GameOver
还没完,我们还需要一个方法来检测游戏目前的状态,预计每一秒检测一次,并且,撞到障碍物时我们设置等两秒钟再切换到游戏结束界面(事先创好新场景并注册,记下其编号index),很明显,又需要用到协程。在LevelOneManager中创建一个协程,为了使检测一直进行,写一个死循环:
public float GameOverInterval = 2f;
//定义好切换到game over结算界面的时间间隔

IEnumerator CheckGameState()
    {
        Debug.Log("check coroutine");
        yield return new WaitForSeconds(1f);
        //continual check
        while (GlobalManager.GlobalState!=GameState.none)
        {
            yield return new WaitForSeconds(1f);
            Debug.Log("check recursion");
            if (GlobalManager.GlobalState == GameState.GameOver)
            {
                yield return new WaitForSeconds(GameOverInterval);
                Debug.Log("check scene change");
                SceneManager.LoadScene(2);//switch scene
            }
        }
    }
并在start()中启动协程:
StartCoroutine("CheckGameState");效果已经有了,GameOver场景,计分等留到明天来实现
然后我们还是在碰到障碍物后绘制一个Game Over贴图,写在LevelOneGUI脚本里
//定义txtGameOver
public Texture2D txtGameOver;

//GameOverGUI
        if(GlobalManager.GlobalState==GameState.GameOver)
        {
            GUI.DrawTexture(new Rect(Screen.width / 2 - txtGameOver.width / 2,
                Screen.height / 2 - txtGameOver.height / 2, txtGameOver.width , txtGameOver.height), txtGameOver);
        }
 //写在OnGUI()方法中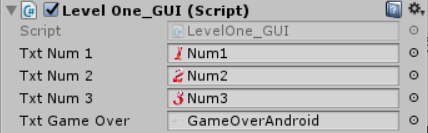
把gameover贴图拖到脚本组件对应的变量位置就行了,附上效果:

完整的LEVELONEGUI脚本:
using System.Collections;
using System.Collections.Generic;
using UnityEngine;

public class LevelOne_GUI : MonoBehaviour {
    public Texture2D txtNum1;
    public Texture2D txtNum2;
    public Texture2D txtNum3;
    public Texture2D txtGameOver;
    private bool _boolDisplayNum;
    private int DisplayNum = 3;

    // Use this for initialization
    void Start () {
        //start counting down coroutine
        StartCoroutine("DisplayCountDown");
 	}

 	 IEnumerator SingleCount(int num)
    {
        _boolDisplayNum = true;
        DisplayNum = num;
        yield return new WaitForSeconds(1f);
        _boolDisplayNum = false;
        yield return new WaitForSeconds(0.5f);
    }

	IEnumerator DisplayCountDown()
    {
        yield return new WaitForEndOfFrame();
        yield return StartCoroutine(SingleCount(3));
        yield return StartCoroutine(SingleCount(2));
        yield return StartCoroutine(SingleCount(1));
        //GameStart
        GlobalManager.GlobalState = GameState.Playing;
    }

	private void OnGUI()
    {
        //GameOverGUI
        if(GlobalManager.GlobalState==GameState.GameOver)
        {
            GUI.DrawTexture(new Rect(Screen.width / 2 - txtGameOver.width / 2,
            Screen.height / 2 - txtGameOver.height / 2, txtGameOver.width , txtGameOver.height), txtGameOver);
        }

	//CountingDownGUI
        if(_boolDisplayNum)
        {
            switch(DisplayNum)
            {
                case 3:
                    GUI.DrawTexture(new Rect(Screen.width / 2 - txtNum3.width / 2, 60,
                        txtNum3.width / 2, txtNum3.height / 2),txtNum3);
                    break;
                case 2:
                    GUI.DrawTexture(new Rect(Screen.width / 2 - txtNum2.width / 2, 60,
                        txtNum2.width / 2, txtNum2.height / 2), txtNum2);
                    break;
                case 1:
                    GUI.DrawTexture(new Rect(Screen.width / 2 - txtNum1.width / 2, 60,
                        txtNum1.width / 2, txtNum1.height / 2), txtNum1);
                    break;
                default:
                    break;
            }
        }
	}
}
游戏已经逐渐开始成型了,还是有点小激动的,明天再见!


 6836
6836


 被折叠的 条评论
为什么被折叠?
被折叠的 条评论
为什么被折叠?
 到【灌水乐园】发言


