


引导异常
ubuntu经常由于各种原因导致系统引导异常,不能正常开机,不能进入到grub界面,或者不管选择任何一种内核和模式进入都出现error: attempt to read or write outside of disk 'hd0’错误。针对这个情况,我采取过两种方式。
https://help.ubuntu.com/community/BootPartition
准备工具:
1、具备EFI格式的ubuntu启动盘;
2、一个不能正常引导的系统
测试环境:ubuntu16.04, nvidia 显卡及驱动
tips:引导修复后如果出现循环登陆的问题,可以alt+ctrl+f2进行命令行模式,对nvidia显卡驱动进行卸载,同时记录自己显卡驱动的版本,重启后再安装一次驱动即可。
sudo apt purge nvidia-*  //remove nvidia driver
sudo apt-get install nvidia-驱动型号(nvidia-384)  //install nvidia driver
一 仅使用boot-repair修复(时而失败)
- Step 1 - Boot on a liveCD or liveUSB
Boot your computer either on:
-
a Linux-Secure-Remix liveCD or liveUSB, then choose “Try Ubuntu”, then go directly to Step 3 below.
-
or a Ubuntu live-CD or live-USB, choose “Try Ubuntu”, then go to Step 2 below.
使用启动盘或者光盘开机。
Step 2 - Install Boot-Repair in the live-session
Once in the Ubuntu live session, install Boot-Repair this way:
Connect internet
Open a terminal (Ctrl+Alt+T) and type :
打开终端输入如下指令,安装boot-repair
sudo add-apt-repository ppa:yannubuntu/boot-repair && sudo apt-get update

sudo apt-get install -y boot-repair

sudo boot-repair
然后按照提示进行操作并重启。如果正常启动就不用看下一步了,若还是不行,则为系统重装一个引导。
二. 在磁盘头新建一个引导,(也是使用boot-repair修复)
step1 step2安装以上操作仅安装boot-repair工具,但不需要运行。
接下来的工作为将硬盘中的所有资料全部向后移动一定大小,而后在磁盘头新建一个free space,然后通过boot-repair在这个空的分区中新建一个引导。
Step 3 - Run gParted
Launch gParted from either:
-
the Dash (Ubuntu 11.04 and next): click the Ubuntu logo in the top-left corner of the screen, then type gparted and click on the gParted icon that will appear.
-
or System->Administration->gParted menu (Ubuntu 10.04)
-
or by typing gksudo gparted in a terminal
打开工具gParted
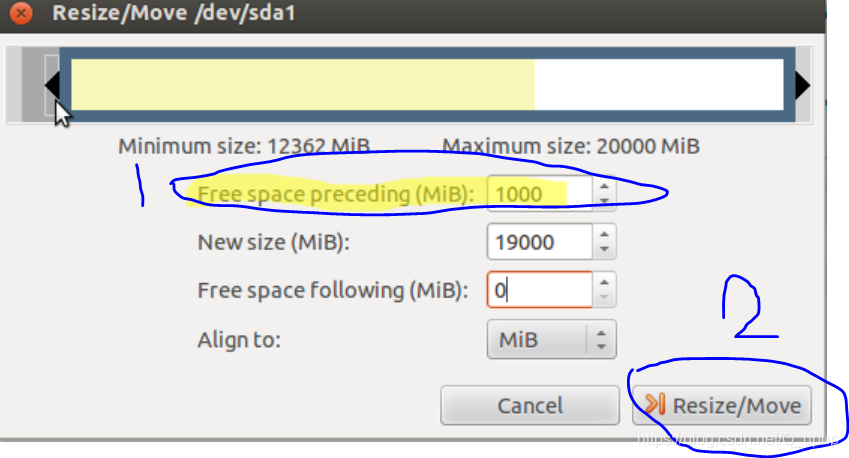
Step 4 - Create a 1GB partition at the start of the disk
Via gParted: -
Reduce one of the first partitions of the disk in order to create 1GB (=1000MiB) of free space at the start of the disk where Ubuntu is installed. This free space must be located inside the first 100GB of the disk (its end must not be located at more than 100GB from the start of the disk). Important: to resize Windows Vista/7/8 partitions, don’t use gParted but Windows tools instead.
-
In this free space, create a 1GB partition formatted in EXT4.
-
On a paper, note the name of this new 1GB partition. This is generally something like /dev/sdXY (X is a letter, Y is a number).
通过这个工具在ubuntu系统的磁盘头创建1G的ext4分区,并记住这个分区的名字。
Step 5 - Run Boot-Repair
Launch Boot-Repair from either: -
the Dash (Ubuntu 11.04 and next): click the Ubuntu logo in the top-left corner of the screen, then type boot and click on the Boot-Repair icon that will appear.
-
or System->Administration->Boot-Repair menu (Ubuntu 10.04)
-
or by typing boot-repair in a terminal
打开boot-repair
Step 6 - Choose the right option
In Boot-Repair: -
Click on Advanced Options
-
Go to the GRUB location tab
-
Tick the “Separate /boot partition: sdXY” option (sdXY must be your 1GB partition)
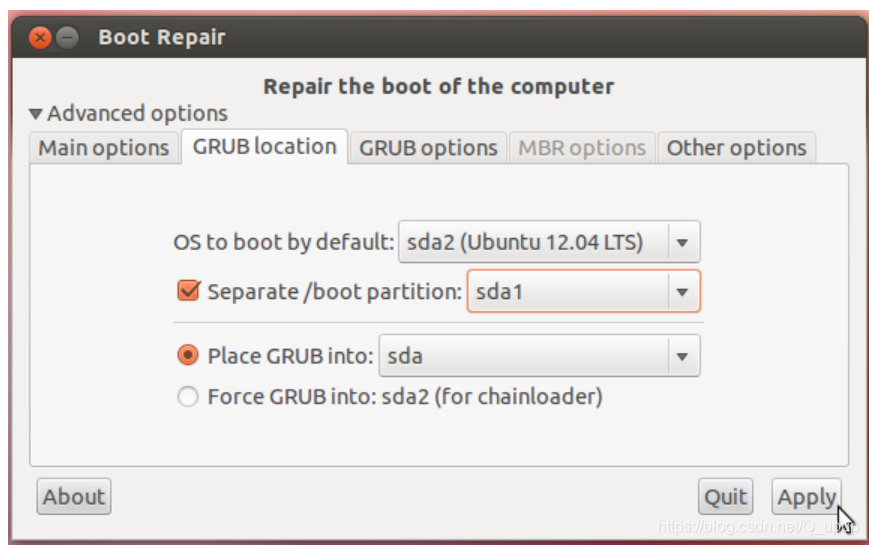
选择advanced-options,然后按照上图将Separate /boot partition设置到刚刚新建的分区中。这一步可能需要等待很长时间,因此需要将所有文件剪切到1G的磁盘后。所以可以在之前将不需要用的日志等冗余数据删除或者早点拷贝出来。
-
Click “Apply”
-
Note on a paper the URL (paste.ubuntu.com/XXXXXX/) that will appear.
-
Shutdown the computer
-
Remove the liveCD and/or liveUSB
-
Start the computer. You should now be able to boot into Ubuntu.


 7288
7288

 被折叠的 条评论
为什么被折叠?
被折叠的 条评论
为什么被折叠?
 到【灌水乐园】发言


