


 本文详细介绍了ESP32C3的通用定时器功能,包括定时器组结构、配置方法,以及如何通过定时器实现LED的ms级定时和闪烁,提供了一个实际工程示例。
前言
ESP32C3硬件外设通过之前的学习基本上要完成了,本次来看看ESP32C3的“定时器”。定时器是一种常用的功能,其作用主要是可配置一定时间的定时计数,并在定时到来后触发回调函数或者中断,这种功能被广泛的使用。
一、ESP32C3通用定时器
1.介绍
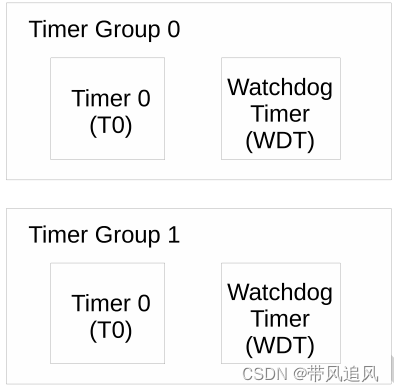
ESP32-C3 包含两个定时器组,即定时器组 0 和定时器组 1。每个定时器组有一个通用定时器(下文用 T0表示)和一个主系统看门狗定时器。所有通用定时器均基于 16 位预分频器和 54 位可自动重新加载的向上/向下可逆计数器。
定时器具有如下功能:
• 16 位时钟预分频器,分频系数为 1-65536
• 54 位时基计数器可配置成递增或递减
• 可读取时基计数器的实时值
• 暂停和恢复时基计数器
• 可配置的报警产生机制
• 计数器值重加载
• 电平触发中断
定时器组结构图:
2.功能描述
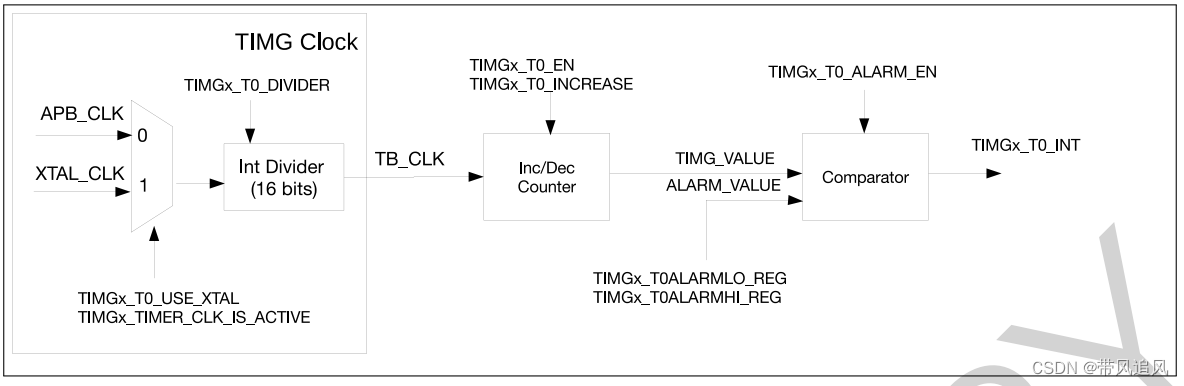
下图为定时器组的 T0架构图。 T0 包含一个时钟选择器、一个 16 位整数预分频器、一个时基计数器和一个用于产生警报的比较器。
相关的功能描述朋友们可以参考《ESP32-C3 技术参考手册》 中的详细介绍,这里主要是记录怎么应用起来。
3.通用定时器主要的使用配置
定时器用作简单时钟
- 配置时基计数器。
• 置位或清除 TIMG_T0_USE_XTAL 字段选择时钟源。
• 置位 TIMG_T0_DIVIDER 配置 16 位预分频器。
• 置位或清除 TIMG_T0_INCREASE 配置定时器方向。
• 在 TIMG_T0_LOAD_LO 和 TIMG_T0_LOAD_HI 上写初始值设置定时器的初始值,然后在TIMG_T0LOAD_REG 上写任意值将初始值重新加载进定时器。 - 置位 TIMG_T0_EN 开启定时器。
- 获得定时器的当前值。
• 在 TIMG_T0UPDATE_REG 上写任意值锁存定时器的当前值。
• 从 TIMG_T0LO_REG 和 TIMG_T0HI_REG 读取锁存的定时器值。
定时器用于单次报警
- 按照第 11.3.1 节的第 1 步配置时基计数器。
- 配置报警。
• 置位 TIMG_T0ALARMLO_REG 和 TIMG_T0ALARMHI_REG 配置报警值。
• 置位 TIMG_T0_INT_ENA 使能中断。 - 清零 TIMG_T0_AUTORELOAD 关闭自动重新加载。
- 置位 TIMG_T0_ALARM_EN 开启报警。
- 处理报警中断。
• 置位定时器在 TIMG_T0_INT_CLR 的对应位清除中断。
• 清零 TIMG_T0_EN 关闭定时器。
定时器用于周期性报警
- 按照第 11.3.1 节的第 1 步配置时基计数器。
- 按照第 11.3.2节的第 2 步配置报警。
- 置位 TIMG_T0_AUTORELOAD 使能自动重新加载,将重新加载值写入 TIMG_T0_LOAD_LO 和 TIMG_T0_LOAD_HI。
- 置位 TIMG_T0_ALARM_EN 开启报警。
- 处理报警中断(每次报警时重复)。
• 置位定时器在 TIMG_T0_INT_CLR 的对应位清除中断。
• 如下一次报警需要新的报警值和重新加载值(即每次都有不同的报警间隔),则应根据需要重新配置TIMG_T0ALARMLO_REG、 TIMG_T0ALARMHI_REG、 TIMG_T0_LOAD_LO 和 TIMG_T0_LOAD_HI 。否则,上述寄存器应保持不变。
• 置位 TIMG_T0_ALARM_EN 重新使能报警。
6.(最后一次报警时)关闭定时器。
• 置位定时器在 TIMG_T0_INT_CLR 的对应位清除中断。
• 清零 TIMG_T0_EN 关闭定时器。
二、定时器工程示例
本工程是根据官方示例进行修改的,主要是实现定时的ms秒级定时并让LED灯1s钟闪烁一次。
1.初始化LED的GPIO
在之前的IIC的博客中有写LED相关GPIO的初始化流程代码,直接拿来就可以了。
LED GPIO相关定义
/* LED相关宏定义 */
#define GPIO_LED_IO    4
#define GPIO_LED_PIN_SEL  (1ULL<<GPIO_LED_IO)

#define LED_H  (*(volatile unsigned long* )(GPIO_OUT_W1TS_REG)|= 1<<GPIO_LED_IO)
#define LED_L  (*(volatile unsigned long* )(GPIO_OUT_W1TC_REG)|= 1<<GPIO_LED_IO)
#define LED(value) (value)?LED_H:LED_L

bool led = false;   /* led控制变量 */
LED GPIO初始化
不使用GPIO中断,GPIO引脚不上拉/下拉,引脚为GPIO4
/**
 * @brief Initialize GPIO of led
 *
 * @param NULL
 * @return NULL
 */
void led_init(void)
{
    //zero-initialize the config structure.
    gpio_config_t io_conf = {};
    //disable interrupt
    io_conf.intr_type = GPIO_INTR_DISABLE;
    //set as output mode
    io_conf.mode = GPIO_MODE_OUTPUT;
    //bit mask of the pins that you want to set,e.g.GPIO4
    io_conf.pin_bit_mask = GPIO_LED_PIN_SEL;
    //disable pull-down mode
    io_conf.pull_down_en = 0;
    //disable pull-up mode
    io_conf.pull_up_en = 0;
    //configure GPIO with the given settings
    gpio_config(&io_conf);
}
2.初始化通用定时器
要初始化的是TIMER_GROUP_0的通用定时器
定时器相关定义
/* 定时器相关宏定义 */
#define TIMER_DIVIDER         (16)  //  Hardware timer clock divider
#define TIMER_SCALE           ((TIMER_BASE_CLK / TIMER_DIVIDER) / 1000)  // convert counter value to ms

typedef struct {
    int timer_group;
    int timer_idx;
    int alarm_interval;
    bool auto_reload;
} example_timer_info_t;/* 用于缓存定时器的配置参数 */

---
**定时器初始化**
这里是要将定时器配置成“周期性报警”,为了让LED灯闪烁,需要定时器中断可循环触发,然后在定时器中断中改变LED的GPIO引脚的输出。
定时器配置步骤:
1.配置定时器时钟:默认使用APB的时钟(ESP32C3的APB时钟是80MHz)
2.配置时钟分频系数:
```c
#define TIMER_DIVIDER         (16)  //  Hardware timer clock divider
3.使能计数器并配置向上计数;
4.使能告警;
5.使能计数器值自动重装载。
最后调用timer_init()函数初始化配置参数。
配置计数器起始的计数值,和告警的阀值:
    /* Timer's counter will initially start from value below.
       Also, if auto_reload is set, this value will be automatically reload on alarm */
    timer_set_counter_value(group, timer, 0);

    /* Configure the alarm value and the interrupt on alarm. */
    timer_set_alarm_value(group, timer, timer_interval_sec * TIMER_SCALE);
使能中断:
timer_enable_intr(group, timer);
将配置参数缓存并传入定时器中断回调函数:
 	example_timer_info_t *timer_info = calloc(1, sizeof(example_timer_info_t));
    timer_info->timer_group = group;
    timer_info->timer_idx = timer;
    timer_info->auto_reload = auto_reload;
    timer_info->alarm_interval = timer_interval_sec;
    timer_isr_callback_add(group, timer, timer_group_isr_callback, timer_info, 0);
开启定时器:
timer_start(group, timer);
完整的初始化函数:
/**
* @brief Initialize selected timer of timer group
*
* @param group Timer Group number, index from 0
* @param timer timer ID, index from 0
* @param auto_reload whether auto-reload on alarm event
* @param timer_interval_sec interval of alarm
*/
/**
* @brief Initialize selected timer of timer group
*
* @param group Timer Group number, index from 0
* @param timer timer ID, index from 0
* @param auto_reload whether auto-reload on alarm event
* @param counte_valu interval of alarm
*/
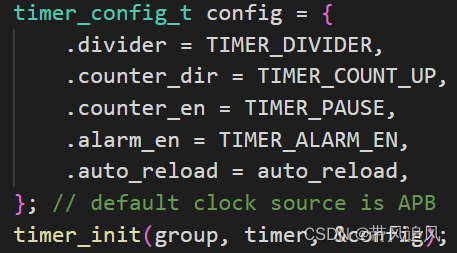
static void my_timer_init(int group, int timer, bool auto_reload, int counte_valu)
{
/* Select and initialize basic parameters of the timer */
timer_config_t config = {
.divider = TIMER_DIVIDER,
.counter_dir = TIMER_COUNT_UP,
.counter_en = TIMER_PAUSE,
.alarm_en = TIMER_ALARM_EN,
.auto_reload = auto_reload,
}; // default clock source is APB
timer_init(group, timer, &config);
/* Timer's counter will initially start from value below.
Also, if auto_reload is set, this value will be automatically reload on alarm */
timer_set_counter_value(group, timer, 0);
/* Configure the alarm value and the interrupt on alarm. */
timer_set_alarm_value(group, timer, counte_valu * TIMER_SCALE);
timer_enable_intr(group, timer);
example_timer_info_t *timer_info = calloc(1, sizeof(example_timer_info_t));
timer_info->timer_group = group;
timer_info->timer_idx = timer;
timer_info->auto_reload = auto_reload;
timer_info->alarm_interval = counte_valu;
timer_isr_callback_add(group, timer, timer_group_isr_callback, timer_info, 0);
timer_start(group, timer);
}
counte_valu参数是设置计数器的比较阀值,这里还配合了宏定义TIMER_SCALE来一起设置,这里实现的是ms级的定时,宏定义TIMER_SCALE:
#define TIMER_SCALE ((TIMER_BASE_CLK / TIMER_DIVIDER) / 1000) // convert counter value to ms
定时器中断服务函数
static bool IRAM_ATTR timer_group_isr_callback(void *args)
{
    BaseType_t high_task_awoken = pdFALSE;
    example_timer_info_t *info = (example_timer_info_t *) args;

    uint64_t timer_counter_value = timer_group_get_counter_value_in_isr(info->timer_group, info->timer_idx);

    if (!info->auto_reload) { /* 重新装载计数器阀值 */
        timer_counter_value += info->alarm_interval * TIMER_SCALE;
        timer_group_set_alarm_value_in_isr(info->timer_group, info->timer_idx, timer_counter_value);
    }
    led = !led;
    LED(led);
    return high_task_awoken == pdTRUE; // return whether we need to yield at the end of ISR
}
在函数前面添加“IRAM_ATTR ”。
在本示例中用到了官方的定时器函数库,建议有心兴趣的朋友可以去看看是怎么写的,这有助于代码编写逻辑的学习。
3.完成工程代码
#include <stdio.h>
#include "freertos/FreeRTOS.h"
#include "freertos/task.h"
#include "freertos/queue.h"
#include "driver/timer.h"
#include "driver/gpio.h"

/* LED相关宏定义 */
#define GPIO_LED_IO    4
#define GPIO_LED_PIN_SEL  (1ULL<<GPIO_LED_IO)

#define LED_H  (*(volatile unsigned long* )(GPIO_OUT_W1TS_REG)|= 1<<GPIO_LED_IO)
#define LED_L  (*(volatile unsigned long* )(GPIO_OUT_W1TC_REG)|= 1<<GPIO_LED_IO)
#define LED(value) (value)?LED_H:LED_L

/* 定时器相关宏定义 */
#define TIMER_DIVIDER         (16)  //  Hardware timer clock divider
#define TIMER_SCALE           ((TIMER_BASE_CLK / TIMER_DIVIDER) / 1000)  // convert counter value to ms

typedef struct {
    int timer_group;
    int timer_idx;
    int alarm_interval;
    bool auto_reload;
} example_timer_info_t;/* 用于缓存定时器的配置参数 */

bool led = false;   /* led控制变量 */
/**
 * @brief Initialize GPIO of led
 *
 * @param NULL
 * @return NULL
 */
void led_init(void)
{
    //zero-initialize the config structure.
    gpio_config_t io_conf = {};
    //disable interrupt
    io_conf.intr_type = GPIO_INTR_DISABLE;
    //set as output mode
    io_conf.mode = GPIO_MODE_OUTPUT;
    //bit mask of the pins that you want to set,e.g.GPIO4
    io_conf.pin_bit_mask = GPIO_LED_PIN_SEL;
    //disable pull-down mode
    io_conf.pull_down_en = 0;
    //disable pull-up mode
    io_conf.pull_up_en = 0;
    //configure GPIO with the given settings
    gpio_config(&io_conf);
}

/*
 * A simple helper function to print the raw timer counter value
 * and the counter value converted to seconds
 */
static void inline print_timer_counter(uint64_t counter_value)
{
    printf("Counter: 0x%08x%08x\r\n", (uint32_t) (counter_value >> 32),
           (uint32_t) (counter_value));
    printf("Time   : %.8f ms\r\n", (double) counter_value / TIMER_SCALE);
}

static bool IRAM_ATTR timer_group_isr_callback(void *args)
{
    BaseType_t high_task_awoken = pdFALSE;
    example_timer_info_t *info = (example_timer_info_t *) args;

    uint64_t timer_counter_value = timer_group_get_counter_value_in_isr(info->timer_group, info->timer_idx);

    if (!info->auto_reload) {
        timer_counter_value += info->alarm_interval * TIMER_SCALE;
        timer_group_set_alarm_value_in_isr(info->timer_group, info->timer_idx, timer_counter_value);
    }
    /* Now just send the event data back to the main program task */
    // xQueueSendFromISR(s_timer_queue, &evt, &high_task_awoken);
    led = !led;
    LED(led);
    return high_task_awoken == pdTRUE; // return whether we need to yield at the end of ISR
}

/**
 * @brief Initialize selected timer of timer group
 *
 * @param group Timer Group number, index from 0
 * @param timer timer ID, index from 0
 * @param auto_reload whether auto-reload on alarm event
 * @param counte_valu interval of alarm
 */
static void my_timer_init(int group, int timer, bool auto_reload, int counte_valu)
{
    /* Select and initialize basic parameters of the timer */
    timer_config_t config = {
        .divider = TIMER_DIVIDER,
        .counter_dir = TIMER_COUNT_UP,
        .counter_en = TIMER_PAUSE,
        .alarm_en = TIMER_ALARM_EN,
        .auto_reload = auto_reload,
    }; // default clock source is APB
    timer_init(group, timer, &config);

    /* Timer's counter will initially start from value below.
       Also, if auto_reload is set, this value will be automatically reload on alarm */
    timer_set_counter_value(group, timer, 0);

    /* Configure the alarm value and the interrupt on alarm. */
    timer_set_alarm_value(group, timer, counte_valu * TIMER_SCALE);
    timer_enable_intr(group, timer);

    example_timer_info_t *timer_info = calloc(1, sizeof(example_timer_info_t));
    timer_info->timer_group = group;
    timer_info->timer_idx = timer;
    timer_info->auto_reload = auto_reload;
    timer_info->alarm_interval = counte_valu;
    timer_isr_callback_add(group, timer, timer_group_isr_callback, timer_info, 0);

    timer_start(group, timer);
}

void app_main(void)
{
    led_init();
    my_timer_init(TIMER_GROUP_0, TIMER_0, true, 1000);

    while (1) {
        /* Print the timer values as visible by this task */
        printf("-------- TASK TIME --------\n");
        uint64_t task_counter_value;
        timer_get_counter_value(TIMER_GROUP_0, TIMER_GROUP_0, &task_counter_value);
        print_timer_counter(task_counter_value);
        vTaskDelay(500 / portTICK_PERIOD_MS);
    }
}
总结
本次主要学习了ESP32C3通用定时器的相关知识,使用通用定时器实现ms级的定时,通过设置计数器阀值实现1s钟的定时并在定时器中断服务函数中改变led的亮灭状态。定时器在后面的开发会有很多的应用场景,学习并掌握其应用是非常重要的。


 701
701

 被折叠的 条评论
为什么被折叠?
被折叠的 条评论
为什么被折叠?
 到【灌水乐园】发言


