


 本文档介绍了史陶比尔CS9控制器和SP2示教器的数据更新、程序运行及操作相关知识,包括数据在示教器与SRS工作站之间的同步、程序运行中的注意事项,以及示教器面板各功能键的使用说明。
前言:史陶比尔更新控制柜的同时终于更新了示教器,原示教器由跑马灯按钮式,变成了现在的触摸屏式,而除了杀马特转变成科技风的同时,二者的具体操作上也有所区别。
以下介绍笔者个人在触摸屏SP2示教器上碰到的一些问题——2020.5.25首写
2020.6.9初次修改 增加示教器面板介绍
一、数据的更新
简介:史陶比尔的数据保存是保持变量,不似ABB在定义变量时有多种可选项(常量,可变变量,保持变量等),史陶比尔数据在配置时只有选择公有,私有,这两类关于访问权限的区别,另外是程序创建可选局部变量与参数(程序没有返回值,如果需要返回值要靠参数传递来实现)。相对来说,史陶比尔的程序使用可能会呆板不够灵活。在遇到下载或上载程序,更新数据时,史陶比尔的SP2示教器需要注意一下。
1.数据:示教器—>SRS工作站
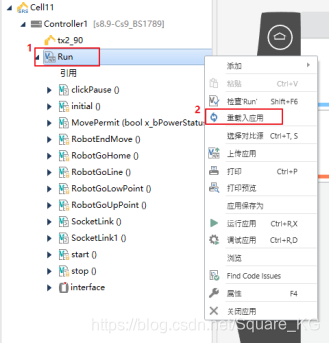
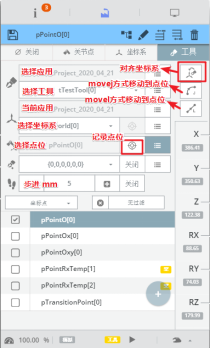
示教器示教的点位,或程序中自动的修正数据上载到SRS,需要在示教器点击“保存”图标后,再在SRS程序上右键点击,选择“重载应用”,这样SRS就能和示教器数据同步了。
步骤1:示教器点击保存

步骤2:SRS重载入程序
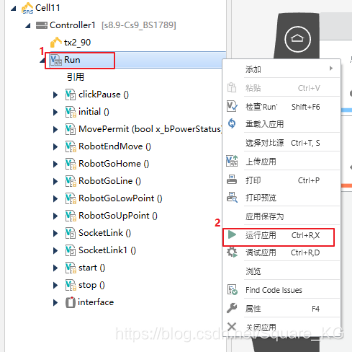
2、数据:SRS工作站—>示教器
步骤1 SRS运行程序
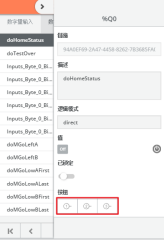
3、数据:通讯变量赋值
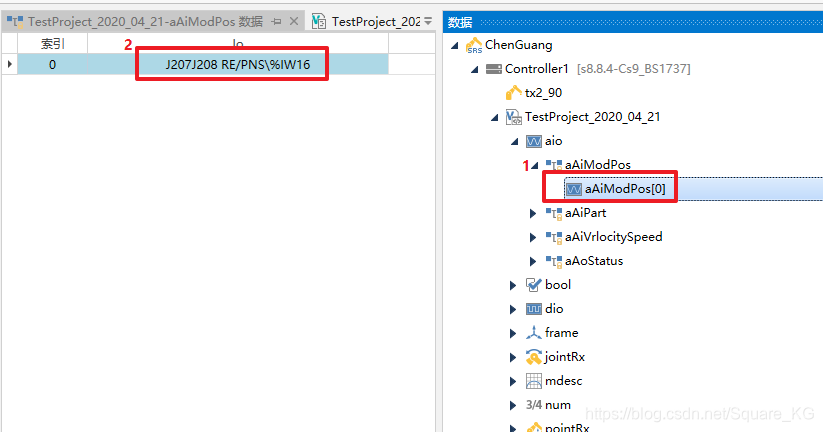
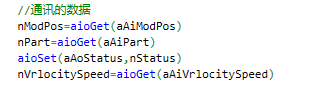
通讯的数据都在AIO与BIO列表中,创建通讯变量后,还要将其与实际的变量地址对应起来,赋值需要使用dioget(),dioset(),aioget(),aioset()指令
步骤1 链接对应变量地址
步骤2 赋值
二、程序运行相关
简介:史陶比尔系统采用的是伪多线程的运行方式,最快4ms一个周期,大概能运行3000行指令,且机器人运行与计算是属于两个不同的过程,故需要使用WaitAndMove(),delay()指令,来保证机器人执行完某些运动动作或某段计算。
1、机器人没有动作
方法:在程序最后一段加waitEndMove()
因为程序在处理运动语句的时候是有预读机制的,一段程序如果不加waitendmove,程序跑完第一句运动语句的时候,(第一个waitendmove)后,处理器直接认为程序已执行完毕,不再执行后续运动语句,如果结尾处再加一个waitendmove,那么相关运动点位还会被保存在处理器里面
2、机器人点位偏移
机器人根据工具手偏移是Appro(),机器人根据工件坐标系偏移是compose()指令
三、操作相关
1、示教器面板介绍
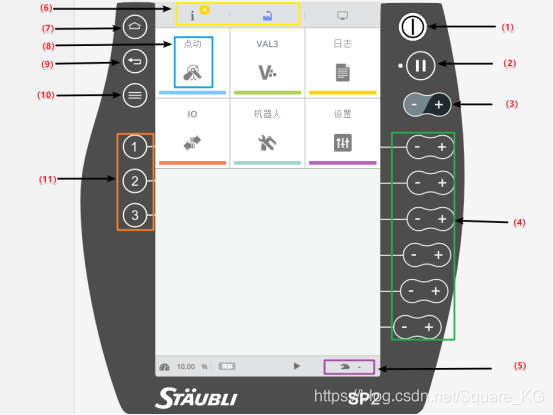
手臂上电按钮 (1)
该发光按钮用来给手臂上电或断电。 当绿色指示灯稳定发亮时,表明手臂已通电。
在手动模式下,必须按示教器背后的确认按钮 来给手臂上电。
Move/HOLD按钮 (2)
该按钮用于控制机器人的运动与暂停。
在手动模式中,在 Move / Hold 键按下时手臂可以运动。 一旦松开这个键,手臂立即在程序设定的轨迹上停止运动。
在自动或远程模式下,按 Move / Hold 键,运动被停止并使机器人转变为暂停模式。 再按一下该键,运动继续。
在手动和自动模式中,当手臂通电时机器人总是处于暂停模式。 在远程模式中,一旦接通电源,
就允许手臂运动。
速度调节按键 (3)
该键可以使速度在运动模式所限制的范围内变化。速度在 显示屏底部 的状态显示栏上给出。速度根据预 先确定的值( 每按一次键,约 2 倍) 而改变。也可单独点击状态显示栏的速度,手动输入

运动按键 (4)
在手动模式下可用,用来产生手臂的运动( 关节坐标或笛卡尔坐标运动),取决于选择的运动模式 (Joint, Frame,Tool)
工作模式切换按钮 (5)
该按钮用于切换机器人工作模式。
 自动模式|远程模式| 慢速手动模式 | 快速手动模式
界面切换功能键 (6)
用它们来选择显示在它们下方的菜单。

日志 | 用户界面
主页面功能键 (7)
回到示教器主页面
点动功能键 (8)
在手动模式下可用,选择的运动模式 (Joint, Frame,Tool)
返回功能键 (9)
进入子菜单时,用于返回父类菜单
程序编辑功能按钮 (10)
按下该按钮,进入程序选择界面,可以加载程序并运行

数字输出激活按钮 (11)
在手动模式下,这些按键改变与它们相连的数字输出的状态。可以在主面板的IO列中
选择输出,点击“1”,“2” 或“3”按钮进行关联。


 779
779

 被折叠的 条评论
为什么被折叠?
被折叠的 条评论
为什么被折叠?
 到【灌水乐园】发言


