


写在前面
百度的paddleocr模型经过几次迭代,经过测试,最新的模型文件体积小,中文本识别效果较好,对手写汉字也有不错的识别率。
本文主要内容包括使用conda环境,paddleocr的GPU版 hubserving的部署方式以及接口模拟测试验证。一些坑和注意事项写在Tips中。
docker方式部署可分别参考paddlepaddle框架的官方安装文档拉取官方镜像(需安装nvidia-docker),同时对paddleocr项目中的./deploy/docker/hubserving/gpu 中的dockerfile文件略做调整即可,下次再更新具体方式。
版本说明
工具版本:PaddleOCR-release-2.6
模型版本:中英文超轻量PP-OCRv3模型(16.2M)
pyhon版本:3.7
Paddle框架:paddlepaddle-gpu==2.4.2
CUDA:cudatoolkit=11.7 cuDNN=8.4.1
本机环境:windows11、3060移动版(6G显存)
参考文档
paddleocr gitee官网–工具及模型下载
paddlepaddle飞桨框架安装(验证是否可使用GPU)
paddleOCR服务端安装部署二:paddleOCR hubserving 服务安装配置
conda安装的cudatoolkit, cudnn与在主机上安装的cuda, cudnn有何关系?
Tips
paddle的GPU框架官网说明支持python版本3.6-3.10,实际操作中发现3.10无法识别到GPU,建议不要使用最新版本,改用3.7后测试成功。
paddle框架通过conda安装时,会在虚拟环境中安装cudatoolkit和cudnn(不完整,仅包含paddle框架中必须的cuda子集),理论上会优先调用虚拟环境中的,所以本地的cuda和cudnn可能可以不用装(未验证)。
如果在本地安装cudnn,正常的在官网下载需要注册登录。通过在官网获取文件链接后,再通过迅雷等工具直接下载,可以免登录下载。
使用GPU需要先指定GPU,windows直接配置环境变量CUDA_VISIBLE_DEVICES(linux可以配置~/.bashrc文件)
通过GPU方式启动服务时,由于程序默认调用显存为8GB,本次显存不足会弹出error,但实际可正常启动。也可以通过修改文件修改默认显存占用(详见1.2.3)。
使用test_hubserving.py进行测试时,可能会出现numpy版本报错 AttributeError: module ‘numpy‘ has no attribute 'int‘,需要修改源码文件,详见2.1
使用postman方式测试时,图片的base64格式必须为双引号,单引号不识别。使用python的request模块则无此限制,猜测为request中对data格式做了自动处理。
一、项目部署
1.1 环境准备(conda、paddle框架gpu版、CUDA安装验证)
1.1.1 conda安装
百度下载anaconda3,安装时选择自定义安装,其他默认即可(建议使用默认安装位置,不需要额外配置环境变量,如果想安装到其他位置,需要手动配置环境变量的conda路径)。安装后程序中会多一个anaconda Navigator。打开powershell(管理员模式)输入conda init powershell,将powershell作为客户端。关闭powershell后重新打开,
出现 (base) PS C:\WINDOWS\system32> 说明已成功安装并初始化。
1.1.2 虚拟环境创建
使用powershell创建名称为paddle-gpu,python版本为3.7的虚拟环境,创建时会自动下载python、pip等必须组件
conda create -n paddle-gpu python=3.7
进入paddle-gpu虚拟环境
conda activate paddle-gpu
成功后显示(paddle-gpu) PS C:\WINDOWS\system32>
1.1.3 检查环境
检查python路径、python版本等(正常应该是env/paddle-gpu路径下,python版本3.7)
where python
python --version
1.1.4 添加国内conda源(非必须)
为了提高下载速度,可以添加国内源,也可以具体安装时指定源。
为避免源过多导致下载出现问题,建议添加源之前先对安装源恢复默认(如想保留原来的源,则后期需要人工指定源的使用顺序)
恢复默认(清理所有自行安装的源):
conda config --remove-key channels
添加清华源:
conda config --add channels https://mirrors.tuna.tsinghua.edu.cn/anaconda/pkgs/free/
conda config --add channels https://mirrors.tuna.tsinghua.edu.cn/anaconda/pkgs/main/
conda config --set show_channel_urls yes
1.1.5 安装paddle框架(GPU版)
高版本显卡驱动可以兼容低版本CUDA,由于本机的3060显卡的驱动版本支持cuda12.1,所以本次使用相对最高的cuda11.7。本地的驱动和cuda版本可以通过执行nvidia-smi查看。各版本安装方式如下:
GPU 版的 PaddlePaddle
对于 CUDA 11.7,需要搭配 cuDNN 8.4.1,安装命令为(本次使用):
conda install paddlepaddle-gpu==2.4.2 cudatoolkit=11.7 -c https://mirrors.tuna.tsinghua.edu.cn/anaconda/cloud/Paddle/ -c conda-forge
对于 CUDA 10.2,需要搭配 cuDNN 7.6.5,安装命令为:
conda install paddlepaddle-gpu==2.4.2 cudatoolkit=10.2 --channel https://mirrors.tuna.tsinghua.edu.cn/anaconda/cloud/Paddle/
对于 CUDA 11.2,需要搭配 cuDNN 8.2.1,安装命令为:
conda install paddlepaddle-gpu==2.4.2 cudatoolkit=11.2 -c https://mirrors.tuna.tsinghua.edu.cn/anaconda/cloud/Paddle/ -c conda-forge
对于 CUDA 11.6,需要搭配 cuDNN 8.4.0,安装命令为:
conda install paddlepaddle-gpu==2.4.2 cudatoolkit=11.6 -c https://mirrors.tuna.tsinghua.edu.cn/anaconda/cloud/Paddle/ -c conda-forge
1.1.6 本机安装cuda11.7和cuDNN 8.4.1(待验证是否必须)
cuda11.7百度搜索cuda下载,在nvidia官网下载安装即可(具体版本根据自己显卡实际配置自行选择)。
cuDNN 8.4.1免登录下载
找到对应版本,右键复制下载链接后,打开迅雷下载。
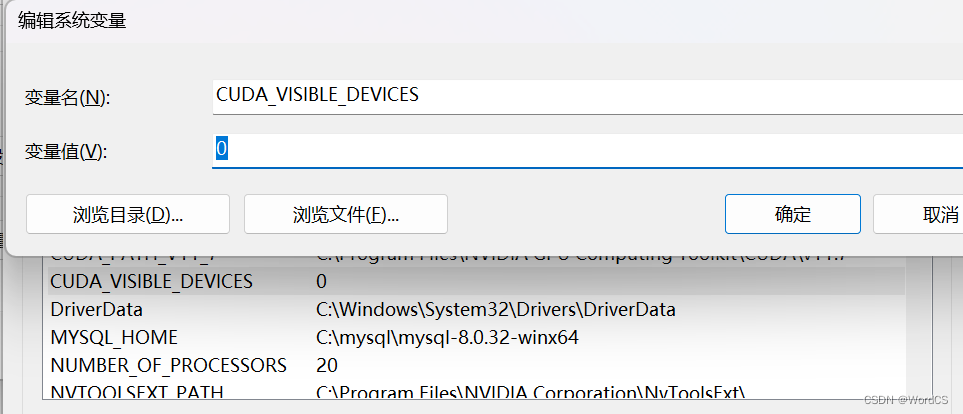
1.1.7 修改windows环境变量,指定GPU
在windows环境变量中增加系统变量,CUDA_VISIBLE_DEVICES = 0
注意此处如果不添加环境变量指定GPU,后面通过GPU启动paddleocr时,可能会无法找到本机GPU。
1.1.8 paddle框架验证
使用python进入python解释器
(paddle-gpu) PS C:\WINDOWS\system32> python

Python 3.7.12 | packaged by conda-forge | (default, Oct 26 2021, 05:35:01) [MSC v.1916 64 bit (AMD64)] on win32
Type "help", "copyright", "credits" or "license" for more information.
>>>
输入import paddle ,再输入 paddle.utils.run_check(),如果出现
PaddlePaddle works well on 1 GPU.
PaddlePaddle works well on 1 GPUs.
PaddlePaddle is installed successfully! Let's start deep learning with PaddlePaddle now.
则说明成功安装paddle框架并且识别到了GPU。
此步关键,确保paddleocr可以使用gpu进行推理加速。
1.2 paddleocr安装
1.2.1 下载paddleocr项目
通过gitee官网从git clone/下载下来整个PaddleOCR项目(需要注册)。paddleocr下载
下载中英文超轻量PP-OCRv3模型推理模型:模型下载
推理模型也可以通过wget下载(docker安装适用):
检测模型
wget  https://paddleocr.bj.bcebos.com/PP-OCRv3/chinese/ch_PP-OCRv3_det_infer.tar

方向分类器
wget https://paddleocr.bj.bcebos.com/dygraph_v2.0/ch/ch_ppocr_mobile_v2.0_cls_infer.tar

识别模型
wget https://paddleocr.bj.bcebos.com/PP-OCRv3/chinese/ch_PP-OCRv3_rec_infer.tar
1、将paddleocr压缩包解压到任意位置后,在解压的目录下创建inference文件夹。
2、将下载好的三个推理模型压缩包(检测、方向分类、识别),解压至inference文件夹。
(paddle-gpu) PS D:\PaddleOCR-release-2.6\inference> ls


    目录: D:\PaddleOCR-release-2.6\inference


Mode                 LastWriteTime         Length Name
----                 -------------         ------ ----
d-----          2023/6/6      8:48                ch_PP-OCRv3_det_infer
d-----          2023/6/6      8:48                ch_PP-OCRv3_rec_infer
d-----          2023/6/6      8:48                ch_ppocr_mobile_v2.0_cls_infer
1.2.2 安装paddleocr相关依赖
确保在paddle-gpu虚拟环境下,进入paddleocr根目录。通过requrement安装所有依赖包。
(paddle-gpu) PS D:\PaddleOCR-release-2.6> pip install -r .\requirements.txt -i https://pypi.tuna.tsinghua.edu.cn/simple
安装paddlehub(用于启动服务)
(paddle-gpu) PS D:\PaddleOCR-release-2.6>pip install paddlehub --upgrade -i https://pypi.tuna.tsinghua.edu.cn/simple
1.2.3 修改配置项(模型路径、启动配置)
1、修改params.py的配置项,与inference实际模型路径一致,使用百度提供的训练好的模型。
实际路径:
目录: D:\PaddleOCR-release-2.6\deploy\hubserving\ocr_system
Mode                 LastWriteTime         Length Name
----                 -------------         ------ ----
d-----         2023/6/26     17:14                __pycache__
-a----         2023/6/19     20:09            288 config.json
-a----         2023/6/26     17:34           5230 module.py
-a----         2023/6/10     10:58           2091 params.py
-a----          2023/6/5     14:41            609 __init__.py
params.py配置(为方便迁移,也可以写相对路径):
    cfg.det_model_dir = r"D:\PaddleOCR-release-2.6\inference\ch_PP-OCRv3_det_infer/"
    cfg.rec_model_dir = r"D:\PaddleOCR-release-2.6\inference\ch_PP-OCRv3_rec_infer/"
    cfg.cls_model_dir = r"D:\PaddleOCR-release-2.6\inference\ch_ppocr_mobile_v2.0_cls_infer/"
2、修改config.json,使用gpu启动(use_gpu:true)
{
    "modules_info": {
        "ocr_system": {
            "init_args": {
                "version": "1.0.0",
                "use_gpu": true
            },
            "predict_args": {
            }
        }
    },
    "port": 8868,
    "use_multiprocess": false,
    "workers": 2
}
此时启动后端口为8868,需注意use_multiprocess 和user_gpu不能同时为true。
3、修改默认显存占用
由于本机显存仅有6G,因此修改了默认显存占用为3G。
修改./deploy/hubserving/ocr_system/module.py
cfg.gpu_mem =3000
def _initialize(self, use_gpu=False, enable_mkldnn=False):
        """
        initialize with the necessary elements
        """
        cfg = self.merge_configs()

        cfg.use_gpu = use_gpu
        if use_gpu:
            try:
                _places = os.environ["CUDA_VISIBLE_DEVICES"]
                int(_places[0])
                print("use gpu: ", use_gpu)
                print("CUDA_VISIBLE_DEVICES: ", _places)
                # cfg.gpu_mem = 8000
                cfg.gpu_mem = 3000
1.2.4 安装服务模块
PaddleOCR提供3种服务模块,分别为检测、识别、检测+识别,根据需要安装所需模块。(这里我们是安装的ocr_system)
本次安装:
(paddle-gpu) PS D:\PaddleOCR-release-2.6> hub install ./deploy/hubserving/ocr_system/
出现如下提示则为成功:
[2023-06-27 12:46:14,438] [    INFO] - Successfully uninstalled ocr_system
[2023-06-27 12:46:15,007] [    INFO] - Successfully installed ocr_system-1.0.0
如需安装其他模块,如下:
安装检测服务模块:
hub install deploy/hubserving/ocr_det/

或,安装识别服务模块:
hub install deploy/hubserving/ocr_rec/

或,安装检测+识别串联服务模块:
hub install ./deploy/hubserving/ocr_system/
截至目前相关环境准备和paddleocr已部署完毕,下一步启动服务进行验证。
1.3 启动paddleocr服务(hubserving启动)
1.3.1 config文件启动(支持GPU和CPU)
通过前面1.2.3中config文件的配置,可以选择gpu或者cpu启动,其中windows版不支持cpu的多核启动。
此时根据config文件,服务端口为8868(根据需要可自行修改)。
(paddle-gpu) PS D:\PaddleOCR-release-2.6> hub serving start -c ./deploy/hubserving/ocr_system/config.json
[2023-06-27 12:54:52,906] [ WARNING] - The _initialize method in HubModule will soon be deprecated, you can use the __init__() to handle the initialization of the object
use gpu:  True
CUDA_VISIBLE_DEVICES:  0
 * Serving Flask app 'paddlehub.serving.app_compat'
 * Debug mode: off
WARNING: This is a development server. Do not use it in a production deployment. Use a production WSGI server instead.
 * Running on all addresses (0.0.0.0)
 * Running on http://127.0.0.1:8868
 * Running on http://192.168.8.113:8868
Press CTRL+C to quit
此两种方式均为开发环境启动,用于测试验证,如果计划在服务器端部署,需要使用WSGI server方式启动,需修改源码(待补充)。
1.3.2 命令行启动(仅支持CPU)
由于config文件也支持CPU启动,且CPU版与GPU版性能差距较大,不推荐此种方式(无NV显卡可以使用此方式),此种方式使用默认端口为8866(通过参数可以自行设置)。
(paddle-gpu) PS D:\study\python_test\ocr\PaddleOCR-release-2.6> hub serving start -m ocr_system

[2023-06-27 12:59:15,449] [ WARNING] - The _initialize method in HubModule will soon be deprecated, you can use the __init__() to handle the initialization of the object
 * Serving Flask app 'paddlehub.serving.app_compat'
 * Debug mode: off
WARNING: This is a development server. Do not use it in a production deployment. Use a production WSGI server instead.
 * Running on all addresses (0.0.0.0)
 * Running on http://127.0.0.1:8866
 * Running on http://192.168.8.113:8866
Press CTRL+C to quit
命令行方式启动参数:
| 参数 | 用途 |
|---|---|
| –modules/-m | PaddleHub Serving预安装模型,以多个Module==Version键值对的形式列出当不指定Version时,默认选择最新版本 |
| –port/-p | 服务端口,默认为8866 |
|
–use_multiprocess
| 是否启用并发方式,默认为单进程方式,推荐多核CPU机器使用此方式,Windows操作系统只支持单进程方式 |
| –workers | 在并发方式下指定的并发任务数,默认为2*cpu_count-1,其中cpu_count为CPU核数 |
二、测试验证
服务部署启动后即生成了API,可以通过调用接口方式进行验证,调用此接口会返回一个列表+字典形式的文本识别结果。启动不同的模块,返回结果不同。本次使用ocr_system模块的返回结果为列表(list),列表中的每一项为词典(dict),词典一共可能包含3种字段,信息如下:
| 字段名称 | 数据类型 | 意义 |
|---|---|---|
| text | str | 文本内容 |
| confidence | float | 文本识别置信度 |
| text_region | list | 文本位置坐标 |
下面测试方式供参考。
2.1 通过项目中的test_hubserving.py文件进行验证
再启动一个powershell窗口,激活paddle-gpu环境,进入到paddleocr的根目录下,执行命令,使用项目中自带的图片样例进行测试(如果CPU启动,端口需指定为8866)
(paddle-gpu) PS D:\PaddleOCR-release-2.6> python tools/test_hubserving.py --server_url http://127.0.0.1:8868/predict/ocr_system --image_dir ./doc/imgs/
避坑:项目基于的numpy版本较老,如果本地环境超过1.20,则使用test_hubserving.py时会报错。需要修改module.py,将np.int 修改为np.int_即可。
            for dno in range(dt_num):
                text, score = rec_res[dno]
                rec_res_final.append({
                    'text': text,
                    'confidence': float(score),
                    'text_region': dt_boxes[dno].astype(np.int_).tolist()
                })
逐个图片输出该目录下所有的图片文本识别信息,包含文本、坐标、置信度等信息。
<Response [200]>
[2023/06/27 13:37:33] ppocr INFO: Predict time of ./doc/imgs/00077949.jpg: 0.102s
[2023/06/27 13:37:33] ppocr INFO: [{'confidence': 0.9887571334838867, 'text': '合格证', 'text_region': [[417, 90], [473, 88], [474, 117], [419, 120]]}, {'confidence': 0.989466667175293, 'text': '品名:纯棉单面背心套', 'text_region': [[364, 125], [482, 120], [483, 139], [365, 145]]}, {'confidence': 0.9776275157928467, 'text': '执行标准:FZ/T73025-2006', 'text_region': [[364, 154], [533, 146], [534, 165], [365, 172]]}, {'confidence': 0.9717323184013367, 'text': '安全类别:GB18401-2010', 'text_region': [[366, 185], [530, 179], [531, 198], [366, 205]]}, {'confidence': 0.9857889413833618, 'text': 'A类婴幼儿用品', 'text_region': [[392, 211], [514, 208], [515, 228], [393, 231]]}, {'confidence': 0.982167661190033, 'text': '货号:B2390', 'text_region': [[368, 242], [445, 242], [445, 263], [368, 263]]}, {'confidence': 0.9948680400848389, 'text': 'DREA', 'text_region': [[326, 277], [359, 277], [359, 291], [326, 291]]}, {'confidence': 0.9731743931770325, 'text': '等级:一等品检验员:08', 'text_region': [[368, 275], [520, 275], [520, 294], [368, 294]]}, {'confidence': 0.7965199947357178, 'text': 'BABYUNCL', 'text_region': [[324, 292], [358, 295], [357, 309], [323, 307]]}, {'confidence': 0.9063783288002014, 'text': 'WOTHERA', 'text_region': [[325, 302], [357, 305], [356, 316], [324, 312]]}, {'confidence': 0.9482898712158203, 'text': '成份:面料:100%棉', 'text_region': [[369, 309], [489, 311], [489, 331], [369, 329]]}, {'confidence': 0.9600080251693726, 'text': '小晶晶母婴', 'text_region': [[162, 401], [376, 401], [376, 454], [162, 454]]}, {'confidence': 0.9166029095649719, 'text': '品名:纯棉单面背心套', 'text_region': [[375, 453], [490, 464], [488, 480], [373, 470]]}, {'confidence': 0.9133300185203552, 'text': '51702539', 'text_region': [[432, 447], [494, 451], [494, 462], [432, 458]]}, {'confidence': 0.9347999691963196, 'text': '装:66/48下装:66/47', 'text_region': [[382, 481], [524, 491], [523, 509], [381, 498]]}, {'confidence': 0.9465142488479614, 'text': '零售价:47.50元', 'text_region': [[377, 491], [467, 501], [465, 518], [375, 508]]}]
2.2 python文件request单个文件测试
通过此方式,确认的postman调用失败问题。。
import requests
import json
import base64


def cv2_to_base64(image):
    return base64.b64encode(image).decode('utf8')

headers = {"Content-type": "application/json"}

img = open(r'D:\study\python_test\ocr\PaddleOCR-release-2.6\doc\imgs\11.jpg', 'rb').read()

b = cv2_to_base64(img)
data = {'images': [cv2_to_base64(img)]}


r = requests.post(url='http://127.0.0.1:8866/predict/ocr_system', headers=headers, data=json.dumps(data))
# data数据写入文件
with open('data.txt', 'w') as f:

    f.write(json.dumps(data))

# 打印data数据和返回结果
print(data)
print(r.json()["results"][0])
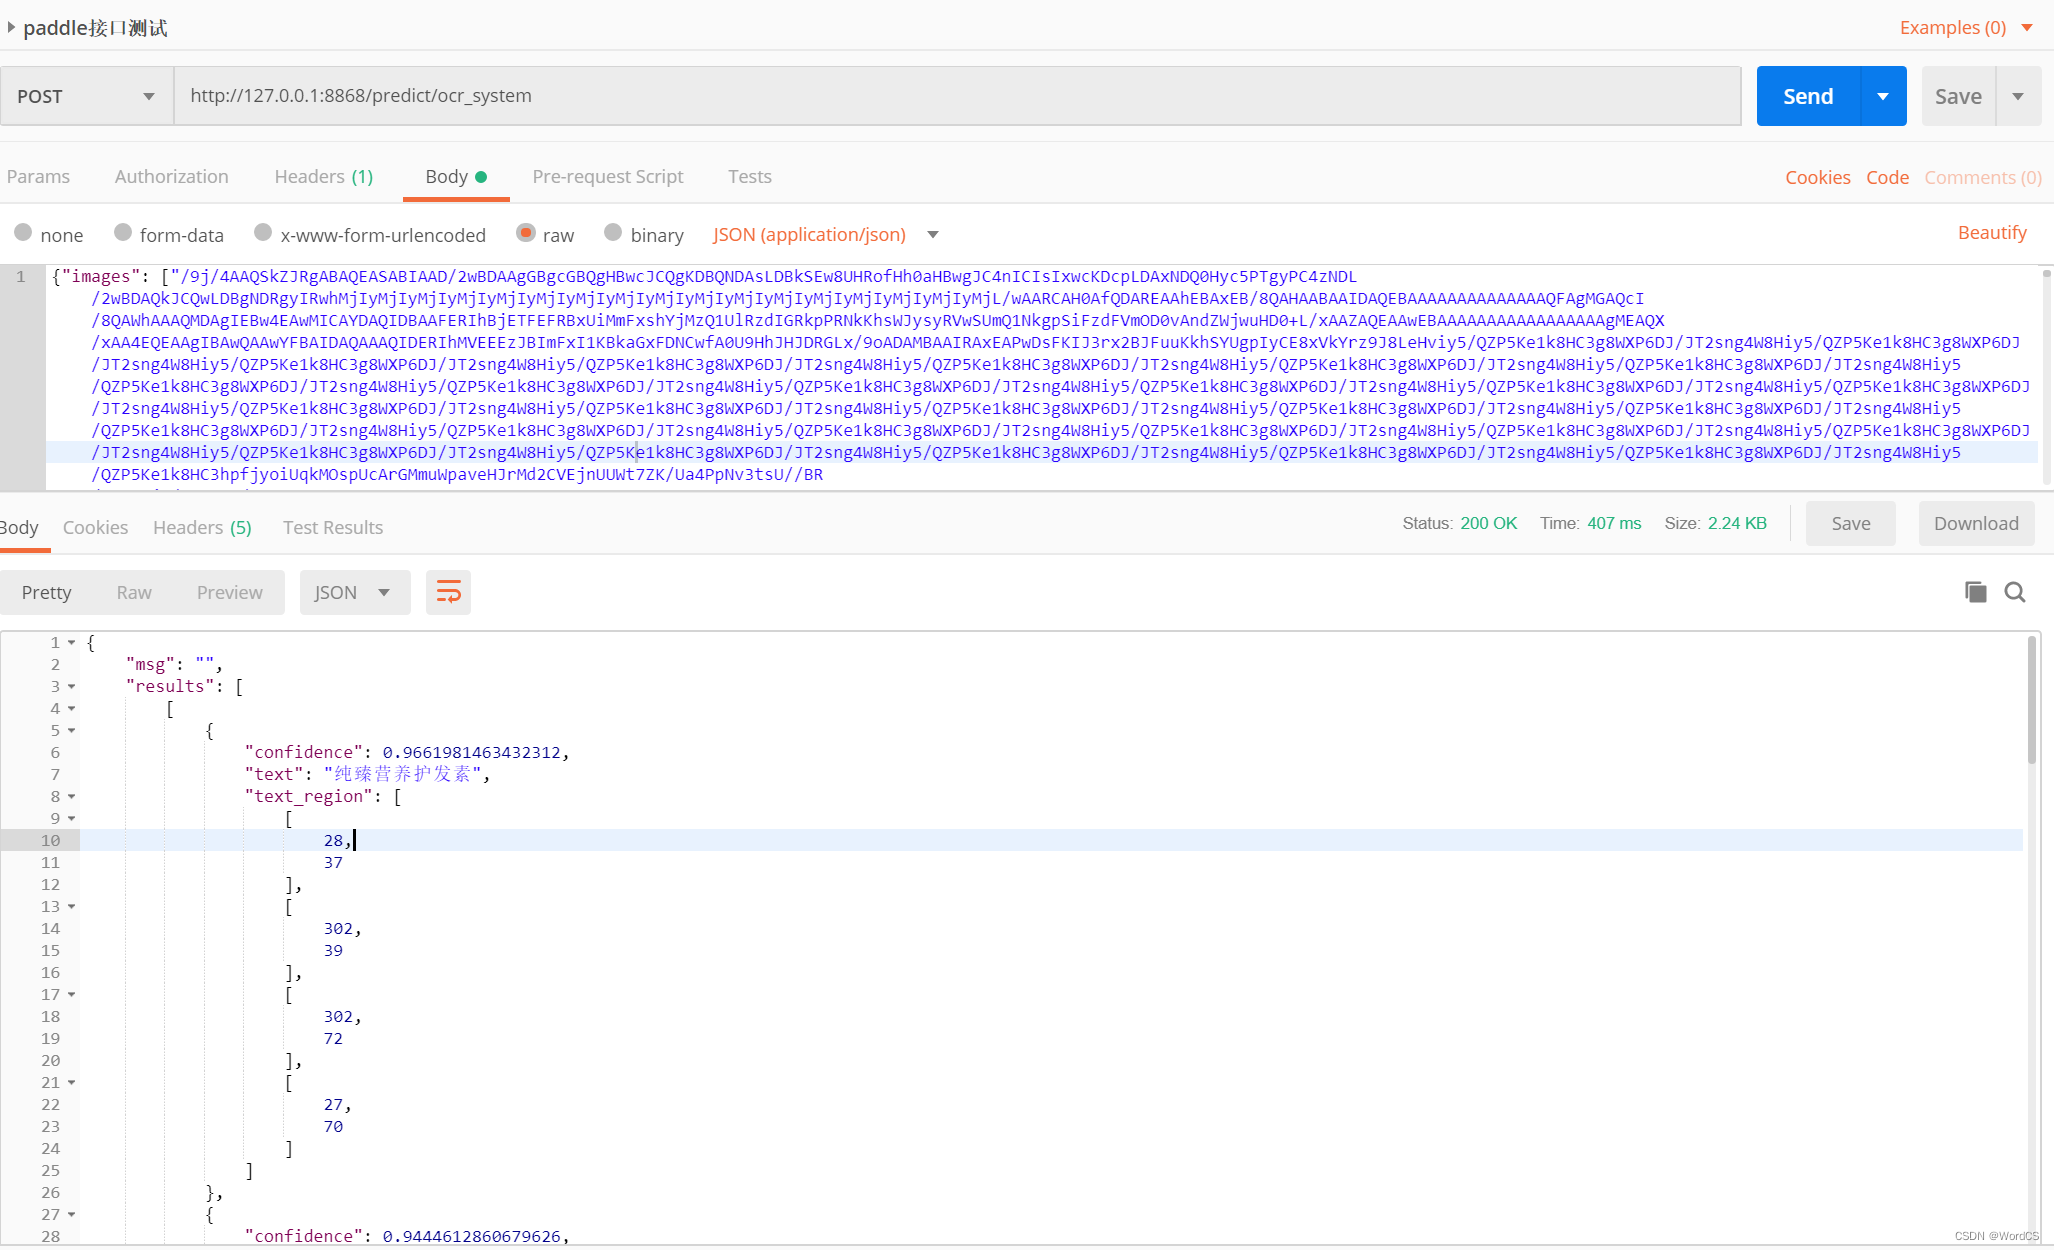
2.3 通过postman调用验证
Headers添加Content-Type application/json,post地址为http://127.0.0.1:8866/predict/ocr_system
b,body为raw的json格式
注意此处body中的json数据,必须为双引号

2.4 通过curl命令手动传送图片的base64编码数据验证(官网验证方式)
由于base64数据太长,不太方便贴入powershell终端,仅作为参考。
a. 计算待识别图片的Base64编码,可以通过免费的在线工具实现,如:http://tool.chinaz.com/tools/imgtobase/,也可以通过python的cv2_to_base64包实现。
或者直接使用\deploy\docker\hubserving路径下的sample_request.txt样例。
b. 发送服务请求
curl -H "Content-Type:application/json" -X POST --data "{\"images\": [\"填入图片Base64编码(需要删除'data:image/jpg;base64,')\"]}" http://localhost:8868/predict/ocr_system
c. 返回结果(如果调用成功,会返回如下结果)
{"msg":"","results":[[{"confidence":0.8403433561325073,"text":"约定","text_region":[[345,377],[641,390],[634,540],[339,528]]},{"confidence":0.8131805658340454,"text":"最终相遇","text_region":[[356,532],[624,530],[624,596],[356,598]]}]],"status":"0"}


 97
97


 被折叠的 条评论
为什么被折叠?
被折叠的 条评论
为什么被折叠?
 到【灌水乐园】发言


