


week2
一、实战一
- 新增一个名称为test的bridge模式网络,网段为172.18.2.0/24,创建一个容器用test网络运行,要求能用宿主机网络访问。
1.创建自定义的网络
- 先查看已有的网络,防止重名
docker network ls
[root@rocky86 ~]# docker network ls
NETWORK ID     NAME      DRIVER    SCOPE
f74257ad041f   bridge    bridge    local
febf075940dc   host      host      local
6d24e1d0923e   none      null      local
- 然后创建
docker network create -d bridge --subnet 172.18.2.0/24 --gateway 172.18.2.1 test
- 再次查看docker网络,多了一个叫test的桥接网络
[root@rocky86 ~]# docker network ls
NETWORK ID     NAME      DRIVER    SCOPE
f74257ad041f   bridge    bridge    local
febf075940dc   host      host      local
6d24e1d0923e   none      null      local
5fc7082cb626   test      bridge    local
- 删除自定义的网络,如果有需要在删除
docker network rm test
2.利用自定义的网络创建容器b1
docker run -it --rm --name b1 --network test alpine sh
- 查看ip ,得到ip
[root@rocky86 ~]# docker run -it --rm --name b1 --network test alpine sh
/ # ip a
1: lo: <LOOPBACK,UP,LOWER_UP> mtu 65536 qdisc noqueue state UNKNOWN qlen 1000
    link/loopback 00:00:00:00:00:00 brd 00:00:00:00:00:00
    inet 127.0.0.1/8 scope host lo
       valid_lft forever preferred_lft forever
6: eth0@if7: <BROADCAST,MULTICAST,UP,LOWER_UP,M-DOWN> mtu 1500 qdisc noqueue state UP
    link/ether 02:42:ac:12:02:02 brd ff:ff:ff:ff:ff:ff
    inet 172.18.2.2/24 brd 172.18.2.255 scope global eth0
       valid_lft forever preferred_lft forever
/ #
3.默认网络创建容器b2
docker run -it --rm --name b2 alpine sh
- 查看ip,并ping b1的ip ,ping 172.18.2.2,发现ping不通
[root@rocky86 ~]# docker run -it --rm --name b2  alpine sh
/ # ip a
1: lo: <LOOPBACK,UP,LOWER_UP> mtu 65536 qdisc noqueue state UNKNOWN qlen 1000
    link/loopback 00:00:00:00:00:00 brd 00:00:00:00:00:00
    inet 127.0.0.1/8 scope host lo
       valid_lft forever preferred_lft forever
37: eth0@if38: <BROADCAST,MULTICAST,UP,LOWER_UP,M-DOWN> mtu 1500 qdisc noqueue state UP
    link/ether 02:42:ac:1e:00:02 brd ff:ff:ff:ff:ff:ff
    inet 172.30.0.2/24 brd 172.30.0.255 scope global eth0
       valid_lft forever preferred_lft forever
/ # ping 172.18.2.2
PING 172.18.2.2 (172.18.2.2): 56 data bytes
^C
4.让默认网络中容器b2可以连通自定义网络test的容器b1
- 指定容器b2连接容器b1的自定义网络test 但是只能单向,只能b2访问b1
- 相当于b2新增了一块网卡
docker network connect test b2
- 要是双向,则指定容器b1连接容器b2的网络
docker network connect bridge b1
5.然后默认网络中容器b2再次ping自定义网络test的容器b1,发现可以连通
/ # ping 172.18.2.2
PING 172.18.2.2 (172.18.2.2): 56 data bytes
64 bytes from 172.18.2.2: seq=0 ttl=64 time=0.159 ms
64 bytes from 172.18.2.2: seq=1 ttl=64 time=0.076 ms
^C
6.断开网络
docker network disconnect bridge b1
docker network disconnect test b2
二、实战二
- harbor安装
- 创建一个harbor镜像仓库A,把镜像上传到harbor仓库A,其他宿主机并能从里面下载镜像创建容器。
- harbor镜像仓库A----10.0.0.150 测试宿主机B----10.0.0.151
Docker的私有仓库Harbor
-
安装Harbor仓库
-
安装docker-compose 因为harbor依赖于docker-compose
-
参考阿里云的https://developer.aliyun.com/article/1080528
-
Docker Compose离线安装
https://github.com/docker/compose/releases/download/v2.13.0/docker-compose-linux-x86_64
- Ubuntu系统:
mv docker-compose-linux-x86_64 /usr/bin/docker-compose
chmod +x /usr/bin/docker-compose
- CentOS系统:
mv docker-compose-linux-x86_64 /usr/local/bin/docker-compose
chmod +x /usr/local/bin/docker-compose
- CentOS在线安装
curl -L https://get.daocloud.io/docker/compose/releases/download/v2.13.0/docker-compose-`uname -s`-`uname -m` > /usr/local/bin/docker-compose
chmod +x /usr/local/bin/docker-compose
1.harbor解压缩
tar xf harbor-offline-installer-v2.6.2.tgz -C /usr/local/
2.编辑 harbor 配置文件
- 新版配置文件为yml格式
[root@ubuntu2004~]# cp /usr/local/harbor/harbor.yml.tmpl /usr/local/harbor/harbor.yml
[root@ubuntu2004 ~]# vi /usr/local/harbor/harbor.yml
- 旧版配置文件为文本格式
[root@ubuntu1804 ~]#vim /usr/local/harbor/harbor.cfg
- 只需要修改下面两行
hostname = 10.0.0.150  #修改此行,指向当前主机IP 或 FQDN,建议配置IP
harbor_admin_password = 123456 #修改此行指定harbor登录用户admin的密码,默认用户/密码:admin/Harbor12345
- https协议注释
#https:
  # https port for harbor, default is 443
  # port: 443
  # The path of cert and key files for nginx
  #certificate: /your/certificate/path
  #private_key: /your/private/key/path
- https协议不注释会报错
prepare base dir is set to /usr/local/harbor
Error happened in config validation...
ERROR:root:Error: The protocol is https but attribute ssl_cert is not set
- 数据存放路径(可以不修改)
data_volume: /data
- 可修改
data_volume: /data/harbor
3.运行 harbor 安装脚本
root@ubuntu20:/usr/local/harbor# pwd
/usr/local/harbor
root@ubuntu20:/usr/local/harbor# ls
common.sh  harbor.v2.6.2.tar.gz  harbor.yml  harbor.yml.tmpl  install.sh  LICENSE  prepare
root@ubuntu20:/usr/local/harbor# ./install.sh
- 安装harbor后会自动开启很多相关容器
docker ps
root@ubuntu20:/usr/local/harbor# docker ps
CONTAINER ID   IMAGE                                COMMAND                  CREATED          STATUS                    PORTS                                   NAMES
27287a6194cb   goharbor/harbor-jobservice:v2.6.2    "/harbor/entrypoint.…"   17 minutes ago   Up 17 minutes (healthy)                                           harbor-jobservice
f770461db616   goharbor/nginx-photon:v2.6.2         "nginx -g 'daemon of…"   17 minutes ago   Up 17 minutes (healthy)   0.0.0.0:80->8080/tcp, :::80->8080/tcp   nginx
967d2d022d6b   goharbor/harbor-core:v2.6.2          "/harbor/entrypoint.…"   17 minutes ago   Up 17 minutes (healthy)                                           harbor-core
4fe0183da556   goharbor/harbor-db:v2.6.2            "/docker-entrypoint.…"   17 minutes ago   Up 17 minutes (healthy)                                           harbor-db
e6396d08f309   goharbor/redis-photon:v2.6.2         "redis-server /etc/r…"   17 minutes ago   Up 17 minutes (healthy)                                           redis
82e2459018c0   goharbor/harbor-portal:v2.6.2        "nginx -g 'daemon of…"   17 minutes ago   Up 17 minutes (healthy)                                           harbor-portal
52c34cfe30f5   goharbor/registry-photon:v2.6.2      "/home/harbor/entryp…"   17 minutes ago   Up 17 minutes (healthy)                                           registry
2c3c931144da   goharbor/harbor-registryctl:v2.6.2   "/home/harbor/start.…"   17 minutes ago   Up 17 minutes (healthy)                                           registryctl
67b16d47bb96   goharbor/harbor-log:v2.6.2           "/bin/sh -c /usr/loc…"   17 minutes ago   Up 17 minutes (healthy)   127.0.0.1:1514->10514/tcp               harbor-log
- 用浏览器访问: http://10.0.0.150/
- 用户名: admin 密码: 即前面harbor.yml中指定的密码12345
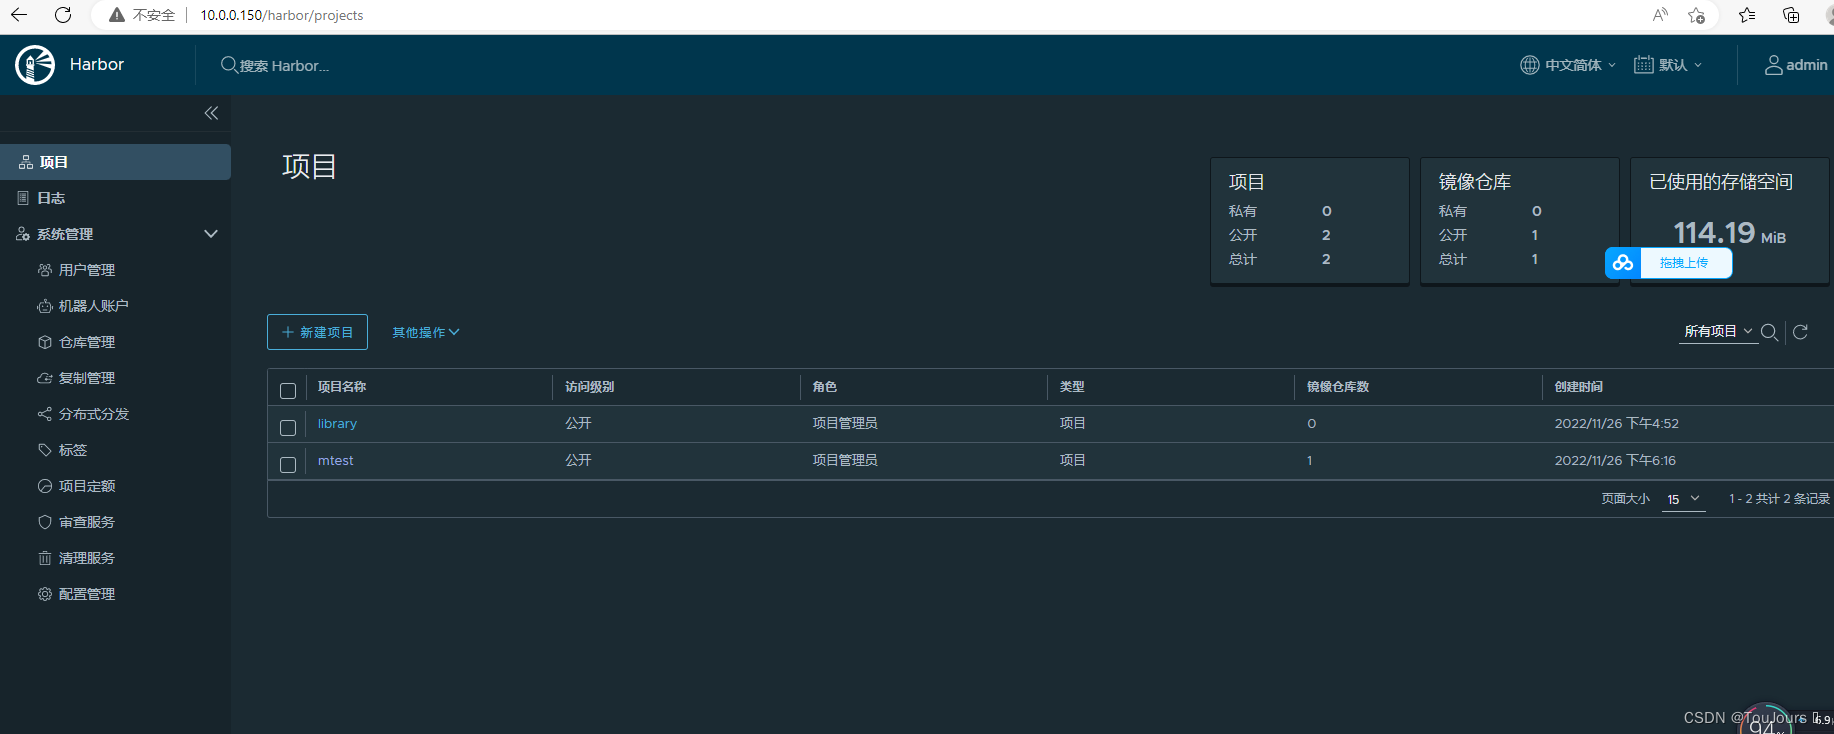
4.实现开机自动启动 harbor
-
方法1: 通过 rc.local实现 (建议使用这个方法)
-
设置harbor开机时启动,编辑系统开机时执行的最后一个文件
[root@harbor harbor]# vim /etc/rc.local
cd /usr/local/harbor
docker-compose start
[root@harbor harbor]# ll /etc/rc.local
lrwxrwxrwx. 1 root root 13 Dec  2  2020 /etc/rc.local -> rc.d/rc.local
[root@harbor harbor]# ll /etc/rc.d/rc.local
-rw-r--r--. 1 root root 516 Aug 11 18:41 /etc/rc.d/rc.local
- 因为/etc/rc.local文件是/etc/rc.d/rc.local的软链接,而/etc/rc.d/rc.local是个执行文件,所以需要执行权限
[root@harbor harbor]# chmod +x /etc/rc.d/rc.local
- 方法2: 通过service文件实现
vim /lib/systemd/system/harbor.service
[Unit]
Description=Harbor
After=docker.service systemd-networkd.service systemd-resolved.service
Requires=docker.service
Documentation=http://github.com/vmware/harbor
[Service]
Type=simple
Restart=on-failure
RestartSec=5
ExecStart=/usr/bin/docker-compose -f /apps/harbor/docker-compose.yml up
ExecStop=/usr/bin/docker-compose -f /apps/harbor/docker-compose.yml down
[Install]
WantedBy=multi-user.target
[root@harbor ~]#systemctl daemon-reload
[root@harbor ~]#systemctl enable harbor
5.登录私有仓库
- 在Docker Host主机通过域名访问
- harbor主机添加域名解析
[root@rocky86 ~]# vim /etc/hosts
[root@rocky86 ~]# cat /etc/hosts
127.0.0.1   localhost localhost.localdomain localhost4 localhost4.localdomain4
::1         localhost localhost.localdomain localhost6 localhost6.localdomain6
10.0.0.150  harbor.lec.org
- 修改docker daemon
vim /etc/docker/daemon.json
{
  "insecure-registries": ["harbor.lec.org"],
  "registry-mirrors": [
    "https://si7y70hh.mirror.aliyuncs.com","https://docker.mirrors.ustc.edu.cn",
    "https://lez13whp.mirror.aliyuncs.com","https://hub-mirror.c.163.com",
    "https://mirror.ccs.tencentyun.com","https://reg-mirror.qiniu.com"

    ],
  "bip": "172.17.0.1/16"
}
systemctl daemon-reload;systemctl restart docker
- 停止harbor
root@ubuntu20:~# cd /usr/local/harbor;docker-compose stop
[+] Running 9/9
 ⠿ Container registryctl        Stopped                                                                                                                             10.3s
 ⠿ Container harbor-jobservice  Stopped                                                                                                                              0.7s
 ⠿ Container nginx              Stopped                                                                                                                              0.7s
 ⠿ Container harbor-portal      Stopped                                                                                                                              0.4s
 ⠿ Container harbor-core        Stopped                                                                                                                              0.4s
 ⠿ Container redis              Stopped                                                                                                                              0.5s
 ⠿ Container harbor-db          Stopped                                                                                                                              0.4s
 ⠿ Container registry           Stopped                                                                                                                              0.3s
 ⠿ Container harbor-log         Stopped
- 开启harbor
[root@rocky86 harbor]# docker-compose start
[+] Running 9/9
 ⠿ Container harbor-log         Started                                                                                                                              0.6s
 ⠿ Container harbor-db          Started                                                                                                                              3.1s
 ⠿ Container registryctl        Started                                                                                                                              3.0s
 ⠿ Container harbor-portal      Started                                                                                                                              3.0s
 ⠿ Container redis              Started                                                                                                                              3.1s
 ⠿ Container registry           Started                                                                                                                              2.9s
 ⠿ Container harbor-core        Started                                                                                                                              0.7s
 ⠿ Container harbor-jobservice  Started                                                                                                                              1.5s
 ⠿ Container nginx              Started
- 登录harbor
docker login harbor.lec.org
Username: admin
Password:
WARNING! Your password will be stored unencrypted in /root/.docker/config.json.
Configure a credential helper to remove this warning. See
https://docs.docker.com/engine/reference/commandline/login/#credentials-store

Login Succeeded
6.推送镜像到私有仓库
- 将本地的任意镜像制作标签,如rockylinux镜像
docker tag rockylinux:v8.5-2022-11-20 harbor.lec.org/mtest/rockylinux:v8.5-2022-11-20
- 推送到harbor上mtest仓库
docker push harbor.lec.org/mtest/rockylinux:v8.5-2022-11-20
-
测试其他机器(10.0.0.151)从harbor上拉取刚才推送的rockylinux镜像
-
10.0.0.151添加域名解析
vim /etc/hosts
10.0.0.150  harbor.lec.org
- 10.0.0.151修改docker daemon
vim /etc/docker/daemon.json

{
  "insecure-registries": ["harbor.lec.org"],
  "registry-mirrors": [
    "https://si7y70hh.mirror.aliyuncs.com","https://docker.mirrors.ustc.edu.cn",
    "https://lez13whp.mirror.aliyuncs.com","https://hub-mirror.c.163.com",
    "https://mirror.ccs.tencentyun.com","https://reg-mirror.qiniu.com"

    ],
  "bip": "172.17.0.1/16"
}
systemctl daemon-reload;systemctl restart docker
- 测试从harbor上上拉取刚才推送的rockylinux镜像
docker pull harbor.lec.org/mtest/rockylinux:v8.5-2022-11-20
root@ubuntu20:/usr/local/harbor# docker images
REPOSITORY                        TAG               IMAGE ID       CREATED         SIZE
harbor.lec.org/mtest/rockylinux   v8.5-2022-11-20   4d42ae577eec   5 days ago      327MB
7.拓展知识
- 将本地的harbor.example.com/library/httpd:v1.1删除
[root@client ~]# docker rmi harbor.example.com/library/httpd:v1.1
三、实战三
用haproxy实现两个web服务器的负载均衡
一、简介
1、应用场景
四层:Redis、Mysql、RabbitMQ、Memcached等
七层:Nginx、Tomcat、Apache、PHP、图片、动静分离、API等
在企业生产环境中,每天会有很多的需求变更,比如增加服务器、新业务上线、url路由修改、域名配置等等,对于前端负载均衡设备来说,容易维护,复杂度低,是首选指标。在企业中,稳定压倒一切,与其搞得很复杂,经常出问题,不如做的简单和稳定。在企业中,90%以上的故障,来源于需求变更。可能是程序bug,也可能是人为故障,也可能是架构设计问题等。
前端负载均衡设备为重中之重,在软件选型上一定充分考虑,能满足业务的前提下,尽可能降低复杂度,提高易维护性
2、版本
企业版网站:https://www.haproxy.com/
社区版网站:http://www.haproxy.org/
github:https://github.com/haproxy
3.安装
- rokcey8 安装
yum -y install haproxy
卸载
yum -y remove haproxy
- 查看版本
[root@rocky86 ~]# haproxy -v
HA-Proxy version 1.8.27-493ce0b 2020/11/06
Copyright 2000-2020 Willy Tarreau <willy@haproxy.org>
- ubuntu安装
apt update
apt-get install --no-install-recommends software-properties-common
add-apt-repository ppa:vbernat/haproxy-2.6
apt-get install haproxy=2.6.\*
- 查看版本
root@ubuntu20:~# haproxy -v
HAProxy version 2.6.6-1ppa1~focal 2022/09/22 - https://haproxy.org/
Status: long-term supported branch - will stop receiving fixes around Q2 2027.
Known bugs: http://www.haproxy.org/bugs/bugs-2.6.6.html
Running on: Linux 5.4.0-132-generic #148-Ubuntu SMP Mon Oct 17 16:02:06 UTC 2022 x86_64
二、拓扑图
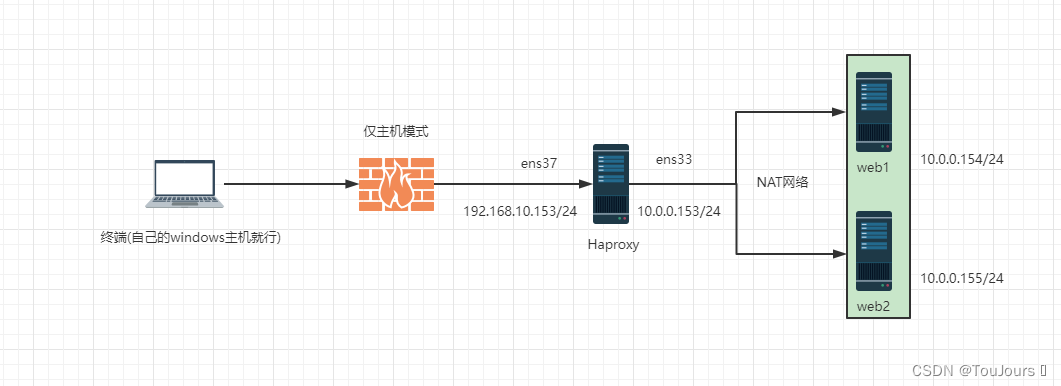
- 预期结果
curl 访问haproxy那台外网
三、机器搭建
| 主机 | IP |
|---|---|
| haproxy | 内网:10.0.0.153 外网:192.168.10.153 |
| web01 | 10.0.0.154 |
| web02 | 10.0.0.155 |
四、配置web端的nginx页面
- web01
vi /var/www/html/index.html
<h1> www.lec.org 10.0.0.154 </h1>
- web02
vi /var/www/html/index.html
<h1> www.lec.org 10.0.0.155 </h1>
五、修改haproxy的配置
- 在最下面加入自己的listen
listen lec.org_http_80
    bind 192.168.10.153:80
    server web1 10.0.0.154:80
    server web2 10.0.0.155:80
root@haproxy:~# cat /etc/haproxy/haproxy.cfg
global
maxconn 100000
stats socket /var/lib/haproxy/haproxy.sock mode 600 level admin
uid 99
gid 99
daemon
pidfile /var/lib/haproxy/haproxy.pid
log 127.0.0.1 local3 info
defaults
option http-keep-alive
option forwardfor
maxconn 100000
mode http
timeout connect 300000ms
timeout client 300000ms
timeout server 300000ms
listen stats
mode http
bind 0.0.0.0:9999
stats enable
log global
stats uri /haproxy-status
stats auth admin:123456
#listen kubernetes-6443
# bind 192.168.10.100:6443
# mode tcp
# log global
# server 192.168.10.101 192.168.10.101:6443 check inter 3000 fall 2 rise 5
# server 192.168.10.102 192.168.10.102:6443 check inter 3000 fall 2 rise 5
# server 192.168.10.103 192.168.10.102:6443 check inter 3000 fall 2 rise 5
#
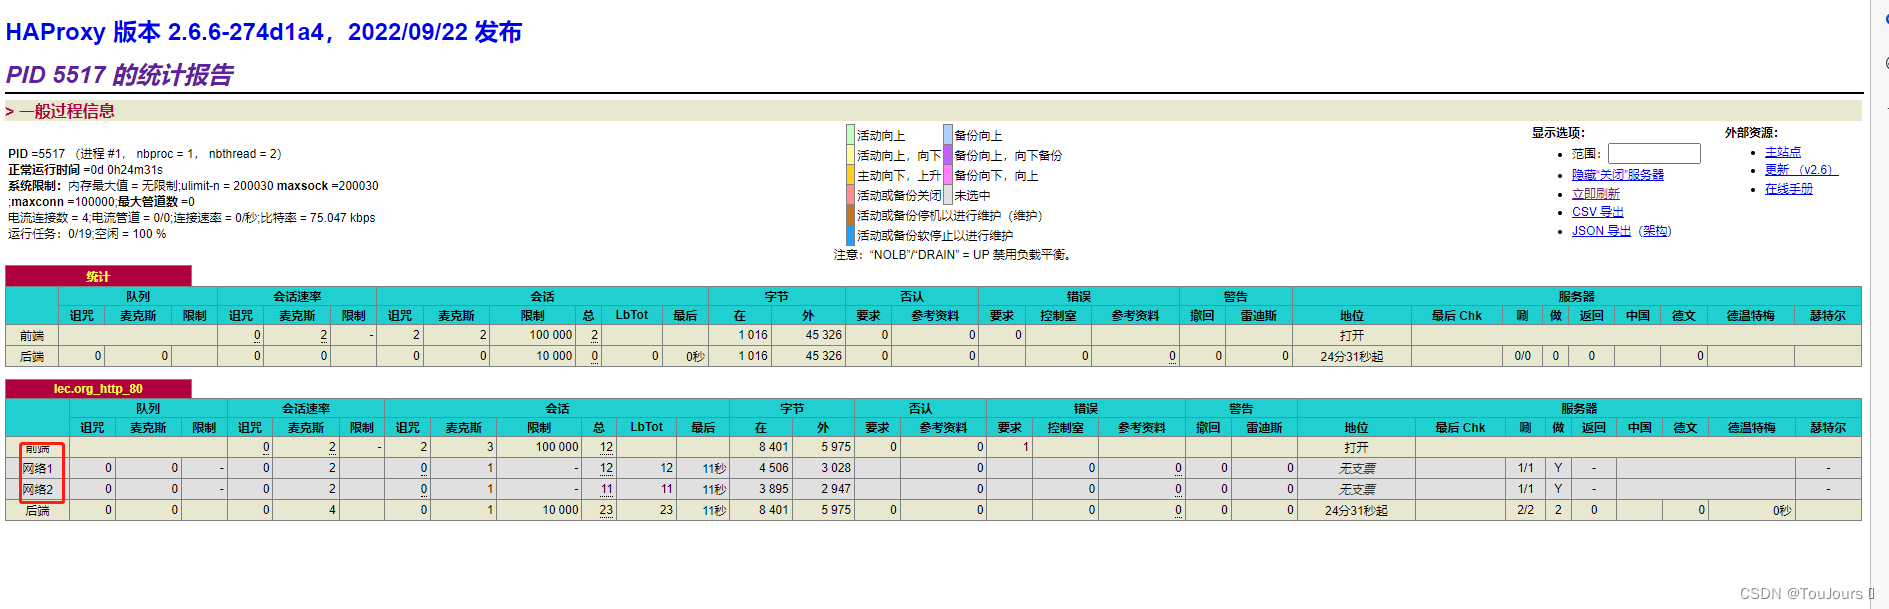
listen lec.org_http_80
bind 192.168.10.153:80
server web1 10.0.0.154:80
server web2 10.0.0.155:80
- 校验配置文件格式是否正确
root@haproxy:/etc/haproxy# haproxy -c -f haproxy.cfg
Configuration file is valid
- 重启haproxy
root@haproxy:~# systemctl restart haproxy.service
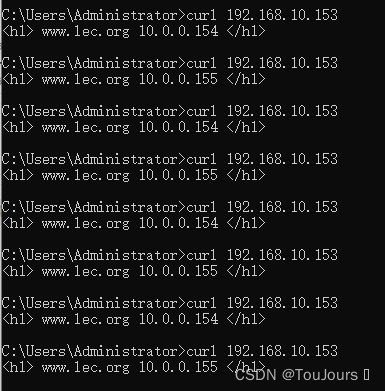
六、访问测试
- windows通过curl测试
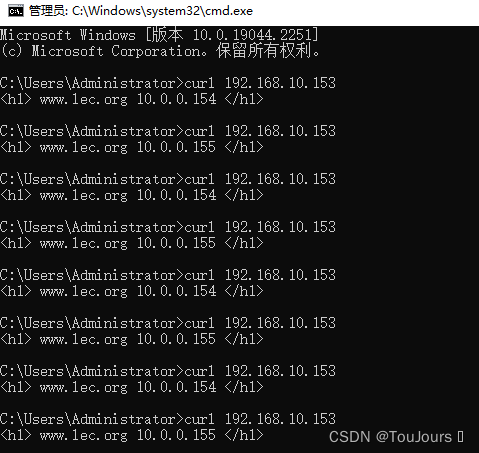
- 浏览器输入haproxy的外网192.168.10.153


- 浏览器输入haproxy的http://10.0.0.153:9999/haproxy-status


 790
790


 被折叠的 条评论
为什么被折叠?
被折叠的 条评论
为什么被折叠?
 到【灌水乐园】发言


