


目录
论文链接:https://github.com/ucaszyp/STEPS?tab=readme-ov-file/
讲解链接:https://air.tsinghua.edu.cn/info/1008/2051.htm
1. 系统配置
本人系统:Win11 CUDA11.1 python3.7(下面的教程是安装CUDA12.2的)
这里附上几个CUDA安装链接:
2. 拉取代码,配置环境
首先,克隆 github 仓库
git clone git@github.com:ucaszyp/STEPS.git
cd STEPS
下载权重
https://drive.google.com/drive/folders/16bqgIYBDg4dd9eGFWYL6Cyp5xCs4-DbI
创建 conda 环境。
conda create -n STEPS python=3.7
conda activate STEPS
pip install torch==1.8.0+cu111 torchvision==0.9.0 torchmetrics==0.9.0 -f https://download.pytorch.org/whl/torch_stable.html
pip install pytorch-lightning==1.6.4
pip install -r requirements.txt
4.数据集下载:
训练数据集-Nuscenes
作者只用了package1、2、5、9、10,下载着五个就行
全网首发 nuScenes数据集(百度网盘 + 迅雷网盘) + 下载方法
测试数据集-Nuscenes
https://drive.google.com/drive/folders/1n2WsaGtB-tRiPyee-vAYF6Cd7EZr4RGe

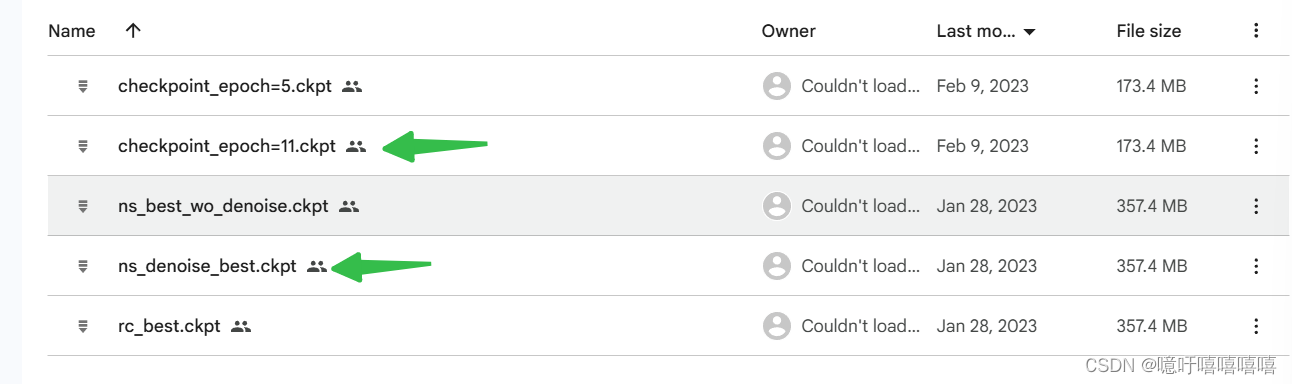
权重下载
https://drive.google.com/drive/folders/16bqgIYBDg4dd9eGFWYL6Cyp5xCs4-DbI

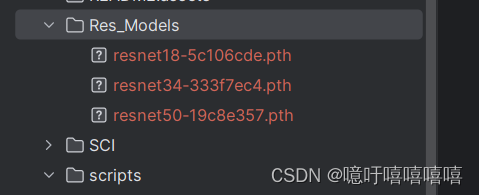
ResNet 预训练权重下载
由于在测试的时候报了一个缺少resnet预训练权重的错误,我们这里提前将其下载好
选择一个连接点进去下载就可以了,将其放到Res_Models下面
'resnet18': 'https://download.pytorch.org/models/resnet18-5c106cde.pth',
'resnet34': 'https://download.pytorch.org/models/resnet34-333f7ec4.pth',
'resnet50': 'https://download.pytorch.org/models/resnet50-19c8e357.pth',
'resnet101': 'https://download.pytorch.org/models/resnet101-5d3b4d8f.pth',
'resnet152': 'https://download.pytorch.org/models/resnet152-b121ed2d.pth',
5.Test
数据组织
下载好的test_ns数据选择color或者color_denoise放入data/nuScenes-Night/test

注意文件位置不要放错了,不然报错很多
并修改datasets/common.py下的数据:

修改如下两处地方的代码:
加上 .split(“__”)[2]
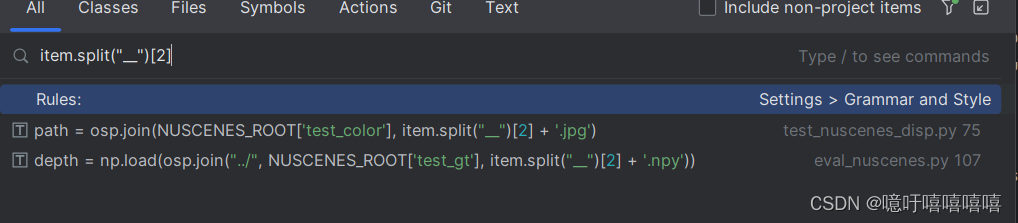
因为作者给的gt没有前缀

运行代码:
sh scripts/test_ns.sh
#!/usr/bin/env bash

CUDA_VISIBLE_DEVICES=0 python test_nuscenes_disp.py night steps_ns best/ns_best_denoise.ckpt --test 1
cd evaluation
python eval_nuscenes.py night
cd ..
python show_predictions.py
# done
scripts/test_ns.sh中我添加了一个show_predictions.py让他输出predictions.npy中的内容,但是效果不尽人意,怀疑epoch=11太少了?所以效果不好?求求大佬解答!
# show_predictions.py

import os.path

import numpy as np
import numpy as np
from plyfile import PlyData, PlyElement
import cv2
import os

file_path = "evaluation/ns_result/predictions.npy"
output_dir = "output"
os.makedirs(output_dir, exist_ok=True)

# 加载 .npy 文件
data = np.load(file_path)  # [图片个数,深度图长,深度图宽]

# 循环遍历每一个深度图
for i in range(len(data)):
    depth_image = data[i]
    # 如果深度图的值需要归一化到16位图像的范围
    if depth_image.dtype != np.uint16:
        # 归一化到16位的范围
        depth_image = ((depth_image - depth_image.min()) / (depth_image.max() - depth_image.min()) * 65535).astype(
            np.uint16)
        depth_path = os.path.join(output_dir, str(i))
        cv2.imwrite(f"{depth_path}.png", depth_image)
运行结果


 7820
7820


 被折叠的 条评论
为什么被折叠?
被折叠的 条评论
为什么被折叠?
 到【灌水乐园】发言


