


1 图像灰度化
1.0 Demo
import cv2
def grayImage(sourceDir):
	img = cv2.imread(sourceDir)
	cv2.imshow("Source Image", img)
	gray = cv2.cvtColor(img, cv2.COLOR_BGR2GRAY)
	cv2.imshow("Gray image", gray)
	print("Image BGRA value: {}".format(img))
	print("Shape of PNG image: {}".format(img.shape))
	print("Image Gray value: {}".format(gray))
	print("Shape of gray image: {}".format(gray.shape))
sourceDir = "./images/reading/250.png"
grayImage(sourceDir)
1.2 Result
Image BGR value: [[[202 140   0]
  [202 140   0]
  [202 140   0]
  ...
  [202 140   0]
  [202 140   0]
  [202 140   0]]

 [[203 141   1]
  [203 141   1]
  [203 141   1]
  ...
  [203 141   1]
  [203 141   1]
  [203 141   1]]

 [[203 141   1]
  [203 141   1]
  [203 141   1]
  ...
  [203 141   1]
  [203 141   1]
  [203 141   1]]

 ...

 [[ 90 175  59]
  [ 90 175  59]
  [ 90 175  59]
  ...
  [ 92 179  51]
  [ 90 180  50]
  [ 88 179  52]]

 [[ 90 175  59]
  [ 90 175  59]
  [ 92 175  59]
  ...
  [ 92 179  52]
  [ 90 180  51]
  [ 88 179  54]]

 [[ 92 175  59]
  [ 92 175  59]
  [ 94 175  59]
  ...
  [ 90 176  58]
  [ 88 176  58]
  [ 88 176  58]]]
Shape of image: (250, 250, 3)
Image Gray value: [[105 105 105 ... 105 105 105]
 [106 106 106 ... 106 106 106]
 [106 106 106 ... 106 106 106]
 ...
 [131 131 131 ... 131 131 131]
 [131 131 131 ... 131 131 131]
 [131 131 131 ... 131 131 131]]
Shape of gray image: (250, 250)
处理的灰度图


1.3 Analysis
- imread()读取图片文件,并解码成整型数据,数据维度为(250,250,3),其中250,250为图片尺寸,3是图片通道数;
- (250, 250, 3)数据为250x(250,3),三列数值分别为B,G,R通道数据;
- BGR2GRAY计算:
0.114 ∗ B + 0.587 ∗ G + 0.229 ∗ R 0.114*B+0.587*G+0.229*R 0.114∗B+0.587∗G+0.229∗R - GRAY数据维度为(250, 250);
2 图片二值化
2.1 直接二值化
2.1.0 Demo1
def directBinary(sourceDir):
	img = cv2.imread(sourceDir)
	cv2.imshow("Source Image", img)
	gray = cv2.cvtColor(img, cv2.COLOR_BGR2GRAY)
	retval, dst = cv2.threshold(gray, 0, 255, cv2.THRESH_BINARY)
	print("Binary image value: {}".format(binary))
	print("Threshold value: {}".format(ret))
	cv2.imshow("Global Binary", binary)
	cv2.waitKey(0)
sourceDir = "./images/reading/250.png"
directBinary(sourceDir)
2.1.2 Result
Binary image value: [[255 255 255 ... 255 255 255]
 [255 255 255 ... 255 255 255]
 [255 255 255 ... 255 255 255]
 ...
 [255 255 255 ... 255 255 255]
 [255 255 255 ... 255 255 255]
 [255 255 255 ... 255 255 255]]
Shape of binary image value: (250, 250)
Threshold value: 0.0
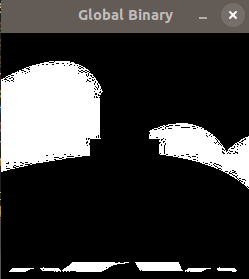
全白的二值化图

2.1.3 Demo2
def directBinary(sourceDir):
	img = cv2.imread(sourceDir)
	cv2.imshow("Source Image", img)
	gray = cv2.cvtColor(img, cv2.COLOR_BGR2GRAY)
	retval, dst = cv2.threshold(gray, 0, 255, cv2.THRESH_BINARY | cv2.THRESH_TRIANGLE)
	# 设置输出numpy.array的数量,如1e6,可以将省略号部分显示出来
	np.set_printoptions(threshold=1e6)
	print("Binary image value: {}".format(binary))
	print("Threshold value: {}".format(ret))
	cv2.imshow("Global Binary", binary)
	cv2.waitKey(0)
sourceDir = "./images/reading/250.png"
directBinary(sourceDir)
2.1.4 Result
Binary image value: [[0 0 0 ... 0 0 0]
 [0 0 0 ... 0 0 0]
 [0 0 0 ... 0 0 0]
 ...
 [0 0 0 ... 0 0 0]
 [0 0 0 ... 0 0 0]
 [0 0 0 ... 0 0 0]]
Shape of binary image value: (250, 250)
Threshold value: 174.0
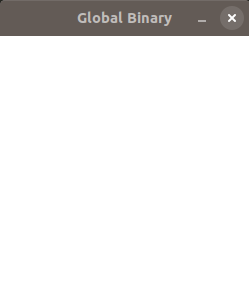
直接二值化处理

2.1.5 Analysis
- cv2.threshold(src, thresh, maxval, type)对应值(gray, 0, 255, cv2.THRESH_BINARY)或(gray, 0, 255, cv2.THRESH_BINARY | cv2.THRESH_BINARY),返回阈值revtal和处理的图像矩阵dst;
- type:为阈值的计算方式,ThresholdTypes常用的有ThresholdBinary, Truncate, Value and Threshold Level等;
- ThresholdBinary计算dst的公式为:
d s t ( x , y ) = { m a x v a l , if src(x,y)>thresh 0 , otherwise dst(x,y)=\begin{cases} maxval, &\text{if src(x,y)>thresh} \\ 0, & \text {otherwise} \end{cases} dst(x,y)={maxval,0,if src(x,y)>threshotherwise - Demo1直接使用ThresholdBinary,返回矩阵全部为255,因为thresh设为0,maxval设为255,输入的gray矩阵像素值全小于255,所以返回白图一张;
- Demo2使用ThresholdBinary和ThreshTriangle取或运算,ThresholdTriangle使用Triangle算法计算合适的阈值,本次计算为174.0,所以返回的dst以174为阈值进行分割,有0有225,返回黑白图;
2.2 自适应阈值二值化
2.2.1 Demo
def adaptiveBinary(sourceDir):
	img = cv2.imread(sourceDir)
	cv2.imshow("Source image", img)
	gray = cv2.cvtColor(img, cv2.COLOR_BGR2GRAY)
	binary = cv2.adaptiveThreshold(gray, 255, cv2.ADAPTIVE_THRESH_GAUSSIAN_C, cv2.THRESH_BINARY, 25, 10)
	print("Binary image value: {}".format(binary))
	cv2.imshow("Adaptive image", binary)
	cv2.waitKey(0)
sourceDir = "./images/reading/250.png"
adaptiveBinary(sourceDir)
2.2.2 Result
Binary image value: [[255 255 255 ... 255 255 255]
 [255 255 255 ... 255 255 255]
 [255 255 255 ... 255 255 255]
 ...
 [255 255 255 ... 255 255 255]
 [255 255 255 ... 255 255 255]
 [255 255 255 ... 255 255 255]]
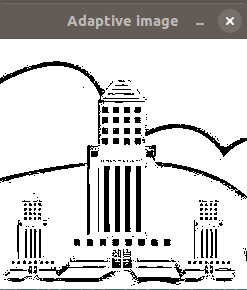
自适应处理

2.2.3 Analysis
- cv2.adaptiveThreshold(src, maxValue, adaptiveMethod, thresholdType, blockSize, C)对应cv2.adaptiveThreshold(gray, 255, cv2.ADAPTIVE_THRESH_GAUSSIAN_C, cv2.THRESH_BINARY, 25, 10)返回图像像素矩阵值dst;
- 高斯自适应算法计算阈值ADAPTIVE_THRESH_GAUSSIAN_C;
- 25为计算阈值取的像素面积,5x5也即卷积神经网络滑动窗口;
- 10为计算的阈值减去的值;
2.3 均值二值化
2.3.1 Demo
def meanBinary(sourceDir):
	img = cv2.imread(sourceDir)
	cv2.imshow("Source image", img)
	gray = cv2.cvtColor(img, cv2.COLOR_BGR2GRAY)
	y, x = gray.shape[:2]
	m = np.reshape(gray, (1, x*y))
	print("Reshape value: {}".format(m))
	print("Shape of reshape value: {}".format(m.shape))
	mean = m.sum()/(x*y)
	print("Mean of gray image value: {}".format(mean))
	retval, dst = cv2.threshold(gray, mean, 255, cv2.THRESH_BINARY)
	print("Retval value: {}".format(retval))
	cv2.imshow("Custom image", dst)
	cv2.waitKey(0)
sourceDir = "./images/reading/250.png"
meanBinary(sourceDir)
2.3.2 Result
Reshape value: [[105 105 105 ... 131 131 131]]
Shape of reshape value: (1, 62500)
Mean of gray image value: 130.606224
Retval value: 130.0
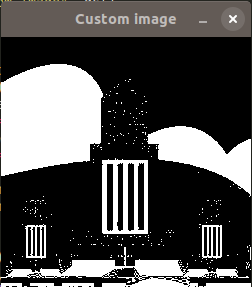
原图及二值图

2.3.3 Analysis
- 计算像素点均值mean作为阈值;
- 使用THRESH_BINARY作为阈值类型,输出较好的反映了图片内容;
3 总结
- 二值化步骤:读取图片imread ⟹ \implies ⟹ 灰度化cvtColor(img, cv2.COLOR_BGR2GRAY) ⟹ \implies ⟹二值化threshold;
- 直接二值化,丢失信息过多,自适应二值化获取图形轮廓较全面,均值二值化类似于直接二值化;
- OpenCV读取图片,输出三列数据分别为B,G,R;
[参考文献]
[1]https://www.cnblogs.com/FHC1994/p/9125570.html
[2]https://blog.csdn.net/wenhao_ir/article/details/51565517


 1728
1728

 被折叠的 条评论
为什么被折叠?
被折叠的 条评论
为什么被折叠?
 到【灌水乐园】发言


