


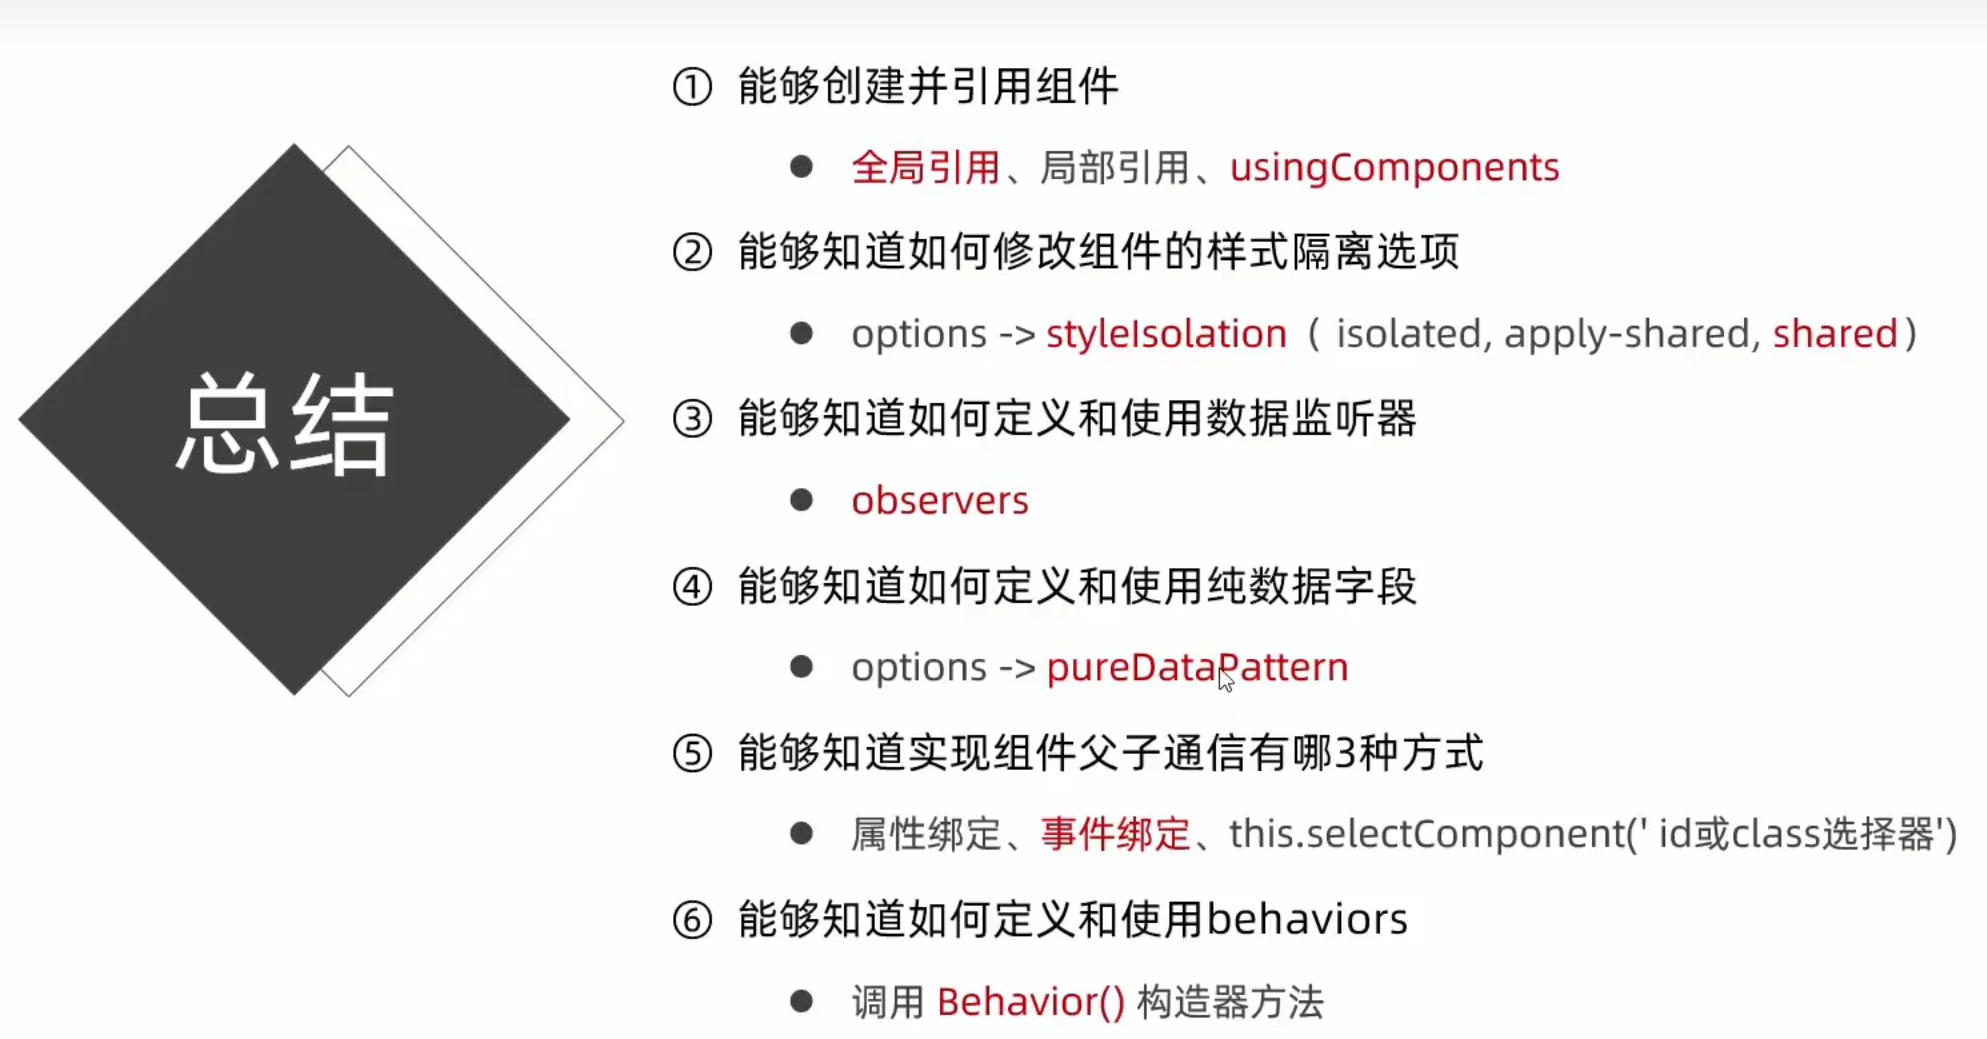
 文章介绍了微信小程序中自定义组件的创建和引用,包括样式隔离、数据与方法、属性、数据监听器的使用,以及组件的生命周期、插槽机制、父子组件通信和behaviors的运用。详细阐述了组件开发的关键概念和实践技巧。
文章目录
简介
黑马程序员,学习记录
视频链接:黑马程序员前端微信小程序开发教程,微信小程序从基础到发布全流程_企业级商城实战
———— 自定义组件 ————
1. 创建和引用
- 创建

- 引用
分为 局部引用 和 全局引用
//在 页面的 .json 文件中   或者   App.json  引入即可
{
  "usingComponents": {
    "my-test1":"/components/test/test"
  }
}
- 组件和页面的区别
{
  "component": true,  // 组件 中默认有这个属性  表示这是个组件
  "usingComponents": {}
}
// 组件的 .js 文件中  其中事件处理函数要写在methods节点中
Component{
    ...
    methods:{
        ...
    }
}

// 页面的 .js 文件中
Page{...}
2. 样式
- 组件样式隔离
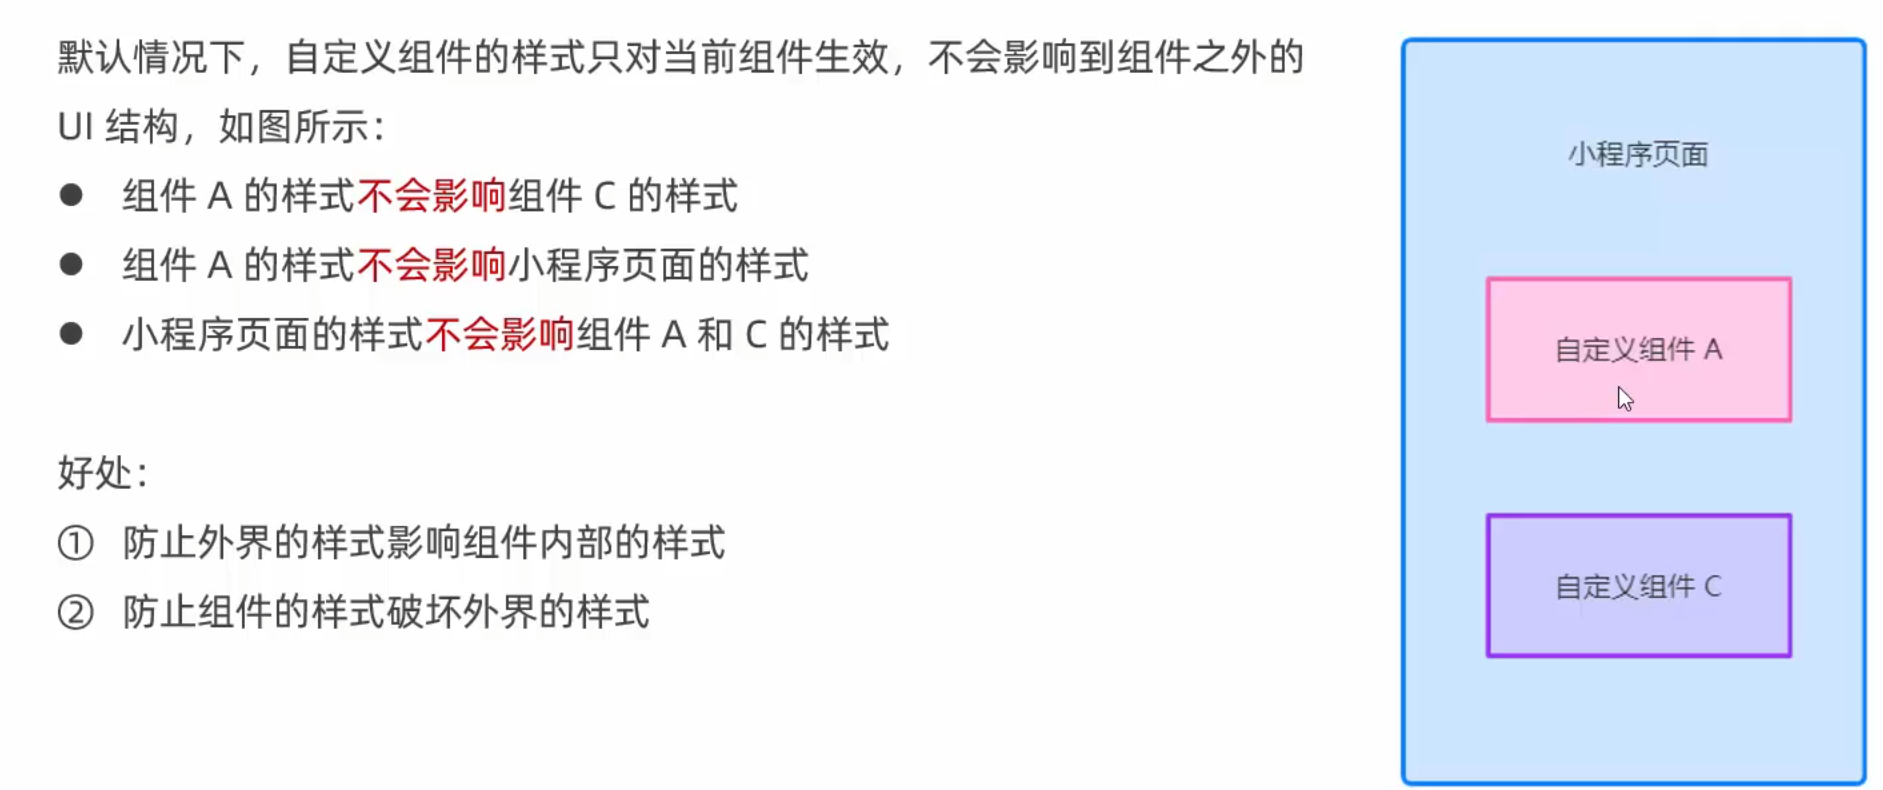
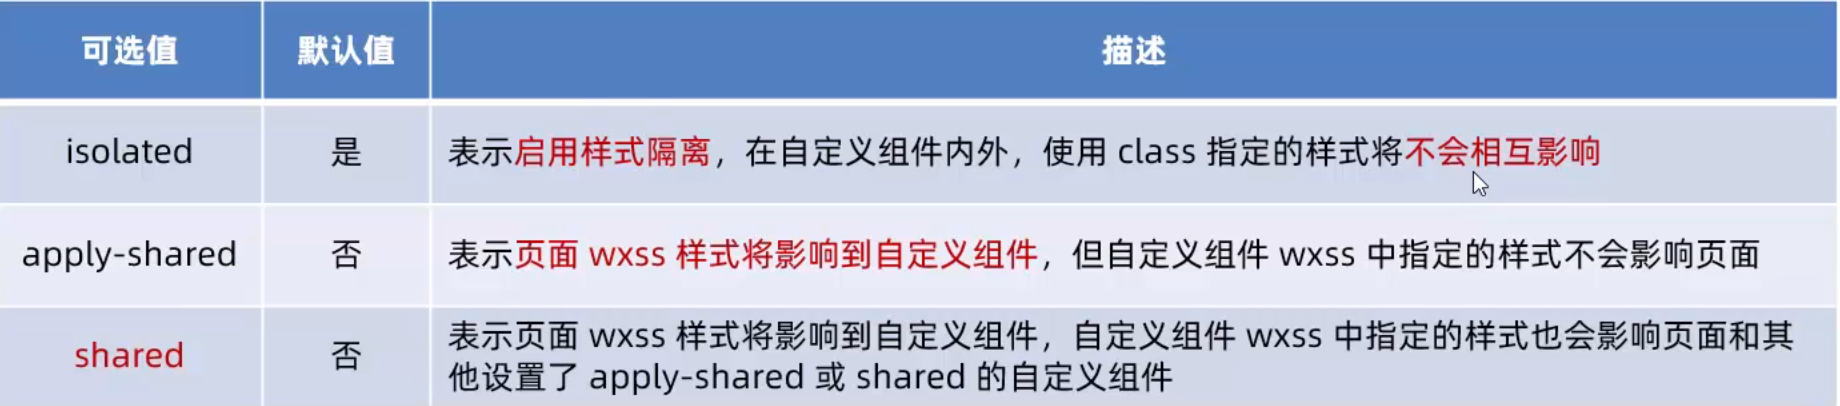
- 注意事项

- 修改组件的样式隔离选项
  options:{
    styleIsolation:'isolated'
  },
可选参数
3. 数据、方法、属性
- data 私有数据
  /**
   * 组件的初始数据
   */
  data: {
    count: 0
  },
- methods 方法
  /**
   * 组件的方法列表
   */
  methods: {
    // 点击事件处理函数
    addCount(){
      this.setData({
        count: this.data.count + 1
      })
      this._showCount() // 调用自定义方法方法      自定义方法建议用 下划线_开头 用于和事件处理函数区分
    },
    _showCount(){
      wx.showToast({ // wx.showToast 弹窗方法
        title: 'count是' + this.data.count,
        icon: 'none'
      })
    }
  }
-
properties 属性
对外属性 接收外部传到组件中的数据 和 vue 中的 props 属性差不多
  /**
   * 组件的属性列表
   */
  properties: {
    // 第一种方式:简化的方式 无法指定默认值
    max: Number,
    // 第二种方式:完整的定义方式
    max1: {
      type: Number,
      value: 10  // 没传用这个 传了用传进来的值
    }
  },
-
data 和 properties 的区别
data : 更倾向于存储组件的私有数据。
properties :更倾向于存储外界传递到组件中的数据。
都是可读可写的 这俩是一个对象 本质上没有任何区别 !

-
使用 setData 修改 properties 的值
和 修改 data 的值一样 直接修改就行
      this.setData({
        count: this.data.count + 1,
        max: this.properties.max + 1
      })
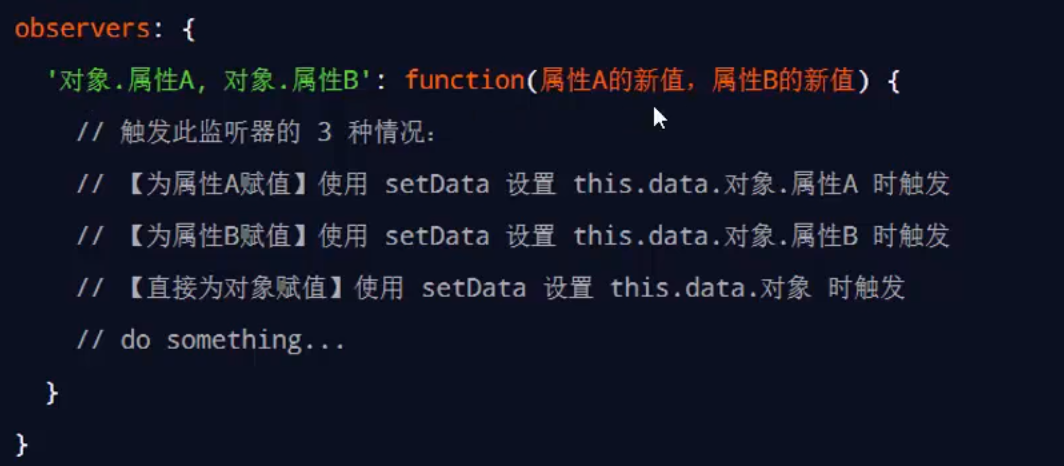
4. 数据监听器
- 介绍

- 基本用法
<view>
  {{n1}} + {{n2}} = {{sum}}
</view>

<button type="primary" bindtap="addN1">n1 + 1</button>
<button type="default" bindtap="addN2">n2 + 1</button>
  data: {
    n1: 0, n2: 0, sum: 0
  },

  methods: {
    addN1() {
      this.setData({
        n1: this.data.n1 + 1
      })
    },
    addN2() {
      this.setData({
        n2: this.data.n2 + 1
      })
    }
  },
      // 监听器
  observers: {
    'n1, n2': function (newN1, newN2) {  // n1 n2 为监听的属性    newN1 newN2 是新值
      this.setData({
        sum: newN1 + newN2
      })
    }
  }
-
监听对象的变化
支持监听对象中单个或多个属性的变化
- 监听器 案例
<view style="background-color: rgb({{fullColor}});" class="colorBox">
	颜色值:{{fullColor}}
</view>
<button size="mini" type="default" bindtap="changeR">R</button>
<button size="mini" type="primary"  bindtap="changeG">G</button>
<button size="mini" type="warn"  bindtap="changeB">B</button>
<view>
  {{rgb.r}},{{rgb.g}},{{rgb.b}}
</view>
.colorBox{
  line-height: 200rpx;
  font-size: 24rpx;
  color: white;
  text-shadow: 0rpx 0rpx 2prx black;
  text-align: center;
}
// components/test3/test3.js
Component({
  /**
   * 组件的属性列表
   */
  properties: {

  },

  /**
   * 组件的初始数据
   */
  data: {
    rgb: {
      r: 0,
      g: 0,
      b: 0,
      fullColor: '0, 0, 0'
    }
  },

  /**
   * 组件的方法列表
   */
  methods: {
    changeR() {
      this.setData({
        'rgb.r': this.data.rgb.r + 5 >= 255 ? 255 : this.data.rgb.r + 5
      })
    },
    changeG() {
      this.setData({
        'rgb.g': this.data.rgb.g + 5 >= 255 ? 255 : this.data.rgb.g + 5
      })
    },
    changeB() {
      this.setData({
        'rgb.b': this.data.rgb.b + 5 >= 255 ? 255 : this.data.rgb.b + 5
      })
    }
  },
  observers: {
    // 'rgb.r, rgb.g, rgb.b':function(r, g, b){
    //   this.setData({
    //     fullColor:`${r}, ${g}, ${b}`
    //   })
    // }
    'rgb.**':function(obj){
      this.setData({
        fullColor:`${obj.r}, ${obj.g}, ${obj.b}`
      })
    }
  }
})

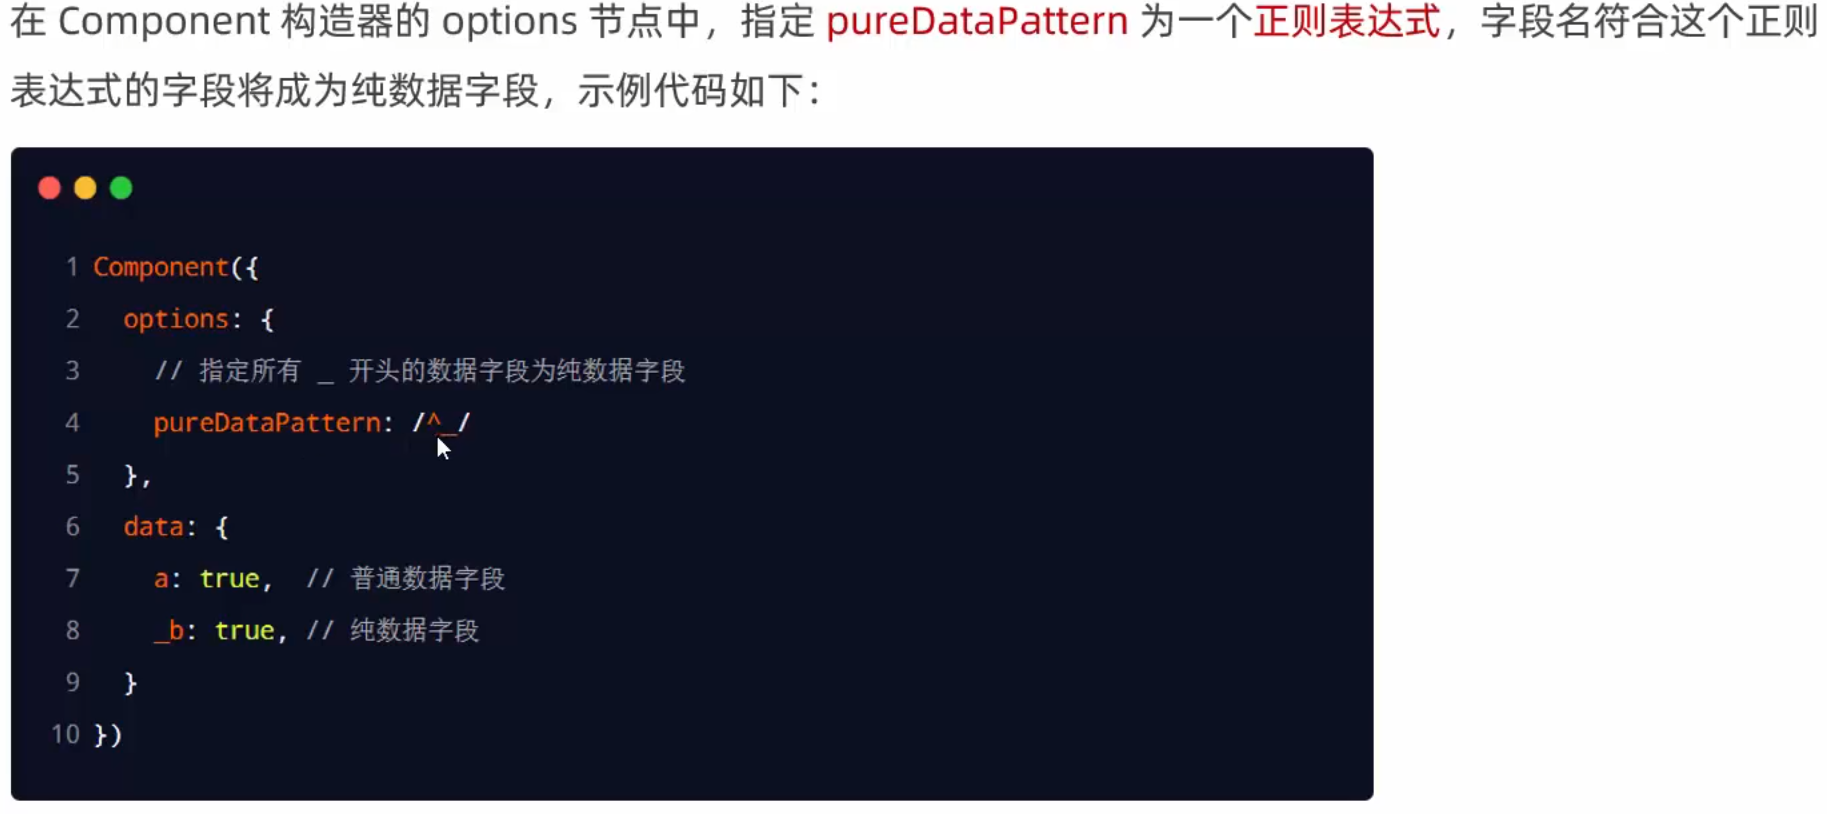
5. 纯数据字段
- 介绍

- 使用规则
- 改造 监听器 案例
 // 满足此正则表达式的即为 纯数据字段
  options:{
    pureDataPattern:/^_/
  },

//将页面上所有rgb 改成 _rgb 即可成为纯数据字段
6. 生命周期
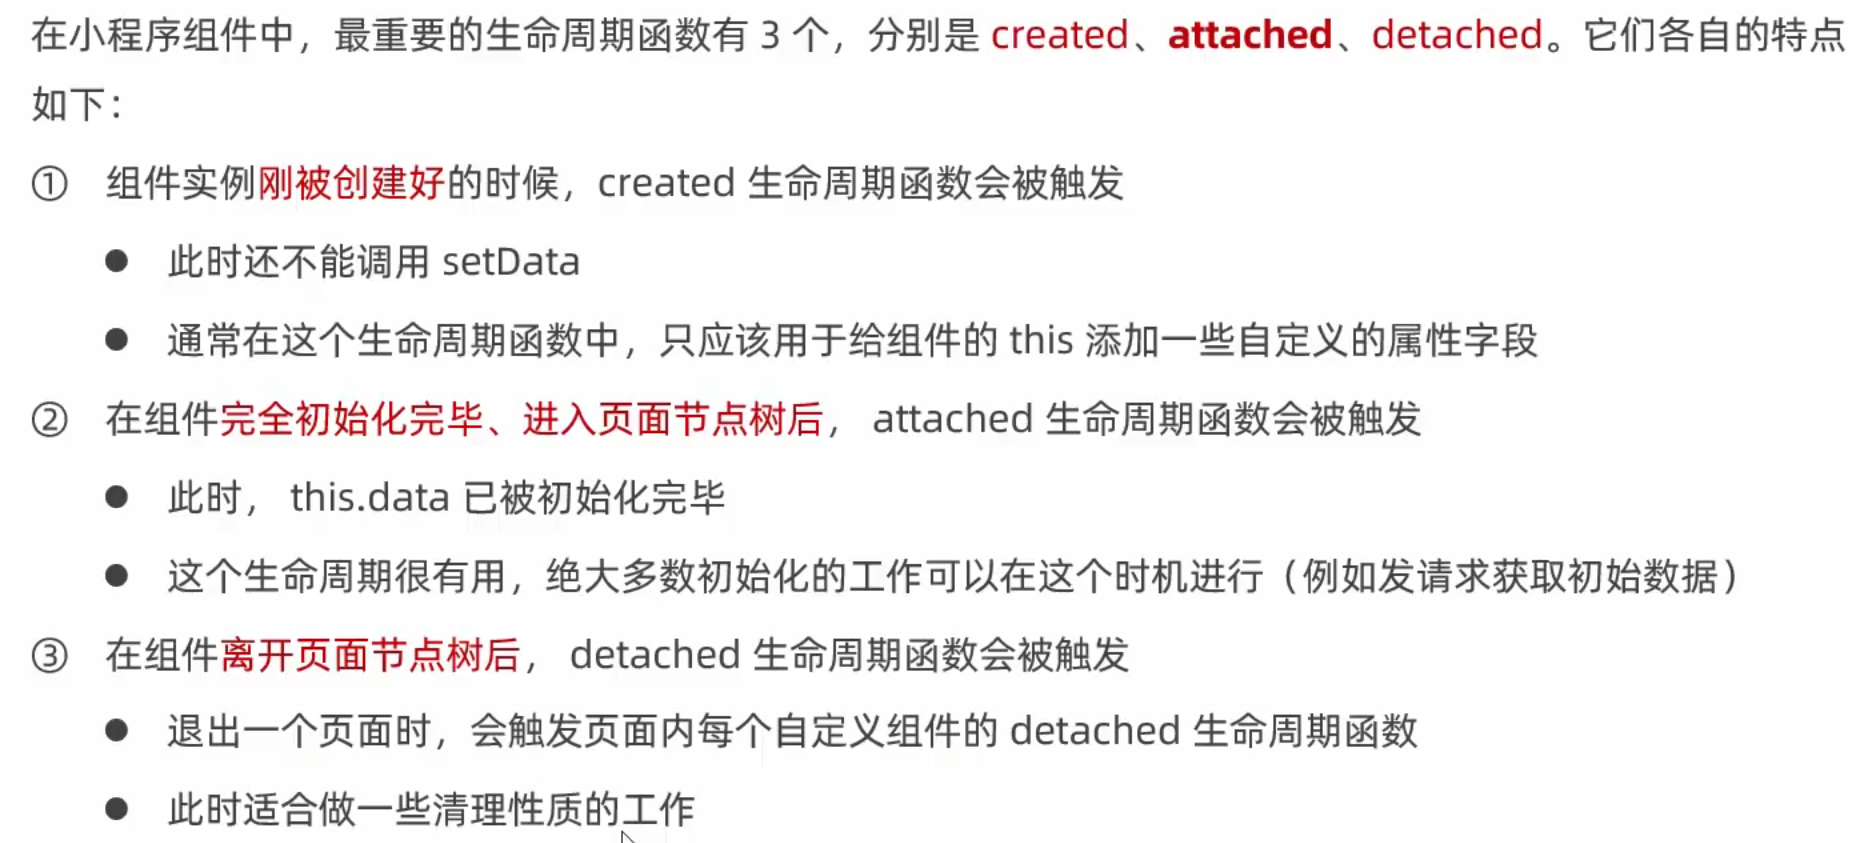
- 组件的全部生命周期函数
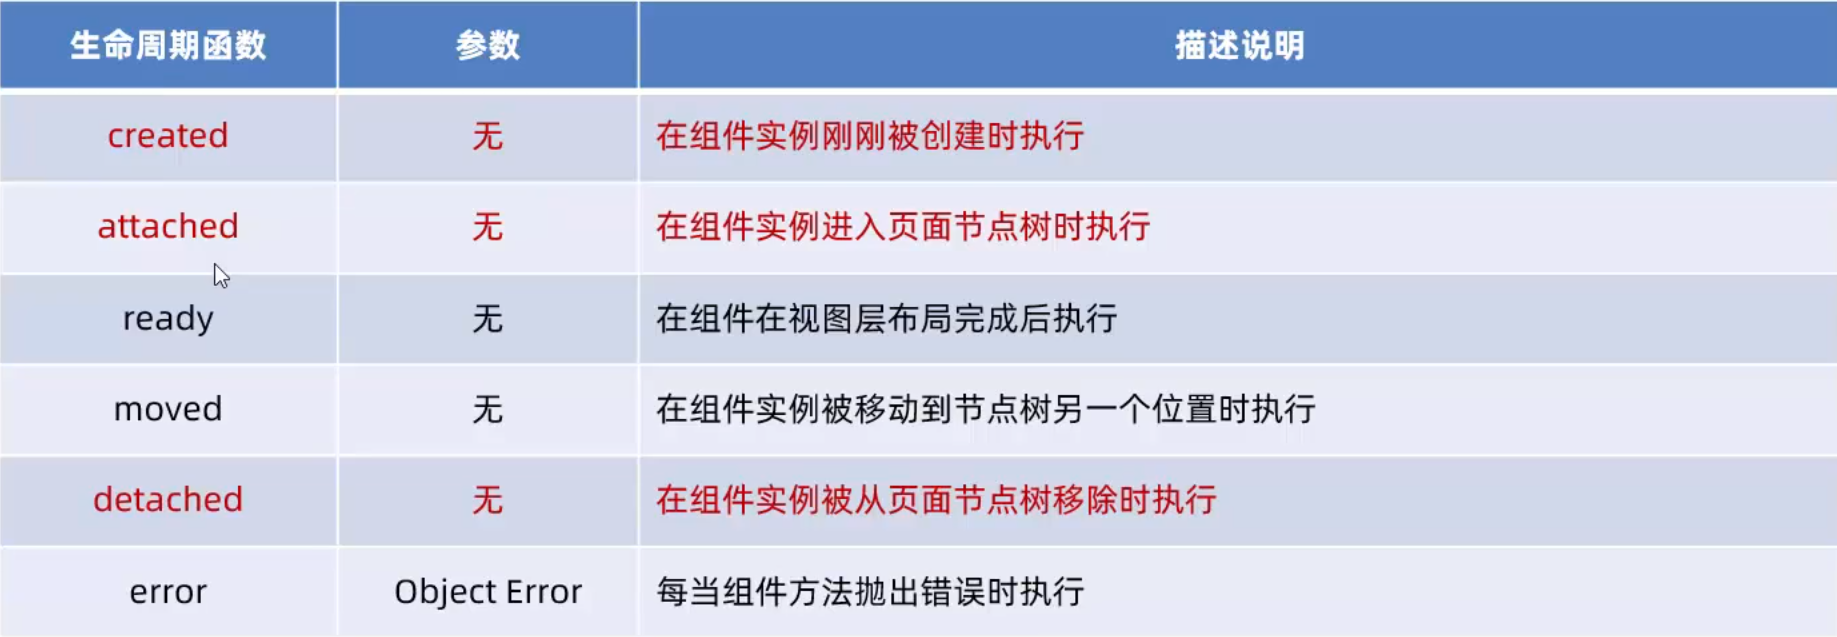
- 主要的生命周期函数 !
-
lifetimes 节点
和 data methods 等同级创建
这个优先级最高 !!!
若两种写法同时存在 则采用新版的!!!
// created:{ // }, // attached:{ // }, lifetimes:{ created:{ // 组件刚被创建好时调用这个方法 setData 还不能用! }, attached:{ // 类似vue中的挂载 这个意思放到页面节点树中 会触发这个方法 这时 setData 可以用了 } } -
组件所在页面的生命周期

//和 lifetimes 同级
  pageLifetimes: {
    show() {
      console.log("show");    // 进入页面就会执行
    },
    hide() {
      console.log("hide");   // 离开页面会执行
    },
    resize() {
      console.log("resize");	//页面尺寸变化时执行
    }
  }
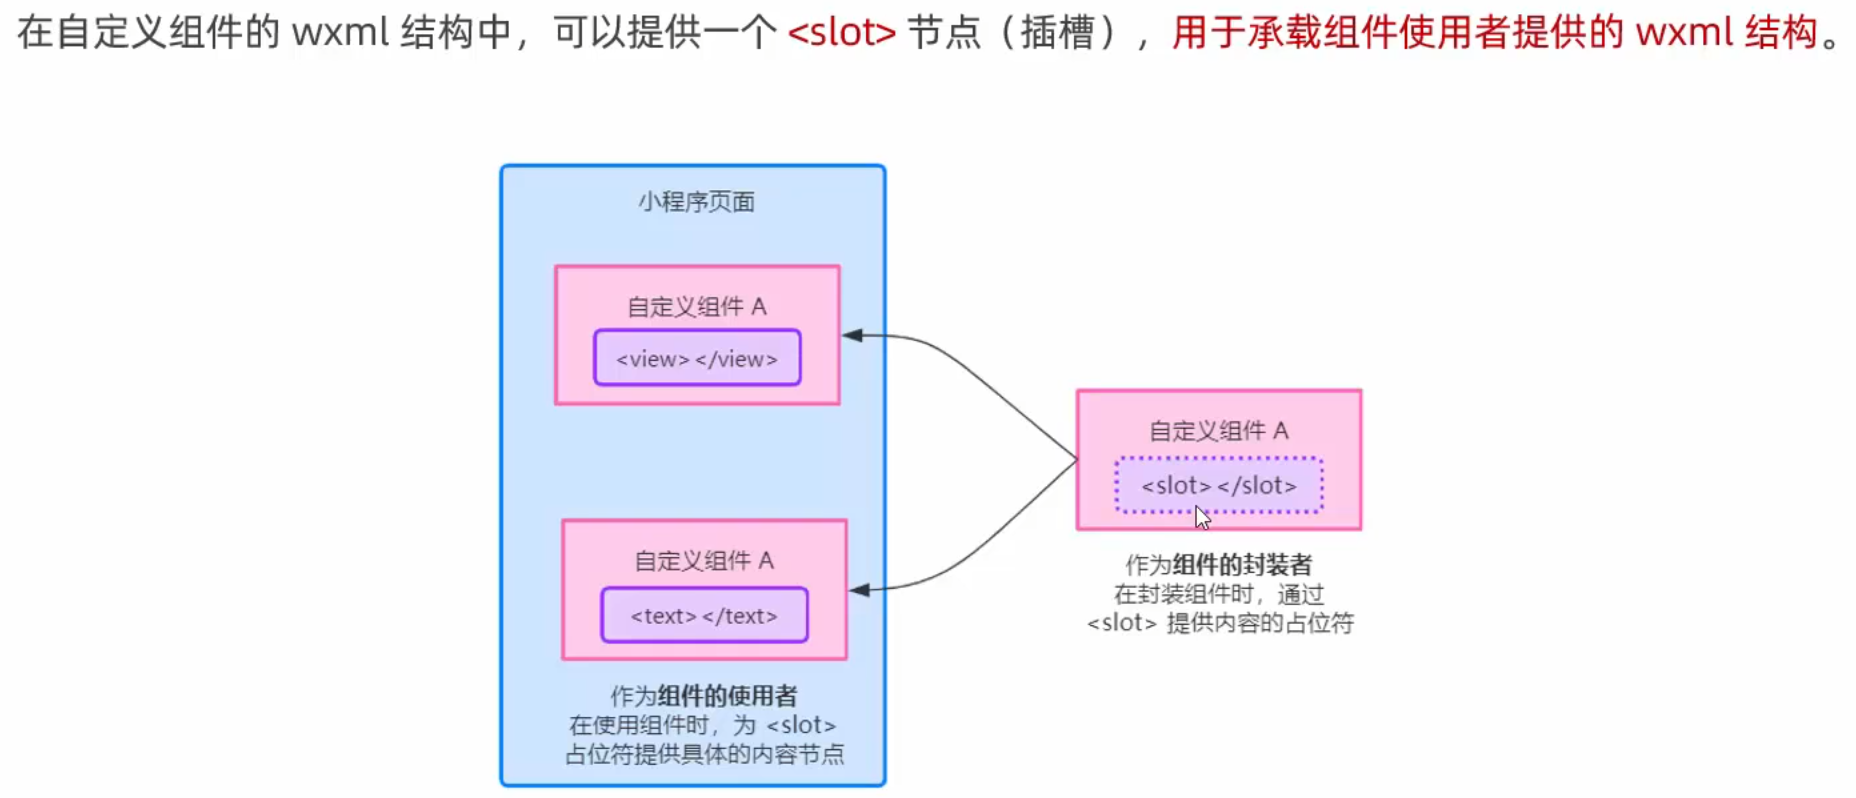
7. 插槽
- 介绍
-
单个插槽
在小程序中,默认每个自定义组件中只允许使用一个进行占位,这种个数的限制叫做单个插槽
<view>
  <view>
    这里是组件的内部结构
  </view>
   <!-- 子组件插槽 -->
  <slot></slot>
</view>
<my-test4>
    <!-- 这样给插槽插入数据 -->
  <view>
    这是通过插槽填充的内容
  </view>
</my-test4>
-
多个插槽
默认不支持 要配置
在子组件
.js文件中配置以下内容
  options:{
    multipleSlots: true  //这样就启用了多插槽
  },
使用多个插槽时 定义name属性
<view>
  <!-- 子组件插槽 -->
  <slot name="before"></slot>
  <view>
    这里是组件的内部结构
  </view>
  <!-- 子组件插槽 -->
  <slot name="after"></slot>
</view>
<my-test4>
  <view slot="before">
    插入前面插槽
  </view>
  <view slot="after">
    插入后面插槽
  </view>
</my-test4>
8. 父子组件通信
- 三种方式

-
属性绑定
用于 父向子 传值,而且只能传递普通类型的数据,无法将方法传递给子组件
父组件中:
  data: {
    count:0
  },
<my-test5 count="{{count}}"></my-test5>
子组件中:
  properties: {
    count:Number
  },
<view>子组件中count值是:{{count}}</view>
-
事件绑定
用于 子向父 传值可以传递任何类型的数据
步骤如下:

1.在 父组件 中定义函数
syncCount(e) {

},
2.在 父组件 调用子组件时定义属性 bind:* = " "
<my-test5 count="{{count}}" bind:sync="syncCount">
<!-- bind:** 就是事件名  引号内是触发事件-->
</my-test5>
3.在 子组件 中同步触发自定义事件 this.triggerEvent()
  methods: {
    addCount(){
      this.setData({
        count: this.properties.count + 1
      })
      // 触发自定义事件 将数值同步给父组件
      this.triggerEvent('sync',{value: this.properties.count})
    }
  }
4…在 父组件 获取子组件传过来的内容 参数就带着 e.detail 当中
  syncCount(e) {
    // console.log(e);
    console.log(e.detail.value);
    this.setData({
      count: e.detail.value
    })
  },
- 获取组件实例

<my-test5 count="{{count}}" bind:sync="syncCount" class="customA" id="cA">

<button bindtap="getChild">获取子组件中的实例对象</button>
getChild(){
    const child  = this.selectComponent('#cA')
    // const child = this.selectComponent('.customA')
    console.log(child);
    // child.setData({
    //   count: child.properties.count + 1
    // })
    child.addCount()
  },
9. behaviors
- 介绍
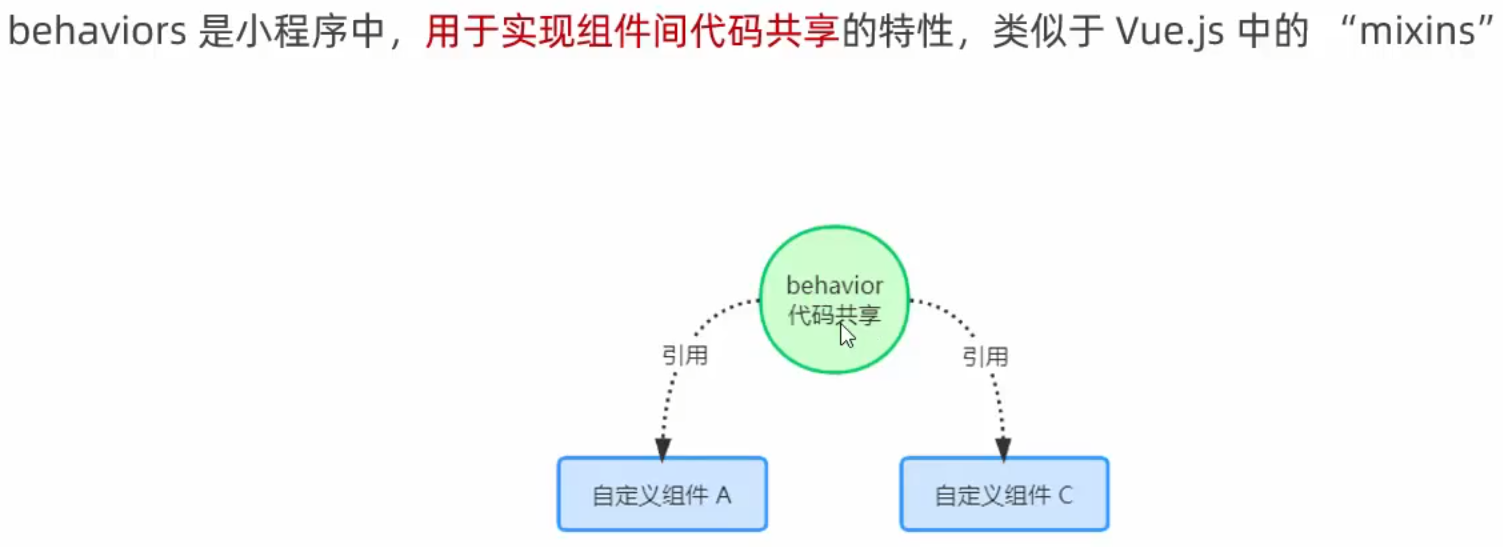
- 工作方式

-
创建 behaviors
调用
Behavior(Object object)方法即可创建一个共享的 behavior 实例对象 供所有组件使用
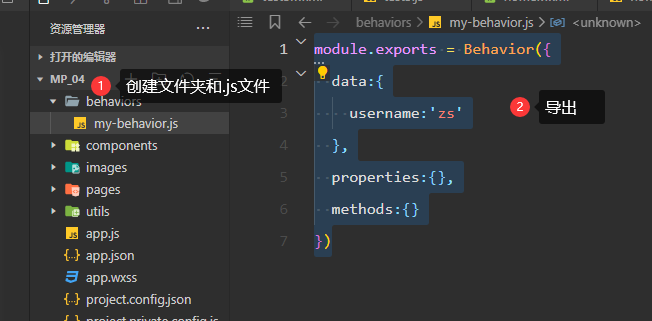
module.exports = Behavior({
  data:{
    username:'zs'
  },
  properties:{},
  methods:{}
})
-
导入并使用
在组件中 使用
require()方法导入需要的 behavior 挂载后即可访问 behavior 中的数据和方法
const myBehavior = require('../../behaviors/my-behavior')

Component({
  behaviors:[myBehavior], // 挂载
    ...
})
<view>
  在behavior中定义的用户名 {{username}}  <!-- 直接使用mustach语法即可 -->
</view>
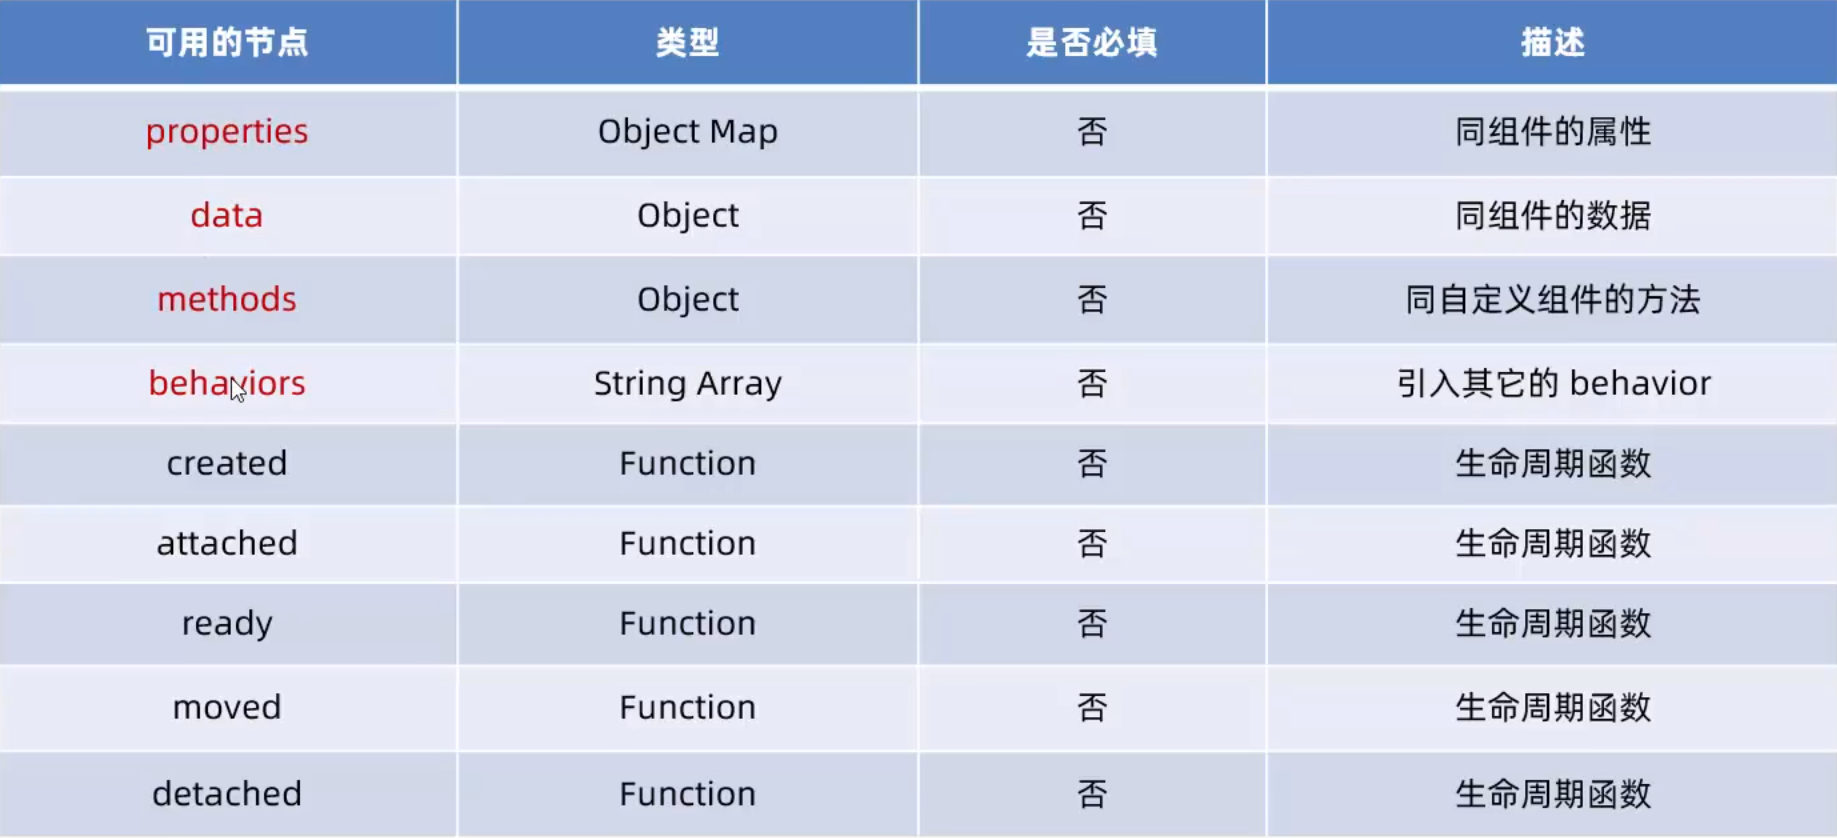
- behavior 中所有可用的节点
- 同名字段和覆盖和组合规则*

官方详细文档:https://developers.weixin.qq.com/miniprogram/dev/framework/custom-component/behaviors.html
————总结————


 1万+
1万+

 被折叠的 条评论
为什么被折叠?
被折叠的 条评论
为什么被折叠?
 到【灌水乐园】发言


