


目录
terminal.hpp
定义终端程序相关信息,包括终端尺寸、终端颜色模式的定义。
struct Dimensions { // 定义终端的外观尺寸
  int dimx; // 宽度(从左到右)
  int dimy; // 高度(从上到下)
};

namespace Terminal {

Dimensions Size(); // 获取当前终端程序的外观尺寸
void SetFallbackSize(const Dimensions& fallbackSize);//修改外观尺寸的静态存储内容

enum Color { // 定义终端支持的色彩显示模式
  Palette1,  // 黑白色
  Palette16, // 16色
  Palette256,// 256色
  TrueColor, // 24位彩色
};
Color ColorSupport(); // 获取当前终端程序的色彩模式
void SetColorSupport(Color color); //修改色彩模式的静态存储内容

}  // namespace Terminal
string.hpp
提供转换函数,将内置类型和标准库字符串类型转为宽字符,以及计算内容在终端的显示长度。
std::string to_string(const std::wstring& s); // 宽字符串转为标准字符串
std::wstring to_wstring(const std::string& s);// 标准字符串转为宽字符串

// 各种内置类型转为宽字符串
template <typename T>
std::wstring to_wstring(T s) {
  return to_wstring(std::to_string(s));
}

// 计算标准字符串内容的显示宽度
int string_width(const std::string&);

// 将字符串拆分成其对应的字形。在全角字形之后插入一个空字形。
std::vector<std::string> Utf8ToGlyphs(const std::string& input);

// 将 |input| 绘制的每个单元格映射到其对应的字形。
// 半尺寸字形占用一个单元格,全尺寸字形占用两个单元格。
std::vector<int> CellToGlyphIndex(const std::string& input);
color.hpp
Color类
用于存储颜色信息,可以将黑白色模式、16色模式、256色模式、真色彩模式下的颜色统一转换为RGB存储。
class Color {
 public:
  enum Palette1 : uint8_t;
  enum Palette16 : uint8_t;
  enum Palette256 : uint8_t;

  Color();                  // Transparent.
  Color(Palette1 index);    // 黑白模式参数构造Color对象
  Color(Palette16 index);   // 16色模式参数构造Color对象
  Color(Palette256 index);  // 256色模式参数构造Color对象
  Color(uint8_t red,
        uint8_t green,
        uint8_t blue,
        uint8_t alpha = 255);//RGB真彩色构造Color对象

  static Color RGB(uint8_t red,
                   uint8_t green,
                   uint8_t blue);//通过RGB构造Color对象
  static Color HSV(uint8_t hue,
                   uint8_t saturation,
                   uint8_t value);//通过HSV值构造Color对象
  static Color RGBA(uint8_t red,
                    uint8_t green,
                    uint8_t blue,
                    uint8_t alpha);//通过RGBA构造Color对象
  static Color HSVA(uint8_t hue,
                    uint8_t saturation,
                    uint8_t value,
                    uint8_t alpha);//通过HSVA值构造Color对象
  static Color Interpolate(float t,
                           const Color& a,
                           const Color& b);//通过两个Color颜色插值构造Color对象
  static Color Blend(const Color& lhs, const Color& rhs);//LHS和RHS计算混合颜色

  // 黑白模式颜色定义
  enum Palette1 : uint8_t{
    Default, // Transparent
  };

  // 16色模式颜色定义
  enum Palette16 : uint8_t {
    Black        = 0,
    Red          = 1,
    ...
    White        = 15,
  };

  // 256色模式颜色定义
  enum Palette256 : uint8_t {
    Aquamarine1        = 122,
    Aquamarine1Bis     = 86,
    ...
    Yellow4Bis         = 106,
  };

  // --- Operators ------
  bool operator==(const Color& rhs) const; // 比较Color是否相同
  bool operator!=(const Color& rhs) const; // 比较Color是否不同

  std::string Print(bool is_background_color) const;//将颜色信息打印为字符串形式
  bool IsOpaque() const { return alpha_ == 255; } // 判断透明度是否为不透明

 private:
  enum class ColorType : uint8_t {
    Palette1,
    Palette16,
    Palette256,
    TrueColor,
  };
  ColorType type_ = ColorType::Palette1;
  uint8_t red_ = 0;
  uint8_t green_ = 0;
  uint8_t blue_ = 0;
  uint8_t alpha_ = 0;
};

inline namespace literals {

// 将 0x808000_rgb 形式的函数调用转为Color对象, 例如: Color color = 0xff00ff_rgb;
Color operator""_rgb(unsigned long long int combined);

}  // namespace literals
color_info.hpp
ColorInfo类
ColorInfo为工具类,用于获取256色、16色模式下对应的颜色值信息。
struct ColorInfo { // 定义颜色描述信息
  const char* name;  // 颜色名称
  uint8_t index_256; // 256色模式的颜色索引
  uint8_t index_16;  // 16色模式的颜色索引
  uint8_t red;       // RGB的R分量
  uint8_t green;     // RGB的G分量
  uint8_t blue;      // RGB的B分量
  uint8_t hue;       // HSV的H值
  uint8_t saturation;// HSV的S值
  uint8_t value;     // HSV的V值
};

ColorInfo GetColorInfo(Color::Palette256 index);//根据256色模式的颜色索引获取颜色描述信息
ColorInfo GetColorInfo(Color::Palette16 index);//根据16色模式的颜色索引获取颜色描述信息
pixel.hpp
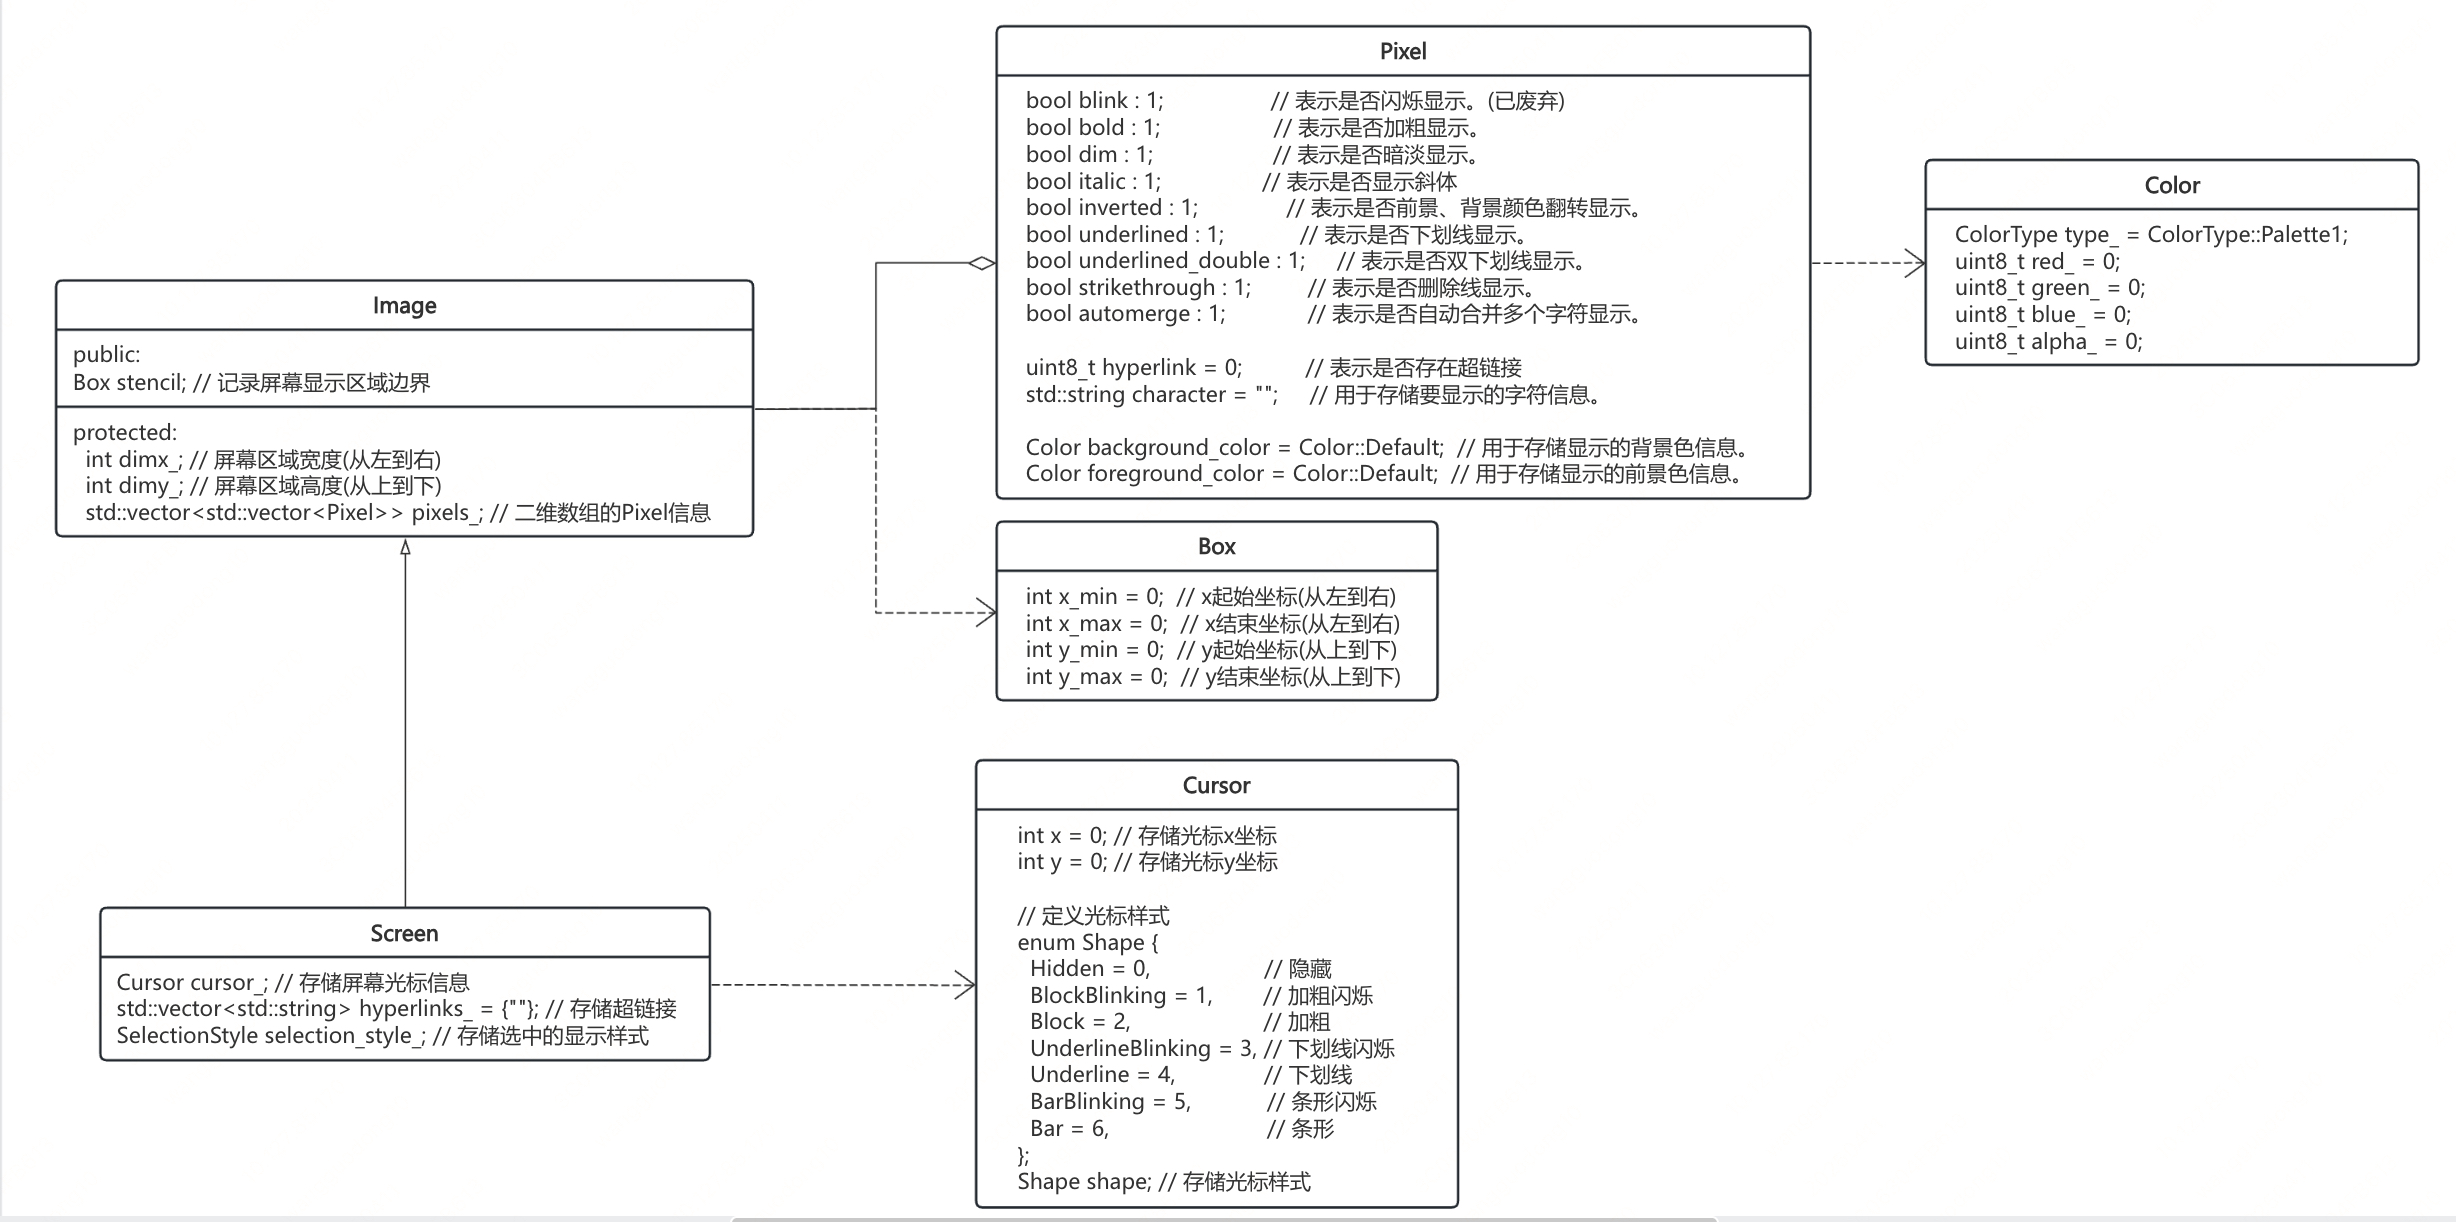
Pixel类
表示一个终端界面中的最小显示单元,每个最小显示单元的内容为字符串。
struct Pixel {
  Pixel()
      : blink(false),
        bold(false),
        dim(false),
        italic(false),
        inverted(false),
        underlined(false),
        underlined_double(false),
        strikethrough(false),
        automerge(false) {}       // 构造Pixel对象

  // 代表样式的位字段
  bool blink : 1;                 // 表示是否闪烁显示。(已废弃)
  bool bold : 1;                  // 表示是否加粗显示。
  bool dim : 1;                   // 表示是否暗淡显示。
  bool italic : 1;                // 表示是否显示斜体
  bool inverted : 1;              // 表示是否前景、背景颜色翻转显示。
  bool underlined : 1;            // 表示是否下划线显示。
  bool underlined_double : 1;     // 表示是否双下划线显示。
  bool strikethrough : 1;         // 表示是否删除线显示。
  bool automerge : 1;             // 表示是否自动合并多个字符显示。

  uint8_t hyperlink = 0;          // 表示是否存在超链接

  std::string character = "";     // 用于存储要显示的字符信息。

  Color background_color = Color::Default;  // 用于存储显示的背景色信息。
  Color foreground_color = Color::Default;  // 用于存储显示的前景色信息。
};
box.hpp
Box类
Box类用于存储绘图区域。
// 定义绘制矩形区域
struct Box {
  int x_min = 0;  // x起始坐标(从左到右)
  int x_max = 0;  // x结束坐标(从左到右)
  int y_min = 0;  // y起始坐标(从上到下)
  int y_max = 0;  // y结束坐标(从上到下)

  static auto Intersection(Box a, Box b) -> Box; // 计算两个矩形区域的重合区域的Box
  static auto Union(Box a, Box b) -> Box;        // 计算两个矩形区域的组合区域的Box
  void Shift(int x, int y);                      // 将Box区域进行x水平偏移和y垂直偏移
  bool Contain(int x, int y) const;              // 判断点(x,y)是否在Box区域内部
  bool IsEmpty() const;                          // Box区域是否为空
  bool operator==(const Box& other) const;       // 判断Box区域是否相同
  bool operator!=(const Box& other) const;       // 判断Box区域是否不同
};
image.hpp
Image类
Image类表示一个屏幕区域绘制内容,其内部维护一个存储Pixel类型的二维数组,用于存储绘图区域的所有显示像素单元,以及存储屏幕绘图区域。
// 定义绘制屏幕的一帧图像
class Image {
 public:
  Image() = delete; // 禁用默认构造函数
  Image(int dimx, int dimy); // 构造函数

  // 访问网格中给定位置的字符。
  std::string& at(int x, int y);
  const std::string& at(int x, int y) const;

  // 访问网格中给定位置的单元格(像素)。
  Pixel& PixelAt(int x, int y);
  const Pixel& PixelAt(int x, int y) const;

  // 获取屏幕尺寸。
  int dimx() const { return dimx_; }
  int dimy() const { return dimy_; }

  // 使用空间和默认样式填充图像
  void Clear();

  Box stencil; // 记录屏幕显示区域边界

 protected:
  int dimx_; // 屏幕区域宽度(从左到右)
  int dimy_; // 屏幕区域高度(从上到下)
  std::vector<std::vector<Pixel>> pixels_; // 存储要显示的所有Pixel信息
};
screen.hpp
Screen类
Screen类继承自Image类,用于定义一帧屏幕内容,内部使用Cursor类存储光标在屏幕绘图区的位置信息,以及存储所有的超链接信息。
// 定义绘制屏幕的图像内容
class Screen : public Image {
 public:
  // 构造一个屏幕绘制区域(x值表示从左到右的坐标,y值表示从上到下的坐标)
  Screen(int dimx, int dimy);

  // 提供静态方法用来创建Screen对象
  static Screen Create(Dimensions dimension);
  static Screen Create(Dimensions width, Dimensions height);

  // 将屏幕绘制区域的所有信息转为可打印的字符串
  std::string ToString();

  // 将屏幕打印到终端上。
  void Print();

  // 用空间填充屏幕并重置任何屏幕状态(使用空格填充显示区域),如超链接和光标
  void Clear();

  // 使用 n = dimy() 将终端光标向上移动 n 行,重置光标到第n行(clear是否清屏)
  std::string ResetPosition(bool clear = false) const;

  // 应用着色器
  void ApplyShader();

  // 定义光标
  struct Cursor {
    int x = 0; // 存储光标x坐标
    int y = 0; // 存储光标y坐标

    // 定义光标样式
    enum Shape {
      Hidden = 0,            // 隐藏
      BlockBlinking = 1,     // 加粗闪烁
      Block = 2,             // 加粗
      UnderlineBlinking = 3, // 下划线闪烁
      Underline = 4,         // 下划线
      BarBlinking = 5,       // 条形闪烁
      Bar = 6,               // 条形
    };
    Shape shape; // 存储光标样式
  };

  // 获取光标
  Cursor cursor() const { return cursor_; }
  // 设置光标
  void SetCursor(Cursor cursor) { cursor_ = cursor; }

  // 设置超链接
  uint8_t RegisterHyperlink(const std::string& link);
  // 获取超链接
  const std::string& Hyperlink(uint8_t id) const;

  // 定义选中样式
  using SelectionStyle = std::function<void(Pixel&)>;
  // 获取选中样式
  const SelectionStyle& GetSelectionStyle() const;
  // 设置选中样式
  void SetSelectionStyle(SelectionStyle decorator);


  std::string& at(int x, int y);  // 获取(x,y)坐标的字符存储信息
  Pixel& PixelAt(int x, int y);   // 获取(x,y)坐标的像素单元信息

  // Get screen dimensions.
  int dimx() const { return dimx_; } // 返回屏幕绘制区域的x坐标长度
  int dimy() const { return dimy_; } // 返回屏幕绘制区域的y坐标长度

 protected:
  Cursor cursor_; // 存储屏幕光标信息
  std::vector<std::string> hyperlinks_ = {""}; // 存储超链接

  // 当前选择样式。该样式会被各种 DOM 元素覆盖。
  SelectionStyle selection_style_ = [](Pixel& pixel) {
    pixel.inverted ^= true;
  };
};
整体类图关系
实践:获取终端相关信息
#include <iostream>
#include <ftxui/screen/terminal.hpp>

int main()
{
  using namespace ftxui;
  Dimensions size = Terminal::Size();
  std::cout << "当前终端的外观尺寸:" << size.dimx << "," << size.dimy << std::endl;

  Terminal::Color color_mode = Terminal::ColorSupport();
  switch (color_mode)
  {
  case Terminal::Color::Palette1:
	std::cout << "黑白模式" << std::endl;
	break;
  case Terminal::Color::Palette16:
	std::cout << "16色模式" << std::endl;
	break;
  case Terminal::Color::Palette256:
	std::cout << "256色模式" << std::endl;
	break;
  case Terminal::Color::TrueColor:
	std::cout << "24位真彩色模式" << std::endl;
	break;
  default:
	std::cout << "未知" << std::endl;
	break;
  }
  return 0;
}
mac下使用iterm2测试打印如下:
当前终端的外观尺寸:120,21
24位真彩色模式
实践:在终端上绘制内容,不断刷新屏幕中的内容
#include <unistd.h>
#include <iostream>
#include <ftxui/screen/terminal.hpp>
#include <ftxui/screen/screen.hpp>
//#include <ftxui/dom/elements.hpp>
//#include <ftxui/component/screen_interactive.hpp>

int main()
{
    using namespace ftxui;
    int row = 0;
    int col = 0;
    while (true)
    {
        // 获取当前终端程序的尺寸
        Dimensions terminal_size = Terminal::Size();
        // 构建一个固定大小(当前终端尺寸)的绘制区域
        Screen screen = Screen::Create(terminal_size);

        auto &pixel = screen.PixelAt(col, row); // 获取坐标(I,J)的绘制单元
        pixel.character = U'A'; //设置绘制单元的显示内容
        pixel.bold = true;      //设置绘制单元加粗显示内容
        pixel.foreground_color = Color::Blue;//设置绘制单元的前景色为蓝色

        screen.Print();// 将绘制区域转为字符串显示到标准输出
        screen.Clear();// 清空绘制区域的内容

        row++;
        if (row >= terminal_size.dimy) {
            col++;
            row=0;
        }
        if (col >= terminal_size.dimx) {
            col = 0;
        }

        usleep(100000);
    }

    return 0;
}


 被折叠的 条评论
为什么被折叠?
被折叠的 条评论
为什么被折叠?
 到【灌水乐园】发言


