


在第一个章节时,我们完成了基本功能的实现,同时也带来了问题就是添加的人脸没有永久保存的问题。今天我们讲解决这些问题。
思路分析
要完成这些功能我们首先要知道,我们要保存的是什么,是人脸特征
关于特征值的保存,faiss库中有专门的方法
void write_index(const Index* idx, const char* fname);
void write_index(const Index* idx, FILE* f);
void write_index(const Index* idx, IOWriter* writer);

void write_index_binary(const IndexBinary* idx, const char* fname);
void write_index_binary(const IndexBinary* idx, FILE* f);
void write_index_binary(const IndexBinary* idx, IOWriter* writer);
还有读取方法
Index* read_index(const char* fname, int io_flags = 0);
Index* read_index(FILE* f, int io_flags = 0);
Index* read_index(IOReader* reader, int io_flags = 0);

IndexBinary* read_index_binary(const char* fname, int io_flags = 0);
IndexBinary* read_index_binary(FILE* f, int io_flags = 0);
IndexBinary* read_index_binary(IOReader* reader, int io_flags = 0);
具体实现还是和之前一样,判断计算方法和是否使用GPU。
加载,导入创建文件函数创建
创建writeToFile函数写入index
void ANN::writeToFile() {
    if(this->method==Cosine){
        if(this->useGPU){
            //faiss::Index* cpu_index;
            faiss::IndexFlatIP cpu_index(this->kValue);
            cpu_index.ntotal = this->cosineGPUIndex->ntotal;
            this->cosineGPUIndex->copyTo(&cpu_index);
            faiss::write_index(&cpu_index,this->indexFileName.c_str());
        }else{
            faiss::write_index(this->cosineIndex.get(),this->indexFileName.c_str());
        }
    }else{
        if(this->useGPU){
            faiss::IndexFlatL2 cpu_index(this->kValue);
            cpu_index.ntotal = this->euclideanGPUIndex->ntotal;
            this->euclideanGPUIndex->copyTo(&cpu_index);
            faiss::write_index(&cpu_index,this->indexFileName.c_str());
        }else{
            faiss::write_index(this->euclideanIndex.get(),this->indexFileName.c_str());
        }
    }
}
根据 method 确定使用的是 Cosine 还是 Euclidean 方法。根据 useGPU 确定是否使用 GPU 索引。如果使用 GPU,先创建一个 CPU 索引对象,将 GPU 索引的数据复制到这个 CPU 索引对象,然后将 CPU 索引对象写入文件。如果不使用 GPU,直接将 CPU 索引对象写入文件。因为FAISS 库中的索引保存和加载功能(即 write_index 和 read_index)仅支持 CPU 索引对象,所以会有一步复制的操作。indexFileName是我们新建的一个成员变量,它会用来存储索引文件。
创建loadFromFile函数加载index
void ANN::loadFromFile() {
    faiss::Index* loadedIndex = faiss::read_index(this->indexFileName.c_str());
    if(this->method==Cosine){
        faiss::IndexFlatIP* cosineTempIndex = dynamic_cast<faiss::IndexFlatIP*>(loadedIndex);
        std::shared_ptr<faiss::IndexFlatIP> tempIndex(cosineTempIndex);
        if(this->useGPU){
            this->cosineGPUIndex->copyFrom(cosineTempIndex);
        }else{
            this->cosineIndex = tempIndex;
        }
    }else{
        faiss::IndexFlatL2* euclideanTempIndex = dynamic_cast<faiss::IndexFlatL2*>(loadedIndex);
        std::shared_ptr<faiss::IndexFlatL2> tempIndex(euclideanTempIndex);
        if(this->useGPU){
            this->euclideanGPUIndex->copyFrom(euclideanTempIndex);
        }else{
            this->euclideanIndex = tempIndex;
        }
    }
}有写入自然有加载,和上面差不多,注意这里读取的指针类型是faiss::Index,它是faiss::IndexFlatL2和faiss::IndexFlatIP的基类,这里使用dynamic_cast做了一个类型转换。
创建调用加载函数和创建文件的函数
该函数用于接收到indexFileName的路径,并创建或加载index。
void ANN::setFileName(const std::string& fileName){
    this->indexFileName = fileName+".idx";
    if(!existFile(this->indexFileName)){
        std::filesystem::create_directories(std::filesystem::path(fileName).parent_path());
    }else{
        this->loadFromFile();
    }
}


 bool existFile(std::string fileName) {
        return (access(fileName.c_str(), F_OK) != -1);
    }
就是简单的判断,文件存在就加载index,不存在就创建。
添加文件index保存函数后的main函数
三个函数创建好之后,我们就可以直接拿来使用了。
std::string fileName = modelPath + "/testAnn";
ann->setFileName(fileName);
这一步是给我们的模型一个文件保存的路径,然后
ann->add(features);
ann->writeToFile();
这次我们的测试流程为,第一次启动程序,先不使用serach,只使用add和writeToFile,第二次只使用search。

图片这里使用同一个人在不同形象下的图片,我第一次会把bb传入进去,然后分别带入123456来查看他们的准确率(这里6不是同一个人)。
添加人员特征信息
ann = std::make_shared<ANN>(512, 5, 0.6, 1, 0);
        std::string fileName = modelPath + "/testAnn" + "/" + "ann";
        ann->setFileName(fileName);
        std::string path = "/.../bb.jpg";
        std::string path2 = "";
        cv::Mat img = getImageMat(path);
        cv::Mat img2 = getImageMat(path2);
//        std::shared_ptr<cv::Mat> imgs = std::make_shared<cv::Mat>(img);
        std::string preLoadFile1 = modelPath + "/test_face1.jpg";
        std::string preLoadFile2 = modelPath + "/test_face2.jpg";
        bool success = globalFaceDetector->initDetection(preLoadFile1, preLoadFile2);
        if (!success) {
            int errorCode = globalFaceDetector->getErrorCode();
            std::string errorString = globalFaceDetector->getErrorString();
        }
        globalFaceDetector->getFaces(img, *faces);
        globalFaceDetector->getFaces(img2, *faces2);
        auto features = faces->at(0).getFeaturesData();
        auto features2 = faces2->at(0).getFeaturesData();
        ann->add(features);
        ann->writeToFile();
//        ann->search(features);
        cleanup();
        return 0;
使用同一个人不同图片来查看输出结果
ann = std::make_shared<ANN>(512, 5, 0.6, 1, 0);
        std::string fileName = modelPath + "/testAnn" + "/" + "ann";
        ann->setFileName(fileName);
        std::string path = "/home/zlzg01/ly/face/1.jpg";
        std::string path2 = "/home/zlzg01/ly/download.jpg";
        cv::Mat img = getImageMat(path);
        cv::Mat img2 = getImageMat(path2);
//        std::shared_ptr<cv::Mat> imgs = std::make_shared<cv::Mat>(img);
        std::string preLoadFile1 = modelPath + "/test_face1.jpg";
        std::string preLoadFile2 = modelPath + "/test_face2.jpg";
        bool success = globalFaceDetector->initDetection(preLoadFile1, preLoadFile2);
        if (!success) {
            int errorCode = globalFaceDetector->getErrorCode();
            std::string errorString = globalFaceDetector->getErrorString();
        }
        globalFaceDetector->getFaces(img, *faces);
        globalFaceDetector->getFaces(img2, *faces2);
        auto features = faces->at(0).getFeaturesData();
        auto features2 = faces2->at(0).getFeaturesData();
//        ann->add(features);
//        ann->writeToFile();
        ann->search(features);
        cleanup();
        return 0;
这里五张图片的结果如下(大家这里可以优化一下代码用循环来放入多张图片,因为人脸检测模型的预热实在有点耗时间):
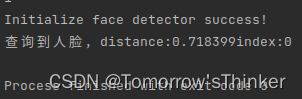
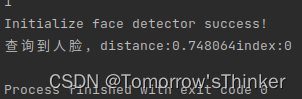
这里我只使用的两张,因为有点懒得等了,这里同一个人的图片搜索的结果,并且我们没有在本次程序中使用到add函数,还是能识别到我们之前录入的人脸。
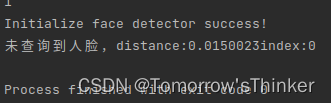
不同人脸的结果
这里可以看到有了我们的二进制文件后,我们基本可以实现模型的永久保存。
(有兴趣的同学可以多录入几个人脸试试)


 6290
6290


 被折叠的 条评论
为什么被折叠?
被折叠的 条评论
为什么被折叠?
 到【灌水乐园】发言


