


Filling Shapes
填充形状
A shape can be filled in a number of different ways. In this section we will have a look at the general filling rule, and also the various ways a path can be filled.
形状可以用多种不同的方式填充。在本节中,我们将了解一般填充规则,以及填充路径的各种方式。
Qt Quick Shapes provides two filling rules controlled using the fillRule property of the ShapePath element. The different results are shown in the screenshot below. It can be set to either ShapePath.OddEvenFill, which is the default. This fills each part of the path individually, meaning that you can create a shape with holes in it. The alternative rule is the ShapePath.WindingFill, which fills everything between the extreme endpoints on each horizontal line across the shape. Regardless of the filling rule, the shape outline is then drawn using a pen, so even when using the winding fill rule, the outline is drawn inside the shape.
Qt Quick Shapes提供了两个填充规则,使用ShapePath元素的fillRule属性进行控制。下面的屏幕截图显示了不同的结果。可以将其设置为ShapePath.OddEvenFill,这是默认值。这将分别填充路径的每个部分,这意味着您可以创建一个带有孔的形状。另一条规则是ShapePath.WindingFill,用于填充形状上每条水平线的端点之间的所有内容。不管填充规则如何,形状轮廓都会使用钢笔绘制,因此即使使用缠绕填充规则,轮廓也会在形状内部绘制。

The examples below demonstrate how to use the two fill rules as shown in the screenshot above.
下面的示例演示了如何使用上述屏幕截图中所示的两个填充规则。
Shape {
    ShapePath {
        strokeWidth: 3
        strokeColor: "darkgray"
        fillColor: "orange"

        fillRule: ShapePath.OddEvenFill

        PathPolyline {
            path: [
                Qt.point(100,  20),
                Qt.point(150, 180),
                Qt.point( 20,  75),
                Qt.point(180,  75),
                Qt.point( 50, 180),
                Qt.point(100,  20),
            ]
        }
    }
}
Shape {
ShapePath {
strokeWidth: 3
strokeColor: "darkgray"
fillColor: "orange"
fillRule: ShapePath.WindingFill
PathPolyline {
path: [
Qt.point(300, 20),
Qt.point(350, 180),
Qt.point(220, 75),
Qt.point(380, 75),
Qt.point(250, 180),
Qt.point(300, 20),
]
}
}
}Once the filling rule has been decided on, there are a number of ways to fill the outline. The various options are shown in the screenshot below. The various options are either a solid color, or one of the three gradients provided by Qt Quick.
一旦确定了填充规则,就有很多方法来填充轮廓。下面的屏幕截图显示了各种选项。各种选项可以是纯色,也可以是Qt Quick提供的三种渐变之一。
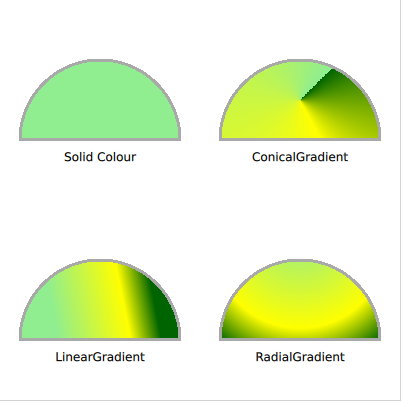
To fill a shape using a solid color, the fillColor property of the ShapePath is used. Set it to a color name or code, and the shape is filled using it.
要使用纯色填充形状,请使用ShapePath的fillColor属性。将其设置为颜色名称或代码,然后使用它填充形状。
Shape {
    ShapePath {
        strokeWidth: 3
        strokeColor: "darkgray"

        fillColor: "lightgreen"

        startX: 20; startY: 140

        PathLine {
            x: 180
            y: 140
        }
        PathArc {
            x: 20
            y: 140
            radiusX: 80
            radiusY: 80
            direction: PathArc.Counterclockwise
            useLargeArc: true
        }
    }
}
If you do not want to use a solid color, a gradient can be used. The gradient is applied using the fillGradient property of the ShapePath element.
如果不想使用纯色,可以使用渐变。使用ShapePath元素的fillGradient属性应用渐变。
The first gradient we look at is the LinearGradient. It creates a linear gradient between the start and end point. The end points can be positioned anyway you like, to create, for instance, a gradient at an angle. Between the end points, a range of GradientStop elements can be inserted. These are put at a position from 0.0, being the x1, y1 position, to 1.0, being the x2, y2 position. For each such stop, a color is specified. The gradient then creates soft transitions between the colors.
我们看的第一个梯度是线性梯度。它在起点和终点之间创建线性渐变。端点可以任意定位,例如,以一定角度创建渐变。在端点之间,可以插入一系列GradientStop元素。它们被放置在从0.0(x1,y1位置)到1.0(x2,y2位置)的位置。对于每一个这样的站点,都会指定一种颜色。然后,渐变会在颜色之间创建柔和的过渡。
TIP
注
If the shape extends beyond the end points, the first or last color is either continued, or the gradient is repeated or mirrored. This behaviour is specified using the
spreadproperty of theLinearGradientelement.如果形状延伸到端点之外,则第一个或最后一个颜色将继续,或者渐变将重复或镜像。此行为是使用LinearGradient元素的扩展属性指定的。
Shape {
    ShapePath {
        strokeWidth: 3
        strokeColor: "darkgray"

        fillGradient: LinearGradient {
            x1: 50; y1: 300
            x2: 150; y2: 280

            GradientStop { position: 0.0; color: "lightgreen" }
            GradientStop { position: 0.7; color: "yellow" }
            GradientStop { position: 1.0; color: "darkgreen" }
        }

        startX: 20; startY: 340

        PathLine {
            x: 180
            y: 340
        }
        PathArc {
            x: 20
            y: 340
            radiusX: 80
            radiusY: 80
            direction: PathArc.Counterclockwise
            useLargeArc: true
        }
    }
}
To create a gradient that spreads around an origin, a bit like a clock, the ConicalGradient is used. Here, the center point is specified using the centerX and centerY properties, and the starting angle is given using the angle property. The gradient stops are then spread from the given angle in a clockwise direction for 360 degrees.
要创建围绕原点展开的渐变,有点像时钟,可以使用圆锥渐变ConicalGradient。这里,使用centerX和centerY属性指定中心点,使用angle属性指定起始角度。然后,梯度止动块从给定角度顺时针扩展360度。
Shape {
    ShapePath {
        strokeWidth: 3
        strokeColor: "darkgray"

        fillGradient: ConicalGradient {
            centerX: 300; centerY: 100
            angle: 45

            GradientStop { position: 0.0; color: "lightgreen" }
            GradientStop { position: 0.7; color: "yellow" }
            GradientStop { position: 1.0; color: "darkgreen" }
        }

        startX: 220; startY: 140

        PathLine {
            x: 380
            y: 140
        }
        PathArc {
            x: 220
            y: 140
            radiusX: 80
            radiusY: 80
            direction: PathArc.Counterclockwise
            useLargeArc: true
        }
    }
}
To instead create a gradient that forms circles, a bit like rings on the water, the RadialGradient is used. For it you specify two circles, the focal circle and the center. The gradient stops go from the focal circle to the center circle, and beyond those circles, the last color continues, is mirrored or repeats, depending on the spread property.
为了创建一个形成圆形的梯度,有点像水上的环,使用了径向梯度RadialGradient。为它指定两个圆,焦点圆和中心。渐变停止点从焦点圆到中心圆,超出这些圆,最后一种颜色将继续、镜像或重复,具体取决于扩展属性spread。
Shape {
    ShapePath {
        strokeWidth: 3
        strokeColor: "darkgray"

        fillGradient: RadialGradient {
            centerX: 300; centerY: 250; centerRadius: 120
            focalX: 300; focalY: 220; focalRadius: 10

            GradientStop { position: 0.0; color: "lightgreen" }
            GradientStop { position: 0.7; color: "yellow" }
            GradientStop { position: 1.0; color: "darkgreen" }
        }

        startX: 220; startY: 340

        PathLine {
            x: 380
            y: 340
        }
        PathArc {
            x: 220
            y: 340
            radiusX: 80
            radiusY: 80
            direction: PathArc.Counterclockwise
            useLargeArc: true
        }
    }
}
TIP
注
The advanced user can use a fragment shader to fill a shape. This way, you have full freedom to how the shape is filled. See the Effects chapter for more information on shaders.
高级用户可以使用片段着色器填充形状。这样,您就可以完全自由地了解形状的填充方式。有关着色器的详细信息,请参见“效果”一章。


 2447
2447


 被折叠的 条评论
为什么被折叠?
被折叠的 条评论
为什么被折叠?
 到【灌水乐园】发言


