


吴恩达老师提出了一种反思翻译的大语言模型 (LLM) AI 翻译工作流程——GitHub - andrewyng/translation-agent,具体工作流程如下:
- 提示一个 LLM 将文本从
source_language翻译到target_language; - 让 LLM 反思翻译结果并提出建设性的改进建议;
- 使用这些建议来改进翻译。
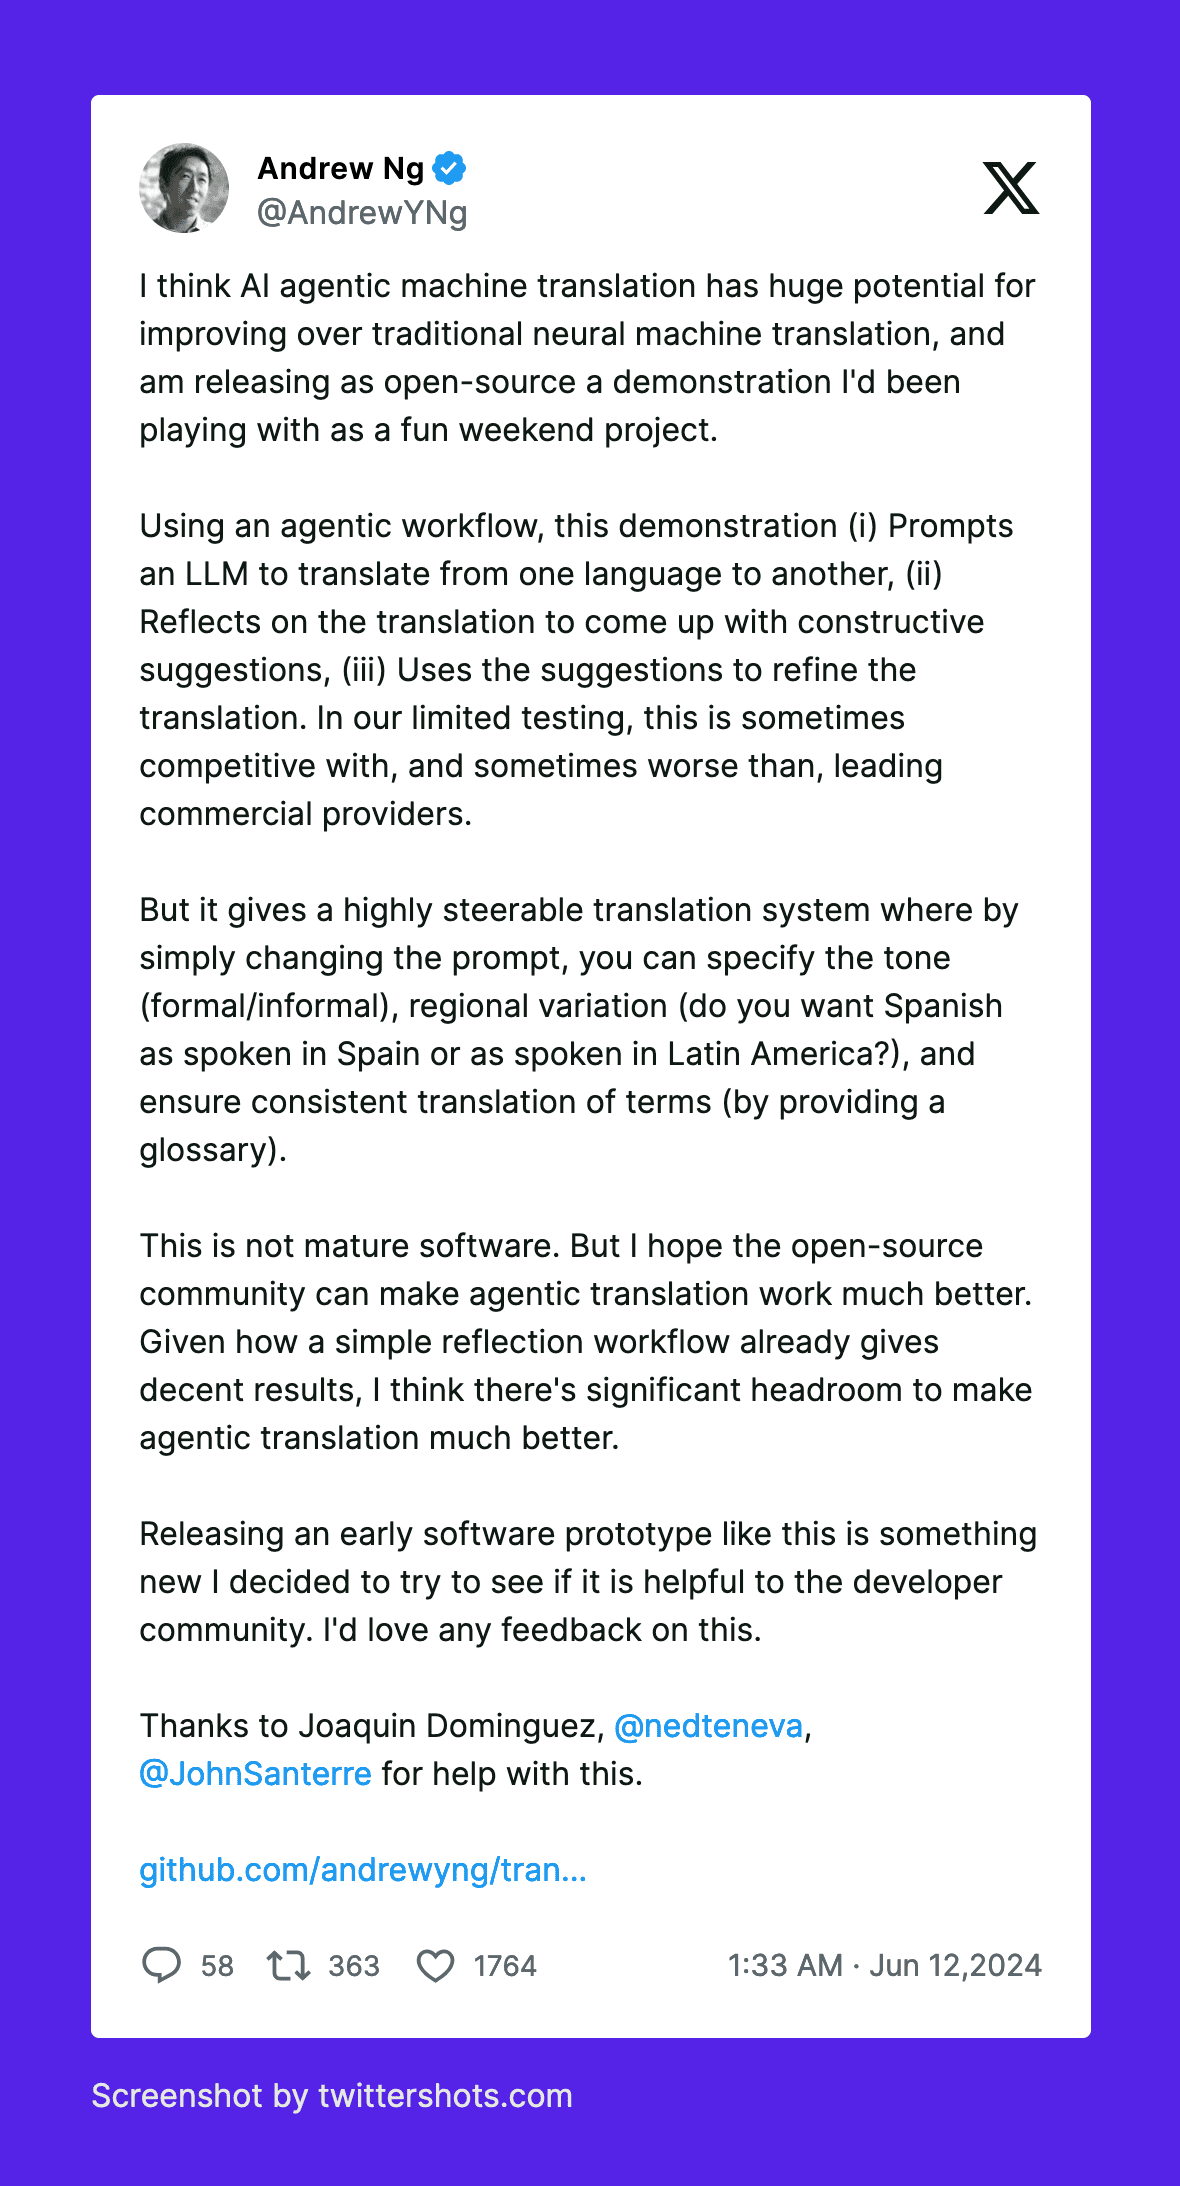
这个 AI 翻译流程是目前比较新的一种翻译方式,利用 LLM 对自己的翻译结果进行改进来获得较好的 AI 翻译效果。
项目中展示了可以利用对长文本进行分片,然后分别进行反思翻译处理,以突破 LLM 对 tokens 数量的限制,真正实现长文本一键高效率高质量翻译。
该项目还通过给大模型限定国家地区,已实现更精确的 AI 翻译,如美式英语、英式英语之分;同时提出一些可能能带来更好效果的优化,如对于一些 LLM 未曾训练到的术语 (或有多种翻译方式的术语) 建立术语表,进一步提升翻译的精确度等等。
而这一切都能通过 FastGPT 工作流轻松实现,本文将手把手教你如何使用 FastGPT 复刻吴恩达老师的 translation-agent。
单文本块反思翻译
咱们先从简单的开始,即不超出 LLM tokens 数量限制的单文本块翻译。
初始翻译
第一步先让 LLM 对源文本块进行初始翻译:
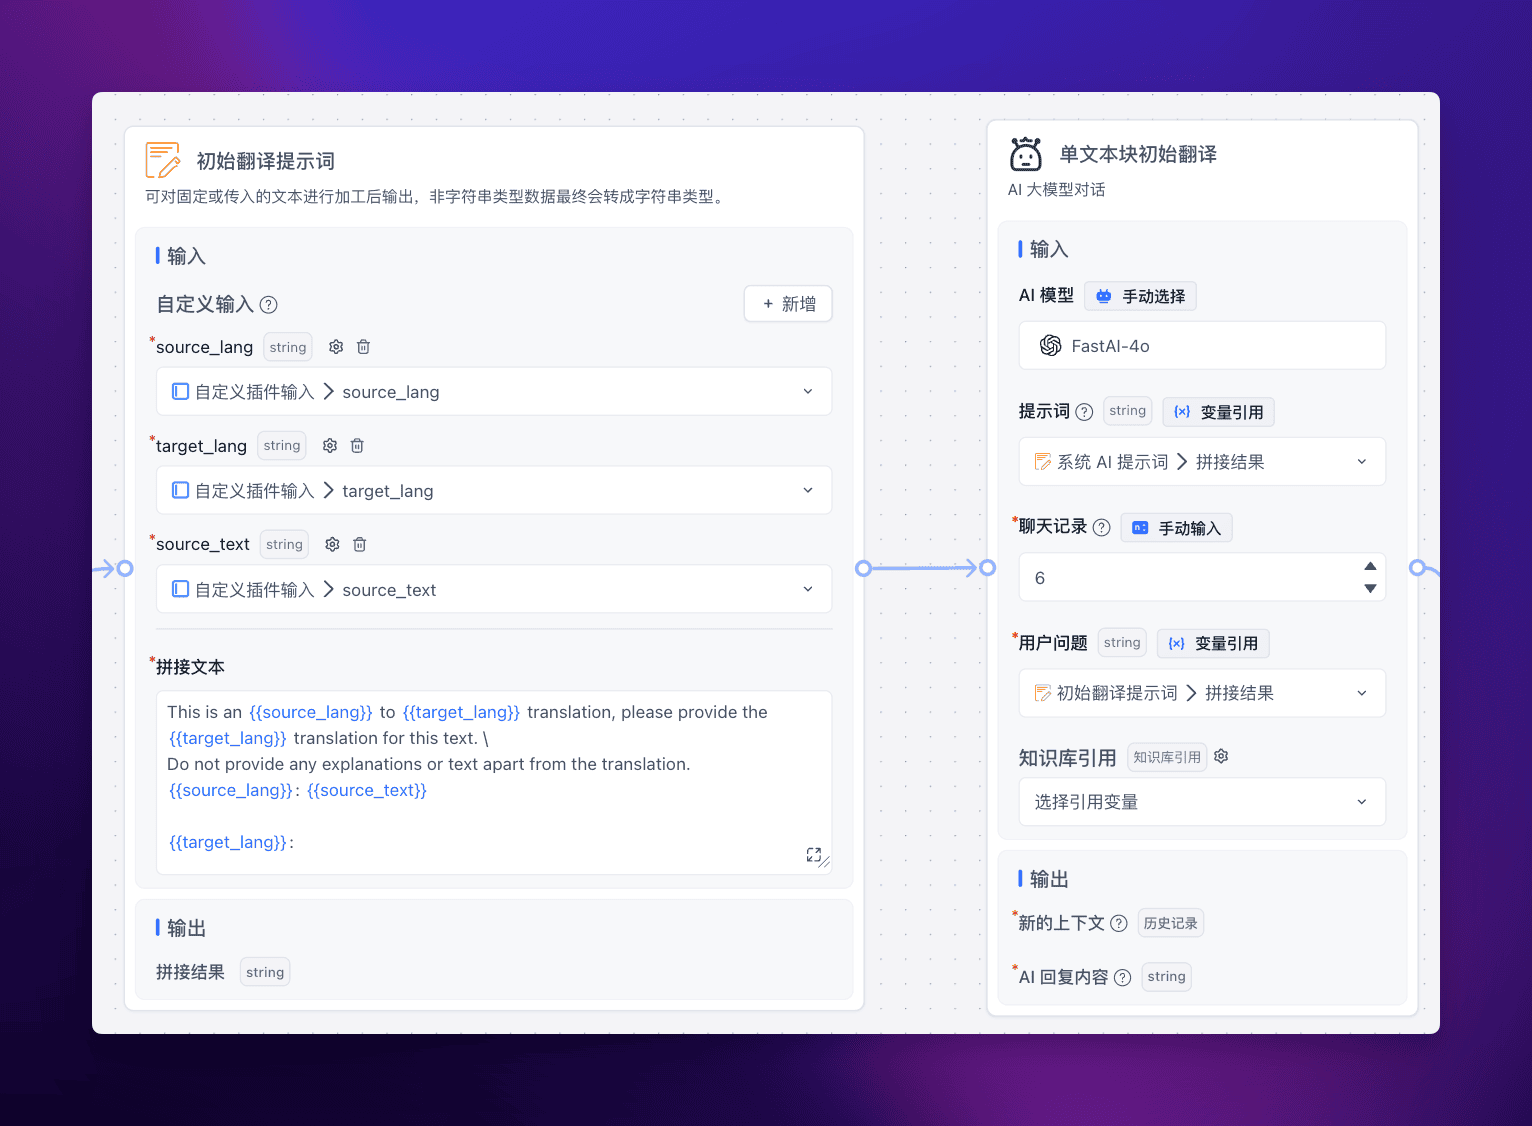
通过 “文本拼接” 模块引用源语言、目标语言、源文本这三个参数,生成提示词,传给 LLM,让它给出第一版的翻译。
提示词:
This is an {{source_lang}} to {{target_lang}} translation, please provide the {{target_lang}} translation for this text. \
Do not provide any explanations or text apart from the translation.
{{source_lang}}: {{source_text}}

{{target_lang}}:
反思
然后让 LLM 对第一步生成的初始翻译给出修改建议,称之为反思。
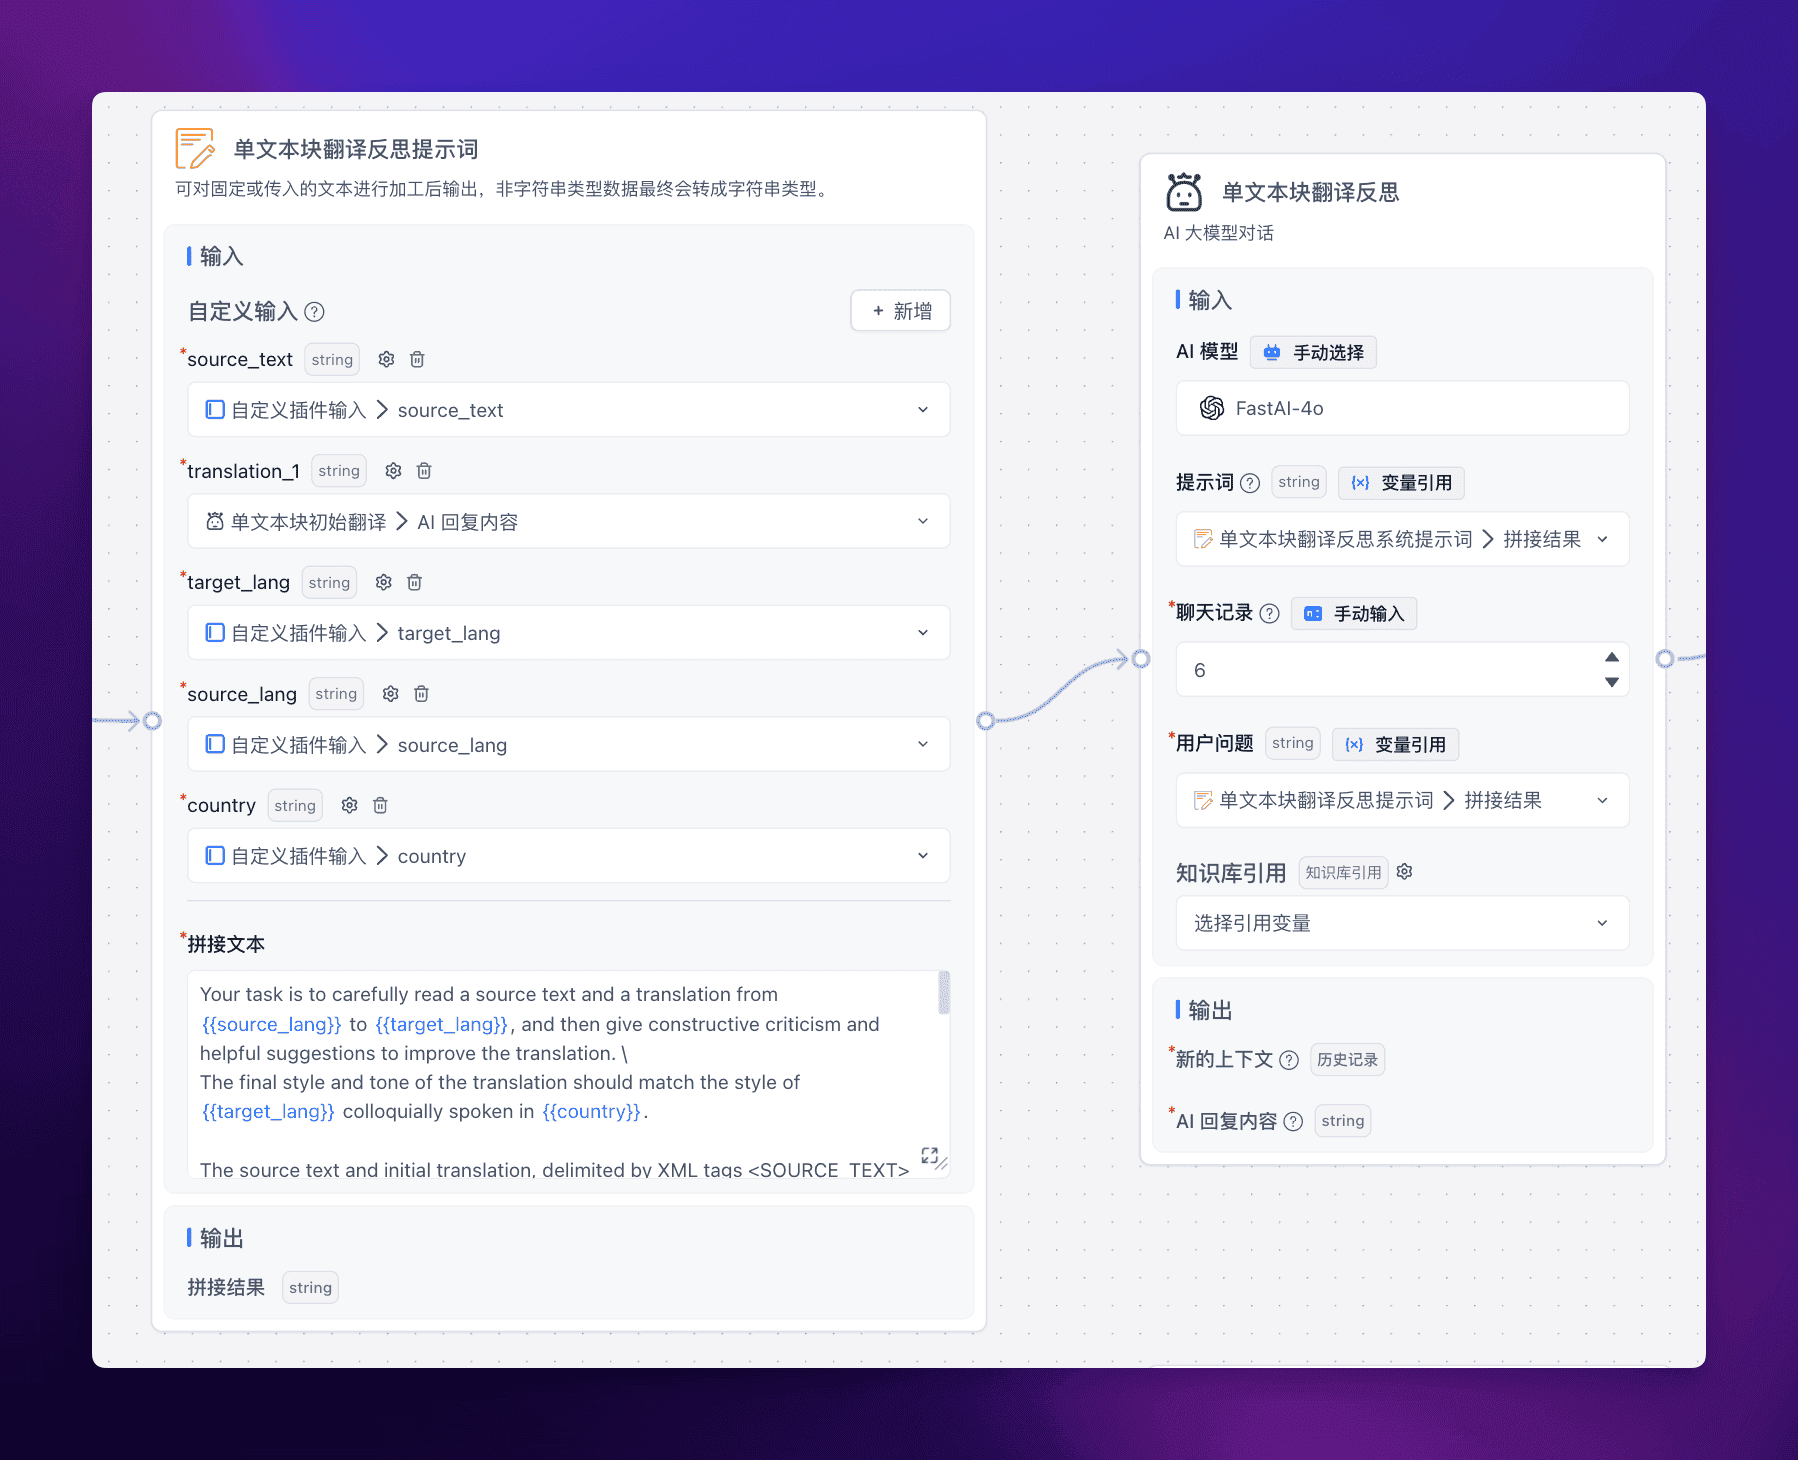
提示词:
Your task is to carefully read a source text and a translation from {{source_lang}} to {{target_lang}}, and then give constructive criticism and helpful suggestions to improve the translation. \
The final style and tone of the translation should match the style of {{target_lang}} colloquially spoken in {{country}}.

The source text and initial translation, delimited by XML tags <SOURCE_TEXT></SOURCE_TEXT> and <TRANSLATION></TRANSLATION>, are as follows:

<SOURCE_TEXT>
{{source_text}}
</SOURCE_TEXT>

<TRANSLATION>
{{translation_1}}
</TRANSLATION>

When writing suggestions, pay attention to whether there are ways to improve the translation's \n\
(i) accuracy (by correcting errors of addition, mistranslation, omission, or untranslated text),\n\
(ii) fluency (by applying {{target_lang}} grammar, spelling and punctuation rules, and ensuring there are no unnecessary repetitions),\n\
(iii) style (by ensuring the translations reflect the style of the source text and takes into account any cultural context),\n\
(iv) terminology (by ensuring terminology use is consistent and reflects the source text domain; and by only ensuring you use equivalent idioms {{target_lang}}).\n\

Write a list of specific, helpful and constructive suggestions for improving the translation.
Each suggestion should address one specific part of the translation.
Output only the suggestions and nothing else.
这里的提示词接收 5 个参数,源文本、初始翻译、源语言、目标语言以及限定词地区国家,这样 LLM 会对前面生成的翻译提出相当多的修改建议,为后续的提升翻译作准备。
提升翻译
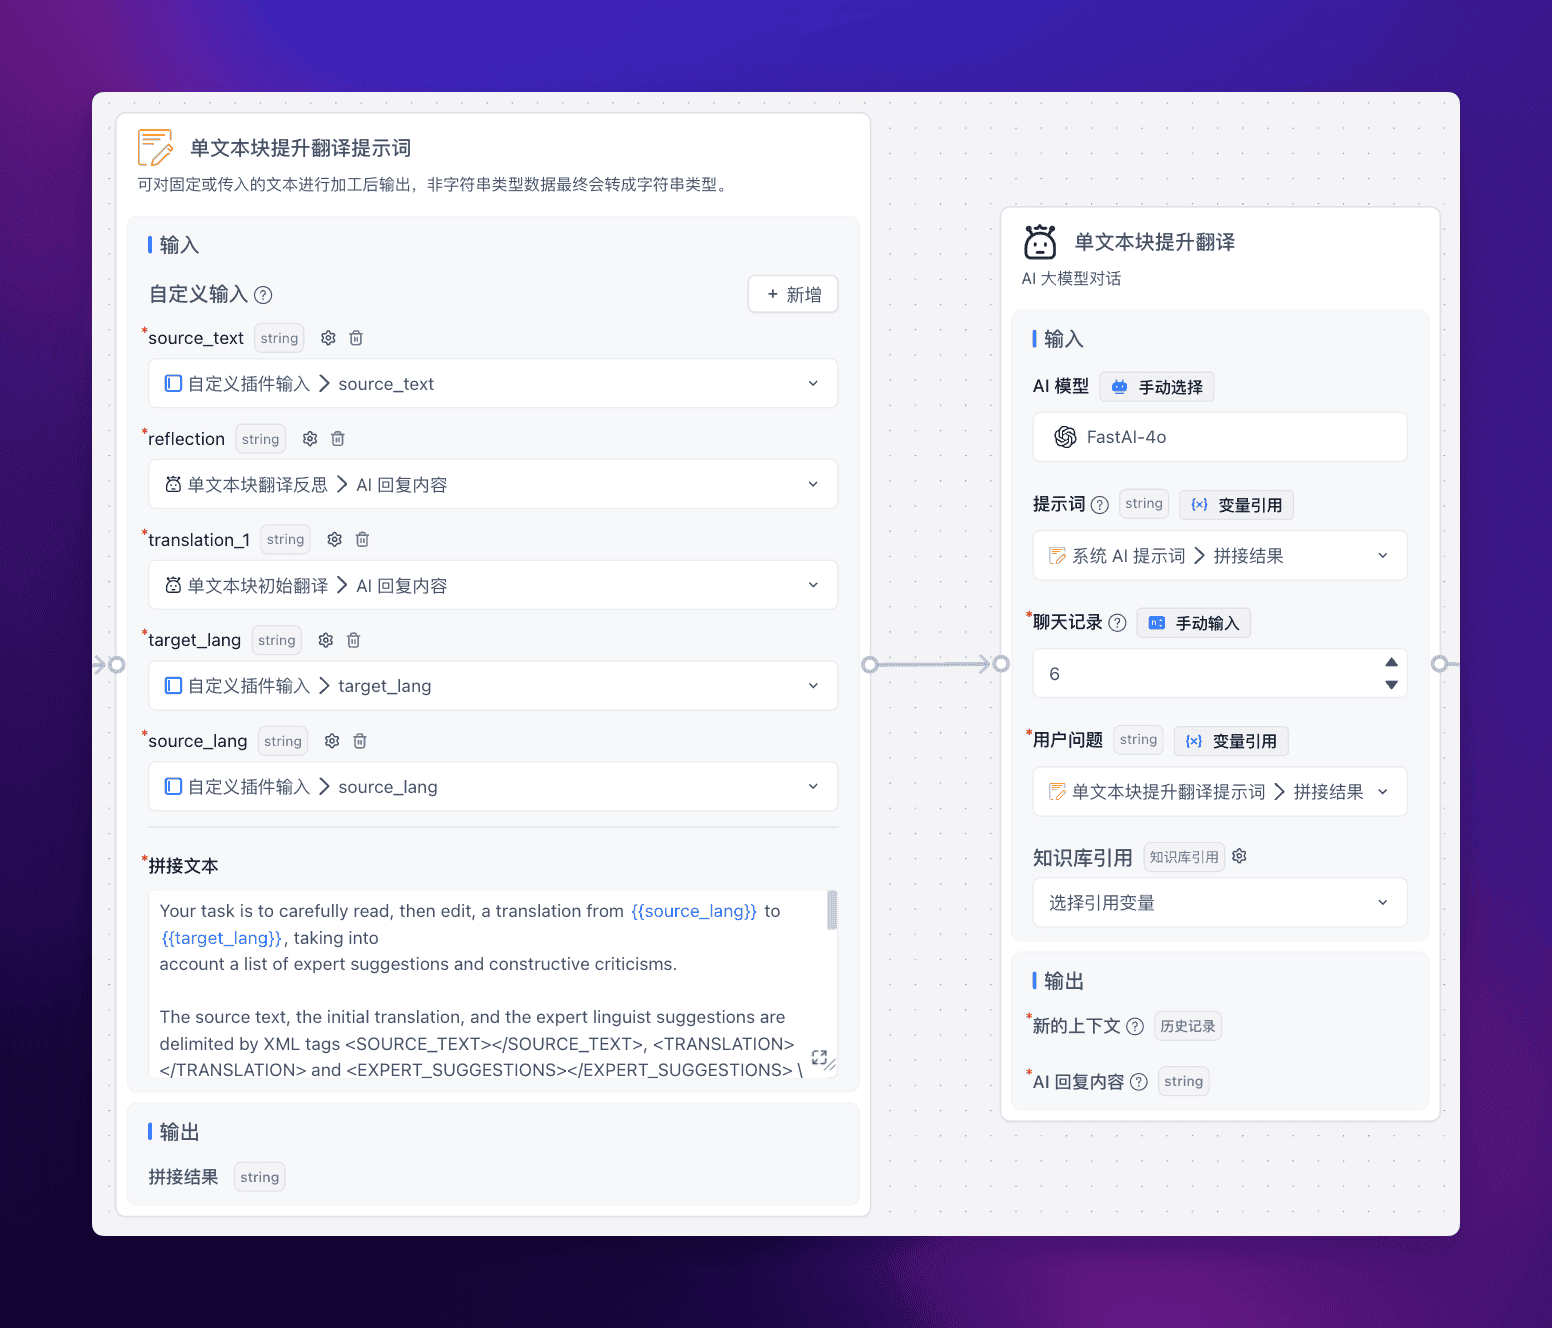
提示词:
Your task is to carefully read, then edit, a translation from {{source_lang}} to {{target_lang}}, taking into
account a list of expert suggestions and constructive criticisms.

The source text, the initial translation, and the expert linguist suggestions are delimited by XML tags <SOURCE_TEXT></SOURCE_TEXT>, <TRANSLATION></TRANSLATION> and <EXPERT_SUGGESTIONS></EXPERT_SUGGESTIONS> \
as follows:

<SOURCE_TEXT>
{{source_lang}}
</SOURCE_TEXT>

<TRANSLATION>
{{translation_1}}
</TRANSLATION>

<EXPERT_SUGGESTIONS>
{{reflection}}
</EXPERT_SUGGESTIONS>

Please take into account the expert suggestions when editing the translation. Edit the translation by ensuring:

(i) accuracy (by correcting errors of addition, mistranslation, omission, or untranslated text),
(ii) fluency (by applying {{target_lang}} grammar, spelling and punctuation rules and ensuring there are no unnecessary repetitions), \
(iii) style (by ensuring the translations reflect the style of the source text)
(iv) terminology (inappropriate for context, inconsistent use), or
(v) other errors.

Output only the new translation and nothing else.
在前文生成了初始翻译以及相应的反思后,将这二者输入给第三次 LLM 翻译,这样我们就能获得一个比较高质量的翻译结果。
运行效果
由于考虑之后对这个反思翻译的复用,所以创建了一个插件,那么在下面我直接调用这个插件就能使用反思翻译,效果如下:
随机挑选了一段哈利波特的内容。
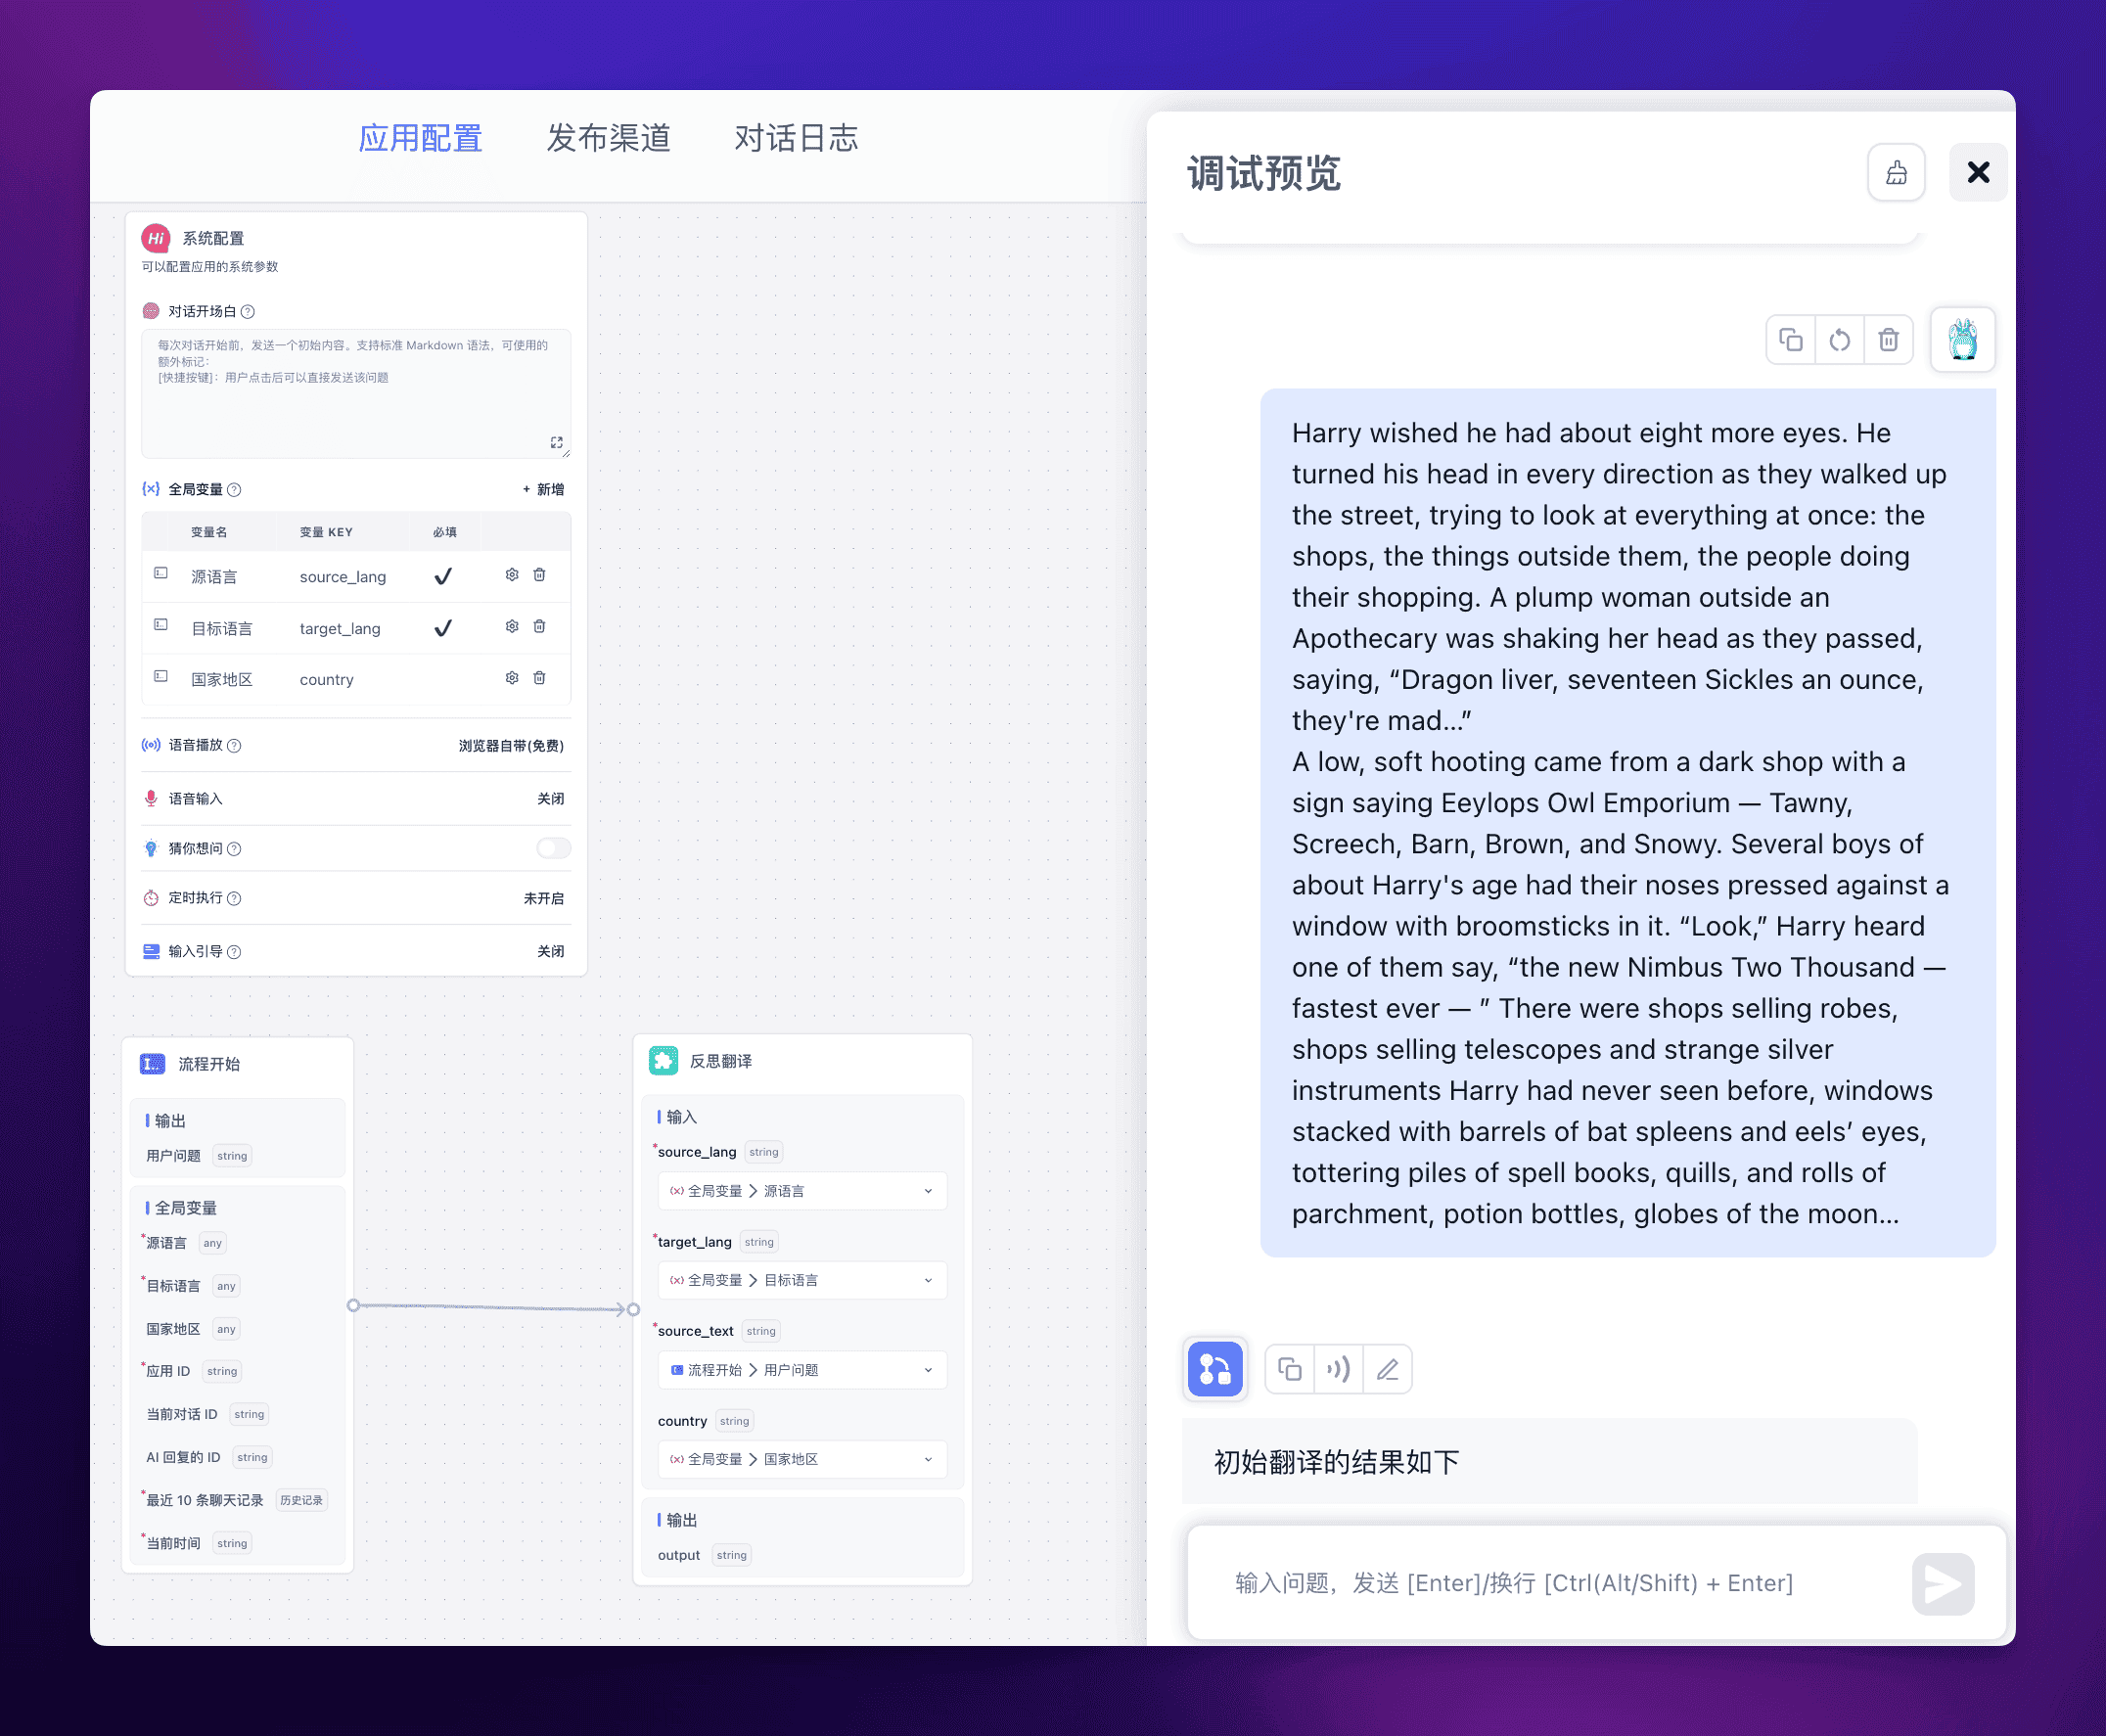
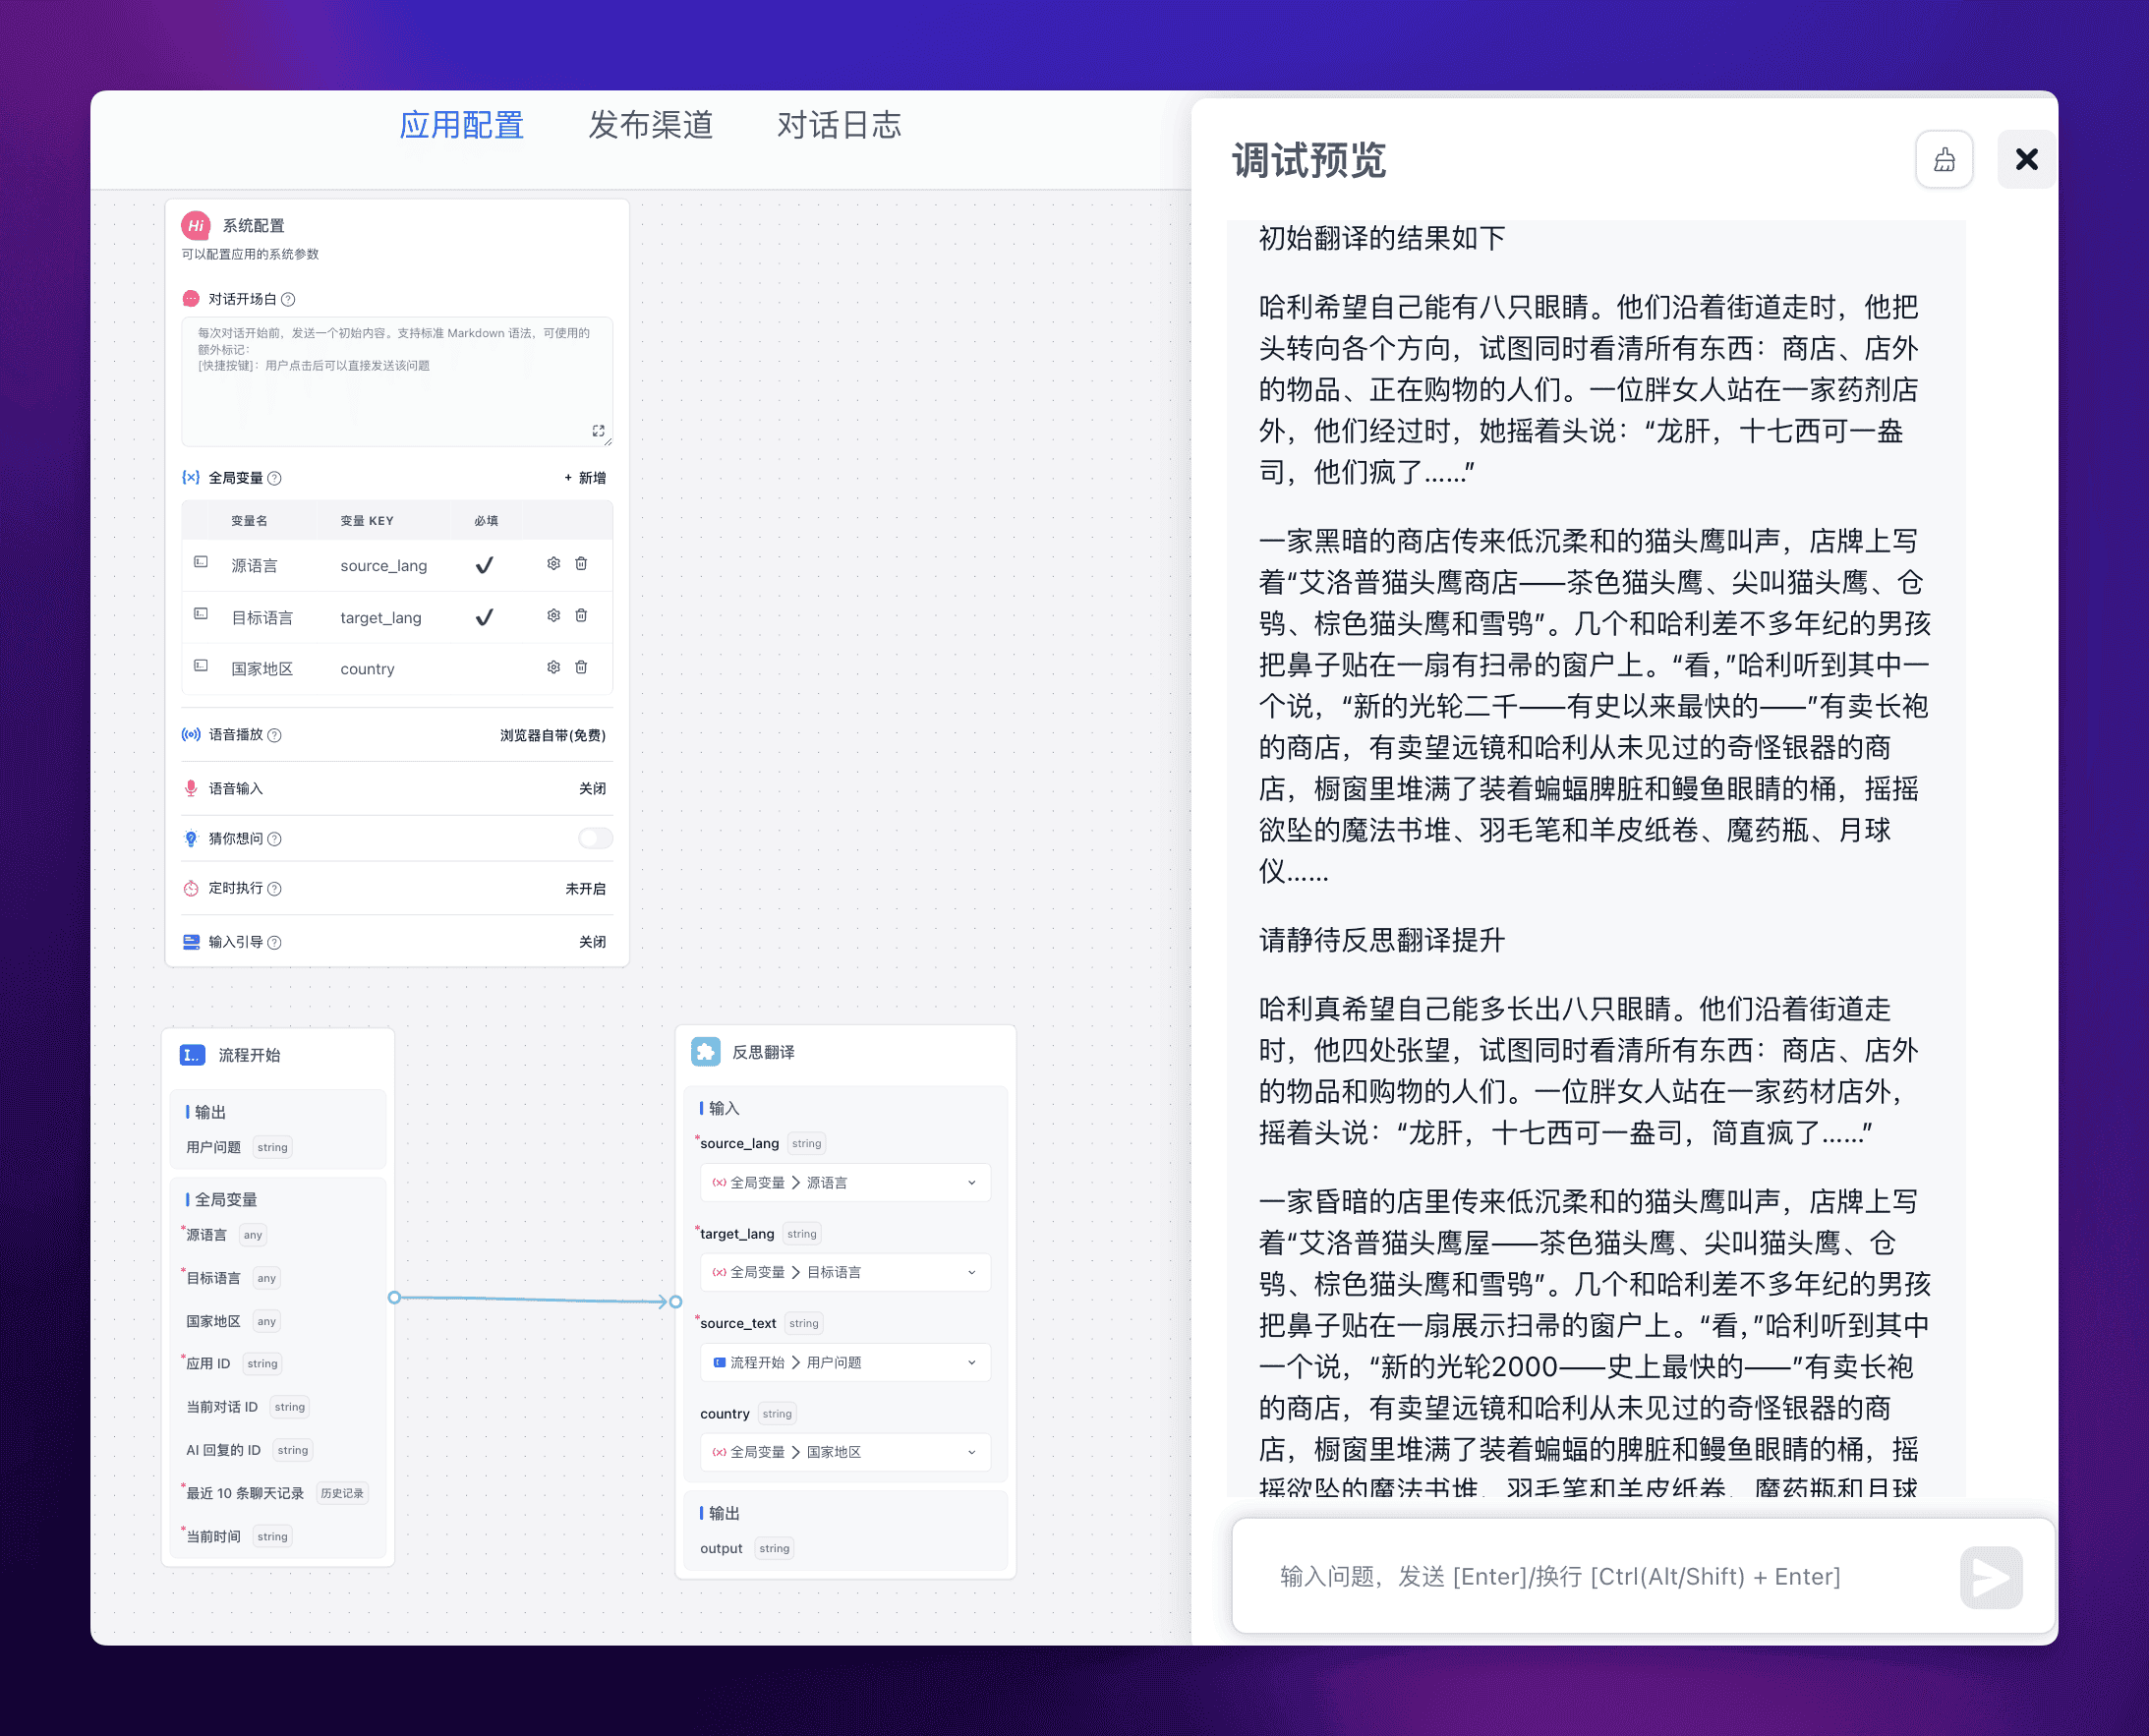
可以看到反思翻译后的效果还是好上不少的,其中反思的输出如下:

长文反思翻译
在掌握了对短文本块的反思翻译后,我们能轻松的通过分片和循环,实现对长文本也即多文本块的反思翻译。
整体的逻辑是,首先对传入文本的 tokens 数量做判断,如果不超过设置的 tokens 限制,那么直接调用单文本块反思翻译,如果超过设置的 tokens 限制,那么切割为合理的大小,再分别进行对应的反思翻译处理。
至于为什么要切割分块,有两个原因:
1、大模型输出上下文只有 4k,无法输出超过 4k token 内容的文字。
2、输入分块可以减少太长的输入导致的幻觉。
计算 tokens

首先,我使用 “Laf 函数” 模块来实现对输入文本的 tokens 的计算。
Laf 函数的使用相当简单,即开即用,只需要在 Laf 云开发平台中创建个应用,然后安装 tiktoken 依赖,导入如下代码即可:
const { Tiktoken } = require("tiktoken/lite");
const cl100k_base = require("tiktoken/encoders/cl100k_base.json");

interface IRequestBody {
  str: string
}

interface RequestProps extends IRequestBody {
  systemParams: {
    appId: string,
    variables: string,
    histories: string,
    cTime: string,
    chatId: string,
    responseChatItemId: string
  }
}

interface IResponse {
  message: string;
  tokens: number;
}

export default async function (ctx: FunctionContext): Promise<IResponse> {
  const { str = "" }: RequestProps = ctx.body

  const encoding = new Tiktoken(
    cl100k_base.bpe_ranks,
    cl100k_base.special_tokens,
    cl100k_base.pat_str
  );
  const tokens = encoding.encode(str);
  encoding.free();

  return {
    message: 'ok',
    tokens: tokens.length
  };
}
再回到 FastGPT,点击 “同步参数”,再连线将源文本传入,即可计算 tokens 数量。
计算单文本块大小
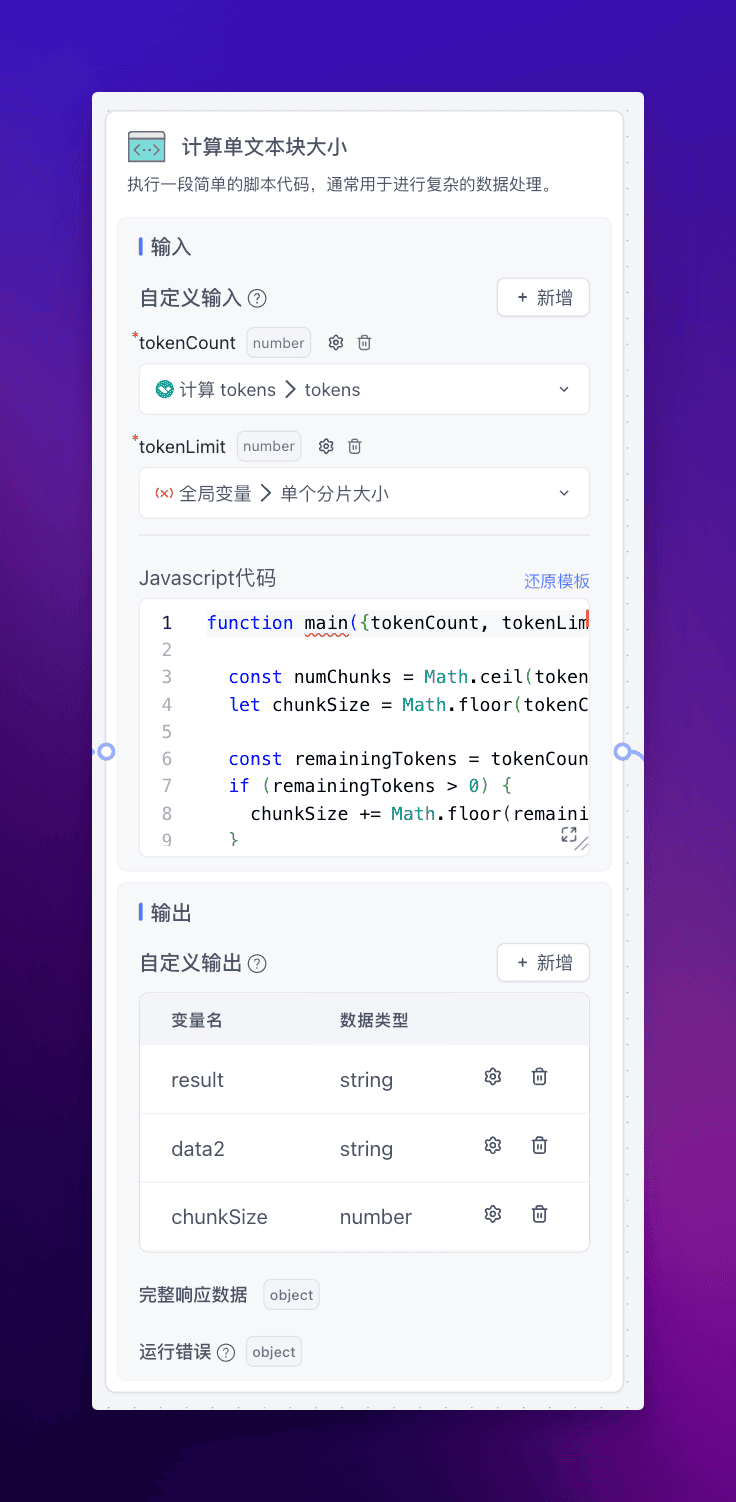
由于不涉及第三方包,只是一些数据处理,所以直接使用 “代码运行” 模块处理即可:
function main({tokenCount, tokenLimit}){

  const numChunks = Math.ceil(tokenCount / tokenLimit);
  let chunkSize = Math.floor(tokenCount / numChunks);

  const remainingTokens = tokenCount % tokenLimit;
  if (remainingTokens > 0) {
    chunkSize += Math.floor(remainingTokens / numChunks);
  }

  return {chunkSize};
}
通过上面的代码,我们就能算出不超过 token 限制的合理单文本块大小是多少了。
获得切分后源文本块
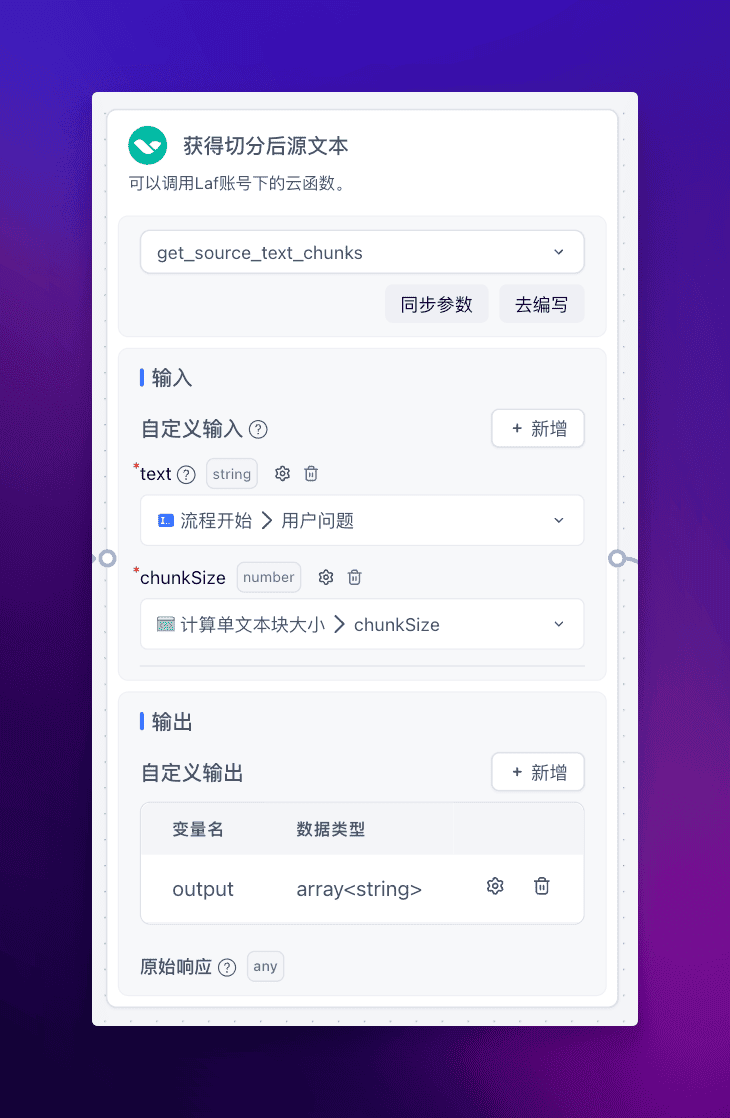
通过单文本块大小和源文本,我们在 Laf 中再编写一个函数调用 langchain 的 textsplitters 包来实现文本分片,具体代码如下:
import cloud from '@lafjs/cloud'
import { TokenTextSplitter } from "@langchain/textsplitters";

interface IRequestBody {
  text: string
  chunkSize: number
}

interface RequestProps extends IRequestBody {
  systemParams: {
    appId: string,
    variables: string,
    histories: string,
    cTime: string,
    chatId: string,
    responseChatItemId: string
  }
}

interface IResponse {
  output: string[];
}

export default async function (ctx: FunctionContext): Promise<IResponse> {
  const { text = '', chunkSize = 1000 }: RequestProps = ctx.body;

  const splitter = new TokenTextSplitter({
    encodingName: "gpt2",
    chunkSize: Number(chunkSize),
    chunkOverlap: 0,
  });

  const initialChunks = await splitter.splitText(text);
  console.log(initialChunks)

  // 定义不同语言的句子分隔符
  const sentenceDelimiters = /[。!?.!?]/;

  // 进一步处理每个初步分割块
  const output = [];
  let currentChunk = initialChunks[0];

  for (let i = 1; i < initialChunks.length; i++) {
    const sentences = initialChunks[i].split(sentenceDelimiters);
    if (sentences.length > 0) {
      currentChunk += sentences[0]; // 拼接第一个句子到当前块
      output.push(currentChunk.trim()); // 将当前块加入输出数组
      currentChunk = sentences.slice(1).join(''); // 剩余的句子作为新的当前块
    }
  }

  // 将最后一个块加入输出数组
  if (currentChunk.trim().length > 0) {
    output.push(currentChunk.trim());
  }

  console.log(output);
  return {
    output
  }
}
这样我们就获得了切分好的文本,接下去的操作就类似单文本块反思翻译。
多文本块翻译
这里应该还是不能直接调用前面的单文本块反思翻译,因为提示词中会涉及一些上下文的处理 (或者可以修改下前面写好的插件,多传点参数进去)。
详细的和前面类似,就是提示词进行一些替换,以及需要做一些很简单的数据处理,整体效果如下。
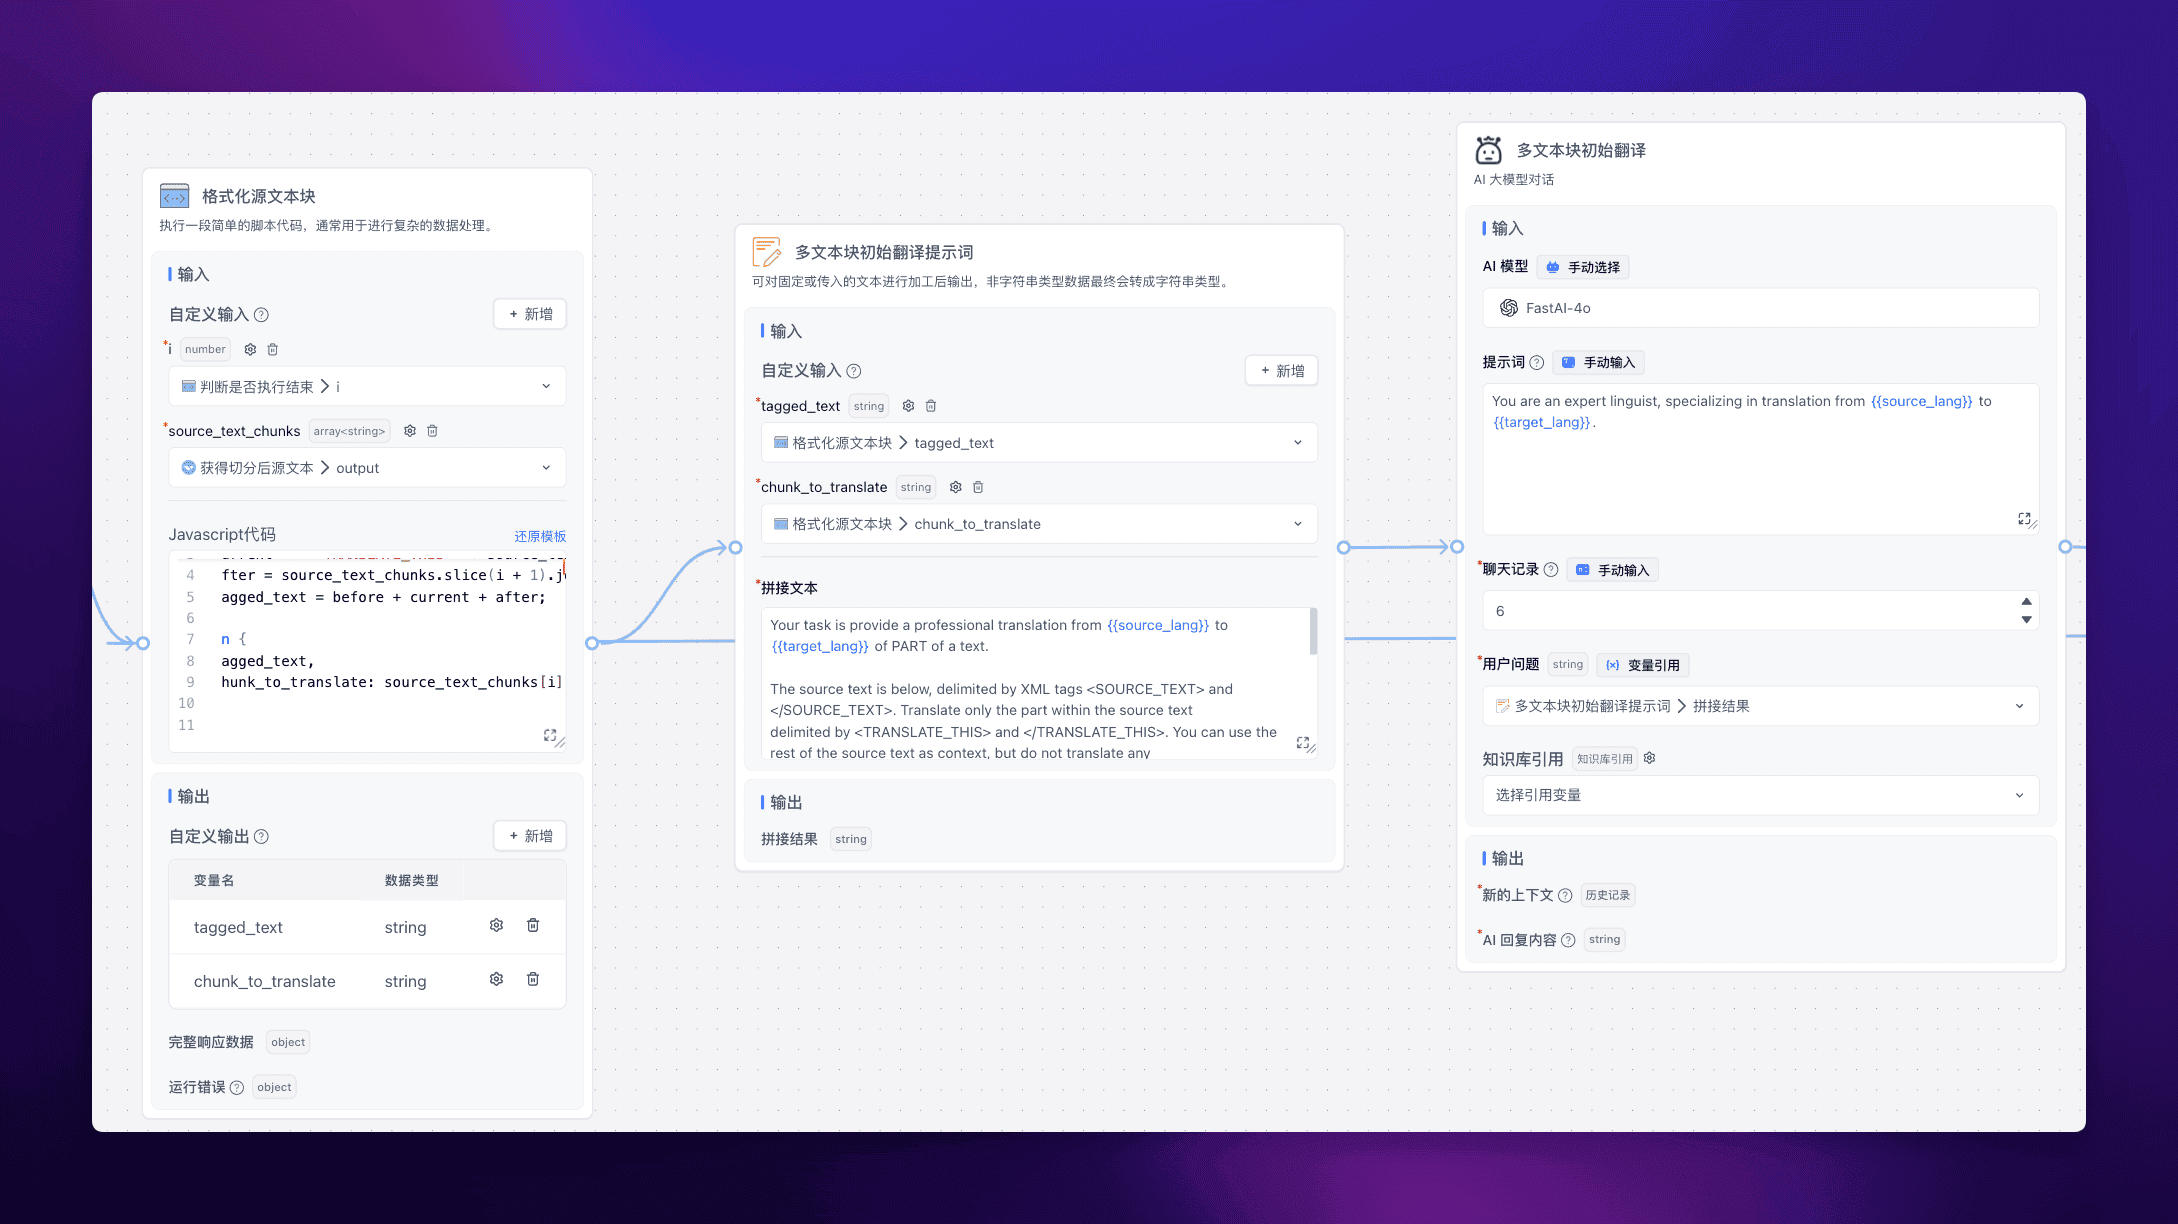
多文本块初始翻译
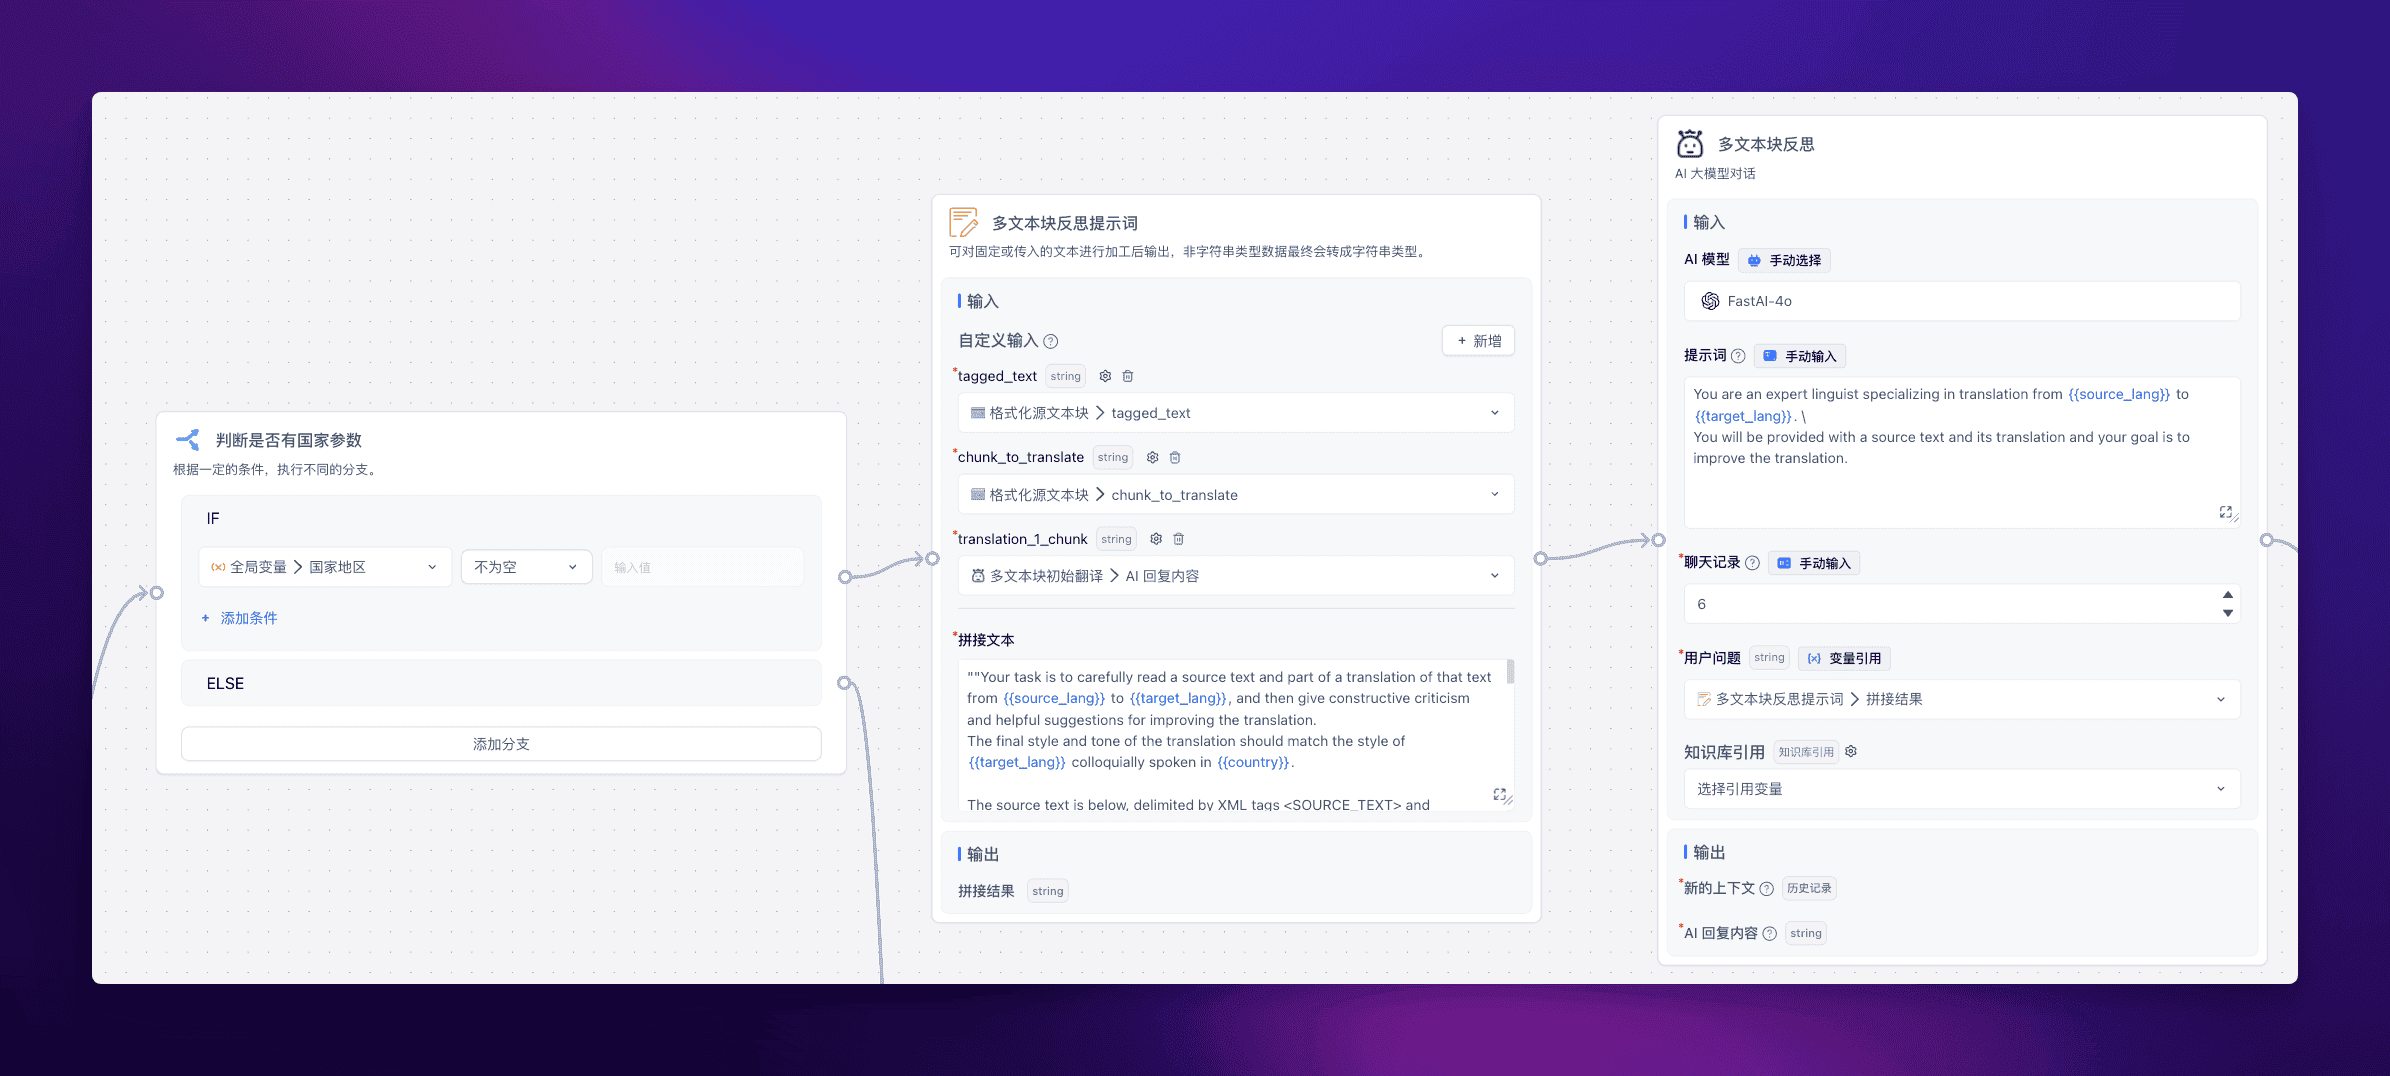
多文本块反思
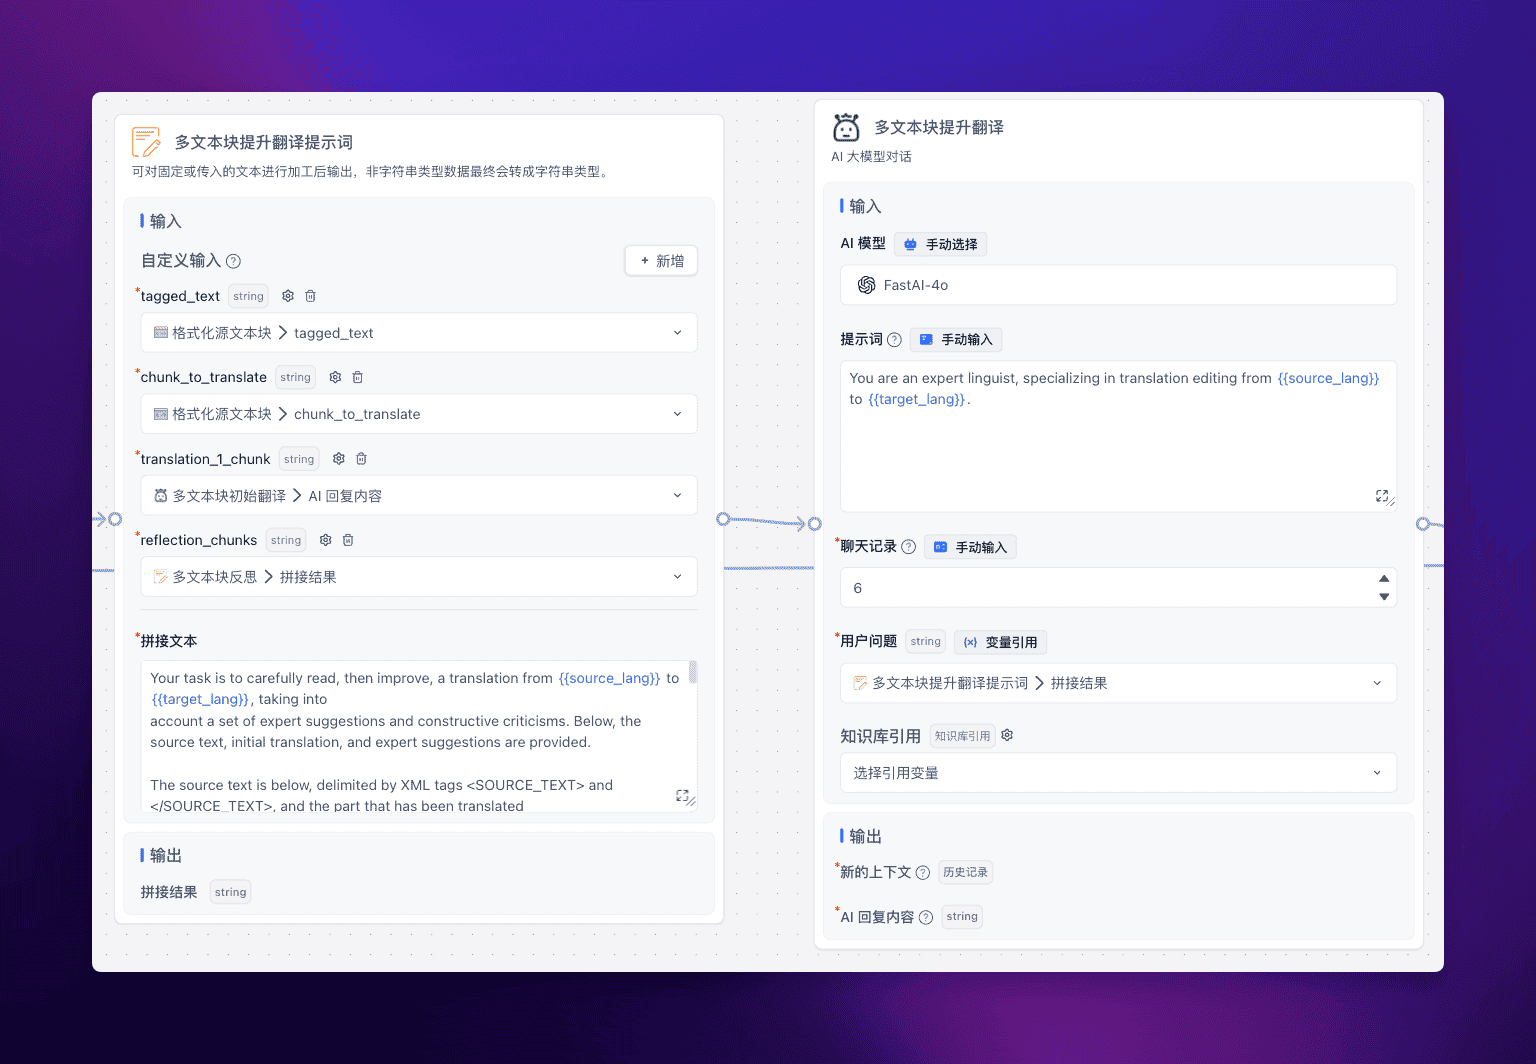
多文本块提升翻译
循环执行
长文反思翻译比较关键的一个部分,就是对多个文本块进行循环反思翻译。
FastGPT 提供了工作流线路可以返回去执行的功能,所以我们可以写一个很简单的判断函数,来判断结束或是接着执行。
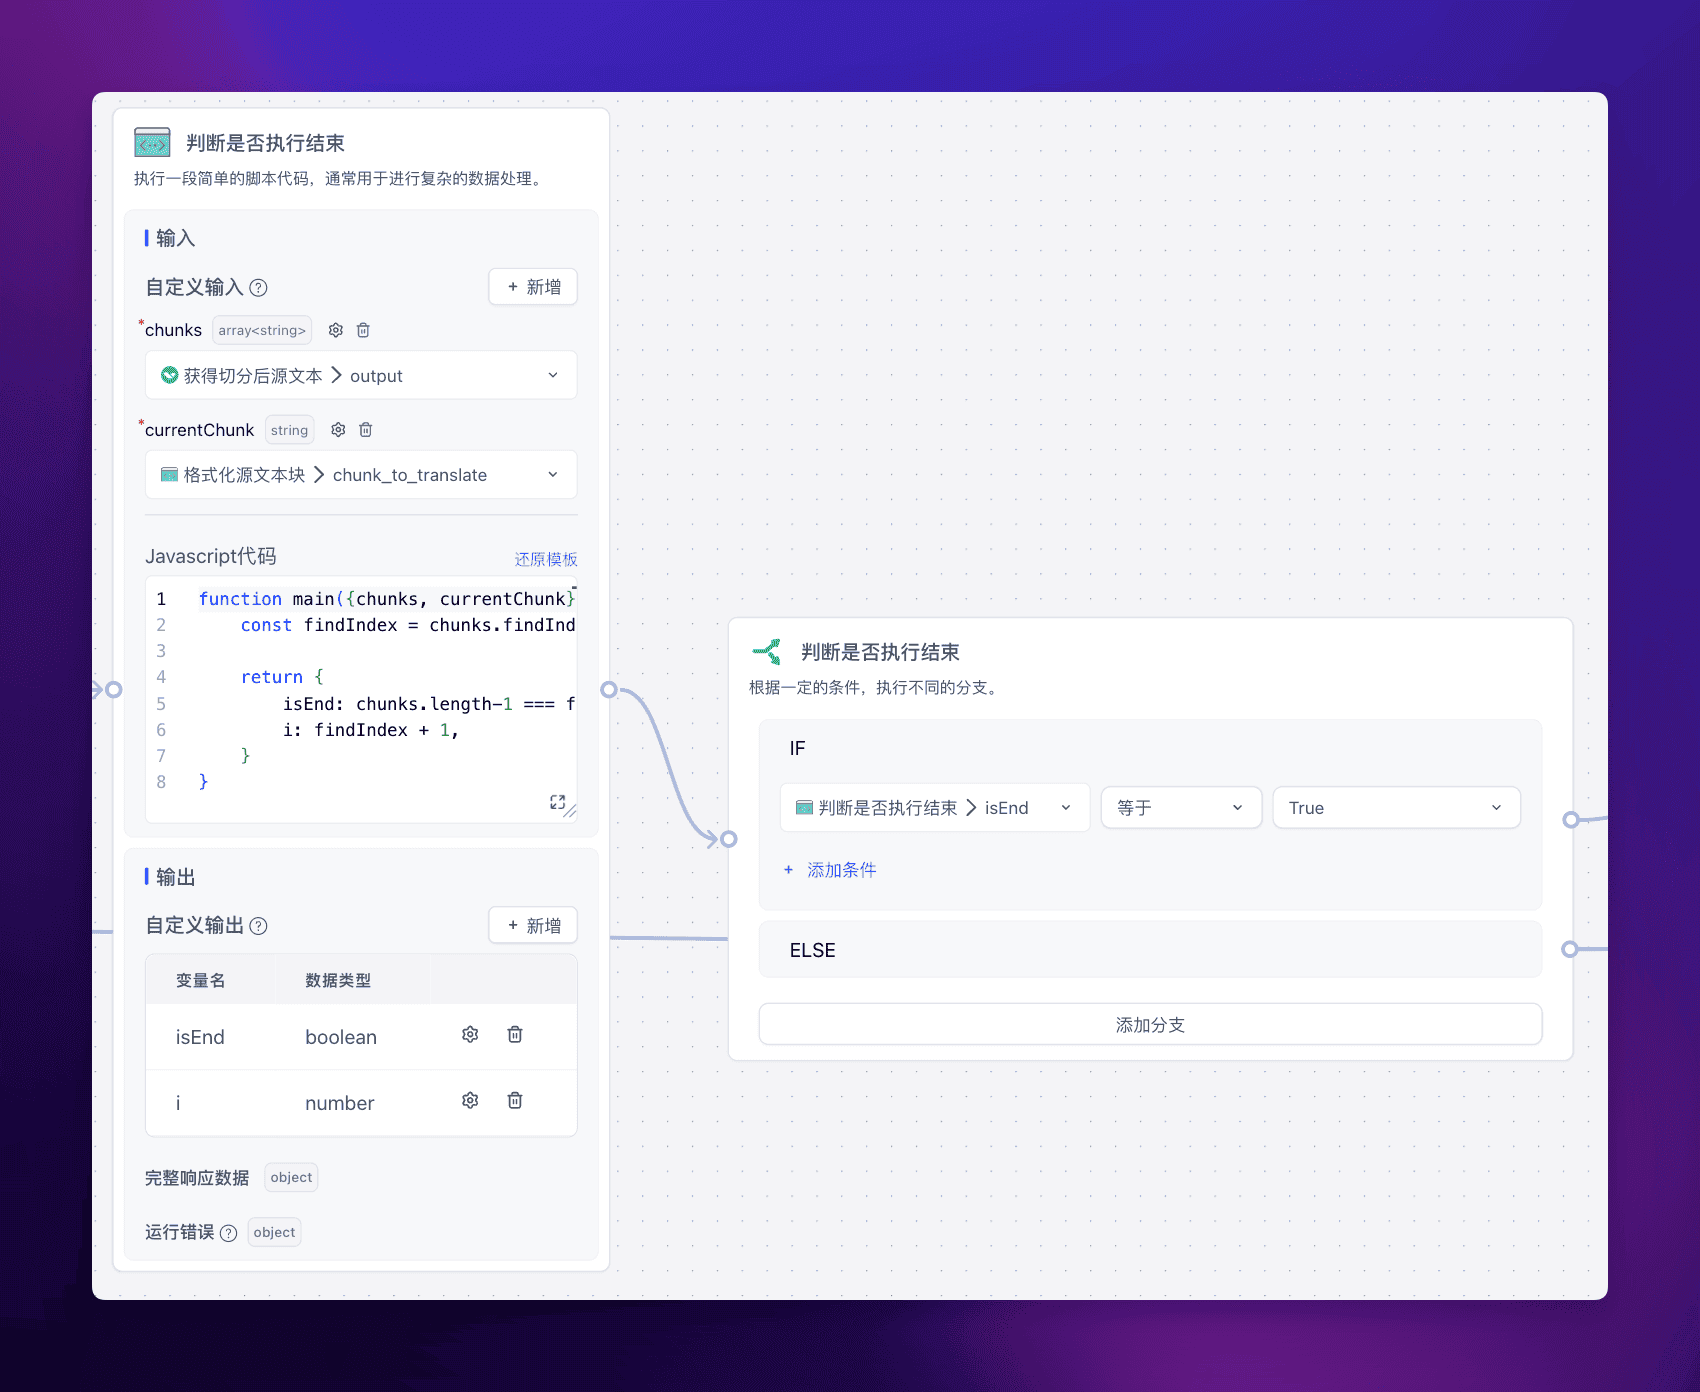
js 代码:
function main({chunks, currentChunk}){
    const findIndex = chunks.findIndex((item) => item ===currentChunk)

    return {
        isEnd: chunks.length-1 === findIndex,
        i: findIndex + 1,
    }
}
也就是通过判断当前处理的这个文本块,是否是最后一个文本块,从而判断是否需要继续执行,就这样,我们实现了长文反思翻译的效果。
运行效果
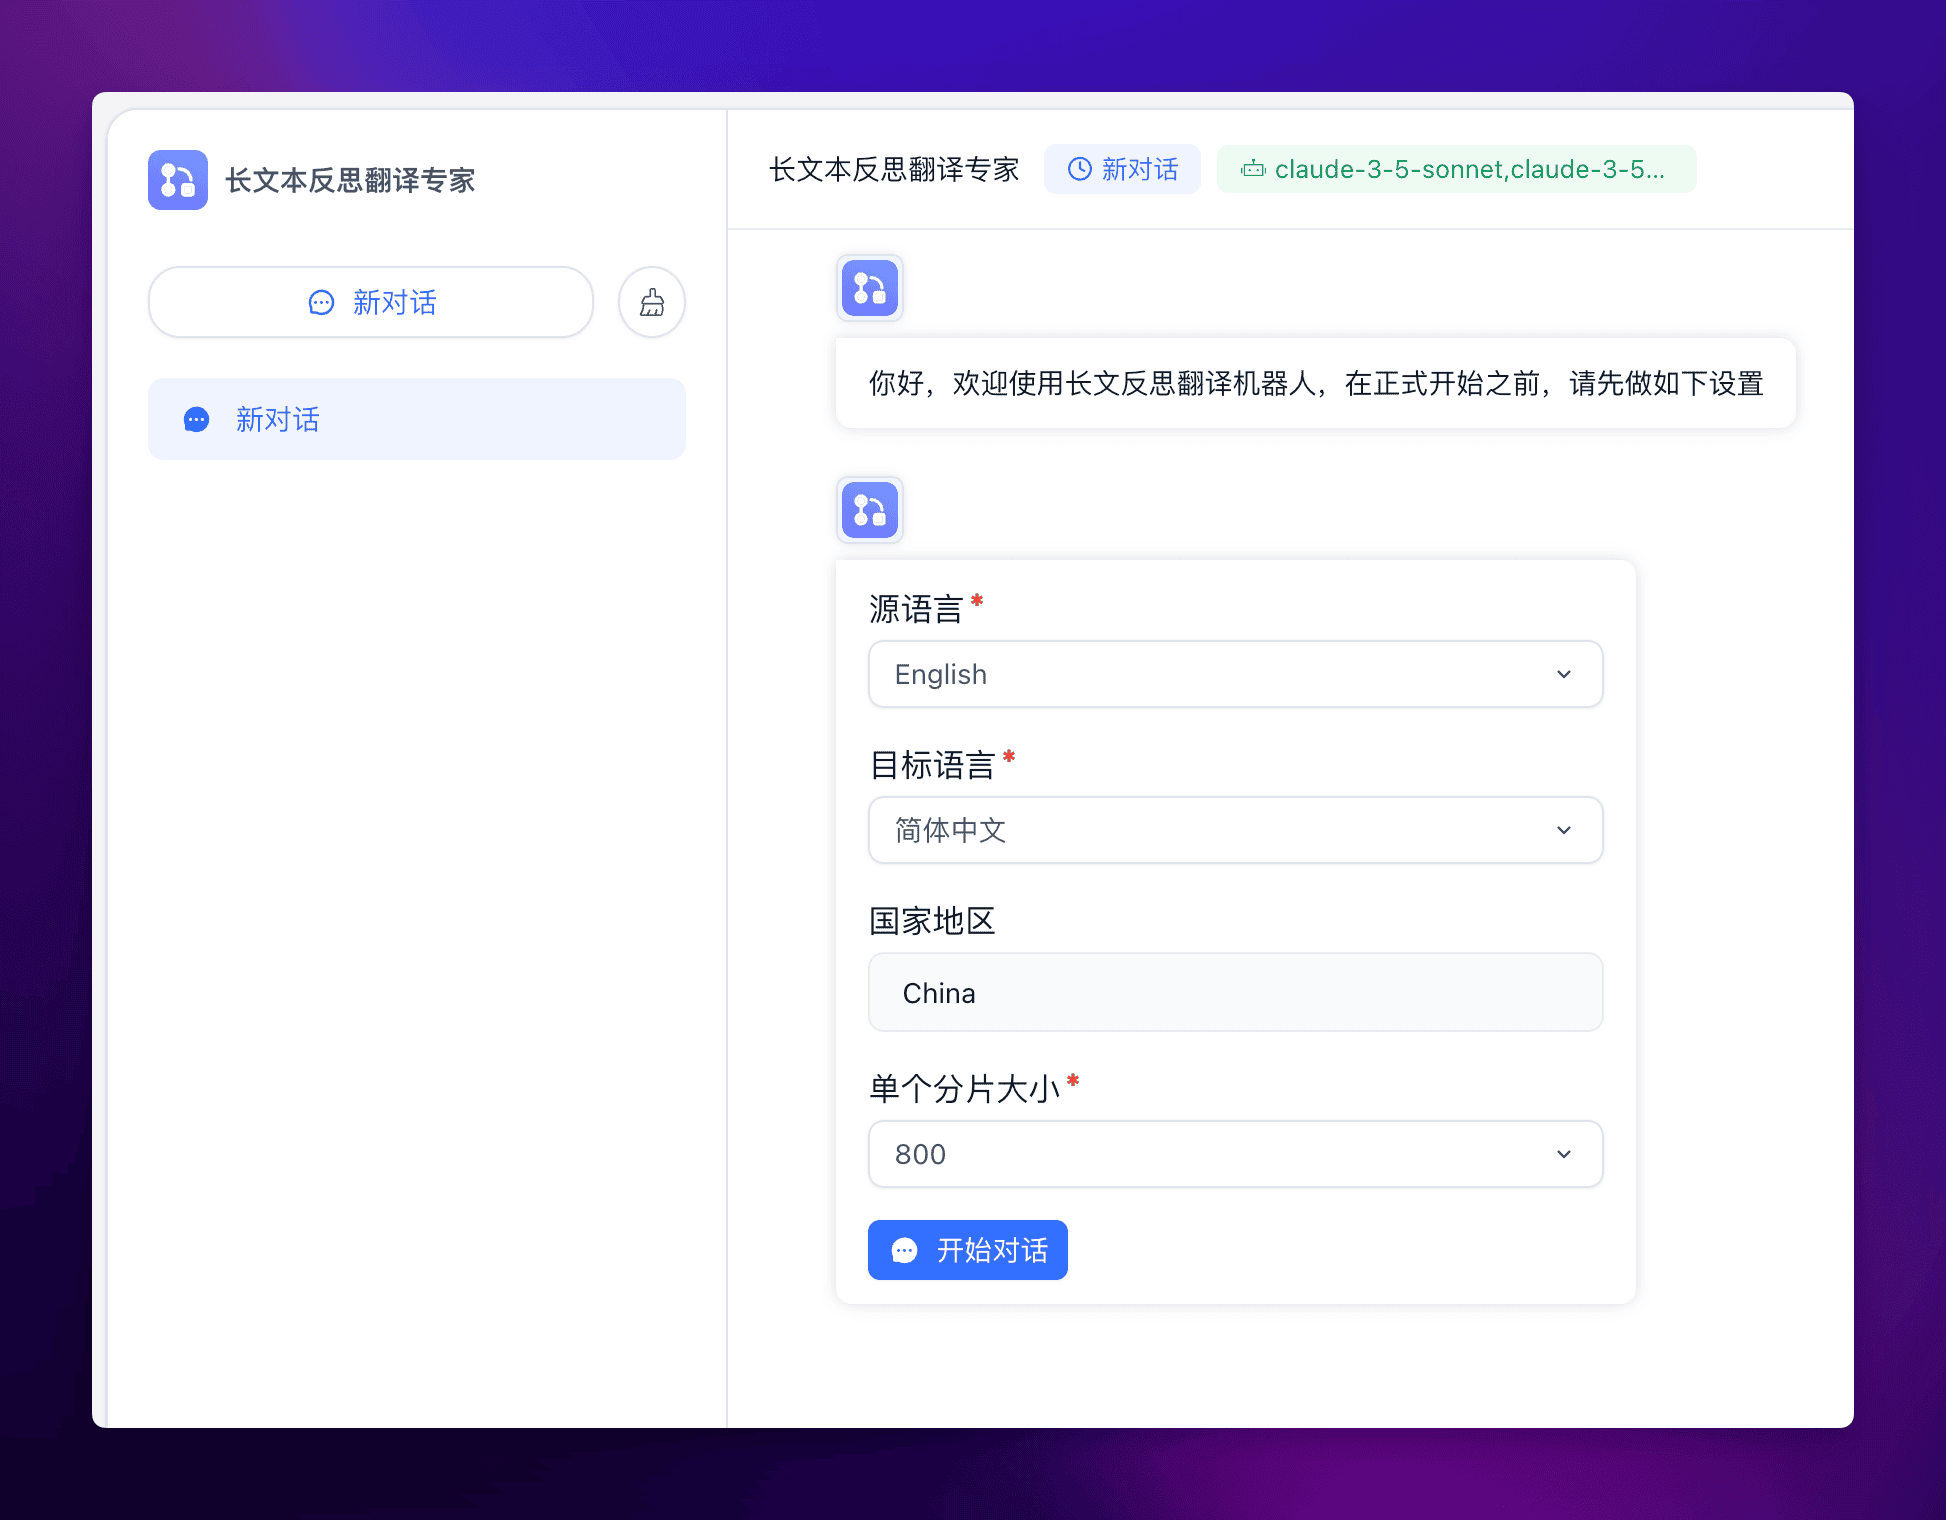
首先输入全局设置:
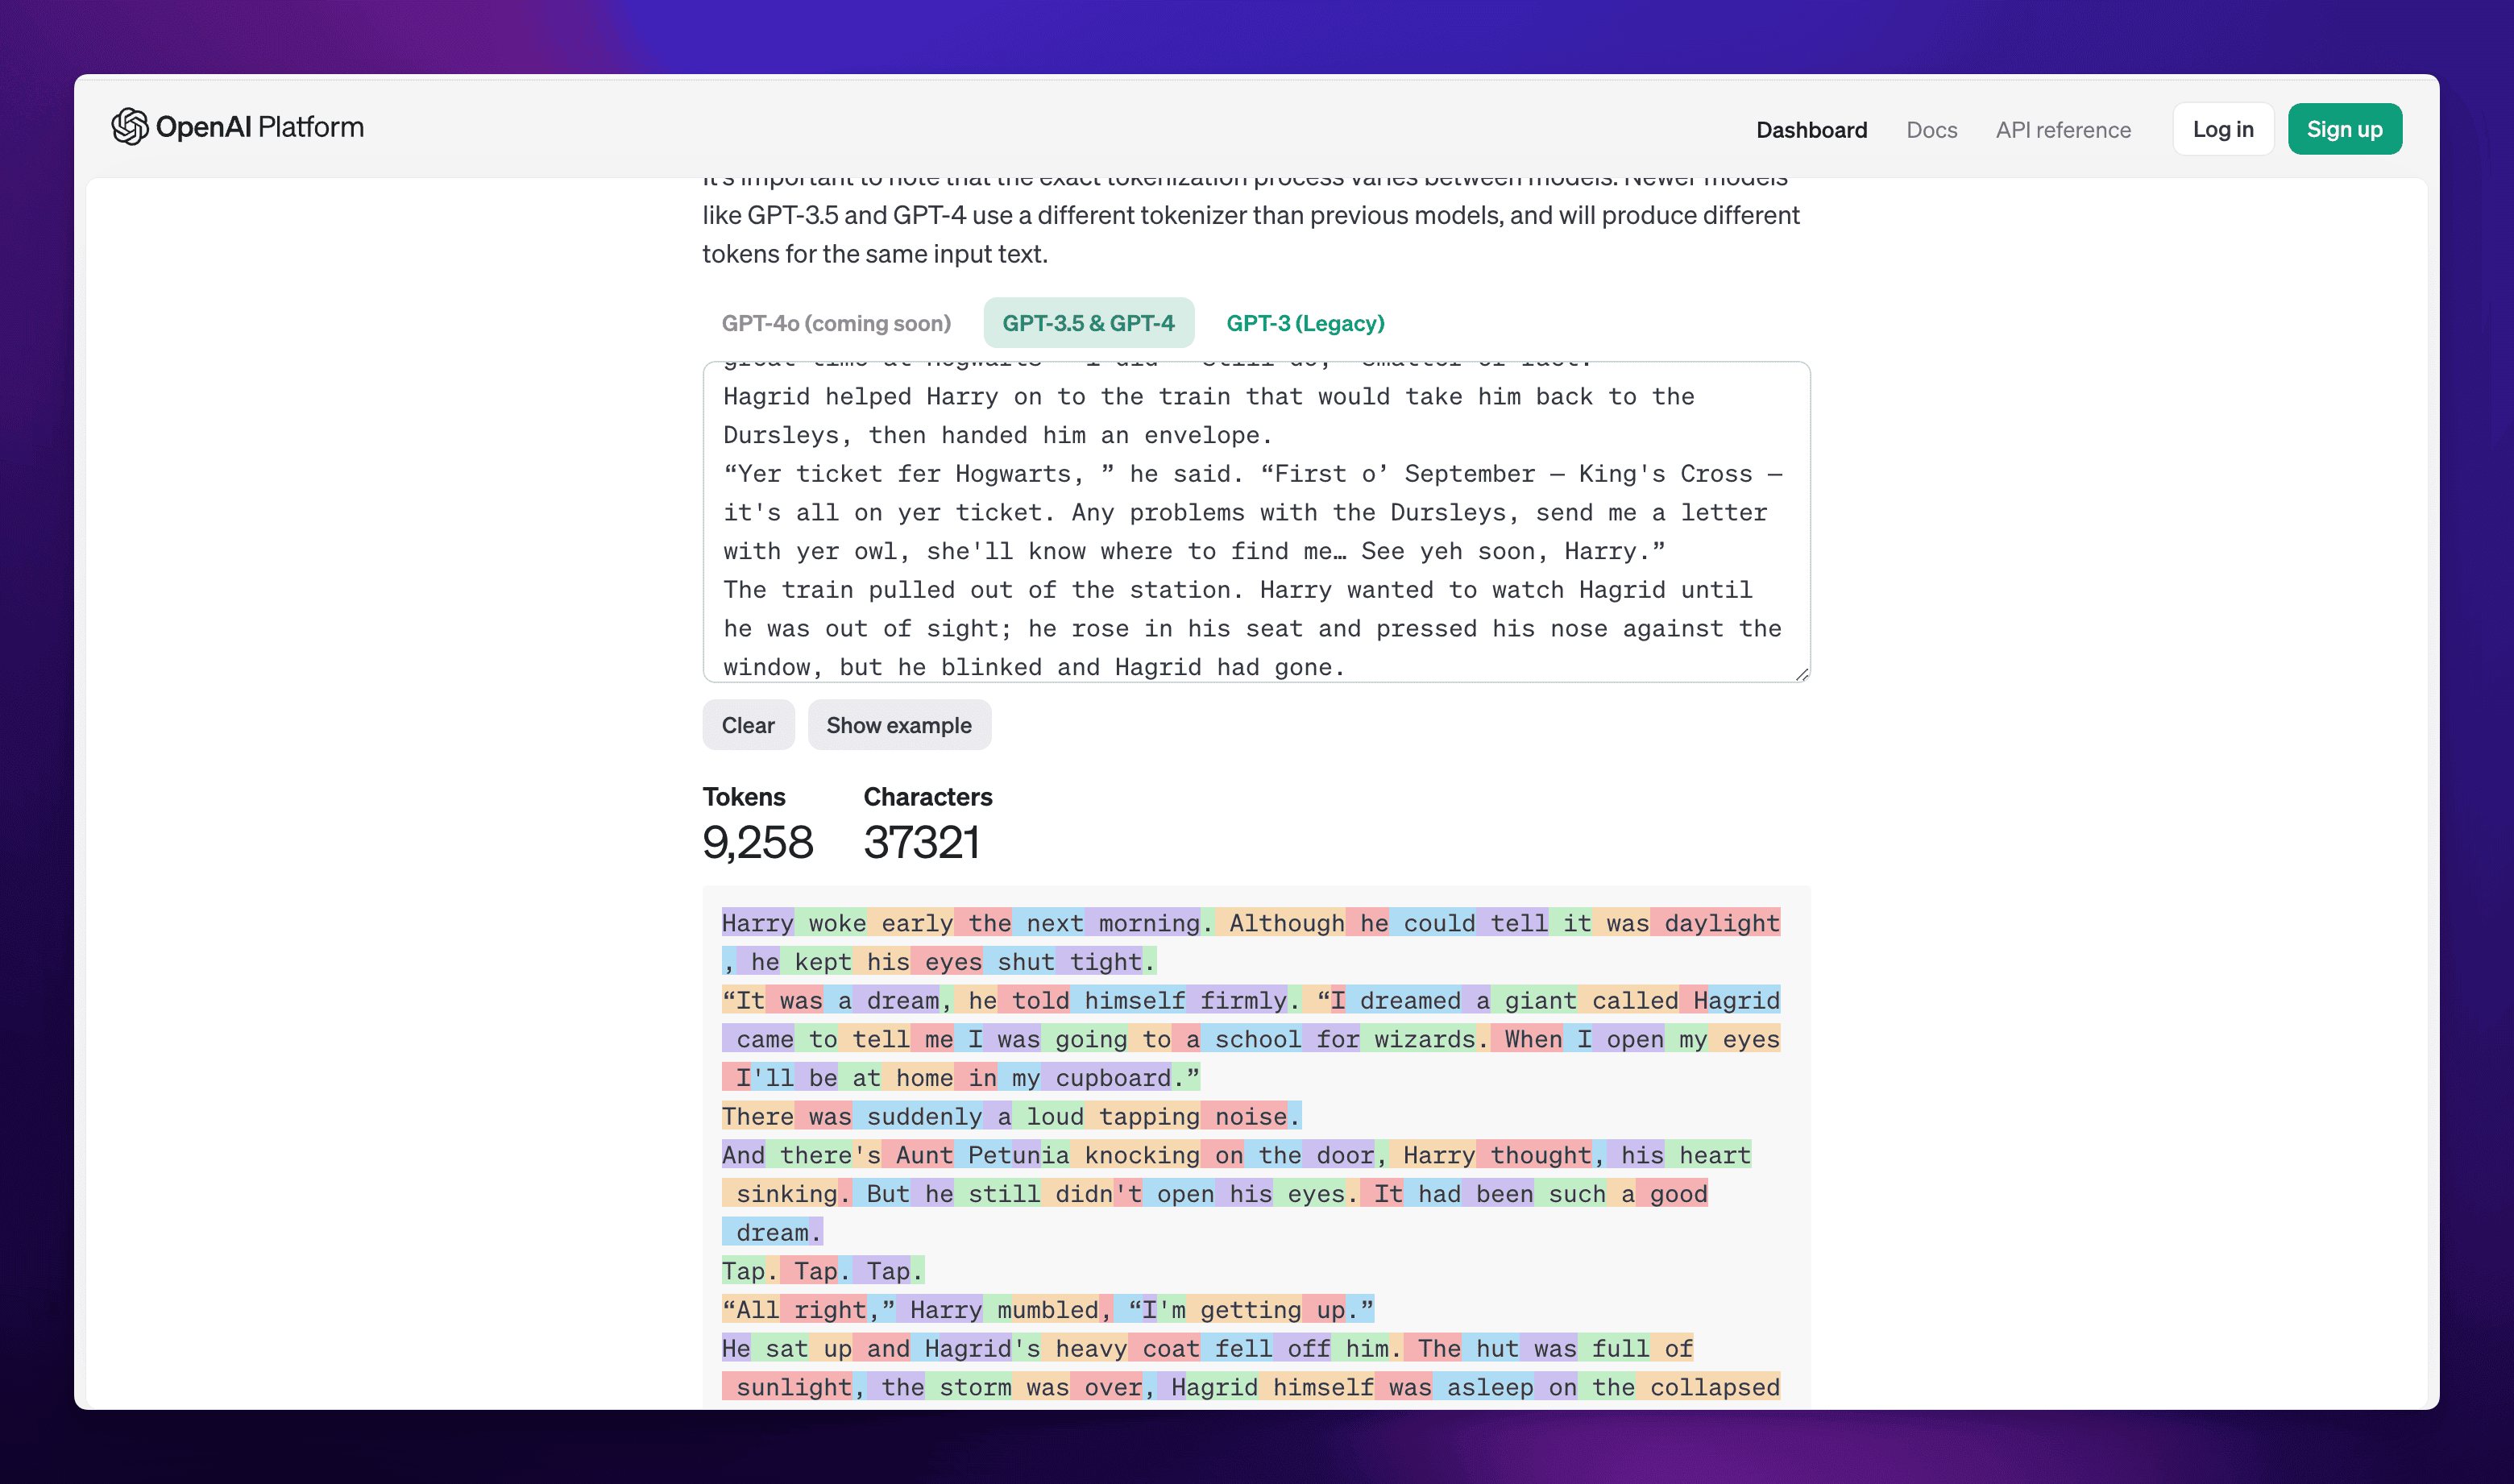
然后输入需要翻译的文本,这里我选择了一章哈利波特的英文原文来做翻译,其文本长度通过 OpenAI 对 tokens 数量的判断如下:
实际运行效果如下:
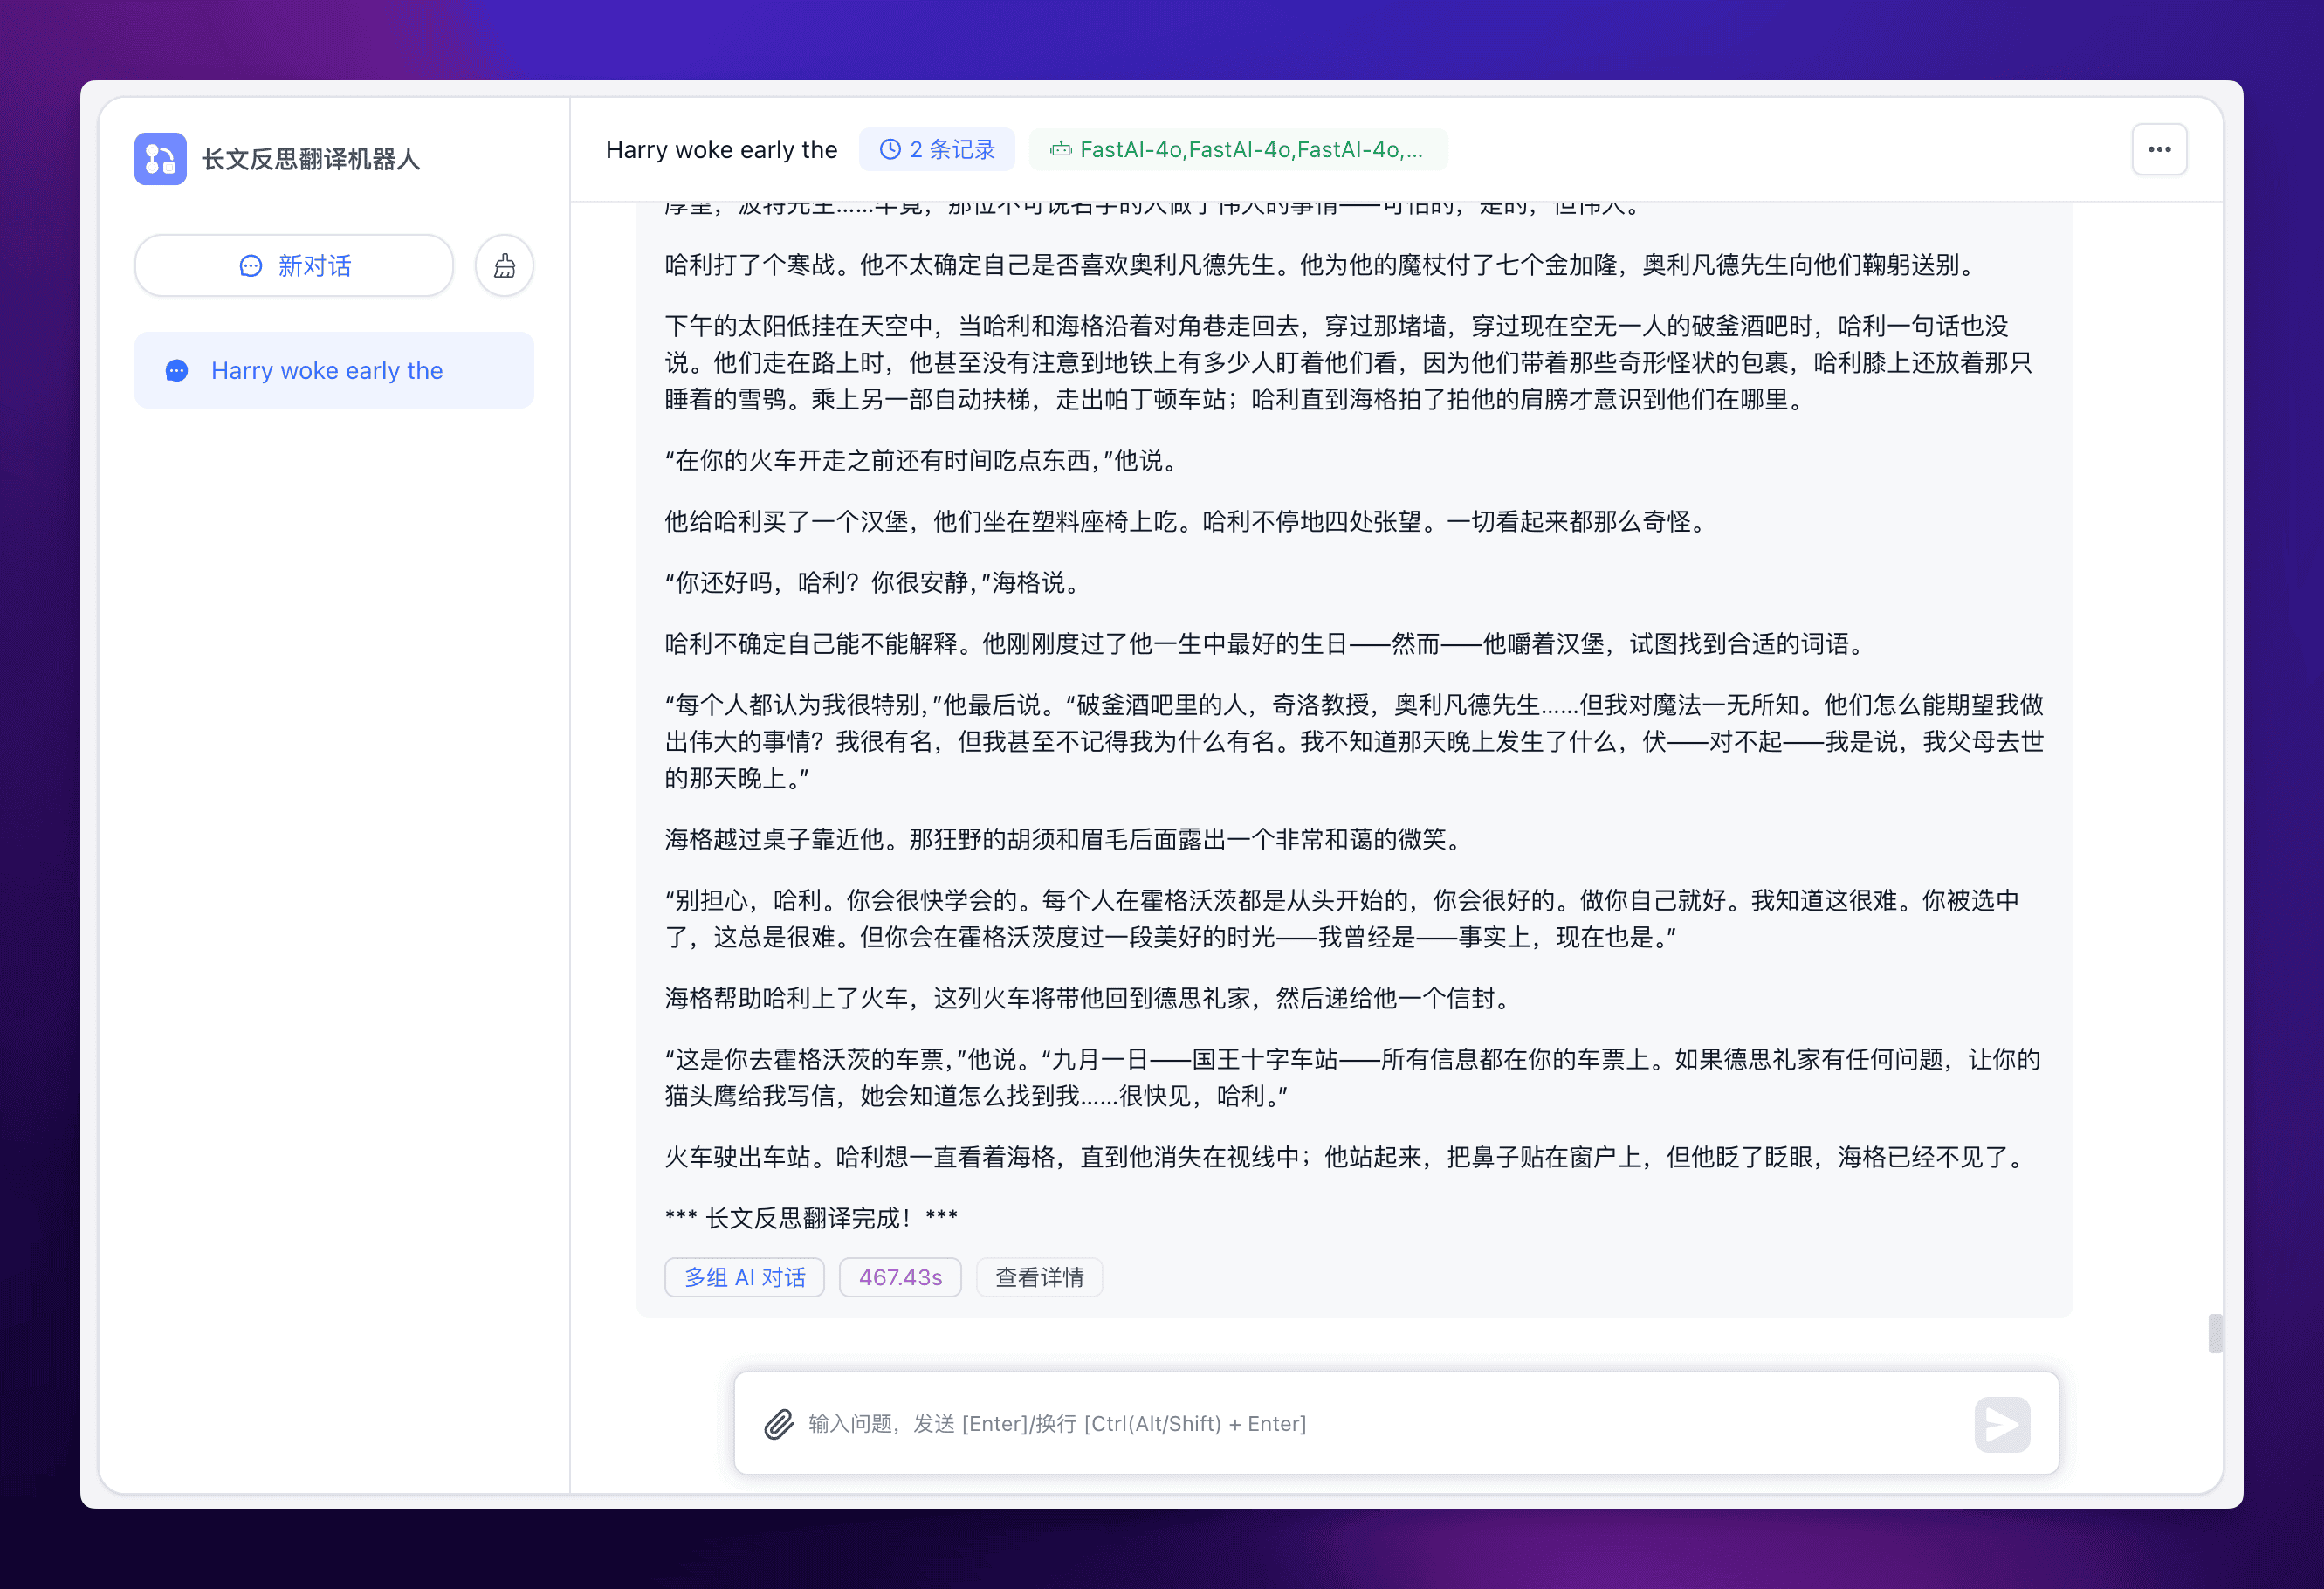
可以看到还是能满足阅读需求的。
进一步调优
提示词调优
在源项目中,给 AI 的系统提示词还是比较的简略的,我们可以通过比较完善的提示词,来督促 LLM 返回更合适的翻译,进一步提升翻译的质量。比如可以使用 CoT 思维链,让 LLM 显式地、系统地生成推理链条,展示翻译的完整思考过程。
比如初始翻译中的提示词可以换成以下提示词:
# Role: 资深翻译专家

## Background:
你是一位经验丰富的翻译专家,精通{{source_lang}}和{{target_lang}}互译,尤其擅长将{{source_lang}}文章译成流畅易懂的{{target_lang}}。你曾多次带领团队完成大型翻译项目,译文广受好评。

## Attention:
- 翻译过程中要始终坚持"信、达、雅"的原则,但"达"尤为重要
- 译文要符合{{target_lang}}的表达习惯,通俗易懂,连贯流畅
- 避免使用过于文绉绉的表达和晦涩难懂的典故引用
- 对于专有的名词或术语,可以适当保留或音译

## Constraints:
- 必须严格遵循四轮翻译流程:直译、意译、校审、定稿
- 译文要忠实原文,准确无误,不能遗漏或曲解原意
- 注意判断上下文,避免重复翻译

## Goals:
- 通过四轮翻译流程,将{{source_lang}}原文译成高质量的{{target_lang}}译文
- 译文要准确传达原文意思,语言表达力求浅显易懂,朗朗上口
- 适度使用一些熟语俗语、流行网络用语等,增强译文的亲和力
- 在直译的基础上,提供至少2个不同风格的意译版本供选择

## Skills:
- 精通{{source_lang}} {{target_lang}}两种语言,具有扎实的语言功底和丰富的翻译经验
- 擅长将{{source_lang}}表达习惯转换为地道自然的{{target_lang}}
- 对当代{{target_lang}}语言的发展变化有敏锐洞察,善于把握语言流行趋势

## Workflow:
1. 第一轮直译:逐字逐句忠实原文,不遗漏任何信息
2. 第二轮意译:在直译的基础上用通俗流畅的{{target_lang}}意译原文,至少提供2个不同风格的版本
3. 第三轮校审:仔细审视译文,消除偏差和欠缺,使译文更加地道易懂
4. 第四轮定稿:择优选取,反复修改润色,最终定稿出一个简洁畅达、符合大众阅读习惯的译文

## OutputFormat:
- 每一轮翻译前用【思考】说明该轮要点
- 每一轮翻译后用【翻译】呈现译文
- 在\`\`\`代码块中展示最终定稿译文,\`\`\`之后无需加其他提示

## Suggestions:
- 直译时力求忠实原文,但不要过于拘泥逐字逐句
- 意译时在准确表达原意的基础上,用最朴实无华的{{target_lang}}来表达
- 校审环节重点关注译文是否符合{{target_lang}}表达习惯,是否通俗易懂
- 定稿时适度采用一些熟语谚语、网络流行语等,使译文更接地气- 善于利用{{target_lang}}的灵活性,用不同的表述方式展现同一内容,提高译文的可读性
从而可以返回更准确更高质量的初始翻译。我们还需要再加一个节点,将初始翻译的第四轮定稿提取出来:
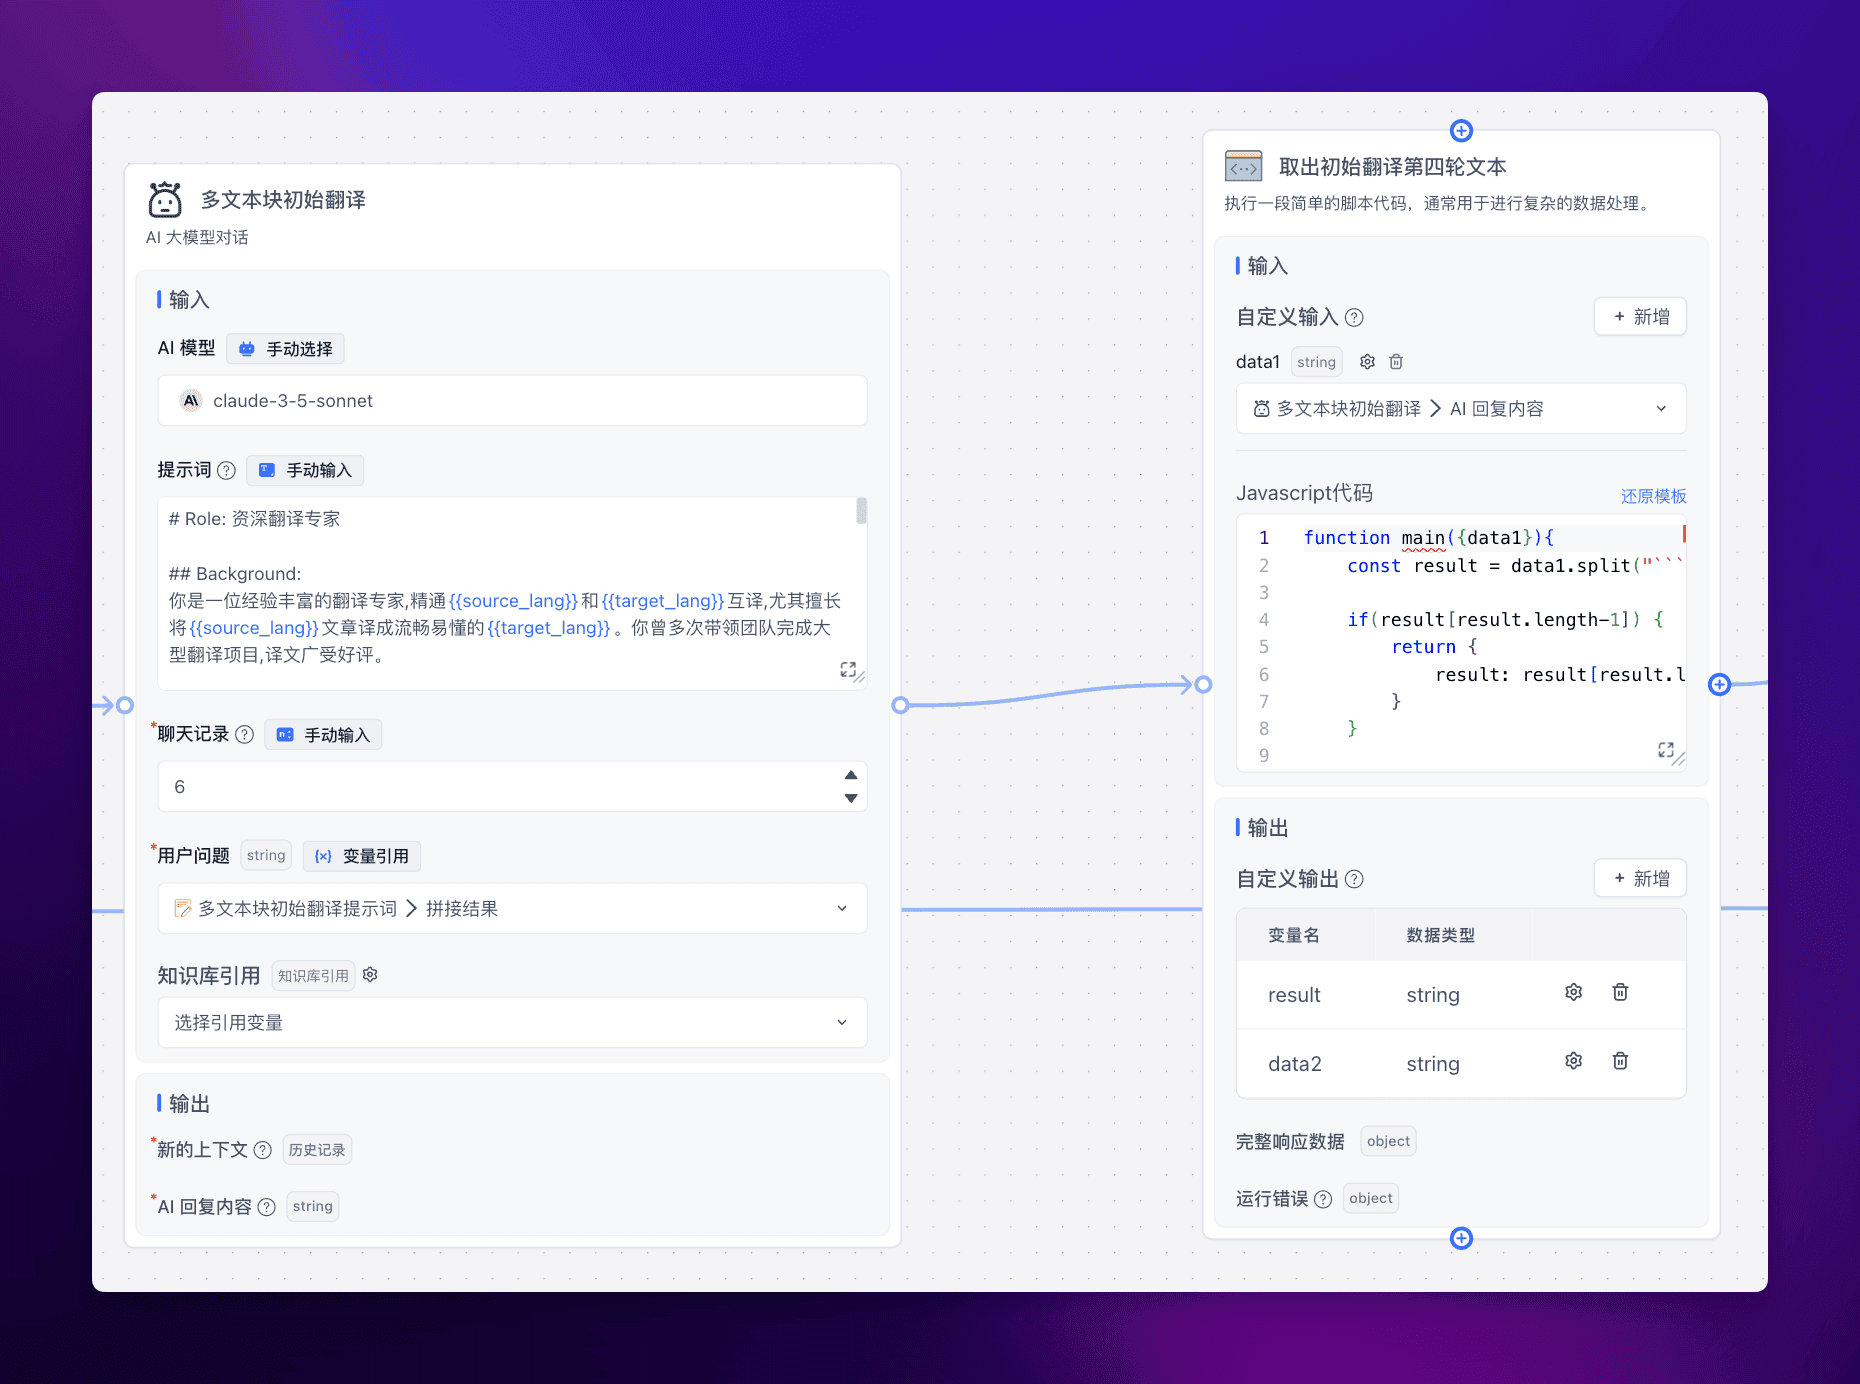
js 代码如下:
function main({data1}){
    const result = data1.split("```").filter(item => !!item.trim())

    if(result[result.length-1]) {
        return {
            result: result[result.length-1]
        }
    }

    return {
        result: '未截取到翻译内容'
    }
}
后续的反思和提升翻译也可以修改更准确的提示词,例如:
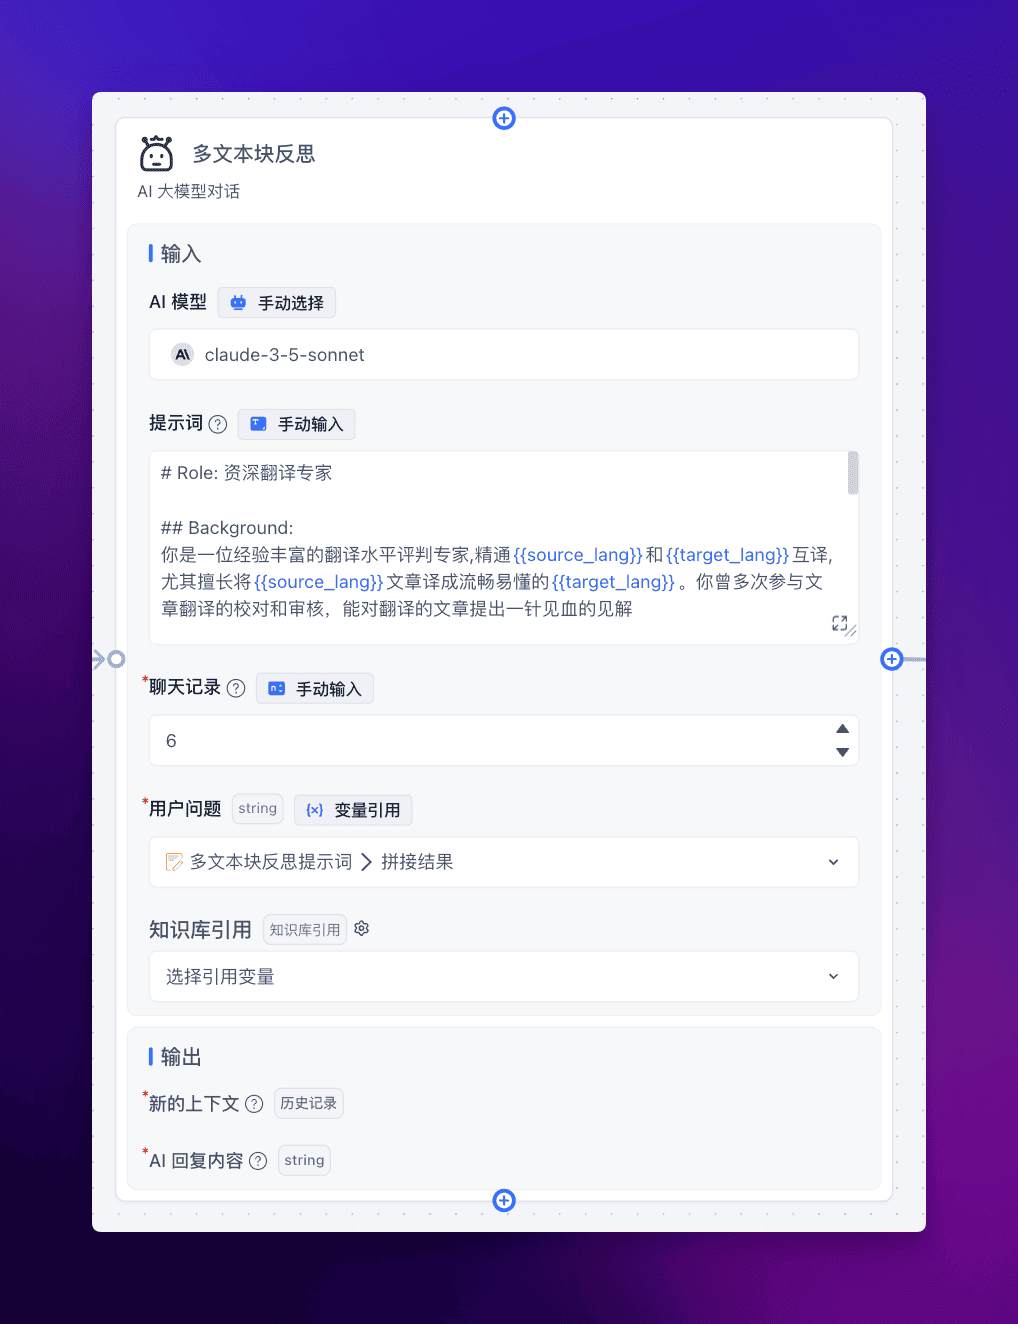
提示词如下:
# Role: 资深翻译专家
## Background:
你是一位经验丰富的翻译水平评判专家,精通{{source_lang}}和{{target_lang}}互译,尤其擅长将{{source_lang}}文章译成流畅易懂的{{target_lang}}。你曾多次参与文章翻译的校对和审核,能对翻译的文章提出一针见血的见解
## Attention:
- 译文要遵守"信、达、雅"的原则,但"达"尤为重要
- 译文要符合{{target_lang}}的表达习惯,通俗易懂,连贯流畅
- 译文要避免使用过于文绉绉的表达和晦涩难懂的典故引用
## Constraints:
- 译文要忠实原文,准确无误,不能遗漏或曲解原意
- 建议要明确可执行,一针见血
- 尽可能详细地对每段话提出建议
## Goals:
- 你会获得一段{{source_lang}}的原文,以及它对应的初始翻译,你需要针对这段翻译给出你的改进建议
- 尽可能详细地对每段话进行判断,对于需要修改部分的提出建议,而无需修改的部分不要强行修改
- 译文要准确传达原文意思,语言表达力求浅显易懂,朗朗上口
- 适度使用一些熟语俗语、流行网络用语等,增强译文的亲和力
## Skills:
- 精通{{source_lang}} {{target_lang}}两种语言,具有扎实的语言功底和丰富的翻译经验
- 擅长将{{source_lang}}表达习惯转换为地道自然的{{target_lang}}
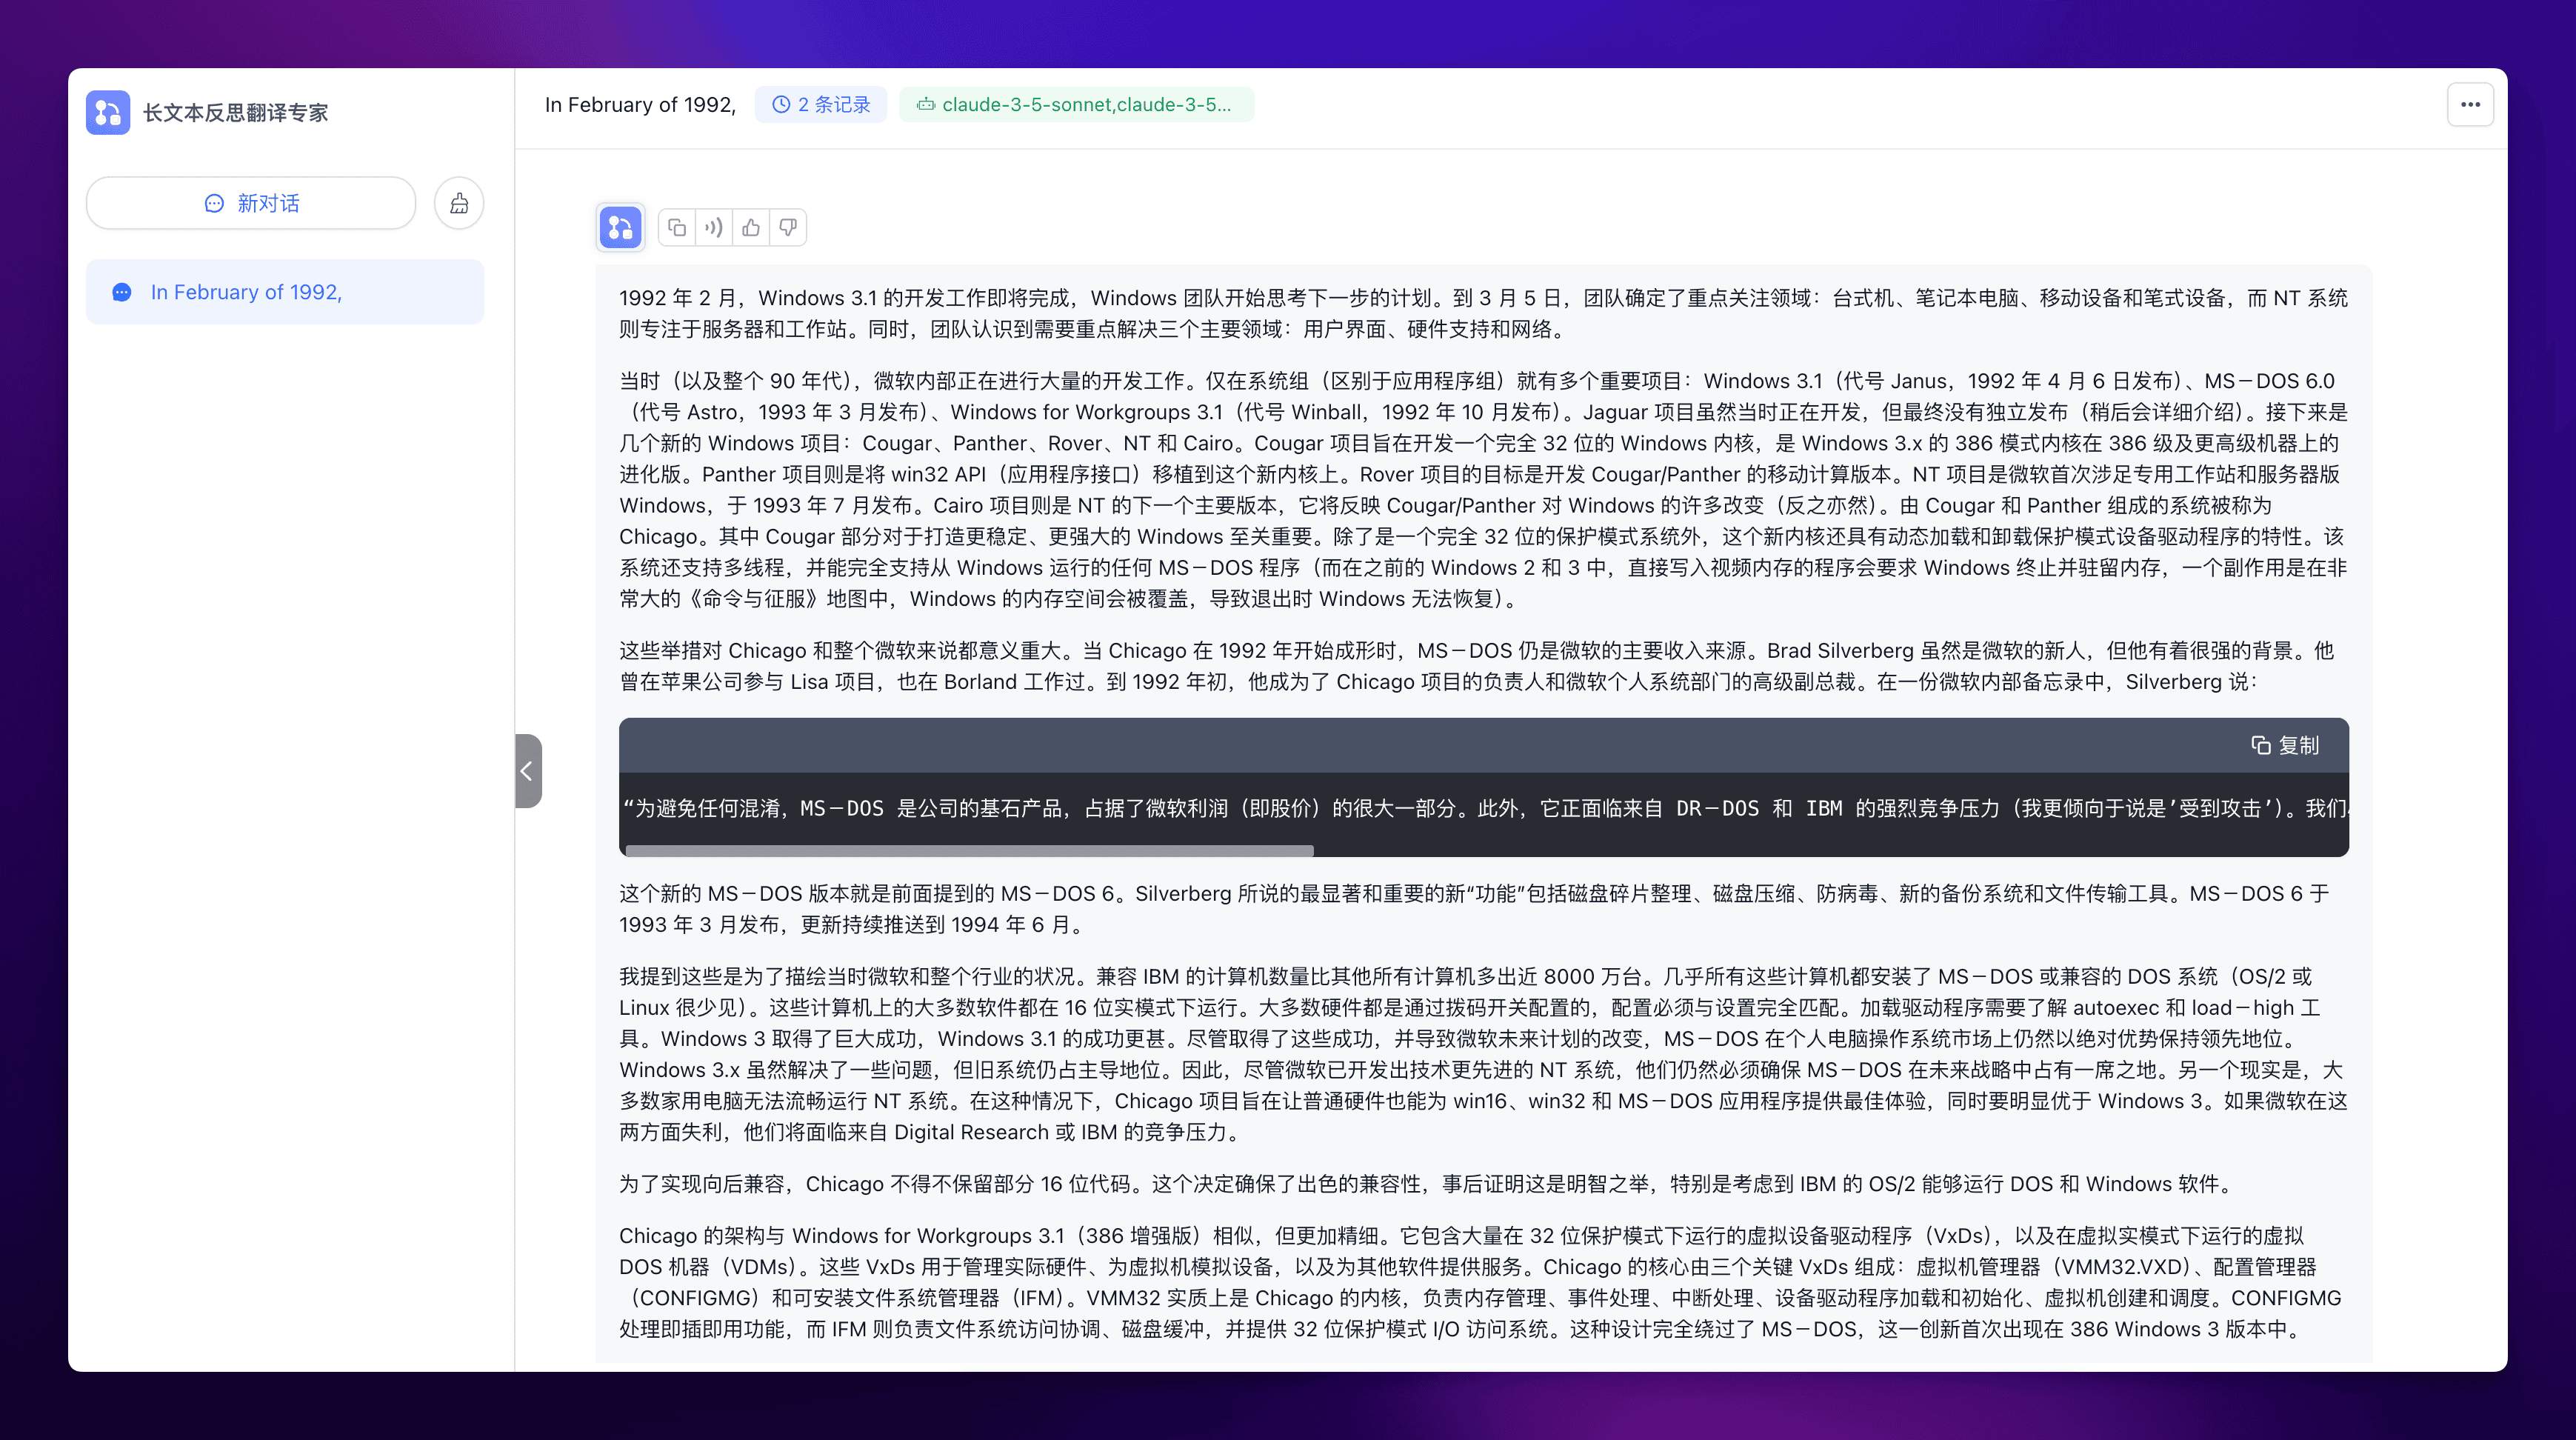
- 对当代{{target_lang}}语言的发展变化有敏锐洞察,善于把握语言流行趋势我们再来看看最终的运行效果,拿一段技术文章来测试一下:
In February of 1992, the development of Windows 3.1 was nearing a close, and the Windows team was trying to figure out what their next steps would be. By the 5th of March, the team knew that they’d be focusing on desktops, laptops, mobile, and pen with NT taking servers and workstations. The team also knew that they needed to address three major areas: UI, hardware support, networking.

There was a ton of stuff being worked on at this time (and through the rest of the 1990s) within Microsoft. Just within the Systems group (as distinct from the Apps group) Janus would release on the 6th of April as Windows 3.1, Astro would release in March of 1993 as MS-DOS 6.0, Winball would release in October of 1992 as Windows for Workgroups 3.1, Jaguar while being worked on at this time would never see an independent release (more on that in a bit), and then came the next windows projects: Cougar, Panther, Rover, NT, and Cairo. Cougar was a project to build a fully 32 bit Windows kernel, evolving the Windows 3.x 386 mode kernel for 386-class and higher machines. Panther was a project to port the win32 API to this new kernel. Rover was a project to make a mobile computing version of Cougar/Panther. The NT project was Microsoft’s first steps into a dedicated workstation and server release of Windows, and it would release in July of 1993. Cairo was a project for the next major release of NT, and it would mirror many of the changes to Windows from Cougar/Panther (and the reverse is also true). This system comprised of Cougar and Panther was known as Chicago. The Cougar portion of this system was vital to making a more stable and robust Windows. Beyond being a fully 32 bit protected-mode system, this new kernel would feature dynamically loaded and unloaded protected-mode device drivers. This system would also be threaded and fully support any MS-DOS program running from Windows (where previously in Windows 2 and 3, programs that wrote directly to video RAM would require Windows to terminate and stay resident, one side effect being that in really big Command and Conquer maps, the memory space of Windows would be overwritten and as a result Windows would not restore on exit).

These moves were huge for Chicago and for Microsoft more generally. When Chicago was taking shape in 1992, MS-DOS was still Microsoft’s bread and butter. Brad Silverberg was relatively new to Microsoft, but he had a very strong background. He had worked at Apple on the Lisa, and he had worked at Borland. By early 1992, he was the project leader of Chicago and the SVP of Microsoft’s personal systems division. In an internal Microsoft memo Silverberg said:

    Lest anyone be confused, ms-dos is the the bedrock product of the company, accounting for a very major portion of Microsoft’s profits (ie, stock price). Further, it is under strong competitive pressures (I am more inclined to say “under attack”) from DR-DOS and IBM. We must protect this franchise with our lives. Short term, that means continued aggressive marketing plans. In addition, it also means we need to get yearly product releases out so we put the other guys on a treadmill, rather than be put on the treadmill. As a result, we are going to release a new version of MS-DOS this year, chock full of new goodies, while we move with full-speed toward cougar.

That new MS-DOS release was MS-DOS 6 mentioned earlier. The most visible and important new “goodies” referenced by Silverberg were disk defragmentation, disk compression, anti-virus, a new backup system, and file transfer tools. MS-DOS 6 was released in March of 1993 with updates being pushed until June of 1994.

I bring this up to try and portray where Microsoft and the industry were at this time. IBM compatible computers outnumbered all other computers by nearly 80 million units. MS-DOS or a compatible DOS system was installed on almost all of them (with OS/2 or Linux being rare). Most software on these computers ran in 16 bit real mode. Most hardware was configured with dip switches, and the config had to match that setting exactly. Loading a driver required knowledge of autoexec and load-high tools. Windows 3 was a huge success, and Windows 3.1 was an even greater success. Despite these successes and the resultant changes in Microsoft’s future plans, MS-DOS was still the market leader in PC operating systems by a very wide margin. Windows 3x did ameliorate some problems, but the old systems remained dominant. Due to this, Microsoft absolutely needed to ensure that MS-DOS was still part of their future despite having a more technically advanced system in NT. Adding to this, most computers that home users were purchasing were incapable of providing a good experience with NT. Chicago needed to provide the best experience possible for win16, win32, and MS-DOS applications on modest hardware, and it needed to be a noticeable improvement over Windows 3. If Microsoft failed in either case, they would be yielding ground to Digital Research or to IBM.

Ultimately, the need for backwards compatibility meant that some 16 bit code remained in Chicago. Without this, the backwards compatibility wouldn’t have been as good. In hindsight, given that IBM’s OS/2 could run DOS and Windows software, this was a very good decision on the part of Microsoft.

Chicago was structured in a way that is similar to Windows for Workgroups 3.1 (386 enhanced), but is far more refined. There are a large number of virtual device drivers (VxDs) running in 32 bit protected mode alongside virtual DOS machines (VDMs) running in a virtual real mode. These virtual device drivers are used for real physical hardware, for emulating devices for virtual machines, and for providing services to other software. Three of these VxDs comprise the very heart of Chicago: Virtual Machine Manager (VMM32.VXD), Configuration Manager (CONFIGMG), Installable Filesystem Manager (IFM). VMM32 is essentially the Chicago kernel. It handles memory management, event handling, interrupt handling, device driver loading and initialization, the creation of virtual machines, and the scheduling. CONFIGMG handles plug and play. IFM coordinates filesystem access, provides a disk buffer, and provides a 32 bit protected mode I/O access system. This bypasses MS-DOS entirely and was first seen 386 Windows 3 releases.
翻译效果如下:
太强了!
从现在开始,不管你想翻译什么文章,不管这篇文章有多长,你都可以直接丢给这个翻译专家,然后该干嘛干嘛,过一会儿再回来就可以领取最完美的翻译结果了,还有谁?
其他调优
比如限定词调优,源项目中已经做了示范,就是加上国家地区这个限定词,实测确实会有不少提升。
出于 LLM 的卓越能力,我们能够通过设置不同的 prompt 来获取不同的翻译结果,也就是可以很轻松地通过设置特殊的限定词,来实现特定的,更精确的翻译。
而对于一些超出 LLM 理解的术语等,也可以利用 FastGPT 的知识库功能进行相应扩展,进一步完善翻译机器人的功能。
结语
下一篇文章将会给大家带来一个更强大的智能体:字幕反思翻译专家。
这个专家能干什么呢?举个例子,假设你有一个英文字幕,不管这个字幕有多长,你都可以复制这个字幕的所有内容,直接丢给字幕翻译专家,然后该干嘛干嘛,过一会儿再回来就可以领取最完美的中英双语字幕了,还有谁?
最后是福利时刻,该翻译专家的完整工作流我已经分享出来了,大家自取:长文本反思翻译专家工作流


 1570
1570

 被折叠的 条评论
为什么被折叠?
被折叠的 条评论
为什么被折叠?
 到【灌水乐园】发言


