


我自己维护引擎的github地址在这里,里面加了不少注释,有需要的可以看看
参考视频链接在这里
很高兴的是,引擎的开发终于慢慢开始往深了走了,前几章的引擎UI搭建着实是有点折磨人,根据课程,接下来的引擎开发路线是:
- Content Browser:又是UI。。。。
- 简单的UUID系统
- PlayMode的开发,点击按钮可以实现Editor下游戏的播放与暂停
- 2D物理系统
- 基础图元的渲染(目前只有Quad)
- C#脚本层与引擎C++代码的交互:这个我很感兴趣,跟Unity交互的方式是类似的,也是用Mono
不过由于我对某些章节比较感兴趣,所以实现模块的顺序可能跟Cherno课上的顺序略有不同
C# Scripting
Scripting is designed to control the Engine.
之前在学Unity的时候,我就对这一块特别感兴趣,因为我在没有完全了解C#、Mono和C++之间的交互原理之前,去看Unity的源码是一件非常费劲的事情,所以把这几课的内容提前实现了。
参考:Mono Embedding for Game Engines
引擎打算跟Unity一样,使用C#作为脚本层,此时需要使用Mono作为C#与C++语言的衔接层,这里的Mono由于本身就很大,所以不作为Submodule了,而是直接获取对应的Binary文件(可以去下载,也可以自行下源码再build)放到引擎里,具体步骤有:
- 了解Mono
- 获取Mono对应的Debug和Release版本的库文件,还有对应的头文件
- 获取Mono使用到的.NET的库文件,比如
mscorlib.dll - 在Hazel项目里添加对应库文件的配置
- 修改Premake5.lua文件,在Hazel里添加一个新的Project,作为C#这边代码的Project,C#工程会编译得到一个dll
- 写C++代码,把前面编译得到的C# dll读取到C++的Mono项目里
了解Mono
Mono is an open source implementation of Microsoft’s .NET Framework.
Mono这个项目是微软官方开发的,最初是为了让.NET语言(比如C#)能在除了windows之外的系统上运行,不过现在的.NET Core已经是自动支持跨平台了,但这并不意味着Mono就没用了,它仍然为在.NET Runtime里使用C/C++的API提供了很好的支持,根据我在Unity论坛上看到的官方在2016年发布的声明来看,Unity近期内也没有舍弃Mono,来用.NET Core的想法,相关言论如下:
We will not be using .NET Core to replace Mono. The open-source runtime is not ported to enough platforms for Unity, and it doesn’t have the embedding hooks that we need (Mono fulfills both of those requirements). Also, the class library profile in .NET Core doesn’t have a number of things that we support currently, and others it moves around, effectively breaking all previous Unity projects - so using it is not feasible.
We will likely support the .NET Standard though. Plans are still up in the air as we work through the technical issues. Please watch that experimental scripting previews forum for more details. We will continue to post there when we have new builds to drop with added functionality.
Mono其实有俩主要的版本:
- Classic Mono:只支持最高到C#7,.NET frameworkd 4.7.2的版本
- .NET Core Mono:与跨平台.NET Core相匹配的Mono,支持最新版的C#
这里选用的Mono版本是Classic Mono,原因如下:
- Classic Mono更简单
- .NET Core Mono暂时不支持
assembly reloading,这意味着我写C#代码,需要手动重新编译,那我开启游戏Editor在里面写脚本时,我肯定希望是Runtime重新load assembly的,不可能我每次改脚本都要重启引擎
获取Mono对应的Debug和Release版本的库文件
这里需要的库文件分为两类:.NET原生的库文件和Mono提供的库文件。
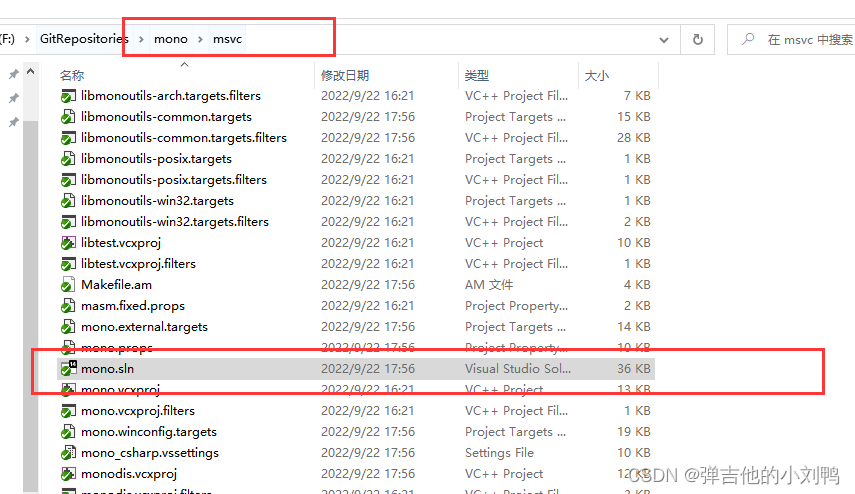
这里选择直接下载Mono的Github项目,然后选择一个可用的Tag版本,手动Build出来对应的库文件。Mono的官方Build文档看起来很复杂,但实际上好像没这么麻烦,直接clone该项目,它里面已经自带了VS用的solution文件了,在msvc文件夹下:
类似之前配置Vulkan SDK在项目里的方式,之前是调用Vulkan SDK.exe,然后把安装得到的include目录添加到Hazel Project的include路径,再把安装得到的Debug和Release下的库文件也添加到Hazel Project的depend路径即可。
这里的做法差不多,无非这里的header和库文件都是我亲手build出来的,直接从这个solution里build即可,会得到如下文件夹:
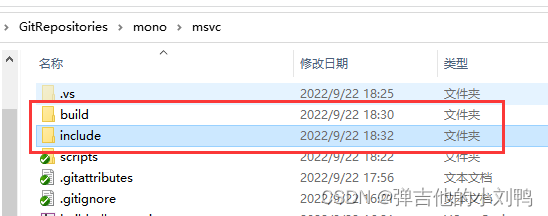
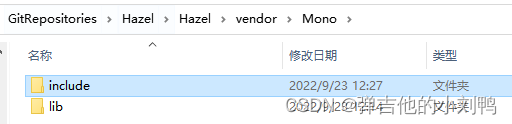
把里面的东西直接挪到HazelEditor/Mono/lib文件夹下即可,后面打算使用static link的方式,把mono link到Hazel里:
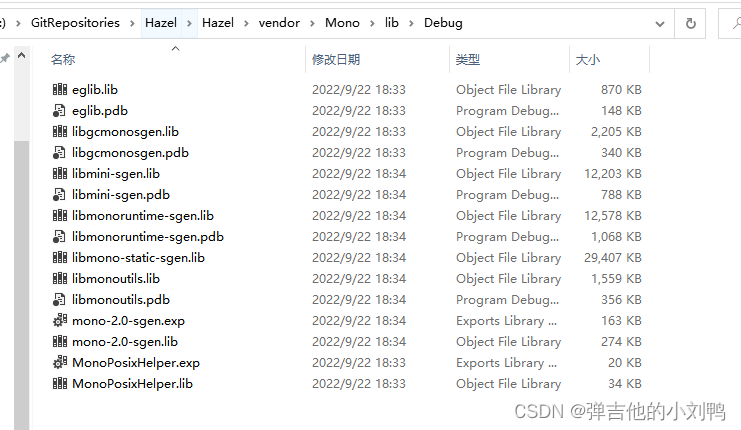
Mono需要的库文件有:
- eglib.lib
- libgcmonosgen.lib
- libmini-sgen.lib
- libmonoruntime-sgen.lib
- libmono-static-sgen.lib
- libmonoutils.lib
- mono-2.0-sgen.lib
- MonoPosixHelper.lib
里面分为Debug和Release两个版本:
获取Mono使用到的.NET的库文件
至于.NET提供的库文件,需要到网上去下载,这里选择直接安装Mono.exe,安装之后会存放对应的.NET库文件,如下图所示:
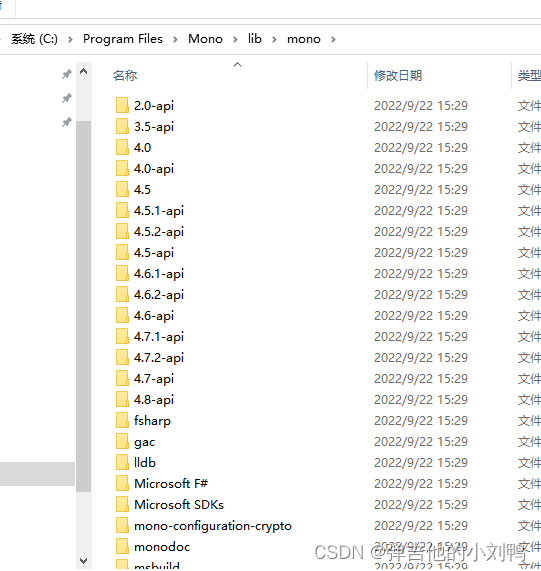
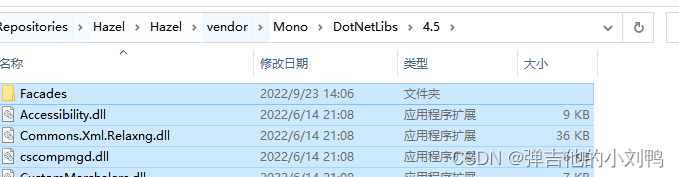
把这里的4.5文件夹下的内容,拷贝到Hazel的vendor下即可,我这里的存放路径为:
创建C#工程和Assembly
步骤也不麻烦:
- C#代码都放HazelEditor的Scripts文件夹下
- 用premake5.lua文件创建C#工程
先创建对应C#源码的路径,这个Test.cs作为样例cs文件:
再写premake5.lua文件即可,C#工程需要编译出一个dll:
project "Hazel-ScriptCore"
	location "%{prj.name}"
	kind "SharedLib"
	language "C#"
	dotnetframework "4.7.2"

	targetdir ("%{prj.name}/Build")
	objdir ("%{prj.name}/Intermediates")

	files
	{
		"%{prj.name}/Scripts/**.cs"
	}
梳理一下各个项目之间的关系
这里先梳理一下各个项目之间的关系:
整个C++部分的引擎工程(即Hazel项目,包括其依赖的Mono部分),都是编译为一个Hazel.lib的库文件的,HazelEditor工程会Link这个Hazel.lib然后一起编译出一个HazelEditor.exe文件,作为用户开发游戏的Editor软件(类似Unity2020.exe),最后,C#部分的工程会build出来一个C#的dll,再把它跟HazelEditor.exe文件放一起应该就可以了。
C++与C#之间交互的核心原理
C++与C#之间交互的核心原理其实很简单,无论是C++调用C#,还是C#调用C++都是通过中间的Mono实现的,具体有:
- C++调用C#时,由于C#的metadata的机制,mono可以直接知道它有哪些method,哪些类,只要知道名字,就可以直接从C++这边通过Mono调用
- C#调用C++时,由于C++没有直接类似的metadata机制,所以C++里需要选择性的暴露接口出来,然后再在Mono这边登记过后,C#这边才可以调用
Scripting类的创建
参考:Mono Embedding for Game Engines
为了实现C++和C#通过Mono互相调用,需要额外写对接的代码。这里先保证能从C++端调用C#的代码,把前面编译得到的C# dll读取到C++的Mono项目里,同时在C++里通过Mono去操作C#这边dll里的内容,比如call method,读取Property和Field值等。
我创建了个Scripting类(这一部分代码参考前面提到的文档就行了):
#pragma once
#include <string>
#include "mono/metadata/image.h"
#include "mono/jit/jit.h"

namespace Hazel
{
	// 类似于Unity, C#这边的脚本层分为核心层和用户层两块
	// 核心层的代码(C#这边的源码)应该是和C++的代码会存在相互调用的情况的
	class Scripting
	{
	public:
		MonoAssembly* LoadCSharpAssembly(const std::string& assemblyPath);

		void PrintAssemblyTypes(MonoAssembly* assembly);

		// 根据C++这边输入的class name, 返回对应的MonoClass, 如果想在C++端创建C#上的对象, 需要借助此API
		MonoClass* GetClassInAssembly(MonoAssembly* assembly, const char* namespaceName, const char* className);

		MonoObject* CreateInstance(MonoClass* p);

		// Mono gives us two ways of calling C# methods: mono_runtime_invoke and Unmanaged Method Thunks.
		// This Api will only cover mono_runtime_invoke

		// Using mono_runtime_invoke is slower compared to Unmanaged Method Thunks, but it's also safe and more flexible.
		// mono_runtime_invoke can invoke any method with any parameters, and from what I understand mono_runtime_invoke also does a lot more error checking and validation on the object you pass, as well as the parameters.

		// 在编译期不知道Method签名时, 适合用mono_runtime_invoke, 每秒高频率调用(10fps)的Method适合用Unmanaged Method Thunks,
		void CallMethod(MonoObject* instance, const char* methodName);

		// Field can be public or private
		MonoClassField* GetFieldRef(MonoObject* instance, const char* fieldName);

		template<class T>
		const T& GetFieldValue(MonoObject* instance, MonoClassField* field)
		{
			T value;
			mono_field_get_value(instance, field, &value);
			return value;
		}

		MonoProperty* GetPropertyRef(MonoObject* instance, const char* fieldName);

		template<class T>
		const T& GetPropertyValue(MonoObject* instance, MonoProperty* prop)
		{
			T value;
			mono_property_get_value(instance, prop, &value);
			return value;
		}
	};
}
类实现如下:
#include "hzpch.h"
#include "Hazel/Utils/Utils.h"
#include "mono/metadata/assembly.h"
#include "Scripting.h"

namespace Hazel
{
    static MonoDomain* s_CSharpDomain;

    // 读取一个C# dll到Mono里, 然后返回对应的Assembly指针
    MonoAssembly* Scripting::LoadCSharpAssembly(const std::string& assemblyPath)
    {
		// InitMono部分
		// Let Mono know where the .NET libraries are located.
	    mono_set_assemblies_path("../Hazel/vendor/Mono/DotNetLibs/4.5");

		MonoDomain* rootDomain = mono_jit_init("MyScriptRuntime");
		if (rootDomain == nullptr)
		{
			// Maybe log some error here
			return nullptr;
		}

		// Create an App Domain
        s_CSharpDomain = mono_domain_create_appdomain("MyAppDomain", nullptr);
		mono_domain_set(s_CSharpDomain, true);

        uint32_t fileSize = 0;
        // 用于直接读取C#的.dll文件, 把它读作bytes数组
        char* fileData = Utils::ReadBytes(assemblyPath, &fileSize);

        // NOTE: We can't use this image for anything other than loading the assembly because this image doesn't have a reference to the assembly
        MonoImageOpenStatus status;
        // 把读取的dll传给Mono, 得到的assembly会存在Mono这边, 暂时不需要反射
        MonoImage* image = mono_image_open_from_data_full(fileData, fileSize, true, &status, false);

        if (status != MONO_IMAGE_OK)
        {
            const char* errorMessage = mono_image_strerror(status);
            // Log some error message using the errorMessage data
            return nullptr;
        }

        // 从image里读取assembly指针
        MonoAssembly* assembly = mono_assembly_load_from_full(image, assemblyPath.c_str(), &status, 0);
        mono_image_close(image);

        // Don't forget to free the file data
        delete[] fileData;

        return assembly;
    }

    // iterate through all the type definitions in our assembly
    void Scripting::PrintAssemblyTypes(MonoAssembly* assembly)
    {
        MonoImage* image = mono_assembly_get_image(assembly);

        // 从assembly的meta信息里读取meta data table, 这里读取的是Type对应的Table, 表里的每一行
        // 代表一个Type
        const MonoTableInfo* typeDefinitionsTable = mono_image_get_table_info(image, MONO_TABLE_TYPEDEF);
        int32_t numTypes = mono_table_info_get_rows(typeDefinitionsTable);

        // 遍历Table里的每行, 这里的numTypes最小为1, 因为C#的DLL和EXEs默认都会有一个Module类型的Type, 代表整个
        // assembly的module
        for (int32_t i = 1; i < numTypes; i++)
        {
            // 每一行的每列元素记录了Type的相关信息, 比如namespace和type name
            uint32_t cols[MONO_TYPEDEF_SIZE];
            mono_metadata_decode_row(typeDefinitionsTable, i, cols, MONO_TYPEDEF_SIZE);

            // 还可以获取field list和method list等
            const char* nameSpace = mono_metadata_string_heap(image, cols[MONO_TYPEDEF_NAMESPACE]);
            const char* name = mono_metadata_string_heap(image, cols[MONO_TYPEDEF_NAME]);

            printf("%s.%s\n", nameSpace, name);
        }
    }

    MonoClass* Scripting::GetClassInAssembly(MonoAssembly* assembly, const char* namespaceName, const char* className)
    {
        MonoImage* image = mono_assembly_get_image(assembly);
        MonoClass* klass = mono_class_from_name(image, namespaceName, className);

        if (!klass)
            return nullptr;

        return klass;
    }

    MonoObject* Scripting::CreateInstance(MonoClass* p)
    {
        if (!p) return nullptr;

        MonoObject* classInstance = mono_object_new(s_CSharpDomain, p);

        // Call the parameterless (default) constructor
        mono_runtime_object_init(classInstance);

        return classInstance;
    }

    void Scripting::CallMethod(MonoObject* objectInstance, const char* methodName)
    {
        // Get the MonoClass pointer from the instance
        MonoClass* instanceClass = mono_object_get_class(objectInstance);

        // Get a reference to the method in the class
        MonoMethod* method = mono_class_get_method_from_name(instanceClass, methodName, 0);

        if (!method)
            return;

        // Call the C# method on the objectInstance instance, and get any potential exceptions
        MonoObject* exception = nullptr;
        mono_runtime_invoke(method, objectInstance, nullptr, &exception);

        // TODO: Handle the exception
    }

    // 注意, MonoClassField本身不含Field数据, 里面存的是数据相对于object的offset
    MonoClassField* Scripting::GetFieldRef(MonoObject* objInstance, const char* fieldName)
    {
        MonoClass* testingClass = mono_object_get_class(objInstance);

        // Get a reference to the public field called "MyPublicFloatVar"
        return mono_class_get_field_from_name(testingClass, fieldName);
    }

    MonoProperty* Scripting::GetPropertyRef(MonoObject* objInstance, const char* propertyName)
    {
        MonoClass* testingClass = mono_object_get_class(objInstance);

        // Get a reference to the public field called "MyPublicFloatVar"
        return mono_class_get_property_from_name(testingClass, propertyName);
    }
}
然后在代码里随便找个地方调用它来测试一下即可,我测过是OK的
mono_runtime_invoke
着重强调下这里的mono_runtime_invoke函数,Mono提供了两种在C++里调用C# method的方法:
mono_runtime_invoke:调用C#里的常规methodUnmanaged Method Thunk:应该是调用C#里的unsafe method
比较而言,mono_runtime_invoke这种方法更安全、更灵活、但更低效,灵活的点在于,它可以接受调用C#里任意函数签名的Method,同时会做一些error检查,和传入object、参数等的校验
使用的例子如下:
// 在cpp里, 我想要调用特定类的特定名字的method

// 函数会在C++里调用objectInstance.methodName函数, 需要传入一个C# object对应的MonoObject对象
void CallCSharpMethodFromCPP(MonoObject* objectInstance, const char* methodName)
{
	// 1. 先获取C# class对应的MonoClass的类型
	MonoClass* instanceClass = mono_object_get_class(objectInstance);

	// 2. 根据method名字和MonoClass, 获取MonoClass里面的MonoMethod
	MonoMethod* method = mono_class_get_method_from_name(instanceClass, methodName, 0);

	if (!method)
		return;

	// 3. 使用mono_runtime_invoke调用objectInstance.method函数
	MonoObject* exception = nullptr;
	mono_runtime_invoke(method, objectInstance, nullptr, &exception);

	// 4. todo: handle exception
}
Calling C++ from C#
前面的部分实现了在C++调用C#里的任何内容,包括调用Method和获取Property和Field等,现在需要反过来,实现在C#里调用C++提供的API。其实有很多可选的做法:
- 使用Platform Invoke (P/Invoke),
这种做法更适合C#工程去使用C++的dll时使用,我之前工作时就是用Unity去通过这种方式,调用寻路导航插件的dll的 - 借助Mono的Internal Call
- C++和C#的中间语言:C++/CLI,EA的寒霜引擎就是用的C#作为编辑器,C++作为Runtime,它们使用C++/CLI进行交互,不过这玩意儿是只支持Windows的
本章的内容如下:
- 介绍P/Invoke
- 学习如何借助Mono的Internal Call,在C#里调用C++的代码
关于P/Invoke
P/Invoke is a technology that allows you to access structs, callbacks, and functions in unmanaged libraries from your managed code. Most of the P/Invoke API is contained in two namespaces: System and System.Runtime.InteropServices. Using these two namespaces give you the tools to describe how you want to communicate with the native component.
重点是:从managed code里获取unmanaged库里的structs、回调和functions,相关的managed的API都主要是在System和 System.Runtime.InteropServices命名空间下。
举个简单例子:
using System;
using System.Runtime.InteropServices;

public class Program
{
    // Import user32.dll (containing the function we need) and define
    // the method corresponding to the native function.
    // 关键的DllImport Attribute, 它会让.NET Runtime去load对应的unmanaged dll(user32.dll)
    [DllImport("user32.dll", CharSet = CharSet.Unicode, SetLastError = true)]
    // p/Invoke会定义与C++的函数签名完全相同的C# Method,
    private static extern int MessageBox(IntPtr hWnd, string lpText, string lpCaption, uint uType);

    public static void Main(string[] args)
    {
        // Invoke the function as a regular managed method.
        MessageBox(IntPtr.Zero, "Command-line message box", "Attention!", 0);
    }
}
这种写法的调用还是有overhead的,它比普通的调用C# method的开销要大
Mono的Internal Call
参考:Embedding Mono
参考:Mono Embedding for Game Engines
目前的Scripting系统,对应的.NET和Assembly的代码,其实是Hazel的一部分,所以并不适合用P/Invoke(而且Hazel引擎目前是用的static linking)。这里的Internal Call,相当于告诉.NET Runtime,我有一些Native Functions你可以调用。
之前都是利用mono_runtime_object_init、mono_metadata_decode_row等函数,通过mono_runtime或者meta机制,在C++里对C#进行操作的。C++这边没有metadata这种方便的东西,所以要通过这里的Internal Call,即mono提供的另一种机制,暴露接口给Mono。
主要是学习一下怎么写API,这里一共举了这么些例子:
- C#调用C++的无参静态函数
- C#调用C++的带参静态函数,参数为string
- C#调用C++的带参静态函数,参数为C#这边自定义的struct(值类型)
- C#调用C++的带参静态函数,参数为C#这边自定义的class(引用类型)
- C#调用C++的重名重载函数
核心就是把C++的static函数通过mono_add_internal_call函数登记一下,然后就可以在C#这边调用了
C#调用C++的无参静态函数
举个简单的例子,有个无参的静态函数,C++端的写法如下:
static void PrintFuncForCSharp()
{
    LOG("PrintFuncForCSharp");
}

// method需要用ClassName::的形式
mono_add_internal_call("MyNamespace.Program::Print", &PrintFuncForCSharp);
C#端的写法如下:
using System;
using System.Runtime.CompilerServices;

namespace MyNamespace
{
    public class Program
    {
        public float MyPublicFloatVar = 5.0f;
        public void PrintFloatVar()
        {
            Console.WriteLine("MyPublicFloatVar = {0:F}", MyPublicFloatVar);
            Print();
        }

        [MethodImplAttribute(MethodImplOptions.InternalCall)]
        // 函数的名字其实是在C++这边就已经写死了的
        extern static void Print();
    }
}
C#调用C++的string为参数的静态函数
如果函数有签名,也是差不多的写法,需要注意的是函数参数为string时的情况,由于托管堆和非托管堆的string内存结构不同,所以从C#调用C++带string参数的函数时,C++这边对应函数的参数不是string,而是MonoString*,举个例子,C++端的写法如下:
static void PrintStringFuncFromCSharp(MonoString* str)
{
    char* arr = mono_string_to_utf8(str);
    LOG(arr);
    // 释放内存
    mono_free(arr);
}

mono_add_internal_call("MyNamespace.Program::PrintString", &PrintStringFuncFromCSharp);
C#端的写法如下:
using System;
using System.Runtime.CompilerServices;

namespace MyNamespace
{
    public class Program
    {
        public void PrintFloatVar()
        {
            PrintString("PrintString");
        }

        [MethodImplAttribute(MethodImplOptions.InternalCall)]
        extern static void PrintString(string s);
    }
}
虽然Mono对string这个特殊变量做了个处理,但对于函数的参数和返回值是其他struct和class的情况,就比较复杂了,在C++里class和struct基本是一样的,而C#里却完全不一样,这里涉及到的点有:
- 如何在C#进行值传入,在C++里也创建一份数据对象,此时的传入值在C#里为struct,在C++里可以是struct或class,各自的栈上各有一份数据
- 如何在C#进行引用传入,即指针传入,在C++里输入的也是指针,托管堆和非托管堆共享同一份数据
- 相同类在managed和unmanaged代码上存在时,如何保证内存分布一致(涉及Marshalling)
- 怎么传struct或class的数组、怎么传普通primitive的数组
- 返回类型也可以是值类型或指针类型,这里应该和传参是一样的,就不重复提了,后面注意下语法就行了
总的来说,C#与C++交互处理传参和返回值时,分两种情况:
- 通过指针进行,不存在值拷贝的过程,C#的struct对应的是ref和out关键字,C#的class直接传对象即可
- 通过Copy值类型进行
两种情况下,只要接触到了struct和class,都需要保证C++和C#定义相同内存结构,对于class会复杂一些,后面再深入研究
C#调用C++的自定义struct为参数的静态函数
由于C#里struct和class的区别,这里具体分为两种,如果是struct,那么需要先定义两端的Struct,写法为:
// 对于POD类型, 只要它俩内存Layout相同即可
// C#
struct Vector3
{
	float x;
	float y;
	float z;
}

// cpp
struct float3
{
	float x,y,z;
}
假设我要从C#这边传入一个Vector3,再让C++打印出来,那么传入Vector3的引用就行了,此时csharp这边传入的参数为ref A ,c++这边传入的参数为A*,代码如下所示:
namespace MyNamespace
{
    public class Program
    {
        public void PrintVector3(ref Vector3f input)
        {
            PrintVector3(input);
        }

        [MethodImplAttribute(MethodImplOptions.InternalCall)]
        extern static void PrintString(ref Vector3f input);
    }
}
再去C++端登记static函数:
static void LogFloat3(const float3* input)
{
	LOG(input);
}


// method需要用ClassName::的形式
mono_add_internal_call("MyNamespace.Program::PrintVector3", &LogFloat3);
C#调用C++的重名重载函数
鉴于mono_add_internal_call("MyNamespace.Program::Print", &PrintFuncForCSharp);这种写法,C++这边应该是不支持函数重载的,但是C#这边是可以通过Wrapper来模拟函数重载的,所以C++这边只能用老的C语言的方式处理函数重载了,比如:
// C++ 端
static void Func(){};
static void FuncString(std::string){};

// C#端
[MethodImplAttribute(MethodImplOptions.InternalCall)]
extern static void Func();

[MethodImplAttribute(MethodImplOptions.InternalCall)]
extern static void FuncString(string);

// 加个wrapper
public static void Function()
{
	Func();
}

public static void Function(string s)
{
	FuncString(s);
}
Internal Call的特殊情况
如果想要在C++设计一个函数,这个函数返回一个指针或引用,此时再把这个函数暴露给C#,是不太好的,更好的方法是让这个函数返回值为void,原本返回的参数作为函数参数传入和传出(应该C#这边也能接受C++返回的指针,无非是要用unsafe的代码),写法大概是这样:
// C++
static void Func(glm::vec3* para, glm::vec3* outResult)// 原本想返回的*变成了参数
{
	...
}

// C#
[MethodImplAttribute(MethodImplOptions.InternalCall)]
extern static void FuncString(ref Vector3 para, out Vector3 result);
而且这样写也不合理,应该是谁分配的内存,谁负责释放。
至此,C#与C++的交互的基础框架代码基本写好了,后面的课程Using C# Scripting with the Entity Component System是基于前面搭建好的关卡制作的,所以我就接着从前面跳过的Content Browser开始学习了。
Content Browser
虽然Content Browser很明显是Editor下用的东西,但并不意味着任何存在于Editor下的模块都没有在Runtime下出现的可能,毕竟它可能需要在Runtime为了Debug使用,Content Browser的主要功能是:
- 提供资源窗口
- 方便把资源直接拖拽到Scene里
显然这个功能是不大可能需要进行Runtime Debug使用的(前面做过的Hierarchy窗口还有一些在Runtime使用可能,它可以帮忙看看Runtime下的场景Hierarchy)。所以会把Content Browser相关的代码写到HazelEditor工程下,目前的Hierarchy窗口则写在Hazel工程里。
这节课主要内容:
- 学会使用C++的
directory_iterator遍历directories(见附录) - 创建ContentBrowserPanel类,也是单独占一个ImGui窗口,类似于现有的HierarchyPanel类,在其
OnImGuiRender函数里绘制相关界面
创建ContentBrowserPanel类
类声明很简单:
namespace Hazel
{
	class ContentBrowserPanel
	{
	public:
		const float HEIGHT = 24.0f;

		void Init();
		void OnImGuiRender();

	private:
		std::filesystem::path m_CurSelectedPath;
		std::filesystem::path m_LastSelectedPath;

		std::shared_ptr<Texture2D> m_DirTex;
		std::shared_ptr<Texture2D> m_FileTex;
	};
};
写代码绘制资源窗口
思路是文件夹和文件都用Button绘制,Button对应的背景图片是一个文件夹的图片,代码如下:
namespace Hazel
{
	void ContentBrowserPanel::Init()
	{
		m_DirTex = Texture2D::Create("Resources/Icons/DirectoryIcon.png");
		m_FileTex = Texture2D::Create("Resources/Icons/FileIcon.png");
	}

	void ContentBrowserPanel::OnImGuiRender()
	{
		ImGui::Begin("ContentBrowser");
		{
			std::filesystem::path p;
			if (m_CurSelectedPath.empty())
			{
				p = std::filesystem::current_path();
				m_CurSelectedPath = p;
			}
			else
				p = std::filesystem::current_path() / (m_CurSelectedPath);// Combine Path

			if (ImGui::Button("<-"))
			{
				if (!m_LastSelectedPath.empty())
					m_CurSelectedPath = m_LastSelectedPath;
			}

			// 绘制项目根目录下的所有内容
			for (const std::filesystem::directory_entry& pp : std::filesystem::directory_iterator(p))
			{
				bool isDir = pp.is_directory();

				int frame_padding = -1;										// -1 == uses default padding (style.FramePadding)
				ImVec2 size = ImVec2(HEIGHT, HEIGHT);						// Size of the image we want to make visible

				if (isDir)
					ImGui::Image((ImTextureID)m_DirTex->GetTextureId(), size, { 0, 0 }, { 1, 1 });
				else
					ImGui::Image((ImTextureID)m_FileTex->GetTextureId(), size, { 0, 0 }, { 1, 1 });
				ImGui::SameLine();
				if (ImGui::Button(pp.path().string().c_str()))
				{
					if (isDir)
					{
						m_LastSelectedPath = m_CurSelectedPath;
						m_CurSelectedPath = pp;
					}
					//LOG(m_CurSelectedPath);
				}
			}
		}
		ImGui::End();
	}
}
效果如下图所示:
Content Browser Panel - ImGui Drag Drop
做了以下事情:
- 把单击进入folder改成双击鼠标进入folder,属于ImGui的相关API写法
- 通过Push和Pop StyleColor,去掉
ImGui::ImageButton的默认背景颜色,属于ImGui的相关API写法(我用的ImGui::Image绘制的icon,没有这个问题) - 实现Content Browser里的Drag和Drop,我可以从里面拖拽Scene文件到Viewport里,快速打开该Scene
代码如下:
// 1. 双击进入folder
// 不再直接判断Button是否点击了, 而是通过ImGui的MouseDoubleClick状态和是否hover来判断双击的
// 其实这里的ImGui::Button改成ImGui::Text也可以双击, 无非是没有hover时的高亮button效果了
ImGui::Button(pp.path().string().c_str());
if (ImGui::IsItemHovered() && ImGui::IsMouseDoubleClicked(ImGuiMouseButton_Left))
{
	if (isDir)
	{
		m_LastSelectedPath = m_CurSelectedPath;
		m_CurSelectedPath = pp;
	}
}


// 2. 通过这种写法, 让Button绘制时的默认颜色为0,0,0,0, 去掉alpha通道的影响
ImGui::PushStyleColor(ImGuiCol_Button, ImVec4(0, 0, 0, 0));
ImGui::ImageButton((ImTextureID)icon->GetRendererID(), { thumbnailSize, thumbnailSize }, { 0, 1 }, { 1, 0 });
ImGui::PopStyleColor();
imgui拖拽相关的api比较复杂,所以这里单独分析一下。看了下Cherno写的代码,感觉imgui设计DragAndDrop的思路是这样的:
在imgui的render的循环里,在绘制了element后可以发出Drag的请求(此时的Drag是只针对前面绘制的element使用的),Drag时可以用byte数组的形式传入Data(也叫payload),imgui会把这个数据和drag的请求存起来,然后在别的窗口的render的代码里,可以查询Drop的状态,一旦判定了鼠标在该窗口释放,那么Drop的状态返回true,然后可以获取出对应的payload
相关代码如下:
// PS: imgui.h的698行提供了相关Drag和Drop的API

// 发送数据和Drag请求的代码
void ContentBrowserPanel::OnImGuiRender()
{
	ImGui::Begin("ContentBrowser");
	{
		...
		// 绘制项目根目录下的所有内容
		for (const std::filesystem::directory_entry& pp : std::filesystem::directory_iterator(p))
		{
			...
			const auto& path = pp.path();
			// 不再直接判断Button是否点击了, 而是通过ImGui的MouseDoubleClick状态和是否hover来判断双击的
			// 其实这里的ImGui::Button改成ImGui::Text也可以双击, 无非是没有hover时的高亮button效果了
			ImGui::Button(path.string().c_str());

			if (path.extension() == ".scene")
			{
				// 拖拽时传入拖拽的item的path
				if (ImGui::BeginDragDropSource())
				{
					const wchar_t* itemPath = path.c_str();
					int len = wcslen(itemPath) + 1;
					// Convert w_char array to char arr(deep copy)
					char* itemPathArr = new char[len];
					std::wcsrtombs(itemPathArr, &itemPath, len, nullptr);

					ImGui::SetDragDropPayload("CONTENT_BROWSER_ITEM", itemPathArr, (len) * sizeof(char));
					ImGui::EndDragDropSource();
				}
			}

			...
		}
	}
	ImGui::End();
}

// 接受数据和Drop请求的代码
ImGui::Begin("Viewport");
{
	...
	// Viewport其实就是一张贴图
	ImGui::Image(m_ViewportFramebuffer->GetColorAttachmentTexture2DId(), size, { 0,1 }, { 1,0 });

	if (ImGui::BeginDragDropTarget())
	{
		if (const ImGuiPayload* payload = ImGui::AcceptDragDropPayload("CONTENT_BROWSER_ITEM"))
		{
			const char* path = (const char*)payload->Data;
			LOG(path);// 后续可以打开Scene
		}
		ImGui::EndDragDropTarget();
	}

	...
}
这里我只打印了path,具体打开Scene的操作也很简单,以后再加上
Textures for Entities!
这节课的目的:
- 给SprietRenderer的Inspector界面添加一个Texture的slot,然后绘制一些贴图属性
- 拖拽ContenBrowser里的texture,可以给SpriteRenderer赋上贴图
这里使用的是2D的Renderer,这种2D的Renderer,目前是只用贴图赋值上去就行了,未来2D的Renderer需不需要material的参与,后面再说(可能还得参考Unity或Unreal的做法)
具体做法挺简单的,主要是imgui的写法:
// 发出Drag事件
ImGui::Begin("ContentBrowser");
{
	...

	if (path.extension() == ".scene")
		...
	if (path.extension() == ".png" || path.extension() == ".jpg")
	{
		// 拖拽时传入拖拽的item的path
		if (ImGui::BeginDragDropSource())
		{
			const wchar_t* itemPath = path.c_str();
			int len = wcslen(itemPath) + 1;
			// Convert w_char array to char arr(deep copy)
			char* itemPathArr = new char[len];
			std::wcsrtombs(itemPathArr, &itemPath, len, nullptr);

			ImGui::SetDragDropPayload("CONTENT_BROWSER_ITEM_IMAGE", itemPathArr, (len) * sizeof(char));
			ImGui::EndDragDropSource();
		}
	}
	...
}
ImGui::End();


// 接受Drag事件
// Draw SpriteRendererComponent
if (go.HasComponent<SpriteRenderer>())
{
	DrawComponent<SpriteRenderer>("SpriteRenderer", go, [](SpriteRenderer& sr)
	{
		ImGui::ColorEdit4("Color", glm::value_ptr(sr.GetTintColor()));

		// 贴图槽位其实是用Button绘制的, 这里并没有绘制出贴图的略缩图
		ImGui::Button("Texture", ImVec2(100.0f, 0.0f));
		if (ImGui::BeginDragDropTarget())
		{
			// 在Content Panel里做了相关文件拽出的代码, 这里只要做接受的代码即可
			if (const ImGuiPayload* payload = ImGui::AcceptDragDropPayload("CONTENT_BROWSER_ITEM_IMAGE"))
			{
				const char* path = (const char*)payload->Data;
				std::filesystem::path texturePath = path;
				sr.SetTexture(Texture2D::Create(texturePath.string()));
			}
			ImGui::EndDragDropTarget();
		}

		ImGui::DragFloat("Tiling Factor X", &sr.GetTilingFactor().x, 0.1f, 0.0f, 100.0f);
		ImGui::DragFloat("Tiling Factor Y", &sr.GetTilingFactor().y, 0.1f, 0.0f, 100.0f);
	});
}
最后再改一下SprieRenderer组件函数,支持绘制带Texture的Quad即可
Everything You Need in a 2D Game Engine (Hazel 2D) - Let’s Talk
很遗憾这个系列未来只会支持2D了,不过其实也是合理的,Cherno已经教给了我们很多东西了,在这个基础上是该自己去学习,再去搭建属于自己的3D引擎了
这节课梳理了下知识点,值得记下来的有:
- 2D游戏里经常用到Sprite Sheets,因为GPU往往只能一次性绑定32个通道的Texture,不过这种把多个贴图合为一个大贴图的方法,不只是用于Sprite Sheets,比如一个点光源、甚至多个点光源、周围六个方向的Shadow Map,都可以合并存到一个贴图上。甚至2D游戏里的动画都是Sprite Sheets实现的
目前的Hazel引擎,作为2D的游戏引擎,还缺少的功能有:
- Animation系统:用Sprite Sheets即可实现,毕竟2D游戏的动画不会需要分辨率特别高的贴图
- Shader和材质系统:2D游戏里,由于万物都是贴图,其实Material和Shader在2D游戏里并不是特别重要,但少数情况还是会用到,比如给角色周边添加彩色光照的buff效果
- 后处理系统:比如添加bloom、color grading等效果,实现HDR Rendering
- Scrpting: C#与C++交互的脚本系统
- 可视化编程系统
- Reflection系统:这个系统可以帮助在Inspector上直接调整Property的值,也可以实现Serialization(暂时不太懂为什么可以这么做),当在编辑器里更改数据的值时(比如从5变为6),C#相关的Assembly不需要重新编译即可改变内存里对应的值。通过反射也可以实现Assembly的加载、卸载和reload,毕竟点击Play按钮进入PlayMode时,是需要Reload C#的Assembly的
- 2D的物理引擎
- Callbacks系统
- 2D Particle System:会使用到类似VFX graph(a node based editor used to define the flow of particles and how they react to things)的东西
- Editor相关的工具:比如UNDO/REDO系统
- UI相关:比如Text Rendering,可能需要使用signed distance field;还有algnment、类似css之类的东西。UI Animation等
- Memory Mapping:可以用于帮助上传很大的贴图(比如500mb的贴图)到GPU
还有很多内容,就不一一列举了,后面慢慢加吧
PLAY BUTTON
先修复了一下上节课的bug,Shader里的TextureId应该用uniform以flat形式传输,用顶点数组数据的形式会被interpolate,这节课内容也挺简单的,内容不多:
- Viewport窗口上面绘制了Toolbar一栏,里面绘制了Play Button
- 代码的EditorLayer里,存两种Scene对应的PlayMode的状态,Editor和Play状态
- Scene里的Update函数分为EditorUpdate和RuntimeUpdate函数(这个Cherno之前做过了,我还没做,用到的时候再做吧)
核心就这点UI的代码:
// 思路是绘制一个小窗口, 然后拖到Dock里布局好, 此横向小窗口作为Toolbar, 中间绘制PlayButton
void EditorLayer::DrawUIToolbar()
{
	ImGui::PushStyleVar(ImGuiStyleVar_WindowPadding, ImVec2(0, 2));
	ImGui::PushStyleVar(ImGuiStyleVar_ItemInnerSpacing, ImVec2(0, 0));
	ImGui::PushStyleColor(ImGuiCol_Button, ImVec4(0, 0, 0, 0));
	auto& colors = ImGui::GetStyle().Colors;
	const auto& buttonHovered = colors[ImGuiCol_ButtonHovered];
	ImGui::PushStyleColor(ImGuiCol_ButtonHovered, ImVec4(buttonHovered.x, buttonHovered.y, buttonHovered.z, 0.5f));
	const auto& buttonActive = colors[ImGuiCol_ButtonActive];
	ImGui::PushStyleColor(ImGuiCol_ButtonActive, ImVec4(buttonActive.x, buttonActive.y, buttonActive.z, 0.5f));

	ImGui::Begin("##toolbar", nullptr, ImGuiWindowFlags_NoDecoration | ImGuiWindowFlags_NoScrollbar | ImGuiWindowFlags_NoScrollWithMouse);
	{
		float size = ImGui::GetWindowHeight() - 4.0f;
		std::shared_ptr<Texture2D> icon = m_PlayMode == PlayMode::Edit ? m_IconPlay : m_IconStop;
		ImGui::SetCursorPosX((ImGui::GetWindowContentRegionMax().x * 0.5f) - (size * 0.5f));
		if (ImGui::ImageButton((ImTextureID)icon->GetTextureId(), ImVec2(size, size), ImVec2(0, 0), ImVec2(1, 1), 0))
		{
			if (m_PlayMode == PlayMode::Edit)
				OnScenePlay();
			else if (m_PlayMode == PlayMode::Play)
				OnSceneStop();
		}

		ImGui::PopStyleVar(2);
		ImGui::PopStyleColor(3);
	}
	ImGui::End();
}
附录
使用directory_iterator遍历directories
这是C++17的std::filesystem提供的方便遍历目录的类,如下是例子,可以迅速遍历出来所有的子目录路径(返回的是相对的带斜杠的路径,而且不含子子文件的路径)
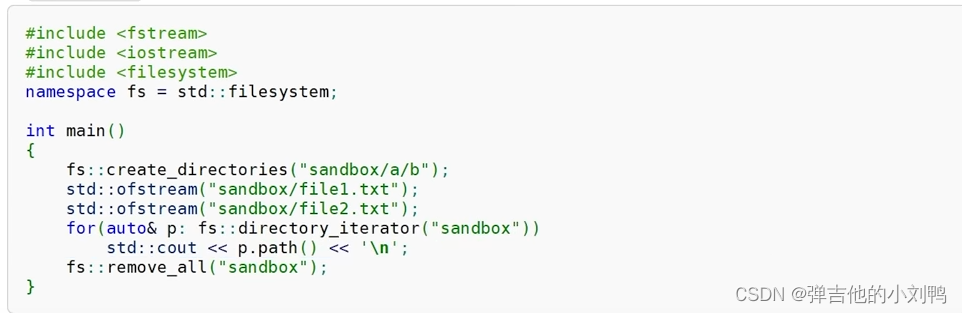
这里的auto类型为:
const std::filesystem::directory_entry
引入mono库时的报错
报错信息如下:
1>Hazel.lib(w32socket.obj) : error LNK2019: unresolved external symbol __imp_bind referenced in function mono_w32socket_bind
1>Hazel.lib(threadpool-io.obj) : error LNK2001: unresolved external symbol __imp_bind
可以看到这里的bind函数是找不到的,搜了一下win32 bind,发现它是属于Ws2_32.lib下的API,然后我这么强行添加依赖,就可以了:
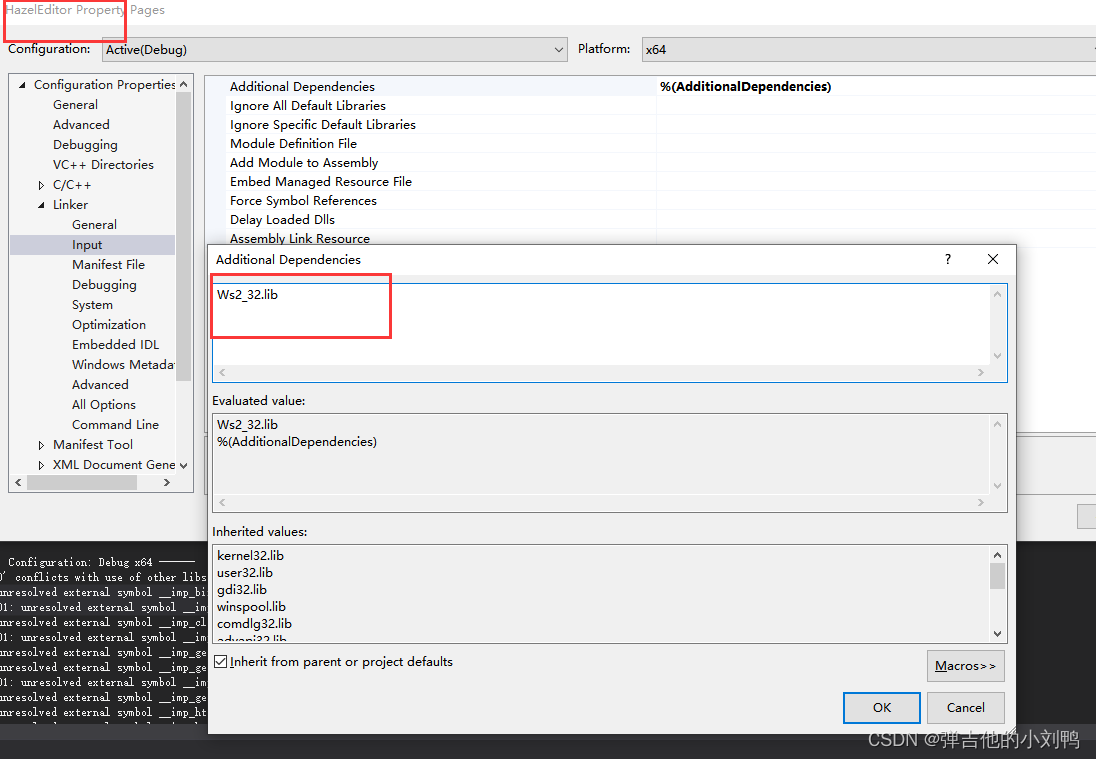
但为什么会这样呢?我自己build出来的static lib,应该是一个完整的内容,为啥还会让我额外依赖lib库呢。
首先,我分析了一下我Build这个static lib的过程,它的Build过程的依赖项目有:
- build-external-btls
- build-external-llvm
- build-init
- eglib
- libgcmonosgen
- libmini
- libmonoruntime
- libmonoutils
在分析之前,需要介绍一些我在分析过程中额外学到的知识
Utility类型的Project
如下图所示,这个选项:
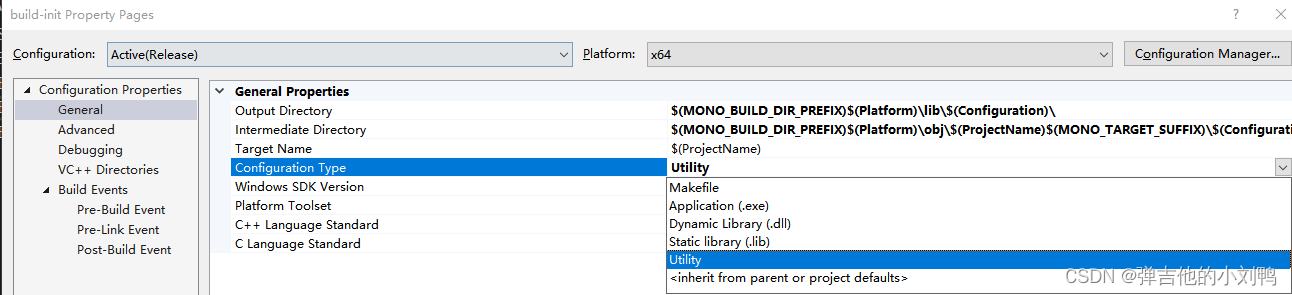
参考:What is “Utility” Configuration type in Visual Studio
The utility project does not generate any predetermined output files, such as a .LIB, .DLL or .EXE. A utility project can be used as a container for files you can build without a link step
这种项目没有任何output文件,它可以用于:
- 导出一个MAKEFILE
- 在里面自定义build rules
- 使用该项目as a master project for your subprojects.
- Utility projects respect the list of specified outputs and checks to see if outputs are out of date.
感觉看这个说明,很难直接理解,我经过自己实践后发现,Utility类型的Project可以在build过程中创建新的头文件,相关LOG信息如下:
Rebuild started...
1>------ Rebuild All started: Project: build-init, Configuration: Release x64 ------
1>Setting up Mono configuration headers...
1>Successfully setup Mono configuration headers F:\GitRepositories\mono\msvc\..\config.h and F:\GitRepositories\mono\msvc\..\mono\mini\version.h from F:\GitRepositories\mono\msvc\..\winconfig.h.
========== Rebuild All: 1 succeeded, 0 failed, 0 skipped ==========
mscorlib.dll找不到
报错:The assembly mscorlib.dll was not found or could not be loaded.
在C# scripting这节课里,加载.NET库时,出了这个问题,很奇怪,咋都弄不对。
一开始是查了下源码,相关函数为:
/**
 * mono_set_assemblies_path:
 * \param path list of paths that contain directories where Mono will look for assemblies
 *
 * Use this method to override the standard assembly lookup system and
 * override any assemblies coming from the GAC(Global Assembly Cache).  This is the method
 * that supports the \c MONO_PATH variable.
 *
 * Notice that \c MONO_PATH and this method are really a very bad idea as
 * it prevents the GAC from working and it prevents the standard
 * resolution mechanisms from working.  Nonetheless, for some debugging
 * situations and bootstrapping setups, this is useful to have.
 */
// 这里的path可以是一堆用';'分隔的path的集合
void
mono_set_assemblies_path (const char* path)
{
	char **splitted, **dest;

	// 由于path可能含有多个路径, 路径之间用';'分隔, 所以这里把路径拆分为多个子路径, 最多有1000个子路径
	splitted = g_strsplit (path, G_SEARCHPATH_SEPARATOR_S, 1000);
	// 如果存在Mono_Path, 则把它置为null str
	if (assemblies_path)
		g_strfreev (assemblies_path);

	assemblies_path = dest = splitted;

	// 遍历每个输入的路径
	while (*splitted)
	{
		char *tmp = *splitted;
		// canonicalize: 规范化, 这个函数会规范输入的str, 应该会返回绝对路径
		if (*tmp)
			*dest++ = mono_path_canonicalize (tmp);

		g_free (tmp);
		splitted++;
	}
	*dest = *splitted;

	// 所以最终的路径都存在了assemblies_path里

	if (g_hasenv ("MONO_DEBUG"))
		return;

	splitted = assemblies_path;
	// 重新遍历每个输入的路径, 对于里面不合理的Dir, 打印出对应的警告
	while (*splitted)
	{
		// 如果输入路径不是已经存在的Dir, 则会打印path in MONO_PATH doesn't exist or has wrong permissions.
		if (**splitted && !g_file_test (*splitted, G_FILE_TEST_IS_DIR))
			g_warning ("'%s' in MONO_PATH doesn't exist or has wrong permissions.", *splitted);

		splitted++;
	}
}
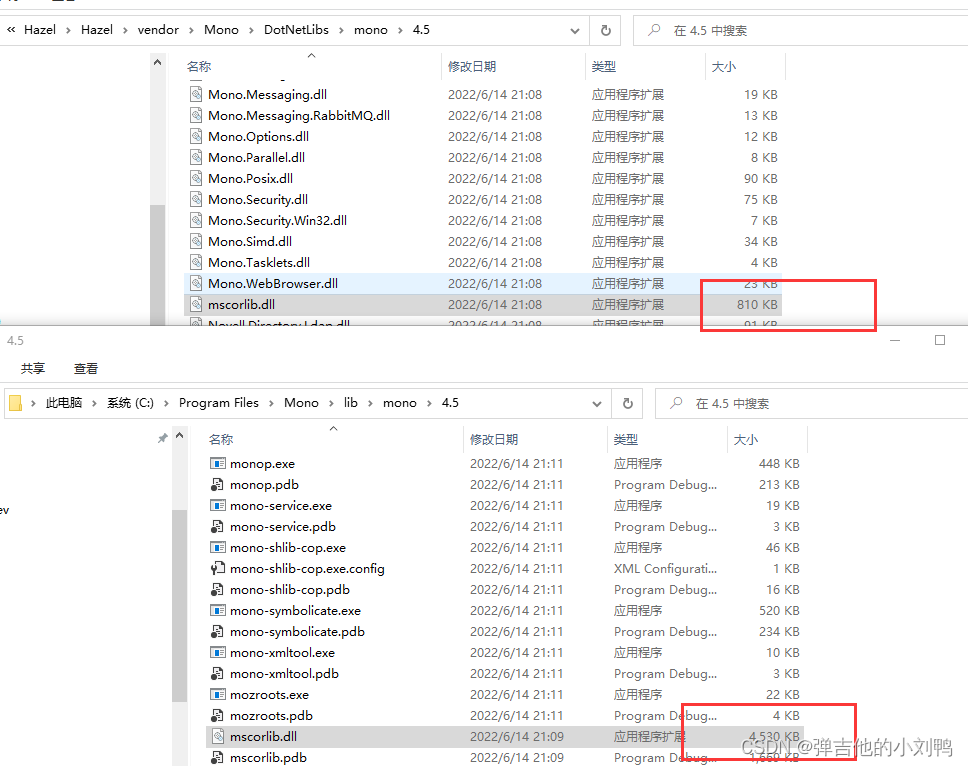
然后怎么改路径都不对,最后发现自己复制粘贴进来的库的文件不对劲(不知道为啥,这也太奇怪了):
关于glDrawElements第四个参数的疑问
参考:The 4th argument in glDrawElements is WHAT?
事情是这样的,我同一个工程,两台电脑上,一台可以正常运行,另一台会在下面这行代码里报错:
// 报错时count为12
glDrawElements(GL_TRIANGLES, count, GL_UNSIGNED_INT, nullptr);
关于这第四个参数,貌似以前是这么解释的:
indices: Specifies a byte offset (cast to a pointer type) into the buffer bound to GL_ELEMENT_ARRAY_BUFFER to start reading indices from.
而现在都是这么解释的:
indices: Specifies a pointer to the location where the indices are stored.
这两种解释都是正确的,取决于绘制的方式:
- 如果没有使用EBO,那么绘制的时候需要通过
glDrawElements的第四个参数传indices数组给GPU,来帮助绘制 - 如果使用了EBO,那么indices数组应该是借助EBO传给GPU的,那么此时的indices就只需要传"Specifies a byte offset (cast to a pointer type) into the buffer bound to GL_ELEMENT_ARRAY_BUFFER to start reading indices from"
使用cloc查看git仓库的代码量级
参考Hazel - My Game Engine // Code Review6分12秒,这里借助AlDanial提供的cloc工具,快速查询了Hazel的src文件夹下的代码量级:

这里出现的数字都是行数,比如说,检测到了C++的cpp文件有56353行,里面有13315行是空白行,有3751行是注释行
任务管理器找不到要杀的进程
参考:https://stackoverflow.com/questions/12124146/vc-fatal-error-lnk1168-cannot-open-filename-exe-for-writing
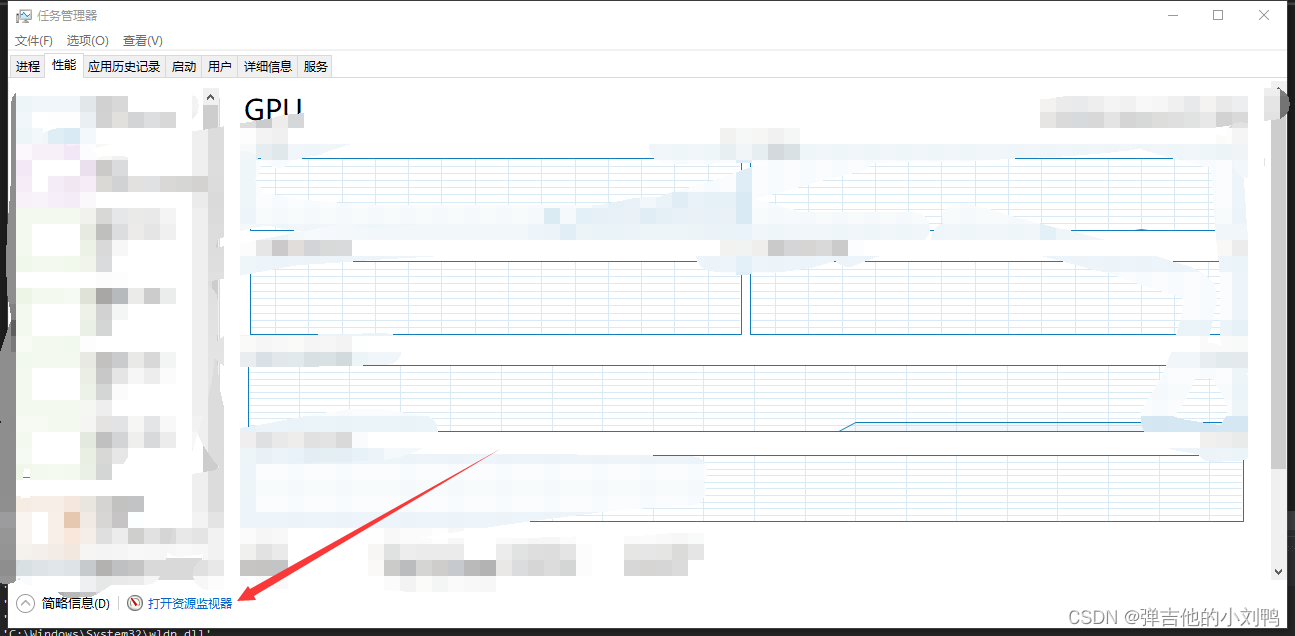
代码一直报错,意思是我没关掉应用cannot open filename.exe for writing,但我又在任务管理器里找不到对应的exe。后来发现可以打开资源监视器,里面可以找到并杀掉对应的进程。
打开任务管理器的性能页面,左下角就可以打开Resources Monitor:
查看cpp文件include的所有头文件
参考:2D PHYSICS! // Game Engine series
需要在Visual Studio里,选中cpp文件,然后右键点击属性,在里面的C+±>Advanced->Show Includes改为Yes,然后直接编译该cpp即可(Visual Studio里使用Ctrl + F7可以单独编译一个cpp),如下图所示:
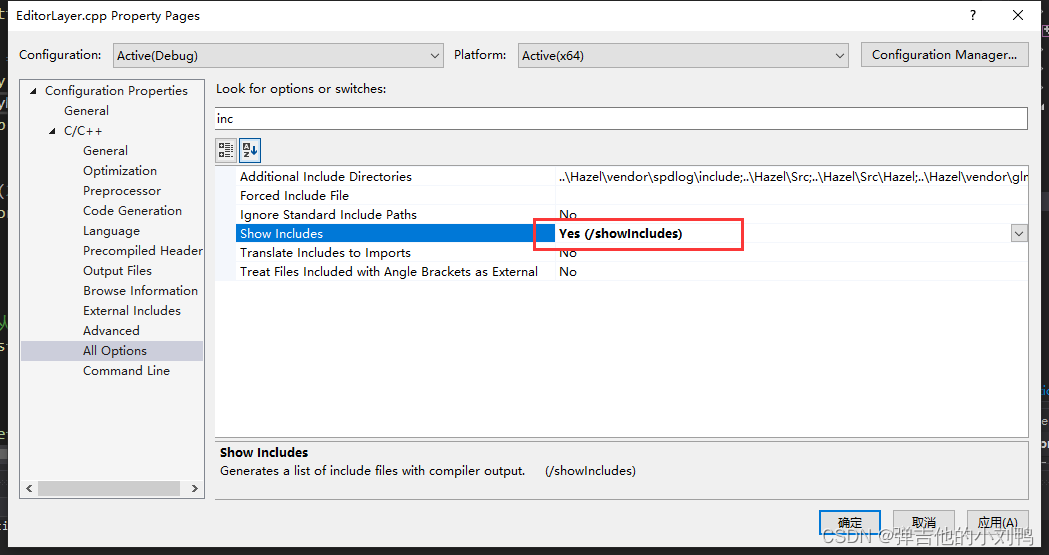
结果如下图所示,看了下,这个选项也可以针对整个project进行设置:
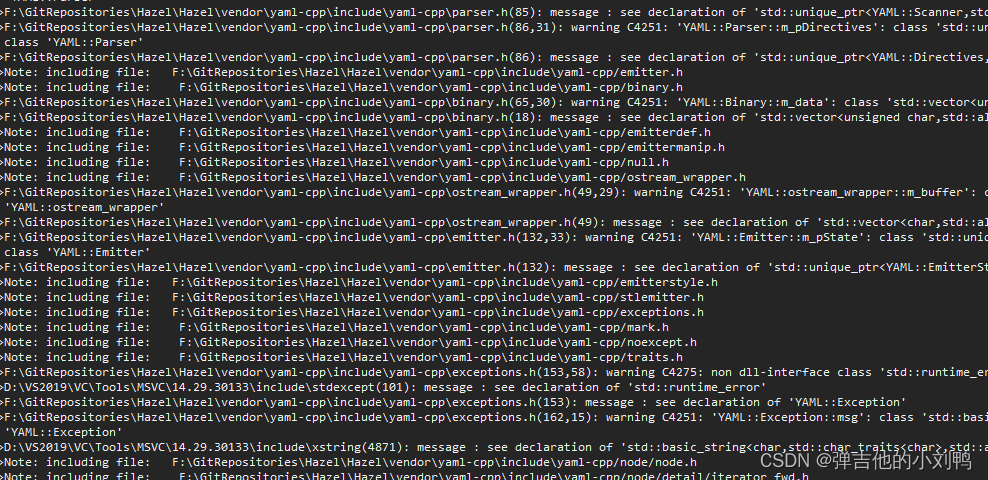
注意,Output这里的Include的信息前面很多空格,这是为了方便显示嵌套include情况的,比如下面这个:`
1>Note: including file: F:\GitRepositories\Hazel\Hazel\Src\Hazel\ECS/Components/Transform.h
1>Note: including file: F:\GitRepositories\Hazel\Hazel\Src\Hazel\ECS/SceneSerializer.h
1>Note: including file:  F:\GitRepositories\Hazel\Hazel\vendor\yaml-cpp\include\yaml-cpp/yaml.h
1>Note: including file:   F:\GitRepositories\Hazel\Hazel\vendor\yaml-cpp\include\yaml-cpp/parser.h
1>Note: including file:    F:\GitRepositories\Hazel\Hazel\vendor\yaml-cpp\include\yaml-cpp/dll.h
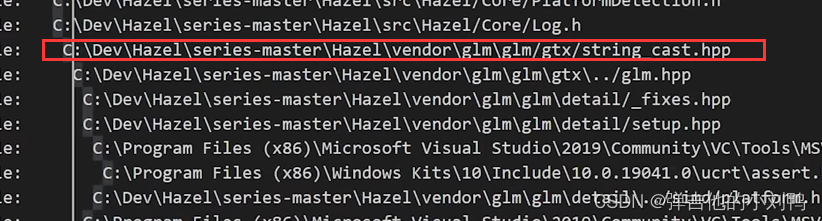
通过这个缩进,可以看出来,SceneSerializer.h引用了yaml.h,而yaml.h引用了parser.h。如果想要知道一个头文件在哪里被引用了,可以把这些Output粘贴到VS Code里,然后鼠标中键点在目标头文件的head位置,往上拖拽即可,直到找到多一个字母的路径,如下图所示:


 287
287

 被折叠的 条评论
为什么被折叠?
被折叠的 条评论
为什么被折叠?
 到【灌水乐园】发言


