


HNSW 索引的实现依赖 hnswlib 库,热门的向量数据库 Milvus 底层的 ANN 库之一就是 hnswlib, 为 milvus 提供 HNSW 检索。具体代码如下(GitHub 链接:
https://github.com/LazyAGI/Tutorial/blob/282ffb74e3fe7c5c28df4ad498ed972973dfbc62/rag/codes/chapter12/retriever_with_custom_index_hnsw.py#L19):
class HNSWIndex(IndexBase):
    def __init__(
            self,
            embed: Dict[str, Callable],
            store: StoreBase,
            max_elements: int = 10000, # 定义索引最大容量
            ef_construction: int = 200,    # 平衡索引构建速度和搜索准确率,越大准确率越高但是构建速度越慢
            M: int = 16,    # 表示在建表期间每个向量的边数目量,M越高,内存占用越大,准确率越高,同时构建速度越慢
            dim: int = 1024, # 向量维度
            **kwargs
        ):
        self.embed = embed
        self.store = store
        # 由于hnswlib中的向量id不能为str,故建立label用于维护向量编号
        # 创建字典以维护节点id和hnsw中向量id的关系
        self.uid_to_label = {}
        self.label_to_uid = {}
        self.next_label = 0
        #初始化hnsw_index
        self._index_init(max_elements, ef_construction, M, dim)

    def _index_init(self, max_elements, ef_construction, M, dim):
        # hnswlib支持多种距离算法:l2、IP内积和cosine
        self.index = hnswlib.Index(space='cosine', dim=dim)
        self.index.init_index(
            max_elements=max_elements,
            ef_construction=ef_construction,
            M=M,
            allow_replace_deleted=True
        )
        self.index.set_ef(100) # 设置搜索时的最大近邻数量,较高值会导致更好的准确率,但搜索速度会变慢
        self.index.set_num_threads(8) # 设置在批量搜索和构建索引过程中使用的线程数

    @override
    def update(self, nodes: List['DocNode']):
        if not nodes or nodes[0]._group != 'block':
            return
        # 节点向量化,这里仅展示使用默认的embedding model
        parallel_do_embedding(self.embed, [], nodes=nodes, group_embed_keys={'block': ["__default__"]})
        vecs = []    # 向量列表
        labels = []    # 向量id列表
        for node in nodes:
            uid = str(node._uid)
            # 记录uid和label的关系,若为新的uid,则写入next_label
            if uid in self.uid_to_label:
                label = self.uid_to_label[uid]
            else:
                label = self.next_label
                self.uid_to_label[uid] = label
                self.next_label += 1
            # 取默认embedding结果
            vec = node.embedding['__default__']
            vecs.append(vec)
            labels.append(label)
            self.label_to_uid[label] = uid

        # 根据向量建立hnsw索引
        data = np.vstack(vecs)
        ids  = np.array(labels, dtype=int)
        self.index.add_items(data, ids)

    @override
    def remove(self, uids, group_name=None):
        """
        标记删除一批 uid 对应的向量,并清理映射
        """
        if group_name != 'block':
            return
        for uid in map(str, uids):
            if uid not in self.uid_to_label:
                continue
            label = self.uid_to_label.pop(uid)
            self.index.mark_deleted(label)
            self.label_to_uid.pop(label, None)

    @override
    def query(
        self,
        query: str,
        topk: int,
        embed_keys: List[str],
        **kwargs,
    ) -> List['DocNode']:
        # 生成查询向量
        parts = [self.embed[k](query) for k in embed_keys]
        qvec = np.concatenate(parts)
        # 调用hnsw knn_query方法进行向量检索
        labels, distances = self.index.knn_query(qvec, k=topk, num_threads=self.index.num_threads)
        results = []
        #取检索topk
        for lab, dist in zip(labels[0], distances[0]):
            uid = self.label_to_uid.get(lab)
            results.append(uid)
            if len(results) >= topk:
                break
        # 从store获取对应uid的节点
        return self.store.get_nodes(group_name='block', uids=results) if len(results) > 0 else []


def test_hnsw_index():
    dataset_path = os.path.join(DOC_PATH, "test")
    docs1 = lazyllm.Document(dataset_path=dataset_path, embed=embedding_model)
    docs1.create_node_group(name='block', transform=(lambda d: d.split('\n')))
    docs1.register_index("hnsw", HNSWIndex, docs1.get_embed(), docs1.get_store())
    retriever1 = lazyllm.Retriever(docs1, group_name="block", similarity="cosine", topk=3)
    retriever2 = lazyllm.Retriever(docs1, group_name="block", index="hnsw", topk=3)
    retriever1.start()
    retriever2.start()
    q = "证券监管?"
    st = time.time()
    res = retriever1(q)
    et = time.time()
    context_str = "\n---------\n".join([r.text for r in res])
    LOG.info(f"query: {q}, default time: {et - st}, default res:\n {context_str}")

    st = time.time()
    res = retriever2(q)
    et = time.time()
    context_str = "\n---------\n".join([r.text for r in res])
    LOG.info(f"query: {q}, HNSW time: {et - st}, HNSW res: \n{context_str}")

test_hnsw_index()
运行结果如下所示:
query: 证券监管?, default time: 0.5182957649230957, default res:
 金融监管部门的保护措施
---------
为规范证券公司资金账户管理工作,防范业务风险,保护客户合法权益,根据《中
---------
 为贯彻落实《证券经纪业务管理办法》 ,引导证券公司规范开展证券经纪业务,协
query: 证券监管?, HNSW time: 0.021764516830444336, HNSW res:
金融监管部门的保护措施
---------
 为贯彻落实《证券经纪业务管理办法》 ,引导证券公司规范开展证券经纪业务,协
---------
为规范证券公司资金账户管理工作,防范业务风险,保护客户合法权益,根据《中
可以看到,使用默认的 cosine 相似度和默认索引进行向量检索用时 0.518s,而使用自己实现的 HNSW 索引执行向量检索耗时 0.022s,时间节省约 95%。这个结论和标量索引实践一致,即通过建立高效索引,“以空间换时间”,可以大大降低计算量,提高检索效率。
实践三. 从零开始,使用高性能向量数据库 Milvus
向量索引很强大,但是从 0 开始手搓一个高性能索引成本比较高。细心的你一定发现了 —— 在先前的存储配置中,Milvus 向量数据库的配置参数中已经包含了索引相关的配置,没错!向量数据库早已把这些高性能的向量索引,实际研发过程中,我们只需要使用这些高性能的向量数据库,便可实现高性能的向量检索!
1. 原生 Milvus 使用方式简介
安装
在本次实践中,我们使用 Milvus Lite,它是 pymilvus 中包含的一个 python 库,可以嵌入到应用程序中。Milvus 还支持在 Docker 和 Kubernetes 上部署,适用于生产用例。运行下方命令即可完成 pymilvus 的安装。
pip install -U pymilvus
使用
首先我们使用以下代码创建一个 milvus 客户端。
from pymilvus import MilvusClient
# 创建milvus客户端,传入本地数据库的存储路径,若路径不存在则创建
client = MilvusClient("dbs/origin_milvus.db")
在 Milvus 中,我们需要一个 Collections 来存储向量及其相关元数据。它相当于传统 SQL 数据库中的表格。创建 Collections 时,可以定义 Schema 和索引参数来配置向量规格,如维度(dimension)、索引类型(index_params)和距离度量(metric_type)等。
(代码 GitHub 链接:
https://github.com/LazyAGI/Tutorial/blob/a09a84cdf0585a5c9d52af6db0e965be95d03123/rag/codes/chapter12/use_original_milvus.py#L8)
# 初始化阶段,如果已存在同名collection,则先删除
if client.has_collection(collection_name="demo_collection"):
    client.drop_collection(collection_name="demo_collection")
client.create_collection(
    collection_name="demo_collection",
    dimension=1024,
)
🚨注意:create_collection 支持更多的入参,如主键列名 primary_field_name、向量列名 vector_field_name、向量索引参数 index_params、相似度参数 metric_type 等,此处仅介绍基本用法,其余均使用默认参数。
随后准备文档切片,进行向量化后按照 milvus 接受的格式创建数据集,并注入数据库中,这里我们额外增加了一个字段 subject(学科),用于充当数据的 metadata。
(代码 GitHub 链接:
https://github.com/LazyAGI/Tutorial/blob/a09a84cdf0585a5c9d52af6db0e965be95d03123/rag/codes/chapter12/use_original_milvus.py#L16)
docs = [
    "Artificial intelligence was founded as an academic discipline in 1956.",
    "Alan Turing was the first person to conduct substantial research in AI.",
    "Born in Maida Vale, London, Turing was raised in southern England.",
]
vecs =[embedding_model(doc) for doc in docs]
data = [
    {"id": i, "vector": vecs[i], "text": docs[i], "subject": "history"}
    for i in range(len(vecs))
]
# 数据注入
res = client.insert(collection_name="demo_collection", data=data)
print(f"Inserted data into client:\n {res}")
进行 query 检索时,同样需要先将 query 进行向量化,随后在 client 中调用 search 方法,指定对应的 collection 以及检索数量,并且支持指定输出哪些字段(output_fields)。
(代码 GitHub 链接:
https://github.com/LazyAGI/Tutorial/blob/a09a84cdf0585a5c9d52af6db0e965be95d03123/rag/codes/chapter12/use_original_milvus.py#L30)
query = "Who is Alan Turing?"
# query向量化
q_vec = embedding_model(query)
# 检索
res = client.search(
    collection_name="demo_collection",    # 指定collection
    data=[q_vec],
    limit=2,    # 指定检索数量(top_k)
    output_fields=["text", "subject"],    #指定检索结果中包含的字段
)
print(f"Query: {query} \nSearch result:\n {res}")
milvus 不仅支持简单高效的向量检索,同时支持使用元数据作为过滤字段,实现标量索引 + 向量索引的符合检索。下面的代码中,我们同样创建 3 个文段,并在数据注入是设置 subject 为不同的学科。在检索方法 search 的入参中,我们输入 filter 参数,以设置期望过滤的数据。
(代码 GitHub 链接:
https://github.com/LazyAGI/Tutorial/blob/a09a84cdf0585a5c9d52af6db0e965be95d03123/rag/codes/chapter12/use_original_milvus.py#L43)
docs = [
    "Machine learning has been used for drug design.",
    "Computational synthesis with AI algorithms predicts molecular properties.",
    "DDR1 is involved in cancers and fibrosis.",
]
vecs =[embedding_model(doc) for doc in docs]
data = [
    {"id": 3 + i, "vector": vecs[i], "text": docs[i], "subject": "biology"}
    for i in range(len(vecs))
]
client.insert(collection_name="demo_collection", data=data)
res = client.search(
    collection_name="demo_collection",
    data=[embedding_model("tell me AI related information")],
    filter="subject == 'biology'",    # 期望过滤的字段
    limit=2,
    output_fields=["text", "subject"],
)
print(f"Filter Query: {query} \nSearch result:\n {res}")
我们结合以上使用方式,结合 LazyLLM 的其他组建重新搭建一个简易的 RAG 系统
(代码 GitHub 链接:
https://github.com/LazyAGI/Tutorial/blob/282ffb74e3fe7c5c28df4ad498ed972973dfbc62/rag/codes/chapter12/rag_with_original_milvus.py#L1):
import os

import lazyllm
from lazyllm.tools.rag import SimpleDirectoryReader, SentenceSplitter
from lazyllm.tools.rag.doc_node import MetadataMode

from pymilvus import MilvusClient

from online_models import embedding_model, llm, rerank_model

DOC_PATH = os.path.abspath("docs")

###################### 文件入库 ###################################
# milvus client初始化
client = MilvusClient("dbs/rag_milvus.db")
if client.has_collection(collection_name="demo_collection"):
    client.drop_collection(collection_name="demo_collection")

client.create_collection(
    collection_name="demo_collection",
    dimension=1024,
)

# 加载本地文件,并解析 -- block切片 -- 向量化 -- 入库
dataset_path = os.path.join(DOC_PATH, "test")
docs = SimpleDirectoryReader(input_dir=dataset_path)()
block_transform = SentenceSplitter(chunk_size=256, chunk_overlap=25)

nodes = []
for doc in docs:
    nodes.extend(block_transform(doc))

# 切片向量化
vecs = [embedding_model(node.get_text(MetadataMode.EMBED)) for node in nodes]
data = [
    {"id": i, "vector": vecs[i], "text": nodes[i].text}
    for i in range(len(vecs))
]
#数据注入
res = client.insert(collection_name="demo_collection", data=data)

###################### 检索问答 ###################################
query = "证券管理的基本规范?"

# 检索与生成
prompt = '你是一个友好的 AI 问答助手,你需要根据给定的上下文和问题提供答案。\
        根据以下资料回答问题:\
        {context_str} \n '
llm.prompt(lazyllm.ChatPrompter(instruction=prompt, extro_keys=['context_str']))

q_vec = embedding_model(query)
res = client.search(
    collection_name="demo_collection",
    data=[q_vec],
    limit=12,
    output_fields=["text"],
)

# 提取检索结果
contexts = [res[0][i].get('entity').get("text", "") for i in range(len(res[0]))]

# 重排
rerank_res = rerank_model(text=query, documents=contexts, top_n=3)
rerank_contexts = [contexts[res[0]] for res in rerank_res]

context_str = "\n-------------------\n".join(rerank_contexts)

res = llm({"query": query, "context_str": context_str})
print(res)
在上述代码中,我们首先使用原生的使用方式定义了 milvus client,随后使用 LazyLLM 自带的文档解析器提取文档内容,并转换为切片,向量化后注入向量数据库中。随后进行 query 检索,提取检索内容并执行重排序后,给到大模型进行回答。
2. 在 LazyLLM 中使用 Milvus
从上述的实践内容中我们不难发现,milvus 可以实现持久化存储、检索性能强。但是原生 milvus 的使用方式确实有些复杂,用户需要花较大的成本从头学习如何使用一个向量数据库。这对于开发者来说多少有些 “折腾”。索性 LazyLLM 已经将 Milvus 完美适配,按照先前介绍的,只需要进行简单的存储及索引后端配置,便可轻松将 milvus 接入到 RAG 系统当中。具体配置方法是需要在上述存储后端配置 store_conf 中额外添加字段 'indices' ,indices 是一个 python 字典,key 是索引类型名称,value 是该索引类型所需要的参数,具体配置如下:
store_conf = {
    'type': 'map',
    'indices': {
        'smart_embedding_index': {
            'backend': 'milvus',                        # 设定索引使用Milvus后端
              'kwargs': {
                'uri': 'dbs/test.db',               # Milvus数据存储地址
                  'index_kwargs': {
                    'index_type': 'HNSW',                # 设置索引类型
                    'metric_type': 'COSINE',       # 设置度量类型
                }
            },
        },
    },
}
-
key: 'smart_embedding_index'(使用 milvus 向量数据库内置向量索引,以实现高效向量检索)
-
values:
⚒️'backend': 索引后端,当前仅支持传入 'milvus',已使用 Milvus 向量数据库。
⚒️'kwargs':选择对应索引后端时,额外的配置项,选择 milvus 时,配置项与存储后端使用 milvus 一致,均为 uri 和 index_kwargs。
Milvus 支持多种索引方式,一般来说浮点索引(即对稠密向量进行索引)的使用场景较多,适用于大规模数据的语义检索,二进制索引和稀疏索引适用于数据集较小的情况,可以保证较高的召回率。每种索引方式都有对应的推荐度量方式,您可以根据需求按照下表进行选择:
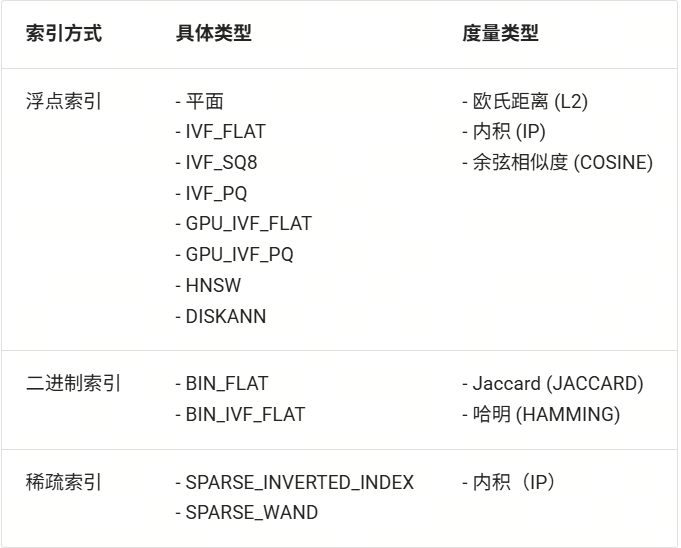
我们根据以上 milvus 配置,使用 LazyLLM 内置的 SmartEmbeddingIndex 实现 Milvus 的索引接入,并同样与使用默认索引的 Retriever 比较检索速度
(完整代码见 Github 链接:
https://github.com/LazyAGI/Tutorial/blob/patch-1/rag/codes/chapter12/retriever_with_custom_index_hnsw.py#L118):
import os
import time

import lazyllm
from lazyllm import LOG

from online_models import embedding_model

DOC_PATH = os.path.abspath("docs")

milvus_store_conf = {
    'type': 'map',
    'indices': {
        'smart_embedding_index': {
            'backend': 'milvus',
            'kwargs': {
                'uri': "dbs/test_map_milvus.db",
                'index_kwargs': {
                    'index_type': 'HNSW',
                    'metric_type': 'COSINE',
                }
            },
        },
    },
}
dataset_path = os.path.join(DOC_PATH, "test")

docs = lazyllm.Document(dataset_path=dataset_path, embed=embedding_model, store_conf=milvus_store_conf)

# 使用默认索引
retriever1 = lazyllm.Retriever(docs, group_name="MediumChunk", topk=6, similarity="cosine")
# 使用milvus内置HNSW索引
retriever2 = lazyllm.Retriever(docs, group_name="MediumChunk", topk=6, index='smart_embedding_index')
retriever1.start()
retriever2.start()

q = "证券监管?"
st = time.time()
res = retriever1(q)
et = time.time()
LOG.info(f"query: {q}, default time: {et - st}")

st = time.time()
res = retriever2(q)
et = time.time()
LOG.info(f"query: {q}, milvus time: {et - st}")
在 store_conf 的配置中,存储后端和索引后端是独立的两部分,但是如果存储类型选择 milvus 的情况下,由于 kwargs 中已经包含了索引配置信息,因此无需额外配置 indices,即可实现内置的向量检索。
可以看到,使用 Milvus 时,和将 Milvus 用作存储后端一致,将索引配置 indices 传入 store_conf ,然后在 Retriever 中指定 index='smart_embedding_index' 即可。相比于原生的使用方式,使用 store_conf 使向量数据库的使用更加简单,代码也更加简洁可读。程序运行的结果如下:
query: 证券监管?, default time: 0.16447973251342773
query: 证券监管?, milvus time: 0.02178812026977539
使用 LazyLLM 内置的 Milvus 执行检索相比默认的向量索引,检索时间节省约 86.75%。使用 Milvus 作为索引后端,基于多 embedding 召回策略构建 RAG 系统代码如下所示,下方代码展示了同时使用稠密和稀疏检索的方式:
import lazyllm
from lazyllm import bind, deploy

milvus_store_conf = {
    'type': 'milvus',
    'kwargs': {
        'uri': "milvus.db",
        'index_kwargs': [
            {
                'embed_key': 'bge_m3_dense',
                'index_type': 'IVF_FLAT',
                'metric_type': 'COSINE',
            },
            {
                'embed_key': 'bge_m3_sparse',
                'index_type': 'SPARSE_INVERTED_INDEX',
                'metric_type': 'IP',
            }
        ]
    },
}

bge_m3_dense = lazyllm.TrainableModule('bge-m3')
bge_m3_sparse = lazyllm.TrainableModule('bge-m3').deploy_method((deploy.AutoDeploy, {'embed_type': 'sparse'}))
embeds = {'bge_m3_dense': bge_m3_dense, 'bge_m3_sparse': bge_m3_sparse}
document = lazyllm.Document(dataset_path='/path/to/your/document',
           embed=embeds,
           store_conf=milvus_store_conf)

document.create_node_group(name="block", transform=lambda s: s.split("\n") if s else '')
bge_rerank = lazyllm.TrainableModule("bge-reranker-large")

with lazyllm.pipeline() as ppl:
    with lazyllm.parallel().sum as ppl.prl:
        ppl.prl.retriever1 = lazyllm.Retriever(doc=document,
                         group_name="block",
                         embed_keys=['bge_m3_dense'],
                         topk=3)
        ppl.prl.retriever = lazyllm.Retriever(doc=document,
                         group_name="block",
                         embed_keys=['bge_m3_sparse'],
                         topk=3)
    ppl.reranker = lazyllm.Reranker(name='ModuleReranker',model=bge_rerank, topk=3) | bind(query=ppl.input)
    ppl.formatter = (
      lambda nodes, query: dict(
          context_str=[node.get_content() for node in nodes],
          query=query)
    ) | bind(query=ppl.input)

    ppl.llm = lazyllm.OnlineChatModule().prompt(lazyllm.ChatPrompter(instruction=prompt, extra_keys=['context_str']))
webpage = lazyllm.WebModule(ppl, port=23492).start().wait()
结合之前介绍的存储配置,我们将第七讲中的 RAG 系统进行存储和索引的全面优化,全面提升系统的执行效率,代码如下
(GitHub 链接:
https://github.com/LazyAGI/Tutorial/blob/patch-4/rag/codes/chapter12/rag_use_milvus_store.py):
import os

import lazyllm
from lazyllm import Reranker

from online_models import embedding_model, llm, rerank_model    # 使用线上模型

DOC_PATH = os.path.abspath("docs")

# milvus存储和索引配置
milvus_store_conf = {
    'type': 'milvus',
    'kwargs': {
        'uri': "dbs/milvus1.db",
        'index_kwargs': {
        'index_type': 'HNSW',
        'metric_type': 'COSINE',
        }
    }
}
dataset_path = os.path.join(DOC_PATH, "test")

# 定义Document,传入配置以使用milvus存储及检索
docs = lazyllm.Document(dataset_path=dataset_path, embed=embedding_model, store_conf=milvus_store_conf)
#创建句子节点组
docs.create_node_group(name='sentence', parent="MediumChunk", transform=(lambda d: d.split('。')))
#创建MediumChunk、sentence节点组多路召回,
retriever1 = lazyllm.Retriever(docs, group_name="MediumChunk", topk=6, index='smart_embedding_index')
retriever2 = lazyllm.Retriever(docs, group_name="sentence", target="MediumChunk", topk=6, index='smart_embedding_index')
retriever1.start()
retriever2.start()
#创建reranker
reranker = Reranker('ModuleReranker', model=rerank_model, topk=3)

prompt = '你是一个友好的 AI 问答助手,你需要根据给定的上下文和问题提供答案。\
        根据以下资料回答问题:\
        {context_str} \n '
llm.prompt(lazyllm.ChatPrompter(instruction=prompt, extro_keys=['context_str']))

query = "证券管理有哪些准则?"

nodes1 = retriever1(query=query)
nodes2 = retriever2(query=query)
rerank_nodes = reranker(nodes1 + nodes2, query)
context_str = "\n======\n".join([node.get_content() for node in rerank_nodes])
print(f"context_str: \n{context_str}")
res = llm({"query": query, "context_str": context_str})
print(res)
Milvus 不仅支持本地 db 文件链接,同时支持远程服务器端点的接入。
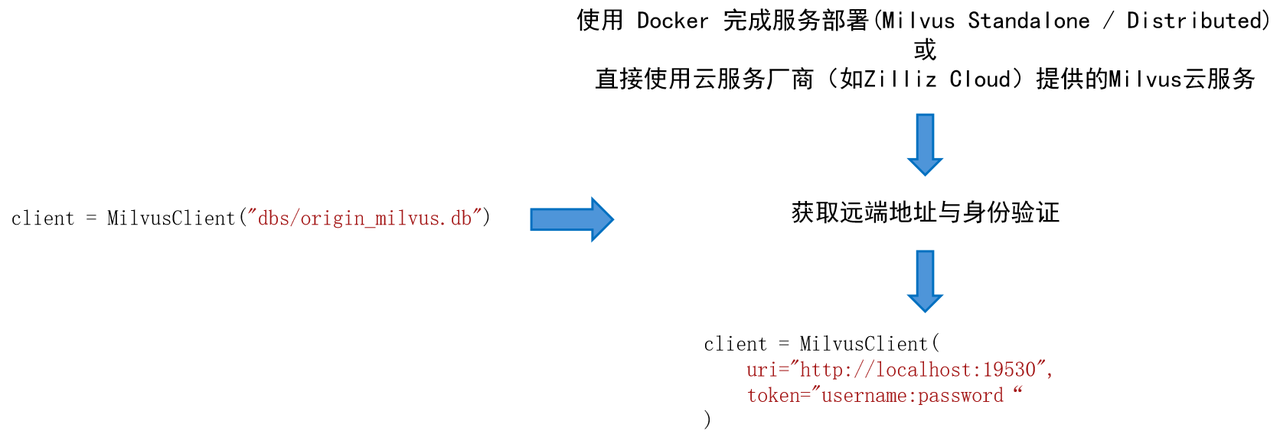
例如,我们期望在 Linux 系统上部署 Milvus Standalone 服务。
-
安装 Docker,并根据 Milvus 官方文档检查硬件与软件要求。
-
在 Docker 中安装 Milvus,安装脚本:
# 下载安装脚本
curl -sfL https://raw.githubusercontent.com/milvus-io/milvus/master/scripts/standalone_embed.sh -o standalone_embed.sh

# 启动Docker容器
bash standalone_embed.sh start
-
安装结果:
⚒️名为 Milvus 的 docker 容器在 19530 端口启动。要更改 Milvus 的默认配置,需将设置添加到当前文件夹中的 user.yaml 文件,然后重新启动服务。
⚒️Milvus 数据卷被映射到当前文件夹中的 volumes/milvus。


 1993
1993

 被折叠的 条评论
为什么被折叠?
被折叠的 条评论
为什么被折叠?
 到【灌水乐园】发言


