


概要
申请专栏成功啦~好开心,嘻嘻,还会坚持下去的,希望一切都会有好结果!!这是专栏的第一讲,我们知道如果用android自带的标题栏好low的,在怎么使用我们自己的标题栏上学习了好久,终于找到了很好的方法,这是最基础的一个知识,现在介绍给大家 ~
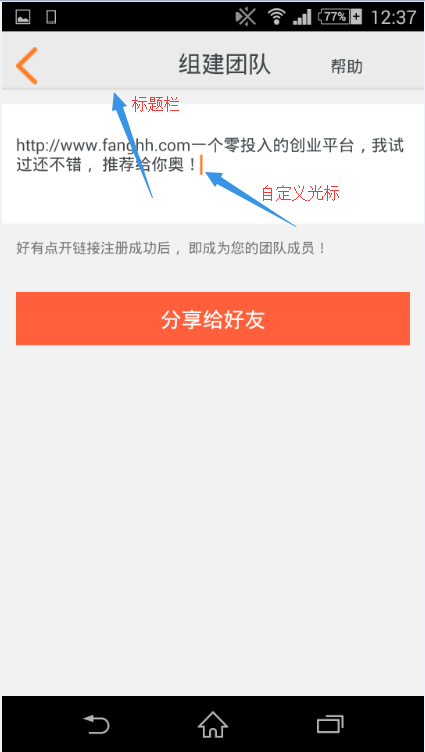
效果展示
demo
首先创建一个android项目,基础的步骤就不说了,创建完毕之后,我们先写他的布局界面
<RelativeLayout xmlns:android="http://schemas.android.com/apk/res/android"
    xmlns:tools="http://schemas.android.com/tools"
    android:layout_width="match_parent"
    android:layout_height="match_parent"
    android:background="#f2f2f2"
    tools:context="com.example.administrator.icephonefhhxml.BuildTeam">
/*这里需要注意的是xml文件刚创建时会有paddingleft/right/top 等等,把这些去掉,至于为什么大家可以加上来感受一下,就是如果有padding的话就说明parent界面有左右边距,也就是linearlayout不能全屏显示*/
    <View
        android:layout_height="2dp"
        android:layout_width="fill_parent"
        android:background="#dddddd"
        android:id="@+id/v0"
        />

    <View
        android:layout_height="0.5dp"
        android:layout_width="fill_parent"
        android:background="#ebebeb"
        android:id="@+id/v1"
        android:layout_below="@+id/v0"
        android:layout_marginTop="12dp"
        />
/*上面是定义几行细线,使界面美观,个人比较喜欢每个控件加id,然后谁在谁下面用below来确定,布局一目了然*/ <LinearLayout
android:id="@+id/block"
android:layout_width="fill_parent"
android:layout_height="102dp"
android:layout_alignTop="@+id/v1"
android:background="#FFFFFF"
android:orientation="vertical" >
<LinearLayout
android:id="@+id/firstline"
android:layout_width="fill_parent"
android:layout_height="wrap_content"
android:layout_alignTop="@+id/v1"
android:background="#FFFFFF"
android:layout_marginTop="25dp"
android:orientation="horizontal" >
<EditText
android:id="@+id/edtTxt_web"
android:layout_marginLeft="12dp"
android:layout_width="340dp"
android:layout_height="fill_parent"
android:textSize="14sp"
android:textColor="#404548"
android:background="@null"
android:textCursorDrawable="@drawable/cursor_style" //这行是设置光标,这个drawable是我们自定义的光标
/>
</LinearLayout>
</LinearLayout>
<TextView
android:id="@+id/tv3"
android:layout_width="wrap_content"
android:layout_height="wrap_content"
android:layout_below="@+id/block"
android:layout_marginLeft="12dp"
android:layout_marginTop="12dp"
android:text="好有点开链接注册成功后, 即成为您的团队成员!"
android:textSize="12sp"
android:textColor="#757575"/>
<Button
android:id="@+id/btn_share"
android:layout_width="fill_parent"
android:layout_height="46dp"
android:layout_below="@+id/tv3"
android:layout_marginLeft="12dp"
android:background="@drawable/button_style"
android:layout_marginRight="12dp"
android:layout_marginTop="30dp"
android:text="分享给好友"
android:textColor="#FFFFFF"
android:textSize="18sp"
android:focusable="true"/>
</RelativeLayout>
我们先说一下如何自定义光标,我们在res->drawable下新建一个名为cursor_style的xml文件
<?xml version="1.0" encoding="utf-8"?>
<shape xmlns:android="http://schemas.android.com/apk/res/android" android:shape="rectangle">
    <size android:width="2dp" />
    <solid android:color="#fd7b23"  />
</shape>
下面我们该定义自己的标题栏了,这个方法我在网上找了很久,都不完整,要么报错要么没有效果
第一步,先创建一个tittle_bar_help.xml文件用来保存标题栏的布局
<?xml version="1.0" encoding="utf-8"?>
<LinearLayout xmlns:android="http://schemas.android.com/apk/res/android"
    android:layout_width="fill_parent"
    android:layout_height="48dp"
    android:orientation="vertical"
    android:background="#ebebeb">
    <LinearLayout
        android:layout_width="wrap_content"
        android:layout_height="wrap_content"
        android:orientation="horizontal"
        android:background="#ebebeb"
        android:layout_marginTop="13.5dp"
        >
        <Button
            android:id="@+id/btn_back"
            android:layout_width="wrap_content"
            android:layout_height="wrap_content"
            android:layout_marginLeft="12dp"
            android:background="@drawable/change_city_nav_back_default" />

        <TextView
            android:id="@+id/tv_tittle"
            android:layout_width="wrap_content"
            android:layout_height="wrap_content"
            android:paddingLeft="120dp"
            android:text="组建团队"
            android:textColor="#404548"
            android:textSize="20sp"/>

        <TextView
            android:id="@+id/tv_help"
            android:layout_width="wrap_content"
            android:layout_height="wrap_content"
            android:layout_marginLeft="50dp"
            android:text="帮助"
            android:textColor="#404548"
            android:textSize="14sp"/>


    </LinearLayout>

</LinearLayout>
然后在activity里是指标题栏样式为自己指向的标题栏
super.onCreate(savedInstanceState);
        requestWindowFeature(Window.FEATURE_CUSTOM_TITLE);
        setContentView(R.layout.activity_build_team);
        getWindow().setFeatureInt(Window.FEATURE_CUSTOM_TITLE, R.layout.tittle_bar_help);
然后运行!!
----------------------------------10秒钟之后------------------------------------------------\
报错了吧!
O(∩_∩)O
哈哈~
--------------------------------怎么办呢?--------------------------------------------------\
首先我们要知道为什么,是配置文件出问题了,我们看一下配置文件
 <application
        android:allowBackup="true"
        android:icon="@drawable/ic_launcher"
        android:label="@string/app_name"
        android:theme="@style/AppTheme" >
在res->values->styles做如下修改
<resources>

    <!-- Base application theme. -->
    <style name="AppTheme" parent="android:Theme.Holo.Light.DarkActionBar">
        <!-- Customize your theme here. -->
    </style>
    <style name="CustomWindowTitleBackground">
        <item name="android:background">#ebebeb</item>
    </style>

    <style name="Mystyle" parent="android:Theme">
        <item name="android:windowTitleSize">48dp</item>
        <item name="android:windowTitleBackgroundStyle">@style/CustomWindowTitleBackground</item>
    </style>
</resources>
我们定义了一个自己的theme,然后声明title使用自定义
然后在配置文件里配置成我们自己的theme
<application
        android:allowBackup="true"
        android:icon="@drawable/ic_launcher"
        android:label="@string/app_name"
        android:theme="@style/Mystyle" >
最后运行就可以啦~啦~啦~
感想
drawable里面还可以定义很多特效,包括按钮点击时的变化等...感兴趣的可以去看看~~android的布局是一个程序的门户,今后我们一起学习布局与设计技巧!
最后,老规矩~
每日一句:
遇见你,希望你是我今生唯一


 2万+
2万+


 被折叠的 条评论
为什么被折叠?
被折叠的 条评论
为什么被折叠?
 到【灌水乐园】发言


