


Ubuntu16.04 + Thinkpad-T440 自带显卡 + CUDA8.0
写在前面: 2018-03-31
在新环境安装了一次,来更新一下文档
配置:台式机+1060(6G) + cuda9.0 + tensorflow1.6 + cudnn7.0
大部分内容与下面相同,就是对于自己购买的显卡,最好事先找到最合适的显卡驱动(比如1060适合390)。
首先按照下面的步骤安装好显卡驱动(当然还是要卸载自带驱动 nouveau nvidia)。然后在装cuda时,问你是否安装驱动时,选择否,能避免不少bug(比如最烦人的登录页面死循环,多数还是显卡驱动不合适造成的)。
还有一点比较重要,看好你的环境究竟需要什么配置,再决定cuda和cudnn的安装版本。
主要参考文章:http://blog.csdn.net/hjimce/article/details/51999566
有些配置上的不同,并出现了一些该文章中没有出现过的问题,记录一下
显卡:Thinkpad-T440 配置的独显 GeForce GT 720M,1G显存
环境:64位 Ubuntu16.06,CUDA 8.0
一. 安装 cuda 8.0
1. 下载
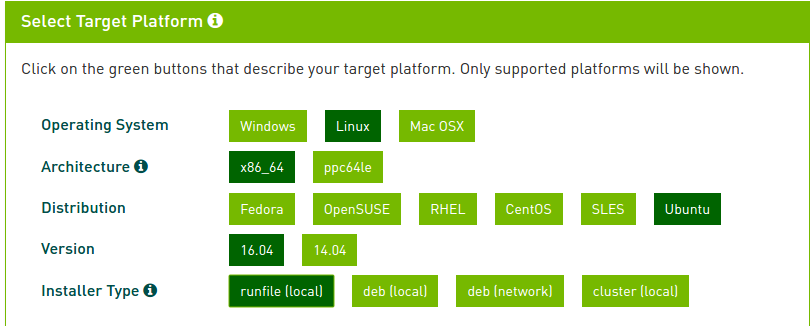
官网下载 cuda 8.0:https://developer.nvidia.com/cuda-downloads
注意:尽量选择 runfile,如下图所示:
2. 除掉旧驱动
打开终端,输入
sudo vim /etc/modprobe.d/blacklist.conf 在文件最后加上以下内容,以禁用自带驱动 nouveau nvidia,但这里貌似没有去干净,后面会做进一步的处理
blacklist nouveau
sudo reboot
sudo apt-get remove --purge nvidia*
重启系统
!!!安装成功后记得把加的几行代码删掉。
============
注(2018-03-10):
更新配置:台式机 + Ubuntu16.04 + Nvidia 1066 + cuda 9.1
需要有所调整,参考:https://askubuntu.com/questions/841876/how-to-disable-nouveau-kernel-driver
maybe it is too late ,but hope can help for others. the follow tips worked for ubuntu 16.04 and elementary os 0.4.
remove all nvidia packages ,skip this if your system is fresh installed
sudo apt-get remove nvidia* && sudo apt autoremoveinstall some packages for build kernel:
sudo apt-get install dkms build-essential linux-headers-genericnow block and disable nouveau kernel driver:
sudo vim /etc/modprobe.d/blacklist.confInsert follow lines to the blacklist.conf:
blacklist nouveau
blacklist lbm-nouveau
options nouveau modeset=0
alias nouveau off
alias lbm-nouveau off
save and exit.
Disable the Kernel nouveau by typing the following commands(nouveau-kms.conf may not exist,it is ok):
echo options nouveau modeset=0 | sudo tee -a /etc/modprobe.d/nouveau-kms.confbuild the new kernel by:
sudo update-initramfs -ureboot
============
3. 安装 cuda 8.0
首先要结束 X-Window 的服务,否则会出现驱动无法正常安装的问题
在终端输入(注意:关闭后会黑屏,要进入tty1控制台,在黑屏状态下快捷键Ctrl+Alt+F1 即可,安装完成后会重新启动。建议在手机或其他电脑上打开说明。)
sudo service lightdm stop开始安装。进入到你下载好的 cuda_8.0.44_linux.run 的目录下,运行
chmod +x cuda*.run
sudo ./cuda*.run 这里并没出现过引文中出现的X-lock问题,有需要的可以去引文中查找。
accept 协议之后,根据自己需求选择安装选项(我的做法是,有默认的默认,没有的都yes,安装路径要注意看一下)
安装完成时,应该有类似如下的提示:
===========
= Summary =
===========

Driver: Installed
Toolkit: Installed in /usr/local/cuda-8.0
Samples: Installed in ***
并提示环境变量的配置 和 卸载方法。
安装完毕后,重新启动 X-Window
sudo service lightdm start若未自动回到图形界面,Ctrl+Alt+F7 可以进入到图形界面
4. 使用环境配置
ubuntu 的 gcc 编译器是 5.4.0,然而 cuda-8.0 不支持 5.0 以上的编译器,因此需要降级,把编译器版本降到 4.9
sudo apt-get install g++-4.9
sudo update-alternatives --install /usr/bin/gcc gcc /usr/bin/gcc-4.9 20
sudo update-alternatives --install /usr/bin/gcc gcc /usr/bin/gcc-5 10
sudo update-alternatives --install /usr/bin/g++ g++ /usr/bin/g++-4.9 20
sudo update-alternatives --install /usr/bin/g++ g++ /usr/bin/g++-5 10
sudo update-alternatives --install /usr/bin/cc cc /usr/bin/gcc 30
sudo update-alternatives --set cc /usr/bin/gcc
sudo update-alternatives --install /usr/bin/c++ c++ /usr/bin/g++ 30
sudo update-alternatives --set c++ /usr/bin/g++
配置环境变量
sudo vim /etc/profile在文件末尾加上
PATH=/usr/local/cuda/bin:/usr/local/cuda-8.0/bin:$PATH
export PATH
在终端输入以下命令,使其生效
source /etc/profile 在终端输入
sudo vim /etc/ld.so.conf.d/cuda.conf添加内容
/usr/local/cuda-8.0/lib64 5. 测试
我没有编译 examples,而是直接安装了 theano
sudo pip install theano若以安装,需加入-U参数
在用户的目录下(/home/*),创建/更改 .theanorc 文件
[global]
floatX=float32
device=gpu
base_compiledir=~/external/.theano/
allow_gc=False
warn_float64=warn
[mode]=FAST_RUN

[nvcc]
fastmath=True

[cuda]
root=/usr/local/cuda-8.0
运行下面的例子
from theano import function, config, shared, sandbox
import theano.tensor as T
import numpy
import time

vlen = 10 * 30 * 768  # 10 x #cores x # threads per core
iters = 1000

rng = numpy.random.RandomState(22)
x = shared(numpy.asarray(rng.rand(vlen), config.floatX))
f = function([], T.exp(x))
print(f.maker.fgraph.toposort())
t0 = time.time()
for i in range(iters):
    r = f()
t1 = time.time()
print("Looping %d times took %f seconds" % (iters, t1 - t0))
print("Result is %s" % (r,))
if numpy.any([isinstance(x.op, T.Elemwise) for x in f.maker.fgraph.toposort()]):
    print('Used the cpu')
else:
    print('Used the gpu')
可以看到结果:
Using gpu device 0: GeForce GT 720M (CNMeM is disabled, cuDNN not available)
[GpuElemwise{exp,no_inplace}(<CudaNdarrayType(float32, vector)>), HostFromGpu(GpuElemwise{exp,no_inplace}.0)]
Looping 1000 times took 0.919536 seconds
Result is [ 1.23178029  1.61879349  1.52278066 ...,  2.20771813  2.29967761
  1.62323296]
Used the gpu

Process finished with exit code 0
6. 问题一
运行测试文件时
***libcublas.so.8.0: cannot open shared object file: No such file or directory解决方法是
sudo ldconfig /usr/local/cuda-8.0/lib647. 问题二
modprobe: ERROR: could not insert 'nvidia_340_uvm': Invalid argument这个可能是由于原来的驱动没有删干净,在终端运行(提示的哪个就删掉哪个,我这里是340)
sudo apt-get remove nvidia-3408. 问题三
类似于
/etc/modprobe.d/blacklist.conf line 57: ignoring bad line starting with ×××的错误。这是由于上面加在blacklist.conf中的几行代码没有去掉,回去删掉就好了
9. 问题四
使用时需要注意的是,我的笔记本自带的显存为1G,大概要预留200M给显示,剩下内存不多了,使用theano 或 th后端的keras 相对来说还好,在使用tensorflow 时可能会用到 4-5G 的内存,所以我安装了cpu版本的tf。


 2204
2204

 被折叠的 条评论
为什么被折叠?
被折叠的 条评论
为什么被折叠?
 到【灌水乐园】发言


