context是Quartz的核心概念,在用CG进行画图的时候,必须和context打交道,所以必须要知道context是什么,干什么以及为什么要有context。
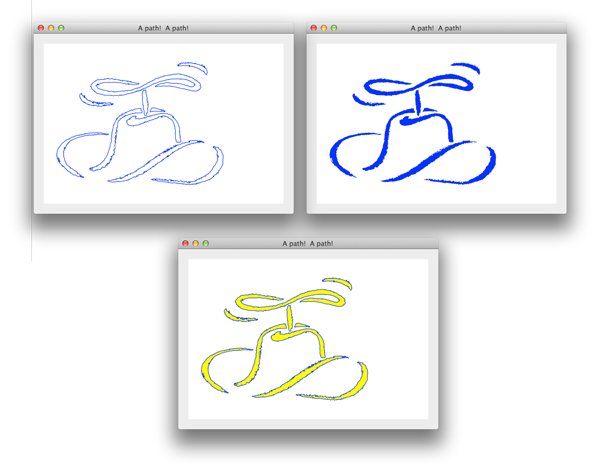
我们使用CG最基本的操作就是创建路径,路径是一个用数学描述的图形形状,路径可以是矩形的,圆形的,牛仔帽形甚至是一个泰姬陵的形状。路径内可以用颜色进行填充,每一个像素点都可以被设置成特定的颜色。路径也可以是一个轮廓。这个有点像是字帖。下面是三幅图,一副是一个帽子的轮廓,一副填充蓝色的帽子,另一副是填充黄色。
正如你所见,上面的轮廓还是挺复杂的。它可以被涂上任何颜色。也可以设置线条的样式,可以设置成粗线条也可以是细线条。线条的末端还能设置成矩形或者圆形。等等,还有很多的属性可以设置。
你查看CG的API后会发现,没有一个函数的参数是包含所有属性的。
CGStrokePath (path, fillColor, strokeColor, lineWidth, dashPattern, bloodType, endCap)取而代之的,是下面这个函数
void CGContextStrokePath(CGContextRef c)其他的属性是来自于哪里呢?都是从context中获得的。
context属性
context拥有许多全局的绘画状态。他们之间都是独立的。
- current state
- current fill and stroke colors
- line width and pattern
- line cap and join(miter)style
- alpha(transparency) ,antialiasing and blend mode
- shadows
- transformation matrix
- text attribuates(font, size, matrix)
- esoteric things like line flatness and interpolation quality
- and more
有非常多的属性。事实上CG的所有属性并没有被文档化,所以很多属性都是很隐性的。不同的conext(image,PDf,etc)拥有不同的属性。
当CG要开始画东西时,例如“fill a path”,它只会去获取需要的属性。同样的代码可能因为不同的context就会得到截然不同的效果。从某方面来说,这是非常强大的。但从另一方面来看,因为context持有的属性都是全局的,所以很容易将属性搞得一团糟。
如果你的代码是这样的:
 draw orange square:
  set color to orange in the current context
  fill a rectagle
这个时候画出来的是一个橘色的矩形
 draw red valentine:
   set color to red in the current context
   fill a valentine
ok,一个红心。这个时候你想将这个代码加到第一段代码中:
  draw orange square:
    set color to orange in the current context
    draw red valentine
    fill a rectangle
这个时候画出来的矩形就变成了红色,为什么?因为画红心的代码中将当前的color设置成了红色。之前的橘色被红色冲掉了,如何避免这样的bug呢?
这里有两种方法:一种是将当前的颜色进行存储(橘色),然后画红心(红色),然后再将橘色重新赋值回去,画矩形。这种方式可以解决上述问题,但是这样做的坏处是,如果context的属性较多,层级较深,这样保存很容易混乱。当然你会想到一个方法就是获取当前context的属性,但是不好意思,CG没有提供getter方法来获取context属性。
context栈
对于上述的问题一个可行的方法就在改变全局属性之前保存整个context。保存context,调整线条属性,颜色属性,绘画。然后恢复context。CG提供了一个保存和恢复context的API。保存context其实就是保存全局属性。实际上,后端是用一个栈结构来保存这些属性的。
当保存context时,就会将当前所有的属性push到栈中。当恢复context时,就会pop出上次的属性,然后当前context也就恢复到上次的状态。下面就来演示下如何用这种方面修复上述的bug:
draw red valentine:
  save graphic state
  set color to red in the current context
  fill a valentine
  restore graphics state
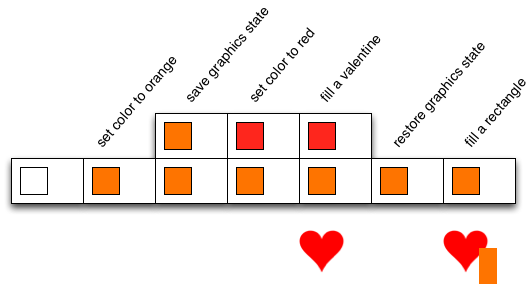
然后,整个流程就像下面这样:
 set color to orange in the current context
 save graphics state
 set colot to red in the current context
 fill a valenine
 restore graphic state
 fill a rectangle
下面用图示来演示上述代码:
Core Graphics API
到此为止,上面都是用伪代码在讲述,究竟CG的代码是什么样的呢?它们看上去有点点负责。Core graphics 风格和 Core Fundation API一样。其中比较让人头疼的是定义指针类型。但是在CG中,凡是“Ref”结尾的,例如CGContextRef活着CGColorRef。这些在实际的定义中就是指针类型的变量。
正确的形式
CGContextRef currentContext = ....; // actually a pointer错误的形式CGContextRef *currentContext = ...; // pointer to a pointer在绘画的时候,很少自己去创建一个context,大多数情况下是获得当前的context:
CGContextRef context = UIGraphicsGetCurrentContext ();在Mac中这样获取:
CGContextRef context = [NSGraphicsContext.currentContext graphicsPort] //before 10.10CGContextRef context = [NSGraphicsContext.currentContext CGContext] //10.10Draw
因为CG是一套C语言实现的面向对象API,函数中传入的第一个参数是“对象”。 例如,下面是画一个矩形轮廓的代码:
CGContextRef context = ...;  // See above for the proper call for your platform
CGRect bounds = someView.bounds;
CGContextStrokeRect (context, bounds);
CGCotextStrokeRect将CGContextRef设置为第一个参数。这个函数的目的是画一个矩形轮廓。如果context是一个image类型,或者是要渲染当前屏幕的,则这个矩形就会去获取当前全局变量中的属性(线宽,颜色,图案等)。如果这个context是PDF,则就会生成特定的指令文件让PDf viewer来解析。
Context
GrafDemo是一个CG的Demo,它会讲CG的方方面面都做一个演示。代码在Github中。
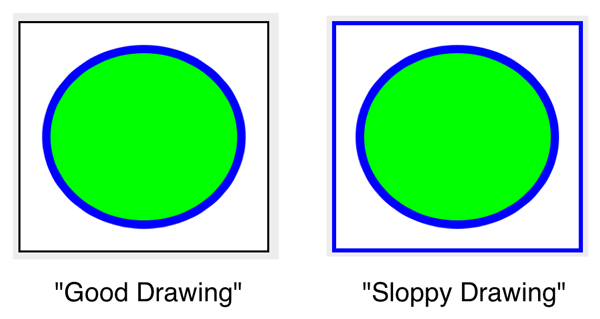
GrafDemo包含了一个NSView,画了一个边框为蓝色,填充是绿色的圆圈。白色的背景边框是黑色。
上面有两个版本的图形,一个是正确的Context属性,另一个不是。注意那个错误的图形。白色背景的边框被设置成了蓝色。Demo中同时含有OC和Swift版本的。
获取当前view上的context很简单,下面是Mac中的获取方法:
- (CGContextRef) currentContext {
    return [NSGraphicsContext.currentContext graphicsPort];
} // currentContext
在view的drawRect方法中,实现绘制图形背景线条的函数。 [code]
绘制背景和轮廓的函数也很简单:
- (void) drawSloppily {
    CGContextRef context = self.currentContext;

    CGContextSetRGBStrokeColor (context, 0.0, 0.0, 0.0, 1.0); // Black
    CGContextSetRGBFillColor (context, 1.0, 1.0, 1.0, 1.0); // White

    [self drawSloppyBackground];
    [self drawSloppyContents];
    [self drawSloppyBorder];

} // drawSloppily
- (void) drawSloppyBackground {
CGContextFillRect (self.currentContext, self.bounds);
} // drawSloppyBackground
- (void) drawSloppyBorder {
CGContextStrokeRect (self.currentContext, self.bounds);
} // drawSloppyBorder下面的代码是在drawRect中调用的,但是,这里存在一个问题:
- (void) drawSloppyContents {
    CGContextRef context = self.currentContext;

    CGRect innerRect = CGRectInset (self.bounds, 20, 20);

    CGContextSetRGBFillColor (context, 0.0, 1.0, 0.0, 1.0); // Green
    CGContextFillEllipseInRect (context, innerRect);

    CGContextSetRGBStrokeColor (context, 0.0, 0.0, 1.0, 1.0); // Blue
    CGContextSetLineWidth (context, 6.0);
    CGContextStrokeEllipseInRect (context, innerRect);

} // drawSloppyContents
注意,上述代码中,讲context中的一些属性进行了改变,这些都是全局属性。所以会影响后面的背景边框颜色。
Push&pull
修复上面bug的一个方法就是,在绘制矩形之前,保存context,绘制之后,恢复context。CGContextSaveGState将当前的contextpush到栈中。CGContextRestoreGState当栈顶的context恢复到当前的context中。
下面是一个修复后的代码版本:
- (void) drawNiceContents {
    CGContextRef context = self.currentContext;

    CGContextSaveGState (context); {
        CGRect innerRect = CGRectInset (self.bounds, 20, 20);

        CGContextSetLineWidth (context, 6.0);

        CGContextSetRGBFillColor (context, 0.0, 1.0, 0.0, 1.0); // Green
        CGContextFillEllipseInRect (context, innerRect);

        CGContextSetRGBStrokeColor (context, 0.0, 0.0, 1.0, 1.0); // Blue
        CGContextStrokeEllipseInRect (context, innerRect);

    } CGContextRestoreGState (context);

} // drawNiceContents
代码中的{}符号,只是个人的编码风格,是为了让代码看上去更加有逻辑性,加不加对功能都没有任何影响。
Swift
CG的代码在OC和swift中使用几乎是一样的,唯一不同的是末尾不需要分号。下面是swift版本的代码:
func drawSloppyContents() {
    let innerRect = CGRectInset(bounds, 20.0, 20.0)

    CGContextSetRGBFillColor (currentContext, 0.0, 1.0, 0.0, 1.0) // Green
    CGContextFillEllipseInRect (currentContext, innerRect)

    CGContextSetRGBStrokeColor (currentContext, 0.0, 0.0, 1.0, 1.0) // Blue
    CGContextSetLineWidth (currentContext, 6.0)
    CGContextStrokeEllipseInRect (currentContext, innerRect)
}
在OC中{}符号不适用于swift,所以这里换作函数闭包的形式来保持代码的逻辑性:
private func saveGState(drawStuff: () -> ()) -> () {
    CGContextSaveGState (currentContext)
    drawStuff()
    CGContextRestoreGState (currentContext)
}
func drawNiceContents() {
saveGState {
let innerRect = CGRectInset(self.bounds, 20.0, 20.0)
CGContextSetRGBFillColor (self.currentContext, 0.0, 1.0, 0.0, 1.0) // Green
CGContextFillEllipseInRect (self.currentContext, innerRect)
CGContextSetRGBStrokeColor (self.currentContext, 0.0, 0.0, 1.0, 1.0) // Blue
CGContextSetLineWidth (self.currentContext, 6.0)
CGContextStrokeEllipseInRect (self.currentContext, innerRect)
}
}获取context
swift中获取context非常简单,也不需要用到Ref指针这些概念:
let context = UIGraphicsGetCurrentContext()UIGraphicsGetCurrentContext()在OC中是返回一个CGContextRef类型的变量。
OSX 10.10中的获取方法:
let context = NSGraphicsContext.currentContext?.CGContext10.9的获取就稍许负责一些,因为NSGraphicsContext中的 -graphicsPort返回的是一个Void*类型的变量,Swift就不能推断出类型了。下面是一种解决方案:
private var currentContext : CGContext? {
    get {
        // The 10.10 SDK provides a CGContext on NSGraphicsContext, but
        // that's not available to folks running 10.9, so perform this
        // violence to get a context via a void*.
        // iOS can just use UIGraphicsGetCurrentContext.

        let unsafeContextPointer = NSGraphicsContext.currentContext()?.graphicsPort

        if let contextPointer = unsafeContextPointer {
            let opaquePointer = COpaquePointer(contextPointer)
            let context: CGContextRef = Unmanaged.fromOpaque(opaquePointer).takeUnretainedValue()
            return context
        } else {
            return nil
        }
    }
}


 1万+
1万+

 被折叠的 条评论
为什么被折叠?


