


本文参考:
基于Flask Web框架提供Pytorch 模型在线服务_艾文aiwen的博客-CSDN博客
1、编写基于flask的运行代码
大致流程:
(1)restfull的POST方式中接受传过来的图片文件
(2)图片格式转换为RGB形式
(3)算法模型处理图片信息,并返回字符串信息,此时不需要返回处理后的图片信息
from __future__ import absolute_import
from __future__ import division
from __future__ import print_function

import _init_paths

import cv2
from opts import opts
from detectors.detector_factory import detector_factory
from PIL import Image
import io
import numpy as np
import time
from flask import Flask, request, jsonify


# 全局变量
IMG_EXT_RATIO = 0.05 # 图片延长单侧比例
MODEL_PATH = r'd:\workspace\CenterNet_3DCar\models\centernet_2_model_best.pth' # 算法模型的位置
IMG_BLUE_PATH = 'lp_blue.png' # 蓝色车牌图片路径

# 图片格式转换
def transform_image(image_bytes):
    image = Image.open(io.BytesIO(image_bytes)).convert("RGB")
    img = cv2.cvtColor(np.asarray(image), cv2.COLOR_RGB2BGR)
    return img

# 获取预测结果
def get_prediction(img, detector):
    ret = detector.run(img)

    best_score = 0
    best_pos = (-1, -1, -1, -1)
    for ind in ret['results']:
        for bbox in ret['results'][ind]:
            if bbox[4] > 0.1:
                if bbox[4] > best_score:
                    best_pos = (int(bbox[0]), int(bbox[1]), int(bbox[2]), int(bbox[3]))
                    best_score = bbox[4]

    return (best_pos, best_score)

# 画车牌
def drawLicensePlate(src_img, lp_img, x1, y1, x2, y2):
    width = int((x2 - x1) * (1 + 2 * IMG_EXT_RATIO))
    height = int((y2 - y1) * (1 + 3 * IMG_EXT_RATIO))  # 上方1个ratio, 下方2个ratio
    lp_img = cv2.resize(lp_img, (width, height))

    x1_new = max(x1 - int(width * IMG_EXT_RATIO), 0)
    x2_new = x1_new + width
    y1_new = max(y1 - int(height * IMG_EXT_RATIO), 0)
    y2_new = y1_new + height

    img = src_img.copy()
    for i in range(0, height):
        img[y1_new + i, x1_new : x2_new, 0: 3] = lp_img[i, 0: width]
    return img, x1_new, y1_new, x2_new, y2_new

app = Flask(__name__)

@app.route('/predict', methods=['POST'])
def predict():
    if request.method == 'POST':
        start = time.time()
        file = request.files['file']
        img_bytes = file.read()
        img = transform_image(image_bytes=img_bytes)
        (best_pos, best_score) = get_prediction(img, detector)
        end = time.time()
        run_time = end - start
        return jsonify({'best_pos': str(best_pos[0]) + '_'+ str(best_pos[1]) + '_' + str(best_pos[2]) + '_' + str(best_pos[3]), 'best_score': str(best_score), 'time': str(run_time)})

if __name__ == "__main__":
    opt = opts().init()
    opt.load_model = MODEL_PATH
    img_lp_blue = cv2.imread(IMG_BLUE_PATH)
    Detector = detector_factory[opt.task]
    detector = Detector(opt)

    app.run()
2、GPU下测试效果
linux下执行程序命令为:nohup python flask_3dcar_ai.py ctdet 2>&1 &
Windows下添加相应参数并直接右击执行
输入命令:
D:\temp>curl -X POST -F file=@1.png http://127.0.0.1:5000/predict
输出结果:{"best_pos":"269_459_346_495","best_score":"0.7344934","time":"0.252579927444458"}
在GPU V100的服务器上执行效果如下:
{"best_pos":"269_459_346_495","best_score":"0.7344936","time":"0.05133223533630371"}
3、CPU下测试效果:
代码稍作修改:

在windows下执行命令后:
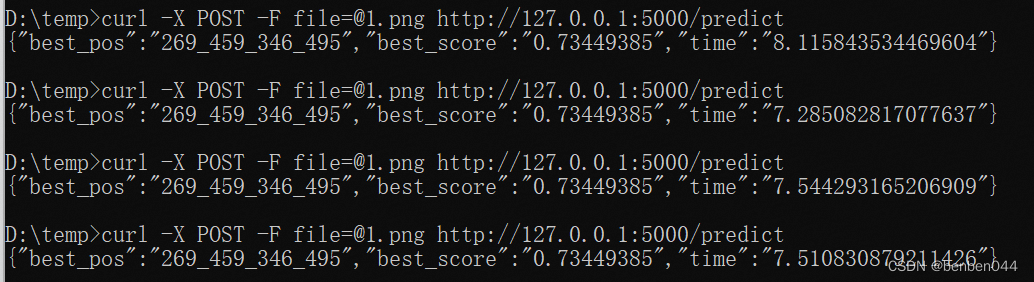
gpu下是0.25秒,而cpu下是7.5秒左右。
在linux下执行命令后:
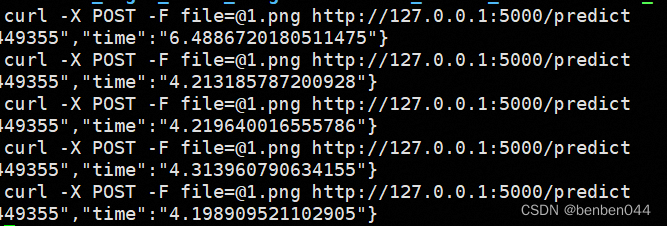
gpu下是0.05秒,而cpu下是4.3秒左右。


 1万+
1万+


 被折叠的 条评论
为什么被折叠?
被折叠的 条评论
为什么被折叠?
 到【灌水乐园】发言


